Microsoft Word - 기술노트[25회] VMWARE_X86_RAC_구축.doc
|
|
|
- 대건 권
- 4 years ago
- Views:
Transcription
1 Goodus 기술노트 [25 회 ] Vmware RAC 구축방법 Author 반채헌 Creation Date Last Updated Version 1.0 Copyright(C) 2004 Goodus Inc. All Rights Reserved Version 변경일자 변경자 ( 작성자 ) 주요내용 반채헌과장 문서최초작성 2 3 1
2 Contents 1. 운영체제환경의개요 게스트운영체제환경의개요 가상디스크레이아웃의개요 RAC 데이터베이스환경의개요 첫번째가상머신구성 첫번째가상머신에 Enterprise Linux 설치하기 오라클사용자환경파일의생성 두번째가상머신의생성및설정 네트워크설정변경 Oracle Automatic Storage Management (ASM) 설정 O2CB 드라이버설정 Oracle Clusterware 설치 데이터베이스설정의확인 테이블스페이스생성 TEST 과정 플래시복구영역의공간사용현황점검
3 VMware Server 를이용하여 Oracle Enterprise Linux 기반 Oracle RAC 10g 설치하기 ( 저자 : Vincent chan 참고자료변경수정함 ) 가상머신테크놀로지를이용하여 Oracle Enterprise Linux 운영체제테스트용 Oracle Real Application Cluster 10g Release 2 를설치하는방법을설명. 전혀비용을들이지않고도 VMware Server(VMware 의무료가상화소프트웨어 ) 를이용하 여일반가정용컴퓨터에 Red Hat Advanced Server 기반 Oracle Real Application Clusters (RAC) 10g 환경을구현함. VMware Server는하나의물리적머신에서여러개의운영체제를동시에실행할수있게합니다. 각각의가상머신은별도의운영체제와디스크, 프로세서, 메모리등의가상컴포넌트를갖습니다. 가상화테크놀로지는하나의물리적서버에서다른데이터또는소프트웨어에영향을주지않고개발 / 테스트작업을수행하기위한용도로활용되고있습니다. VMware 소프트웨어는특히개발 / 테스트과정의총소유비용을절감하고애플리케이션개발기간을단축할수있는솔루션으로각광받고있습니다. 본가이드에서는 Enterprise Linux와 VMware Server를기반으로실행되는 2 노드구성의 Oracle RAC 10g Release 2 환경을설치하고구성하는방법을설명하고있습니다. 이가이드는교육 / 테스트용으로만활용할수있으며, 오라클및다른어떤벤더도이러한구성에대한기술지원을제공하지않고있음을참고. 1. 운영체제환경의개요 호스트 네임 OS 프로세서메모리디스크네트워크카드 samsung- Windows XP Intel(R) 2 GB DDR2 120 GB, Realtek RTL8139 cba1f14 Professional Pentium(R) SDRAM, Ultra Family PCI Fast Service Pack 2 MProcessor 797 MHz ATA/133, Ethernet NIC (32-bit) 노트북 2.00GHz 7200 RPM SensR-50 3
4 2. 게스트운영체제환경의개요 호스트네임 OS 프로세서메모리 rac1 Oracle Enterprise Linux 4 (5upgrade) (32-bit) MB rac2 Oracle Enterprise Linux 4 (5upgrade) (32-bit) MB 3. 가상디스크레이아웃의개요 호스트가상디스크 게스트 가상 디스크 가상 디바이스 노드 사이즈 (MB) 설명 d:\vm\rac\localdisk.vmdk /dev/sda1 /dev/sda2 /dev/sda3 SCSI 0:0 20 / 마운트포인트 스왑공간 오라클바이너리 d:\vm\rac\sharedstorage\ocfs2disk.vmdk /dev/sdb SCSI 1:0 512 OCFS2 디스크 d:\vm\rac\sharedstorage\asmdisk1.vmdk /dev/sdc SCSI 1: ASM disk group 1 d:\vm\rac\sharedstorage\asmdisk2.vmdk /dev/sdd SCSI 1: ASM disk group 1 d:\vm\rac\sharedstorage\asmdisk3.vmdk /dev/sde SCSI 1: ASM 플래시복구영역 4. RAC 데이터베이스환경의개요 호스트네임 ASM 인스턴스 네임 RAC 인스턴스 네임 데이터베이스 네임 데이터베이스 파일스토리지 OCR & Voting Disk rac1 +ASM1 devdb1 devdb ASM OCFS2 rac2 +ASM2 devdb2 devdb ASM OCFS2 4
5 4.1 첫번째가상머신구성 C:\>mkdir vm\rac\rac1 C:\>mkdir vm\rac\rac2 C:\>mkdir vm\rac\sharedstorage 데스크탑의 VMware Server 아이콘을더블클릭하여애플리케이션을실행합니다 : 1. Ctrl-N 을눌러새로운가상머신을생성합니다. 2. New Virtual Machine Wizard: Next 를클릭합니다. 3. Select the Appropriate Configuration: a. Virtual machine configuration: Custom 을선택합니다. 4. Select a Guest Operating System: a. Guest operating system: Linux 를선택합니다. b. Version: Red Hat Enterprise Linux 4 를선택합니다. 5. Name the Virtual Machine: a. Virtual machine name: rac1 을입력합니다. b. Location: d:\vm\rac\rac1. 을입력합니다. 6. Set Access Rights: a. Access rights: Make this virtual machine private 를선택합니다. 7. Startup / Shutdown Options: a. Virtual machine account: User that powers on the virtual machine 을선택합니다. 8. Processor Configuration: a. Processors: One 을선택합니다. 9. Memory for the Virtual Machine: a. Memory: 700MB 를선택합니다. 10. Network Type: a. Network connection: Use bridged networking 을선택합니다. 11. Select I/O Adapter Types: a. I/O adapter types: LSI Logic 을선택합니다. 12. Select a Disk: a. Disk: Create a new virtual disk 를선택합니다. 13. Select a Disk Type: a. Virtual Disk Type: SCSI (Recommended) 를선택합니다. 14. Specify Disk Capacity: 5
6 a. Disk capacity: 20GB. 를입력합니다. b. Allocate all disk space now 의선택을해제합니다. 공간을절약할생각이라면, 굳이지금모든디스크공간을할당할필요가없습니다. 15. Specify Disk File: a. Disk file: localdisk.vmdk. 를입력합니다. b. Finish 를클릭합니다 번과정을반복하여 4 개의가상 SCSI 하드디스크를생성합니다 - ocfs2disk.vmdk (512MB), asmdisk1.vmdk (3GB), asmdisk2.vmdk (3GB), asmdisk3.vmdk (2GB). 16. VMware Server Console: Edit virtual machine settings 를클릭합니다. 17. Virtual Machine Settings: Add 를클릭합니다. 18. Add Hardware Wizard: Next 를클릭합니다. 19. Hardware Type: a. Hardware types: Hard Disk 를선택합니다. 20. Select a Disk: a. Disk: Create a new virtual disk 을선택합니다. 21. Select a Disk Type: a. Virtual Disk Type: SCSI (Recommended) 을선택합니다. 22. Specify Disk Capacity: a. Disk capacity: 0.5GB. 을입력합니다. b. Allocate all disk space now 을선택합니다. 공간을절약할생각이라면, 굳이지금모든디스크공간을할당할필요가없습니다. 하지만성능문제를고려하여, 각각의가상공유디스크에디스크공간을미리할당해주는것이바람직합니다. 흔한일은아니지만오라클데이터베이스생성과정에서, 또는데이터베이스에 DML 작업이과도하게발생하여공유디스크의사이즈가급격히증가하는경우, 가상머신의동작이잠시멈추는상황이발생할수도있습니다. 23. Specify Disk File: a. Disk file: C:\vm\rac\sharedstorage\ocfs2disk.vmdk 을입력합니다. b. Advanced 를클릭합니다. 24. Add Hardware Wizard: a. Virtual device node: SCSI 0:1 을선택합니다. b. Mode: 모든공유디스크에대해 Independent, Persistent 를선택합니다. c. Finish 를클릭합니다. 6

7 마지막으로, 사설인터커넥트를위한가상네트워크카드를추가하고플로피드라이브를 제거합니다. 25. VMware Server Console: dit virtual machine settings 를클릭합니다. 26. Virtual Machine Settings: Add 를클릭합니다. 27. Add Hardware Wizard: Next 를클릭합니다. 28. Hardware Type: a. Hardware types: Ethernet Adapter. 29. Network Type: a. Host-only: A private network shared with the host b. Finish 를클릭합니다. 30. Virtual Machine Settings: a. Floppy 를선택하고 Remove 를클릭합니다. 31. Virtual Machine Settings: OK 를클릭합니다. 7
8 가상머신설정파일의수정 : 두대의가상 RAC 노드간에디스크를공유하기위해서는추 가로매개변수를설정해주어야합니다. C:\vm\rac\rac1\Red Hat Enterprise Linux 4.vmx 파일을열고아래굵은글씨체로표시된매개변수들을추가함. config.version = "8" virtualhw.version = "6" scsi0.present = "TRUE" scsi0.virtualdev = "lsilogic" memsize = "700" scsi0:0.present = "TRUE" scsi0:0.filename = "localdisk.vmdk" ide1:0.present = "TRUE" ide1:0.filename = "auto detect" ide1:0.devicetype = "cdrom-raw" floppy0.autodetect = "TRUE" ethernet0.present = "TRUE" ethernet0.wakeonpcktrcv = "FALSE" usb.present = "TRUE" ehci.present = "TRUE" sound.present = "TRUE" sound.filename = "-1" sound.autodetect = "TRUE" svga.autodetect = "TRUE" pcibridge0.present = "TRUE" mks.keyboardfilter = "allow" displayname = "rac1" guestos = "rhel4" nvram = "Red Hat Enterprise Linux 4.nvram" deploymentplatform = "windows" virtualhw.productcompatibility = "hosted" tools.upgrade.policy = "useglobal" disk.locking = "FALSE" disklib.datacachemaxsize = "0" scsi1.sharedbus = "virtual" 8
9 scsi0:1.present = "TRUE" scsi0:1.filename = "C:\vm\rac\sharedstorage\ocfs2disk.vmdk" scsi0:1.mode = "independent-persistent" scsi0:1.devicetype = "disk" scsi0:2.present = "TRUE" scsi0:2.filename = "C:\vm\rac\sharedstorage\asmdisk1.vmdk" scsi0:2.mode = "independent-persistent" scsi0:2.devicetype = "disk" scsi0:3.present = "TRUE" scsi0:3.filename = "C:\vm\rac\sharedstorage\asmdisk2.vmdk" scsi0:3.mode = "independent-persistent" scsi0:3.devicetype = "disk" scsi0:4.present = "TRUE" scsi0:4.filename = "C:\vm\rac\sharedstorage\asmdisk3.vmdk" scsi0:4.mode = "independent-persistent" scsi0:4.devicetype = "disk" floppy0.present = "FALSE" ethernet1.present = "TRUE" ethernet1.connectiontype = "hostonly" ethernet1.wakeonpcktrcv = "FALSE" 4.2 첫번째가상머신에 Enterprise Linux 설치하기 오라클웹사이트에서다운로드하고파일압축을풉니다 : Enterprise-R4-U5-i386-disc1.iso Enterprise-R4-U5-i386-disc2.iso Enterprise-R4-U5-i386-disc3.iso Enterprise-R4-U5-i386-disc4.iso 9
10 1. VMware Server 콘솔에서오른쪽패널의 CD-ROM 디바이스를더블클릭하고 disk 1 을위한 ISO 이미지 (Enterprise-R4-U5-i386-disc1.iso) 를선택합니다. 2. VMware Server console o Start this virtual machine 을클릭합니다. 3. Enter 를눌러그래픽모드에서설치하도록선택합니다. 4. 미디어테스트를생략하고설치를시작합니다. 5. Welcome to enterprise Linux: Next 를클릭합니다. 6. Language Selection: < 사용할언어를선택합니다.> 7. Keyboard Configuration: < 사용할키보드를선택합니다 > 8. Installation Type: Custom. 9. Disk Partitioning Setup: Manually partition with Disk Druid. o Warning: Yes 를클릭하여모든디바이스 (sda, sdb, sdc, sdd, sde) 를초기화합니다. 10. Disk Setup: /dev/sda 를더블클릭하여 sda 드라이브에마운트포인트 (/, /u01) 와스왑공간을위한디스크공간을할당합니다. OCFS2, ASM 을위한드라이브설정은뒷부분에서수행하게됩니다. o Add Partition: Mount Point: / File System Type: ext3 Start Cylinder: 1 End Cylinder: 910 File System Type: Swap Start Cylinder: 911 End Cylinder: 1170 Mount Point: /u01 File System Type: ext3 Start Cylinder: 1171 End Cylinder:

11 11. Boot Loader Configuration: 디폴트 /dev/sda1 만을선택하고나머지는선택되지않은상태로둡니다. 12. Network Configuration: a. Network Devices eth0 을선택합니다. 1. Configure Using DHCP 의선택을해제합니다. 2. Activate on boot 을선택합니다. 3. IP Address: 을입력합니다. 4. Netmask: 을입력합니다. eth1 을선택합니다. 1. Configure Using DHCP 의선택을해제합니다. 2. Activate on boot 을선택합니다. 11
12 3. IP Address: 을입력합니다. 4. Netmask: 을입력합니다. b. Hostname manually 를선택하고 rac1.mycorpdomain.com. 을입력합니다. c. Miscellaneous Settings Gateway: 을입력합니다. Primary DNS: < 옵션 > Secondary DNS: < 옵션 > 13. Firewall Configuration: a. No Firewall 을선택합니다. 방화벽이활성화된경우, ocfs2 파일시스템을마운트하는과정에서 mount.ocfs2: Transport endpoint is not connected while mounting 에러가발생할수있습니다. b. Enable SELinux?: Active. 14. Warning No Firewall: Proceed 를클릭합니다. 15. Additional Language Support: < 사용할언어를선택합니다 >. 16. Time Zone Selection: < 표준시간대를선택합니다 > 17. Set Root Password: <root 패스워드를입력합니다 > 18. Package Group Selection: a. X Window System 을선택합니다. b. GNOME Desktop Environment 를선택합니다. c. Editors 를선택합니다. Details 를클릭하고사용할텍스트편집기를선택합니다. d. Graphical Internet 을선택합니다. e. Text-based Internet 을선택합니다. f. Office/Productivity 를선택합니다. g. Sound and Video 를선택합니다. h. Graphics 를선택합니다. i. Server Configuration Tools 를선택합니다. j. FTP Server 를선택합니다. k. Legacy Network Server 를선택합니다. Details 를클릭합니다. 1. rsh-server 를선택합니다. 2. Sstrong>telnet-server 를선택합니다. l. Development Tools 를선택합니다. m. Legacy Software Development 를선택합니다. n. Administration Tools 를선택합니다. 12
13 o. System Tools 를선택합니다. Details 를클릭합니다. 디폴트로선택된패키지와별도로아래패키지를선택합니다. 1. ocfs el(up 커널을위한드라이버 ) 을선택하거나, 또는 ocfs elsmp(smp 커널을위한드라이버 ) 를선택합니다. 2. ocfs2-tools 를선택합니다. 3. ocfs2console 을선택합니다. 4. oracle oracleasm el(up 커널을위한드라이버 ) 를선택하거나, 또는 oracleasm elsmp(smp 커널을위한드라이버 ) 를선택합니다. 5. sysstat 을선택합니다. p. Printing Support 를선택합니다. 19. About to Install: Next 를클릭합니다. 20. Required Install Media: Continue 를클릭합니다. 21. Change CD-ROM: VMware Server 콘솔에서 Ctrl-D 를눌러 Virtual Machine Settings 를실행합니다. CD-ROM 디바이스를클릭하고 disk 2 를위한 ISO 이미지 (Enterprise-R4-U5-i386-disc2.iso) 를선택하고, 다시 disk3 을위한 ISO 이미지 (Enterprise-R4-U5-i386-disc3.iso) 를선택합니다. 22. 설치작업이종료된후, a. VMware Server 콘솔에서 Ctrl-D 를눌러 Virtual Machine Settings 를실행합니다. CD-ROM 디바이스를클릭하고 Use physical drive 를클릭합니다. b. Reboot 를클릭합니다. 23. Welcome: Next 를클릭합니다. 24. License Agreement: Yes, I agree to the License Agreement 를선택합니다. 25. Date and Time: 날짜와시간을설정합니다. 26. Display: < 원하는해상도를선택합니다 > 27. System User: 항목을빈칸으로남겨두고 Next 를클릭합니다. 28. Additional CDs: Next 를클릭합니다. 29. Finish Setup: Next 를클릭합니다. 13

14 이것으로 VMware Server 에 Enterprise Linux 를설치하는작업을완료하였습니다. 하지만위에서설치해야할 PKG 가다설치되지않았을겁니다. Enterprise Linux 소프트웨어패키지의설치. 오라클소프트웨어설치를위해추가해 주어야하는패키지가아래와같습니다. Enterprise Linux 의 64 비트버전을설치한경우에는, 인스톨러가이패키지를이미설치한 상태이어야합니다. libaio i386.rpm openmotif rhel4.6.i386.rpm 14
15 proc]# rpm -qa grep libaio* libaio proc]# rpm -qa grep openmotif21* openmotif rhel4.6 proc]# cd ~]# ls Desktop anaconda-ks.cfg install.log install.log.syslog ~]# cd /u01 u01]# ls lost+found pkg u01]# cd pkg pkg]# ls ocfs2-tools i386.rpm oracleasm elsmp i686.rpm ocfs2console i386.rpm oracleasm-support i386.rpm oracleasm el i686.rpm oracleasmlib i386.rpm pkg]# ls -ltr rw-r--r-- 1 root root ?? 5 15:26 ocfs2-tools i386.rpm -rw-r--r-- 1 root root ?? 5 15:26 ocfs2console i386.rpm 15
16 -rw-r--r-- 1 root root ??26 15:58 oracleasm-support i386.rpm -rw-r--r-- 1 root root ??26 15:58 oracleasmlib i386.rpm -rw-r--r-- 1 root root ??31 10:25 oracleasm el i686.rpm -rw-r--r-- 1 root root ??31 10:32 oracleasm elsmp i686.rpm -rw-r--r-- 1 root root Aug 3 10:47 ocfs el i686.rpm 다음명령으로 pkg 설치한다. [root@rac1 pkg]# rpm -ivh ocfs2-tools i386.rpm [100%] ########################################### 1:ocfs2-tools ########################################### [100%] [root@rac1 pkg]# LANG=C [root@rac1 pkg]# rpm -ivh ocfs2console i386.rpm Preparing... ########################################### [100%] 1:ocfs2console ########################################### [100%] [root@rac1 pkg]# rpm -ivh oracleasm-support i386.rpm Preparing... ########################################### [100%] 1:oracleasm-support ########################################### [100%] 16
17 pkg]# rpm -ivh oracleasm el i686.rpm Preparing... ########################################### [100%] 1:oracleasm EL ########################################### [100%] pkg]# rpm -ivh oracleasmlib i386.rpm Preparing... ########################################### [100%] 1:oracleasmlib ########################################### [100%] pkg]# rpm -ivh ocfs el i686.rpm Preparing... ########################################### [100%] 1:ocfs EL ########################################### [100%] 모든 pkg 설치완료함 pkg]# 필요한 rpm 설치완료. 위의내용을전부 install 해야함.( 아래와같이모두완료되야한다 ) 전부확인한다. 17

18 VMware Tools 설치. VMware Tools 는호스트머신과게스트머신간의시간을동기화하기 위해사용됩니다. VMware 콘솔에서 root 사용자로로그인합니다. 1. VM 을클릭한후 Install VMware Tools 를선택합니다. 2. rac1 Virtual Machine: Install 을클릭합니다. 3. 데스크탑의 VMware Tools 아이콘을더블클릭하여애플리케이션을실행합니다. 4. cdrom: VMwareTools i386.rpm 을더블클릭합니다. 5. Completed System Preparation: Continue 를클릭합니다. 6. 터미널을열고 vmware-config-tools.pl 을실행합니다. o 원하는디스플레이사이즈를입력합니다 게스트 OS 와호스트 OS 의시간동기화. Oracle Clusterware 와 Oracle Database 소프트웨어를설치하는과정에서오라클인스톨러는먼저로컬노드에소프트웨어를설치한후원격노드에소프트웨어를카피하는작업을수행합니다. 양쪽 RAC 노드의날짜와시간이동기화되지않은경우아래와같은에러가발생할수도있습니다. 18
19 "/bin/tar:./inventory/components21/oracle.ordim.server/ : time stamp :24:04 is 25 s in the future" 따라서 Oracle RAC 설치를수행하기전에, 가상머신과호스트머신의시간을동기화해주어야합니다. root 사용자로로그인하여아래작업을실행하여시간을동기화합니다. 1. vmware-toolbox 를실행하여 VMware Tools Properties 윈도우를엽니다. Options 탭에서 Time synchronization between the virtual machine and the host operating system 을선택합니다. tools.synctime = "TRUE" 매개변수가가상머신설정파일 (C:\vm\rac\rac1\Red Hat Enterprise Linux 4.vmx) 에추가된것을확인할수있을것입니다 "/boot/grub/grub.conf" 파일을편집하여 kernel /boot/ 라인에 clock=pit nosmp noapic nolapic 옵션을추가합니다. 이제양쪽커널에옵션을추가하는작업을완료했습니다. 변경작업은현재사용중인커널에대해서만수행해주면됩니다 [root@rac1 grub]# vi grub.conf # grub.conf generated by anaconda # # Note that you do not have to rerun grub after making changes to this file # NOTICE: You do not have a /boot partition. This means that # all kernel and initrd paths are relative to /, eg. # root (hd0,0) # kernel /boot/vmlinuz-version ro root=/dev/sda1 # initrd /boot/initrd-version.img #boot=/dev/sda default=0 timeout=5 splashimage=(hd0,0)/boot/grub/splash.xpm.gz hiddenmenu title Red Hat Enterprise Linux ES ( EL) root (hd0,0) kernel /boot/vmlinuz el ro root=label=/ rhgb quiet clock=pit nosmp noapic nolapic initrd /boot/initrd el.img 19
20 Rac1 리부팅한다. ~]# reboot ~]# df -kp Filesystem 1024-blocks Used Available Capacity Mounted on /dev/sda % / none % /dev/shm /dev/sda % /u01 [root@rac1 ~]# fdisk -l Disk /dev/sda: 21.4 GB, bytes 255 heads, 63 sectors/track, 2610 cylinders Units = cylinders of * 512 = bytes Device Boot Start End Blocks Id System /dev/sda1 * Linux /dev/sda Linux swap /dev/sda Linux Disk /dev/sdb: 536 MB, bytes 64 heads, 32 sectors/track, 512 cylinders Units = cylinders of 2048 * 512 = bytes Device Boot Start End Blocks Id System Disk /dev/sdc: 3221 MB, bytes 255 heads, 63 sectors/track, 391 cylinders Units = cylinders of * 512 = bytes Device Boot Start End Blocks Id System Disk /dev/sdd: 3221 MB, bytes 255 heads, 63 sectors/track, 391 cylinders Units = cylinders of * 512 = bytes 20
21 Device Boot Start End Blocks Id System Disk /dev/sde: 2147 MB, bytes 255 heads, 63 sectors/track, 261 cylinders Units = cylinders of * 512 = bytes Device Boot Start End Blocks Id System 오라클사용자의생성 root 사용자로로그인하여아래와같이실행 [root@rac1 ~]# groupadd oinstall [root@rac1 ~]# groupadd dba [root@rac1 ~]# mkdir -p /export/home/oracle /ocfs [root@rac1 ~]# useradd -d /export/home/oracle -g oinstall -G dba -s /bin/ksh oracle [root@rac1 ~]# chown oracle:dba /export/home/oracle /u01 [root@rac1 ~]# passwd oracle Changing password for user oracle. New UNIX password: BAD PASSWORD: it is based on a dictionary word Retype new UNIX password: passwd: all authentication tokens updated successfully. 4.3 오라클사용자환경파일의생성 [root@rac1 ~]# vi /export/home/oracle/.profile export PS1="`/bin/hostname -s`-> " export EDITOR=vi export ORACLE_SID=devdb1 export ORACLE_BASE=/u01/app/oracle export ORACLE_HOME=$ORACLE_BASE/product/10.2.0/db_1 export ORA_CRS_HOME=$ORACLE_BASE/product/10.2.0/crs_1 21
22 export LD_LIBRARY_PATH=$ORACLE_HOME/lib export PATH=$ORACLE_HOME/bin:$ORA_CRS_HOME/bin:/bin:/usr/bin:/usr/sbin:/ usr/local/bin:/usr/x11r6/bin umask 022 파일시스템디렉토리구조의생성. oracle 사용자로로그인하여아래와같이실행 ~]# su - oracle rac1-> pwd /export/home/oracle rac1-> mkdir -p $ORACLE_BASE/admin rac1-> mkdir -p $ORACLE_HOME rac1-> mkdir -p $ORA_CRS_HOME rac1-> mkdir -p /u01/oradata/devdb oracle 사용자의 Shell Limit 설정. 텍스트편집기를사용하여아래라인을 /etc/security/limits.conf, /etc/pam.d/login, /etc/profile 에추가합니다. 보다상세한정보는제품문서에서확인하실수있습니다. /etc/security/limits.conf oracle soft nproc 2047 oracle hard nproc oracle soft nofile 1024 oracle hard nofile /etc/pam.d/login session required /lib/security/pam_limits.so /etc/profile if [ $USER = "oracle" ]; then if [ $SHELL = "/bin/ksh" ]; then 22
23 else fi fi ulimit -p ulimit -n ulimit -u n Enterprise Linux 소프트웨어패키지의설치. 오라클소프트웨어설치를위해추가해주어야하는패키지가아래와같습니다. Enterprise Linux의 64 비트버전을설치한경우에는, 인스톨러가이패키지를이미설치한상태이어야합니다. 아닌경우아래처럼설치한다 커널매개변수설정. 텍스트편집기를사용하여 /etc/sysctl.conf 에아래라인을추가합니다. 변경사항을즉시적용하기위해 "/sbin/sysctl -p" 를실행합니다. ~]# vi /etc/sysctl.conf # Controls the System Request debugging functionality of the kernel kernel.sysrq = 0 # Controls whether core dumps will append the PID to the core filename. # Useful for debugging multi-threaded applications. kernel.core_uses_pid = 1 kernel.shmall = kernel.shmmax = kernel.shmmni = 4096 kernel.sem = fs.file-max = net.ipv4.ip_local_port_range = net.core.rmem_default =
24 net.core.rmem_max = net.core.wmem_default = net.core.wmem_max = root@rac1 pkg]# vi /etc/hosts # Do not remove the following line, or various programs # that require network functionality will fail localhost rac1.mycorpdomain.com rac1 #eth0 public rac1-vip.mycorpdomain.com rac1-vip # 서비스 ip rac1-priv.mycorpdomain.com rac1-priv #eth1 private rac2.mycorpdomain.com rac2 #eth0 public rac2-vip.mycorpdomain.com rac2-vip # 서비스 ip rac2-priv.mycorpdomain.com rac2-priv #eth1 private Vi /etc/host 대한설명참조 localhost rac1.mycorpdomain.com rac1 ---> eth rac1-vip.mycorpdomain.com rac1-vip --à eth0: rac1-priv.mycorpdomain.com rac1-priv ---> eth1 -- ->PRIVATE 사설 IP ( 서비스 (telnet) 접속안된다. device(eth1) 지만내부적으로 ping 가능함 ( 외부안됨 ) rac2.mycorpdomain.com rac2 ---> eth rac2-vip.mycorpdomain.com rac2-vip --à eth0: rac2-priv.mycorpdomain.com rac2-priv -> eth1(inter- 24
25 connect --->PRIVATE 사설 IP ( 서비스 (telnet) 접속않된다.) device(eth1) 하지만내부적으로 ping 가능함 ( 외부안됨 ) PRIVATE 사설 IP 는? rac1 의 (eth1) 와 rac (eth1) 는 rac1 ~ rac2 사이의내부적 으로는 ping 이가능하지만외부에서는 ping 이안될것이다. 다음은네크워크관계에서 ping 이가는지확인한다. [root@rac1 ~]# ifconfig -a eth0 Link encap:ethernet HWaddr 00:0C:29:BA:66:40 inet addr: Bcast: Mask: inet6 addr: fe80::20c:29ff:feba:6640/64 Scope:Link UP BROADCAST RUNNING MULTICAST MTU:1500 Metric:1 RX packets:2036 errors:0 dropped:0 overruns:0 frame:0 TX packets:1859 errors:0 dropped:0 overruns:0 carrier:0 collisions:0 txqueuelen:1000 RX bytes: (176.8 KiB) TX bytes: (157.6 KiB) Interrupt:10 Base address:0x2024 eth0:1 Link encap:ethernet HWaddr 00:0C:29:BA:66:40 inet addr: Bcast: Mask: UP BROADCAST RUNNING MULTICAST MTU:1500 Metric:1 Interrupt:10 Base address:0x2024 eth1 Link encap:ethernet HWaddr 00:0C:29:BA:66:4A inet addr: Bcast: Mask: inet6 addr: fe80::20c:29ff:feba:664a/64 Scope:Link UP BROADCAST RUNNING MULTICAST MTU:1500 Metric:1 RX packets:10873 errors:0 dropped:0 overruns:0 frame:0 TX packets:13417 errors:0 dropped:0 overruns:0 carrier:0 collisions:0 txqueuelen:1000 RX bytes: (5.2 MiB) TX bytes: (9.5 MiB) Interrupt:9 Base address:0x20a4 lo Link encap:local Loopback inet addr: Mask:
26 inet6 addr: ::1/128 Scope:Host UP LOOPBACK RUNNING MTU:16436 Metric:1 RX packets:11849 errors:0 dropped:0 overruns:0 frame:0 TX packets:11849 errors:0 dropped:0 overruns:0 carrier:0 collisions:0 txqueuelen:0 RX bytes: (4.9 MiB) TX bytes: (4.9 MiB) sit0 Link encap:ipv6-in-ipv4 NOARP MTU:1480 Metric:1 RX packets:0 errors:0 dropped:0 overruns:0 frame:0 TX packets:0 errors:0 dropped:0 overruns:0 carrier:0 collisions:0 txqueuelen:0 RX bytes:0 (0.0 b) TX bytes:0 (0.0 b) ~]# ping PING ( ) 56(84) bytes of data. 64 bytes from : icmp_seq=0 ttl=64 time=0.928 ms 64 bytes from : icmp_seq=1 ttl=64 time=0.817 ms ping statistics packets transmitted, 2 received, 0% packet loss, time 1002ms rtt min/avg/max/mdev = 0.817/0.872/0.928/0.062 ms, pipe 2 [root@rac1 ~]# ping PING ( ) 56(84) bytes of data. 64 bytes from : icmp_seq=0 ttl=64 time=40.7 ms 64 bytes from : icmp_seq=1 ttl=64 time=1.82 ms 64 bytes from : icmp_seq=2 ttl=64 time=6.05 ms 64 bytes from : icmp_seq=3 ttl=64 time=46.0 ms ping statistics packets transmitted, 4 received, 0% packet loss, time 3006ms rtt min/avg/max/mdev = 1.827/23.654/46.003/ ms, pipe 2 [root@rac1 ~]# ping PING ( ) 56(84) bytes of data. 64 bytes from : icmp_seq=0 ttl=64 time=1.07 ms 64 bytes from : icmp_seq=1 ttl=64 time=1.00 ms 26
27 64 bytes from : icmp_seq=2 ttl=64 time=0.453 ms ping statistics packets transmitted, 3 received, 0% packet loss, time 2003ms rtt min/avg/max/mdev = 0.453/0.845/1.079/0.278 ms, pipe 2 [root@rac1 ~]# ping PING ( ) 56(84) bytes of data. 64 bytes from : icmp_seq=0 ttl=64 time=2.50 ms 64 bytes from : icmp_seq=1 ttl=64 time=2.59 ms 64 bytes from : icmp_seq=2 ttl=64 time=43.9 ms ping statistics packets transmitted, 3 received, 0% packet loss, time 2004ms rtt min/avg/max/mdev = 2.506/16.341/43.927/ ms, pipe 2 [root@rac1 ~]# ping PING ( ) 56(84) bytes of data. 64 bytes from : icmp_seq=0 ttl=64 time=0.991 ms 64 bytes from : icmp_seq=1 ttl=64 time=0.927 ms 64 bytes from : icmp_seq=2 ttl=64 time=0.484 ms ping statistics packets transmitted, 3 received, 0% packet loss, time 2001ms rtt min/avg/max/mdev = 0.484/0.800/0.991/0.227 ms, pipe 2 [root@rac1 ~]# ping PING ( ) 56(84) bytes of data. 64 bytes from : icmp_seq=0 ttl=64 time=7.98 ms 64 bytes from : icmp_seq=1 ttl=64 time=44.9 ms 64 bytes from : icmp_seq=2 ttl=64 time=18.7 ms 64 bytes from : icmp_seq=3 ttl=64 time=10.2 ms ping statistics packets transmitted, 4 received, 0% packet loss, time 3145ms rtt min/avg/max/mdev = 7.985/20.471/44.917/ ms, pipe 2 정상적으로동작함 위의설정은 vmware 이므로설정된것임원래는 rac1-vip 과 rac2-vip ( 실서버사용 27
28 할때는서비스 IP 접속가능하도록 eth0:1 로물리적으로 device 추가해서사용한다. hangcheck-timer 커널모듈의설정. hangcheck timer 커널모듈은시스템의상태를모니터링하고장애가발생한 RAC 노드를재시작합니다. 노드의장애상황을파악하기위해사용되는두가지매개변수로 hangcheck_tick( 시스템모니터링빈도정의 ) 과 hangcheck_margin(rac 노드의리셋을수행하기위한최대지연허용시간 ) 이있습니다. /etc/modprobe.conf 파일에아래라인을추가하여 hangcheck 커널모듈매개변수를설정 해줍니다. [root@rac1 pkg]# vi /etc/modprobe.conf options hangcheck-timer hangcheck_tick=30 hangcheck_margin=180 모듈을즉시로드하기위해 "modprobe -v hangcheck-timer" 명령을실행합니다 [root@rac1 pkg]# modprobe -v hangcheck-timer insmod/lib/modules/ el/kernel/drivers/char/hangcheck-timer.ko hangcheck_tick=30 hangcheck_margin=180 실행됨. # ASM을위한디스크파티션생성. OCFS2, Oracle ASM 을위한디스크파티션생성. OCFS2(/dev/sdb) 와 Oracle ASM(/dev/sdc, /dev/sdd, /dev/sde) 을위한로우디스크를생성합니다 rac1 에서 root 사용자로로그인하여아래와같이실행. [root@rac1 pkg]# fdisk /dev/sdb 28
29 Command (m for help): n Command action e extended p primary partition (1-4) p Partition number (1-4): 1 First cylinder (1-512, default 1): Using default value 1 Last cylinder or +size or +sizem or +sizek (1-512, default 512): Using default value 512 Command (m for help): w The partition table has been altered! Calling ioctl() to re-read partition table. Syncing disks. [root@rac1 pkg]# fdisk /dev/sdc Command (m for help): n Command action e extended p primary partition (1-4) p Partition number (1-4): 1 First cylinder (1-391, default 1): Using default value 1 Last cylinder or +size or +sizem or +sizek (1-391, default 391): Using default value 391 Command (m for help): w The partition table has been altered! Calling ioctl() to re-read partition table. Syncing disks. [root@rac1 pkg]# fdisk /dev/sdd 29
30 Command (m for help): n Command action e extended p primary partition (1-4) p Partition number (1-4): 1 First cylinder (1-391, default 1): Using default value 1 Last cylinder or +size or +sizem or +sizek (1-391, default 391): Using default value 391 Command (m for help): w The partition table has been altered! Calling ioctl() to re-read partition table. Syncing disks. [root@rac1 pkg]# fdisk /dev/sde Command (m for help): n Command action e extended p primary partition (1-4) p Partition number (1-4): 1 First cylinder (1-261, default 1): Using default value 1 Last cylinder or +size or +sizem or +sizek (1-261, default 261): Using default value 261 Command (m for help): w The partition table has been altered! Calling ioctl() to re-read partition table. Syncing disks. [root@rac1 pkg]# fdisk -l 30
31 Disk /dev/sda: 21.4 GB, bytes 255 heads, 63 sectors/track, 2610 cylinders Units = cylinders of * 512 = bytes Device Boot Start End Blocks Id System /dev/sda1 * Linux /dev/sda Linux swap /dev/sda Linux Disk /dev/sdb: 536 MB, bytes 64 heads, 32 sectors/track, 512 cylinders Units = cylinders of 2048 * 512 = bytes Device Boot Start End Blocks Id System /dev/sdb Linux Disk /dev/sdc: 3221 MB, bytes 255 heads, 63 sectors/track, 391 cylinders Units = cylinders of * 512 = bytes Device Boot Start End Blocks Id System /dev/sdc Linux Disk /dev/sdd: 3221 MB, bytes 255 heads, 63 sectors/track, 391 cylinders Units = cylinders of * 512 = bytes Device Boot Start End Blocks Id System /dev/sdd Linux Disk /dev/sde: 2147 MB, bytes 255 heads, 63 sectors/track, 261 cylinders Units = cylinders of * 512 = bytes Device Boot Start End Blocks Id System /dev/sde Linux 31
32 ~]# vi /etc/sysconfig/rawdevices /dev/raw/raw1 /dev/sdc1 /dev/raw/raw2 /dev/sdd1 /dev/raw/raw3 /dev/sde1 ~ [root@rac1 ~]# /sbin/service rawdevices restart Assigning devices: /dev/raw/raw1 --> /dev/sdc1 /dev/raw/raw1: bound to major 8, minor 33 /dev/raw/raw2 --> /dev/sdd1 /dev/raw/raw2: bound to major 8, minor 49 /dev/raw/raw3 --> /dev/sde1 /dev/raw/raw3: bound to major 8, minor 65 done [root@rac1 ~]# chown oracle:dba /dev/raw/raw[1-3] [root@rac1 ~]# chmod 660 /dev/raw/raw[1-3] [root@rac1 ~]# ls -ltr /dev/raw/raw[1-3] crw-rw oracle dba 162, 1 Jul 31 12:28 /dev/raw/raw1 crw-rw oracle dba 162, 2 Jul 31 12:28 /dev/raw/raw2 crw-rw oracle dba 162, 3 Jul 31 12:28 /dev/raw/raw3 [root@rac1 ~]# ln -sf /dev/raw/raw1 /u01/oradata/devdb/asmdisk1 [root@rac1 ~]# ln -sf /dev/raw/raw2 /u01/oradata/devdb/asmdisk2 [root@rac1 ~]# ln -sf /dev/raw/raw3 /u01/oradata/devdb/asmdisk3 /etc/udev/permissions.d/50-udev.permissions 수정 Raw-device는부팅시점에 re-mapping 됩니다. 디폴트설정에서로우디바이스의 owner-ship은부팅시점에 root 사용자에게귀속됩니다. 하지만 oracle 사용자에게 owner-ship이귀속되지않는경우, ASM이공유파티션에접근할때문제가발생할수있습니다. /etc/udev/permissions.d/50-udev.permissions 파일의 raw/*:root:disk:0660 라인을주석처리하고새로운라인 raw/*:oracle:dba:0660 을추가합니다. 32
33 ~]# vi /etc/udev/permissions.d/50-udev.permissions ~~ # raw devices ram*:root:disk:0660 #raw/*:root:disk:0660 raw/*:oracle:dba:0660 ~~ oracleasmlib 패키지설치. OTN 에서 ASM 라이브러리를다운로드하고 root 사용자로 ASM RPM 을설치합니다 Cluster 을설치하기위해서아래의내용이없다면설치해준다. [root@rac1 pkg]# rpm -qa grep oracleasm oracleasm-support oracleasmlib oracleasm el [root@rac1 pkg]# rac1 기본 setting 완료함 5. 두번째가상머신의생성및설정 두번째가상머신을생성하기위해, 첫번째가상머신을셧다운하고, C:\vm\rac\rac1 의모든파일을 C:\vm\rac\rac2 로복사한다음몇가지설정을 변경해줍니다. 5.1 네트워크설정변경. 1. rac1 에서 root 사용자로로그인한후, # shutdown -h now 실행. 2. 호스트시스템에서 rac1 폴더의모든파일을 rac2 로복사합니다. C:\>copy C:\vm\rac\rac1 C:\vm\rac\rac2 33
 rac2 를시작함. o rac2 Virtaul Machine: Create a new identifier 를클릭함.")
34 3. VMware Server 콘솔에서 Ctrl-O 를눌러두번째가상머신, C:\rac\rac2\Red Hat Enterprise Linux 4.vmx 를엽니다. 4. VMware Server console: o o 가상머신의이름을 rac1 에서 rac2 로변경합니다. rac1 탭을마우스오른쪽버튼으로클릭하고 Settings 를선택합니다. Options 탭을선택합니다. 1. Virtual machine name: Virtual machine name: rac2 입력. Start this virtual machine 를클릭하여 (rac1 이셧다운된상태에서 ) rac2 를시작함. o rac2 Virtaul Machine: Create a new identifier 를클릭함. 34

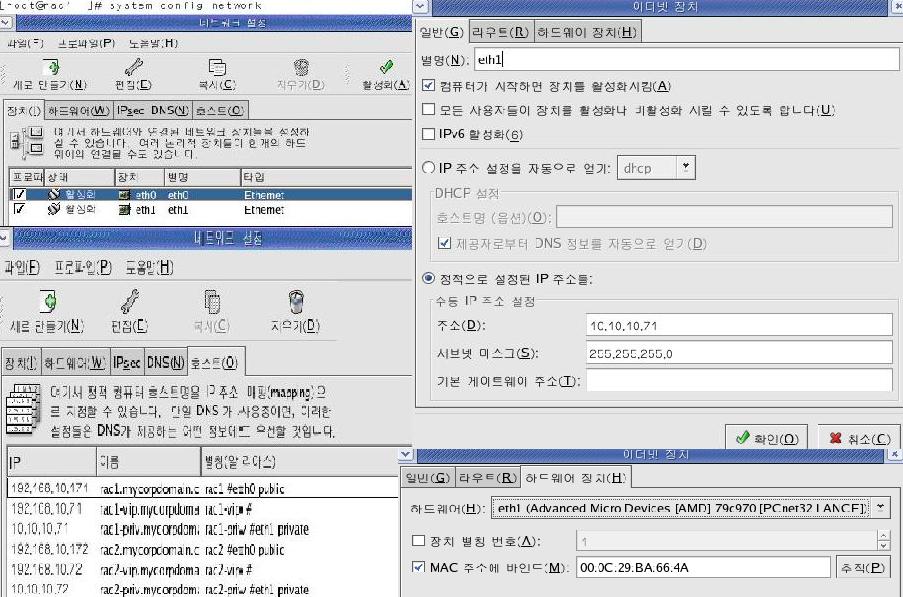
35 root 사용자로로그인한상태에서 system-config-network 를실행하여네트워크설정을 변경함. 35
36 5. IP Address: 각각의이더넷디바이스를더블클릭하고아래표를참고하여변경 작업을수행합니다. 디바이스 IP 주소서브넷마스크디폴트게이트웨이주소 eth eth < 공란으로비워둠 > 6. MAC Address: Hardware Device 탭으로이동하여각이더넷디바이스의새로운 MAC 어드레스를조회합니다. 7. Hostname and DNS: 아래표를참고하여 DNS 탭의항목을변경하고 Ctrl-S 를눌러저장합니다. Hostname Primary DNS Secondary DNS DNS search path rac2.mycorpdomain.com DNS IP 주소를입력하거나공란으로비워둡니다. DNS IP 주소를입력하거나공란으로비워둡니다. 디폴트설정을승인하거나공란으로비워둡니다. 8. 마지막으로, 각이더넷디바이스를활성화합니다. /etc/hosts 파일수정. /etc/hosts 파일에아래항목을추가합니다 localhost VIPCA 는 Oracle Clusterware 소프트웨어설치과정에서루프백주소를사용하려시도함. ~]# vi /export/home/oracle/.profile ORACLE_SID 값을 devdb2 로변경 LANG=C export PS1="`/bin/hostname -s`-> " export EDITOR=vi export ORACLE_SID=devdb2 -à 변경함 export ORACLE_BASE=/u01/app/oracle 36
37 export ORACLE_HOME=$ORACLE_BASE/product/10.2.0/db_1 export ORA_CRS_HOME=$ORACLE_BASE/product/10.2.0/crs_1 export LD_LIBRARY_PATH=$ORACLE_HOME/lib export PATH=$ORACLE_HOME/bin:$ORA_CRS_HOME/bin:/bin:/usr/bin:/usr/sbin:/usr/local/bin:/ usr/x11r6/bin umask 022 SSH를이용한 user equivalence의설정. Cluster Ready Services(CRS) 및 RAC 설치과정에서, Oracle Universal Installer(OUI) 는 oracle 사용자로 ( 패스워드를별도로입력하지않고 ) 모든 RAC 노드에소프트웨어를복사할수있어야합니다. Oracle 10g에서는 rsh 대신 ssh를이용하여이작업을수행할수있습니다 oracle user 에서작업한다. 먼저 rac1 에서아래와같이작업합니다 Last login: Thu Jul 26 20:01: [root@rac1 ~]# su - oracle rac1-> mkdir ~/.ssh rac1-> chmod 700 ~/.ssh rac1-> ssh-keygen -t rsa Generating public/private rsa key pair. Enter file in which to save the key (/export/home/oracle/.ssh/id_rsa): Enter passphrase (empty for no passphrase): Enter same passphrase again: Your identification has been saved in /export/home/oracle/.ssh/id_rsa. Your public key has been saved in /export/home/oracle/.ssh/id_rsa.pub. The key fingerprint is: 53:5f:37:26:91:d8:6d:43:8c:ba:da:39:03:ba:2a:ca oracle@rac1.mycorpdomain.com rac1-> ssh-keygen -t dsa 37
38 Generating public/private dsa key pair. Enter file in which to save the key (/export/home/oracle/.ssh/id_dsa): Enter passphrase (empty for no passphrase): Enter same passphrase again: Your identification has been saved in /export/home/oracle/.ssh/id_dsa. Your public key has been saved in /export/home/oracle/.ssh/id_dsa.pub. The key fingerprint is: 93:73:15:37:cf:06:b1:e6:ff:00:e5:4a:70:af:a2:d7 다음으로 rac2 에서아래와같이작업합니다 Last login: Thu Jul 26 20:13: ~]# su - oracle rac2-> mkdir ~/.ssh rac2-> chmod 700 ~/.ssh rac2-> ssh-keygen -t rsa Generating public/private rsa key pair. Enter file in which to save the key (/export/home/oracle/.ssh/id_rsa): Enter passphrase (empty for no passphrase): Enter same passphrase again: Your identification has been saved in /export/home/oracle/.ssh/id_rsa. Your public key has been saved in /export/home/oracle/.ssh/id_rsa.pub. The key fingerprint is: fa:a4:7f:a6:8e:eb:53:51:3d:fa:29:31:8d:42:42:a1 oracle@rac2.mycorpdomain.com rac2-> ssh-keygen -t dsa Generating public/private dsa key pair. Enter file in which to save the key (/export/home/oracle/.ssh/id_dsa): Enter passphrase (empty for no passphrase): Enter same passphrase again: Your identification has been saved in /export/home/oracle/.ssh/id_dsa. Your public key has been saved in /export/home/oracle/.ssh/id_dsa.pub. The key fingerprint is: 71:2f:2d:e3:1c:4d:cc:4c:00:cd:25:95:28:f8:c9:48 oracle@rac2.mycorpdomain.com 38
39 rac1 에서아래와같이작업합니다 rac1-> cat ~/.ssh/id_rsa.pub >> ~/.ssh/authorized_keys rac1-> cat ~/.ssh/id_dsa.pub >> ~/.ssh/authorized_keys rac1-> ssh rac2 cat ~/.ssh/id_rsa.pub >> ~/.ssh/authorized_keys The authenticity of host 'rac2 ( )' can't be established. RSA key fingerprint is be:e5:a9:27:2d:5b:e5:48:be:10:f4:16:b6:a4:1a:3d. Are you sure you want to continue connecting (yes/no)? yes Warning: Permanently added 'rac2, ' (RSA) to the list of known hosts. password: oracle 엔터 rac1-> ssh rac2 cat ~/.ssh/id_dsa.pub >> ~/.ssh/authorized_keys password: oracle 엔터 rac1-> scp ~/.ssh/authorized_keys rac2:~/.ssh/authorized_keys password: oracle 엔터 authorized_keys 100% KB/s 00:00 rac1-> 사전 test 해봅니다. 각노드의연결을테스트합니다. 아래명령을두번째실행했을때패스워드를묻는프롬 프트가뜨지않음을확인 실전 > rac1-> ssh rac1 date The authenticity of host 'rac1 ( )' can't be established. RSA key fingerprint is 50:f8:cb:b0:12:12:a2:7b:cb:54:4f:d4:d0:89:15:6d. Are you sure you want to continue connecting (yes/no)? yes Warning: Permanently added 'rac1, ' (RSA) to the list of known hosts. Thu Aug 2 19:23:36 KST 2007 rac1-> ssh rac2 date 39
40 Thu Aug 2 19:24:13 KST 2007 rac1-> ssh rac1-priv date The authenticity of host 'rac1-priv ( )' can't be established. RSA key fingerprint is 50:f8:cb:b0:12:12:a2:7b:cb:54:4f:d4:d0:89:15:6d. Are you sure you want to continue connecting (yes/no)? yes Warning: Permanently added 'rac1-priv, ' (RSA) to the list of known hosts. Thu Aug 2 19:25:05 KST 2007 rac1-> ssh rac2-priv date The authenticity of host 'rac2-priv ( )' can't be established. RSA key fingerprint is 50:f8:cb:b0:12:12:a2:7b:cb:54:4f:d4:d0:89:15:6d. Are you sure you want to continue connecting (yes/no)? yes Warning: Permanently added 'rac2-priv, ' (RSA) to the list of known hosts. Thu Aug 2 19:24:31 KST 2007 rac1-> ssh rac1.mycorpdomain.com date The authenticity of host 'rac1.mycorpdomain.com ( )' can't be established. RSA key fingerprint is 50:f8:cb:b0:12:12:a2:7b:cb:54:4f:d4:d0:89:15:6d. Are you sure you want to continue connecting (yes/no)? yes Warning: Permanently added 'rac1.mycorpdomain.com' (RSA) to the list of known hosts. Thu Aug 2 19:25:26 KST 2007 rac1-> ssh rac2.mycorpdomain.com date The authenticity of host 'rac2.mycorpdomain.com ( )' can't be established. RSA key fingerprint is 50:f8:cb:b0:12:12:a2:7b:cb:54:4f:d4:d0:89:15:6d. Are you sure you want to continue connecting (yes/no)? yes Warning: Permanently added 'rac2.mycorpdomain.com' (RSA) to the list of known hosts. Thu Aug 2 19:24:48 KST
41 rac1-> ssh rac1-priv.mycorpdomain.com date The authenticity of host 'rac1-priv.mycorpdomain.com ( )' can't be established. RSA key fingerprint is 50:f8:cb:b0:12:12:a2:7b:cb:54:4f:d4:d0:89:15:6d. Are you sure you want to continue connecting (yes/no)? yes Warning: Permanently added 'rac1-priv.mycorpdomain.com' (RSA) to the list of known hosts. Thu Aug 2 19:25:42 KST 2007 rac1-> ssh rac2-priv.mycorpdomain.com date The authenticity of host 'rac2-priv.mycorpdomain.com ( )' can't be established. RSA key fingerprint is 50:f8:cb:b0:12:12:a2:7b:cb:54:4f:d4:d0:89:15:6d. Are you sure you want to continue connecting (yes/no)? yes Warning: Permanently added 'rac2-priv.mycorpdomain.com' (RSA) to the list of known hosts. Thu Aug 2 19:25:01 KST 2007 rac1-> rac1-> 패스워드묻는문구안나옴을확인합니다 ( 정상확인 ) 다시실행 (test) 해본다. rac1-> ssh rac1 date Mon Aug 6 14:55:24 KST 2007 rac1-> ssh rac2 date Mon Aug 6 14:55:19 KST 2007 rac1-> ssh rac1-priv date Mon Aug 6 14:55:35 KST 2007 rac1-> ssh rac2-priv date Mon Aug 6 14:55:30 KST 2007 rac1-> ssh rac1.mycorpdomain.com date Mon Aug 6 14:55:47 KST 2007 rac1-> ssh rac2.mycorpdomain.com date 41
42 Mon Aug 6 14:55:41 KST 2007 rac1-> ssh rac1-priv.mycorpdomain.com date Mon Aug 6 14:55:59 KST 2007 rac1-> ssh rac2-priv.mycorpdomain.com date Mon Aug 6 14:55:52 KST 2007 양쪽 load 에설정 (rac1, rac2) 5.2 Oracle Automatic Storage Management (ASM) 설정 Oracle ASM은오라클데이터베이스와긴밀하게통합되어있으며오라클의데이터베이스관리툴과연동합니다. Oracle ASM은데이터베이스스토리지관리업무를단순화하고로우디스크 I/O 성능을개선하는효과를제공합니다. ASMLib 설정. root 사용자로로그인하여양쪽노드에서 ASMLib 을설정해줍니다. [root@rac1 ~]# /etc/init.d/oracleasm configure Configuring the Oracle ASM library driver. This will configure the on-boot properties of the Oracle ASM library driver. The following questions will determine whether the driver is loaded on boot and what permissions it will have. The current values will be shown in brackets ('[]'). Hitting <ENTER> without typing an answer will keep that current value. Ctrl-C will abort. Default user to own the driver interface []: oracle Default group to own the driver interface []: dba Start Oracle ASM library driver on boot (y/n) [n]: y Fix permissions of Oracle ASM disks on boot (y/n) [y]: y Writing Oracle ASM library driver configuration: [ OK ] Loading module "oracleasm": [ OK ] Mounting ASMlib driver filesystem: [ OK ] Scanning system for ASM disks: [ OK ] 42
43 rac1 설정성공함 ASM 디스크의생성. root 사용자로두노드중하나에서만 ASM 디스크를 생성합니다.( rac1 만생성 ) [root@rac1 ~]# [root@rac1 ~]# /etc/init.d/oracleasm createdisk VOL1 /dev/sdc1 Marking disk "/dev/sdc1" as an ASM disk: [ OK ] [root@rac1 ~]# /etc/init.d/oracleasm createdisk VOL2 /dev/sdd1 Marking disk "/dev/sdd1" as an ASM disk: [ OK ] [root@rac1 ~]# /etc/init.d/oracleasm createdisk VOL3 /dev/sde1 Marking disk "/dev/sde1" as an ASM disk: [ OK ] [root@rac1 ~]# /etc/init.d/oracleasm scandisks Scanning system for ASM disks: [ OK ] [root@rac1 ~]# /etc/init.d/oracleasm listdisks VOL1 VOL2 VOL3 성공함. [root@rac1 ~]# Rac2 에서도 oracleasm 설정함. [root@rac2 ~]# /etc/init.d/oracleasm configure Configuring the Oracle ASM library driver. This will configure the on-boot properties of the Oracle ASM library driver. The following questions will determine whether the driver is loaded on boot and what permissions it will have. The current values will be shown in brackets ('[]'). Hitting <ENTER> without typing an answer will keep that current value. Ctrl-C will abort. Default user to own the driver interface []: oracle 43
44 Default group to own the driver interface []: dba Start Oracle ASM library driver on boot (y/n) [n]: y Fix permissions of Oracle ASM disks on boot (y/n) [y]: y Writing Oracle ASM library driver configuration: [ OK ] Loading module "oracleasm": [ OK ] Mounting ASMlib driver filesystem: [ OK ] Scanning system for ASM disks: [ OK ] rac2 도성공함. Oracle Cluster File System(OCFS2) 설정 OCFS2는오라클이개발한범용클러스터파일시스템으로 Enterprise Linux 커널과통합되어있습니다. OCFS2는전체노드가클러스터파일시스템에동시접근하는것을가능하게하며, 로우디바이스관리의필요성을제거합니다. 본가이드에서는 OCFS2 파일시스템에 OCR과 Voting Disk를위치시키는방법을사용합니다. OCFS2에대한자세한정보는 OCFS2 사용자가이드에서확인하실수있습니다. Enterprise Linux 설치과정에서이미 OCFS2 RPM 이설치되었을것입니다. * 양쪽노드에 RPM 이선택되었는지확인합니다. [root@rac1 ~]# rpm -qa grep ocfs ocfs2-tools ocfs el ocfs2console [root@rac2 ~]# rpm -qa grep ocfs ocfs2-tools ocfs el ocfs2console OCFS2 설정파일의생성. root 사용자로로그인하여아래와같이실행 44
![[root@rac2 ~]# ocfs2console OCFS2 Console: Cluster, Configure Nodes를선택합니다. The cluster stack has been started : Close를클릭합니다. Node Configuration: Add를클릭합니다.](/docs-images/102/156645290/images/45-1.jpg "Add Node: 아래노드를추가한후 Apply를클릭합니다. Name: rac1 IP Address: 192.168.10.171 IP Port: 7777 Name: rac2 IP Address: 192.168.10.172 IP Port: 7777 5.")
45 ~]# ocfs2console OCFS2 Console: Cluster, Configure Nodes를선택합니다. The cluster stack has been started : Close를클릭합니다. Node Configuration: Add를클릭합니다. Add Node: 아래노드를추가한후 Apply를클릭합니다. Name: rac1 IP Address: IP Port: 7777 Name: rac2 IP Address: IP Port: 생성된설정파일의내용을확인함 45
46 ~]# more /etc/ocfs2/cluster.conf node: ip_port = 7777 ip_address = number = 0 name = rac1 cluster = ocfs2 node: ip_port = 7777 ip_address = number = 1 name = rac2 cluster = ocfs2 cluster: node_count = 2 name = ocfs2 rac1 의내용그대로 copy 한다. [root@rac2 etc]# more /etc/ocfs2/cluster.conf node: ip_port = 7777 ip_address = number = 0 name = rac1 cluster = ocfs2 node: ip_port = 7777 ip_address = number = 1 46
47 name = rac2 cluster = ocfs2 cluster: node_count = 2 name = ocfs2 [root@rac2 etc]# 6. O2CB 드라이버설정. O2CB는노드와클러스터파일시스템간의커뮤니케이션을관리하는일련의클러스터링서비스로구성됩니다. 각서비스에대한설명이아래와같습니다 NM: Node Manager / cluster.conf에설정된모든노드의상태를추적. HB: Heartbeat 서비스 / 노드가클러스터에가입 / 탈퇴하는경우업 / 다운통보를전달 TCP: 노드간의커뮤니케이션을처리 DLM: Distributed Lock Manager / 락, 락의소유자및상태정보를추적 CONFIGFS: 사용자공간 (/config) 에마운트되는구성파일시스템 DLMFS: 커널스페이스 DLM을위한사용자공간인터페이스 * 양쪽노드에아래작업을수행하여부팅시 O2CB 가실행되도록설정해줍니다. heartbeat dead threshold를묻는프롬프트에서 7 이상의값을입력하여낮은성능의 IDE 디스크드라이브로인해 node crash 가발생하는것을방지해주어야합니다. heartbeat dead threshold는 fence time을계산하기위한변수로활용됩니다. Fence time (seconds) = (heartbeat dead threshold -1) * 2 본가이드의구성에서는 120 초의 fence time 이면충분합니다. heartbeat dead threshold 값은 * 양쪽 node 에동일하게설정되어야합니다. 47
48 root 사용자로로그인하여아래와같이실행 ~]# /etc/init.d/o2cb unload Stopping O2CB cluster ocfs2: OK Unmounting ocfs2_dlmfs filesystem: OK Unloading module "ocfs2_dlmfs": OK Unmounting configfs filesystem: OK Unloading module "configfs": OK ~]# /etc/init.d/o2cb configure Configuring the O2CB driver. This will configure the on-boot properties of the O2CB driver. The following questions will determine whether the driver is loaded on boot. The current values will be shown in brackets ('[]'). Hitting <ENTER> without typing an answer will keep that current value. Ctrl-C will abort. Load O2CB driver on boot (y/n) [n]: y Cluster to start on boot (Enter "none" to clear) [ocfs2]: Specify heartbeat dead threshold (>=7) [7]: 61 Writing O2CB configuration: OK Loading module "configfs": OK Mounting configfs filesystem at /config: OK Loading module "ocfs2_nodemanager": OK Loading module "ocfs2_dlm": OK Loading module "ocfs2_dlmfs": OK Mounting ocfs2_dlmfs filesystem at /dlm: OK Starting O2CB cluster ocfs2: OK [root@rac1 ~]# 48
49 rac1 설정성공함 ~]# /etc/init.d/o2cb unload 아무것도안나옴 ~]# /etc/init.d/o2cb configure Configuring the O2CB driver. This will configure the on-boot properties of the O2CB driver. The following questions will determine whether the driver is loaded on boot. The current values will be shown in brackets ('[]'). Hitting <ENTER> without typing an answer will keep that current value. Ctrl-C will abort. Load O2CB driver on boot (y/n) [n]: y Cluster to start on boot (Enter "none" to clear) [ocfs2]: Specify heartbeat dead threshold (>=7) [7]: 61 Writing O2CB configuration: OK Loading module "configfs": OK Creating directory '/config': OK Mounting configfs filesystem at /config: OK Loading module "ocfs2_nodemanager": OK Loading module "ocfs2_dlm": OK Loading module "ocfs2_dlmfs": OK Creating directory '/dlm': OK Mounting ocfs2_dlmfs filesystem at /dlm: OK Starting O2CB cluster ocfs2: OK [root@rac2 ~]# rac2 설정성공 참고 : 파일시스템의포맷. 파일시스템의포맷, 마운팅을수행하기전에, OC2B 가양쪽 node 에서온라인상태인지확인합니다. O2CB heartbeat 는파일시스템이 mount 되기전까지활성화되지않습니다. 49
50 ~]# /etc/init.d/o2cb status Module "configfs": Loaded Filesystem "configfs": Mounted Module "ocfs2_nodemanager": Loaded Module "ocfs2_dlm": Loaded Module "ocfs2_dlmfs": Loaded Filesystem "ocfs2_dlmfs": Mounted Checking O2CB cluster ocfs2: Online Checking O2CB heartbeat: Not active ~]# --> 온라인상태확인 ~]# /etc/init.d/o2cb status Module "configfs": Loaded Filesystem "configfs": Mounted Module "ocfs2_nodemanager": Loaded Module "ocfs2_dlm": Loaded Module "ocfs2_dlmfs": Loaded Filesystem "ocfs2_dlmfs": Mounted Checking O2CB cluster ocfs2: Online Checking O2CB heartbeat: Not active ~]# --> 온라인상태확인 파일시스템포맷작업은두 node 중하나에서만수행합니다. root 사용자로 rac1 에로그인하여아래와같이실행합니다. ~]# ocfs2console OCFS2 Console: Tasks, Format을선택합니다. Format: Available devices: /dev/sdb1 Volume label: oracle 50
51 Cluster size: Auto Number of node slots: 4 Block size: Auto OCFS2 Console: CTRL-Q를눌러종료합니다. 파일시스템의마운트. 파일시스템을마운트하기위해, * 양쪽 node 에서 아래와같이명령을실행합니다. [root@rac1 ~]# mount -t ocfs2 -o datavolume,nointr /dev/sdb1 /ocfs [root@rac2 ~]# mount -t ocfs2 -o datavolume,nointr /dev/sdb1 /ocfs 부팅시에파일시스템이 mount 되도록, 양쪽노드의 /etc/fstab 에아래라인을추가해 줍니다. [root@rac1 ~]# vi /etc/fstab # This file is edited by fstab-sync - see 'man fstab-sync' for details LABEL=/ / ext3 defaults 1 1 none /dev/pts devpts gid=5,mode= none /dev/shm tmpfs defaults 0 0 none /proc proc defaults 0 0 none /sys sysfs defaults 0 0 LABEL=/u01 /u01 ext3 defaults 1 2 LABEL=SWAP-sda2 swap swap defaults 0 0 # Beginning of the block added by the VMware software.host:/ /mnt/hgfs vmhgfs defaults,ttl=5 0 0 # End of the block added by the VMware software /dev/hdc /media/cdrecorder auto pamconsole,fscontext=system_u:object_r:removable_t,exec,noauto,managed 0 0 /dev/fd0 /media/floppy auto pamconsole,fscontext=system_u:object_r:removable_t,exec,noauto,managed 0 0 /dev/sdb1 /ocfs ocfs2 _netdev,datavolume,nointr >> 추가해줌 51
52 ~]# vi /etc/fstab # This file is edited by fstab-sync - see 'man fstab-sync' for details LABEL=/ / ext3 defaults 1 1 none /dev/pts devpts gid=5,mode= none /dev/shm tmpfs defaults 0 0 none /proc proc defaults 0 0 none /sys sysfs defaults 0 0 LABEL=/u01 /u01 ext3 defaults 1 2 LABEL=SWAP-sda2 swap swap defaults 0 0 # Beginning of the block added by the VMware software.host:/ /mnt/hgfs vmhgfs defaults,ttl=5 0 0 # End of the block added by the VMware software /dev/hdc /media/cdrecorder auto pamconsole,fscontext=system_u:object_r:removable_t,exec,noauto,managed 0 0 /dev/fd0 /media/floppy auto pamconsole,fscontext=system_u:object_r:removable_t,exec,noauto,managed 0 0 /dev/sdb1 /ocfs ocfs2 _netdev,datavolume,nointr > 추가해줌 Oracle Clusterware 디렉토리생성. OCFS2 파일시스템에 OCR, Voting Disk 가위치할 디렉토리를생성. rac1 에서아래와같이작업 [root@rac1 ~]# mkdir /ocfs/clusterware [root@rac1 ~]# chown -R oracle:dba /ocfs 이것으로 OCFS2 의셋업과정을완료하였습니다. * 양쪽 node 의공유클러스터파일시스템에서파일읽기 / 쓰기를수행할수있는지확인 함. 52

53 7. Oracle Clusterware 설치 다운로드를완료한후, rac1 에 oracle 사용자로로그인하여아래와같이실행 Xhost 및 xclock 이실행되도록함. 53

54 클러스터설치한다. 54
55 55
56 56
57 57
58 58
59 Oracle Clusterware 설치위의그림참고함 59
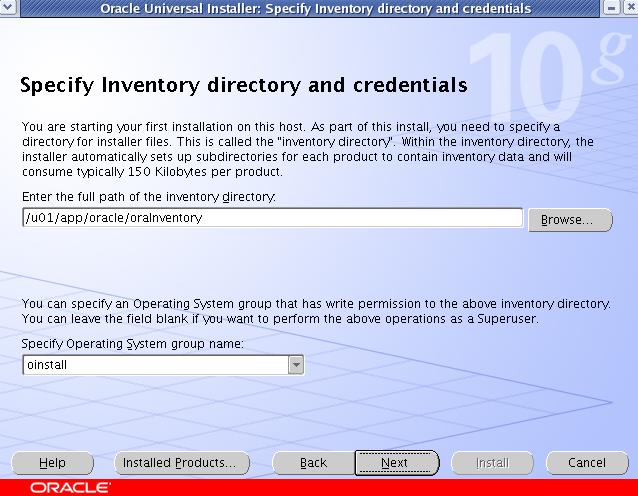
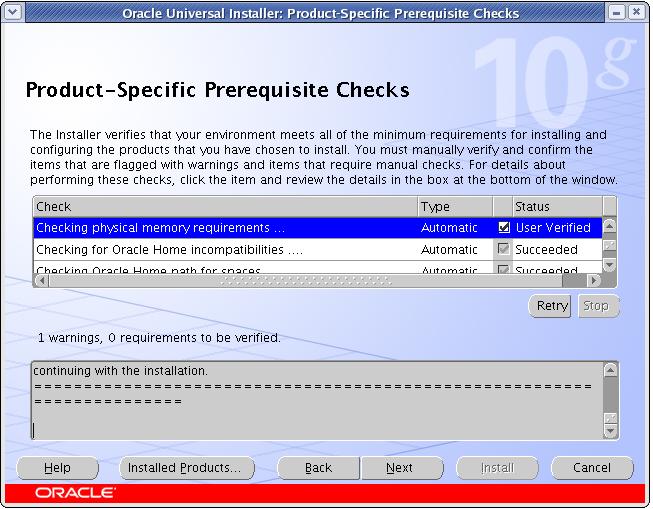
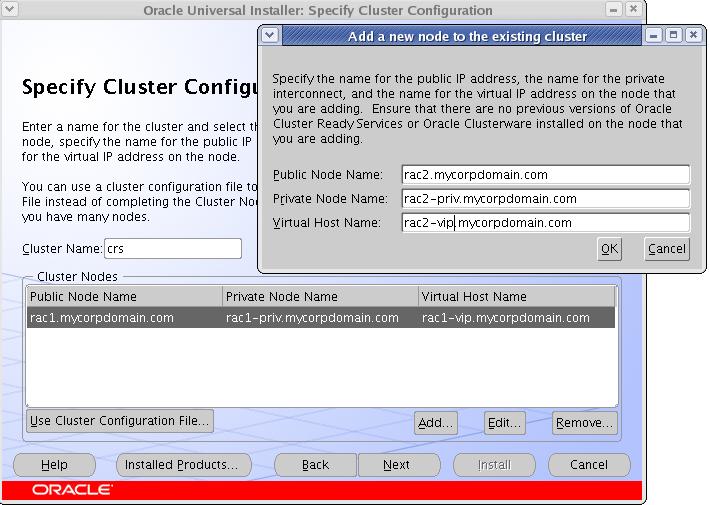
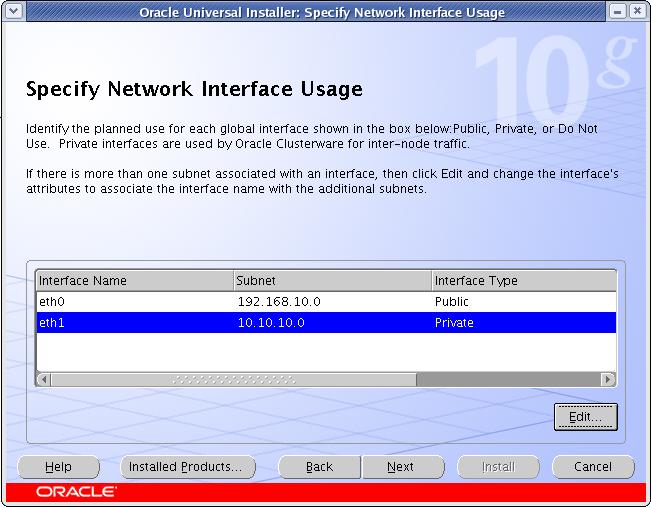
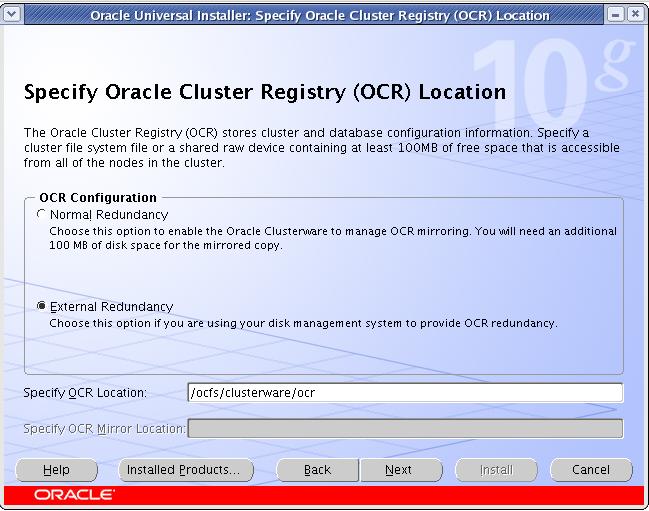
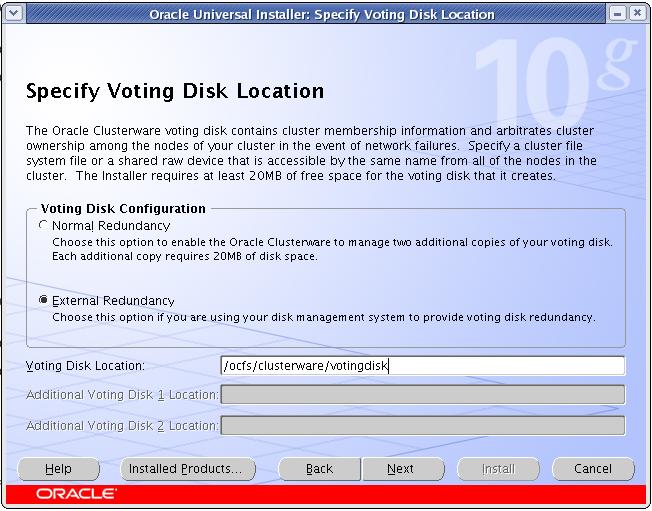
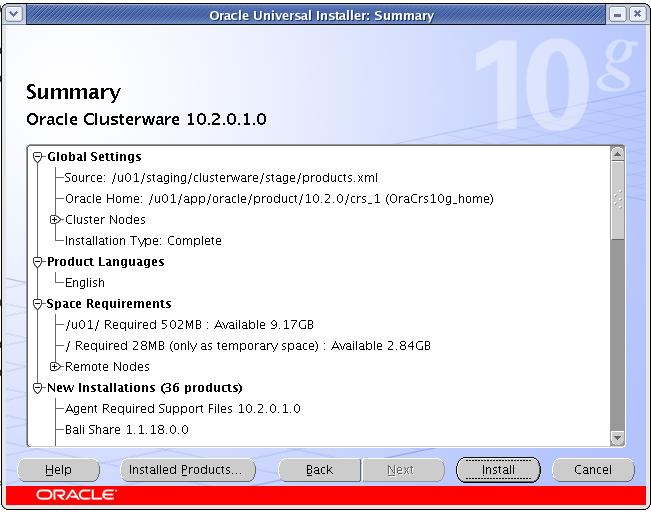
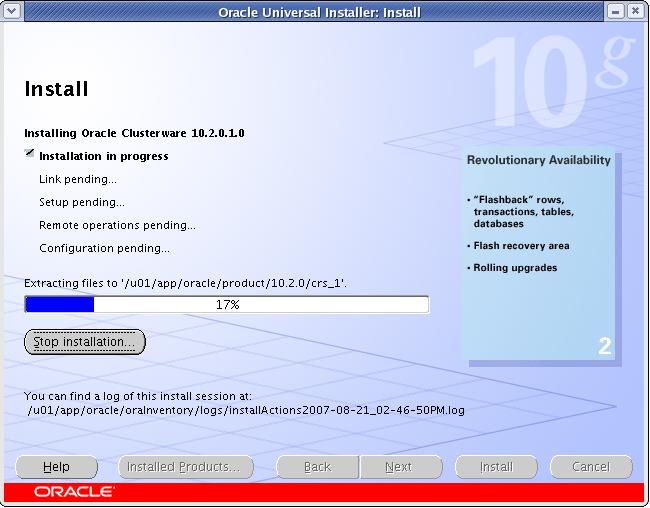
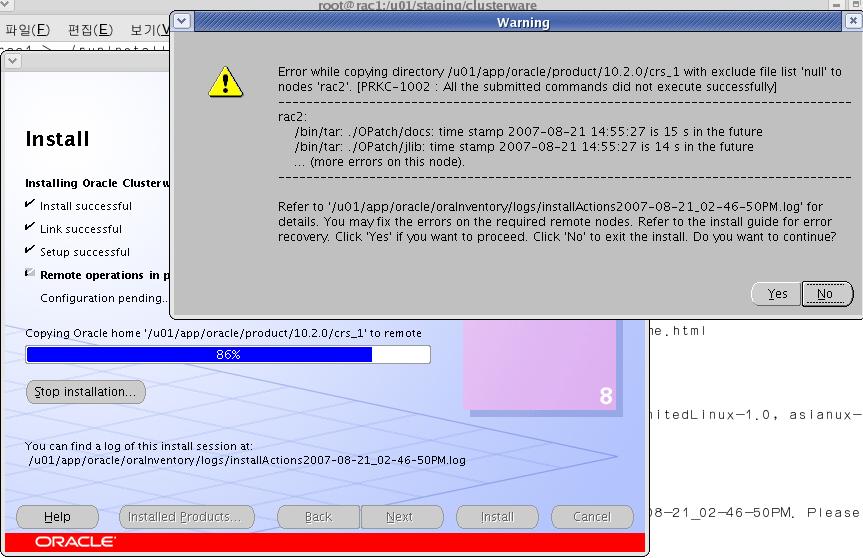
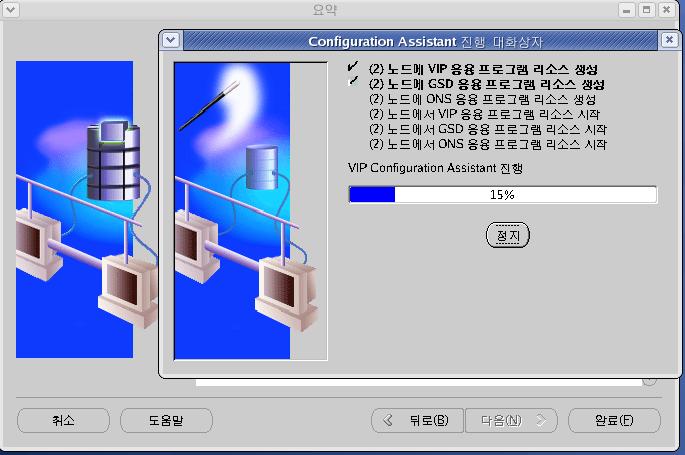
60 다운로드를완료한후, rac1 에 oracle 사용자로로그인하여아래와같이실행합니다 : rac1-> /u01/staging/clusterware/runinstaller Welcome: Next를클릭합니다. Specify Inventory directory and credentials: Enter the full path of the inventory directory: /u01/app/oracle/orainventory. Specify Operating System group name: oinstall. Specify Home Details: Name: OraCrs10g_home /u01/app/oracle/product/10.2.0/crs_1 Product-Specific Prerequisite Checks: 물리적메모리요구사항에관련한경고를무시합니다. Specify Cluster Configuration: Add를클릭합니다. Public Node Name: rac2.mycorpdomain.com Private Node Name: rac2-priv.mycorpdomain.com Virtual Host Name: rac2-vip.mycorpdomain.com Specify Network Interface Usage: Interface Name: eth0 Subnet: Interface Type: Public Interface Name: eth1 Subnet: Interface Type: Private Specify Oracle Cluster Registry (OCR) Location: External Redundancy를선택합니다. 구성의단순화를위해, 본가이드에서는 OCR을미러링하지않는것으로합니다. 실제운영환경에서는 OCR 디스크의가용성개선을위해멀티플렉싱을사용해야합니다. Specify OCR Location: /ocfs/clusterware/ocr Specify Voting Disk Location: External Redundancy를선택합니다. 구성의단순화를위해, 본가이드에서는 Voting Disk를미러링하지않는것으로합니다. Voting Disk Location: /ocfs/clusterware/votingdisk 위의마지막그림보면. Summary: Install 을클릭합니다. install 하다가 rac2 하다가 errors 난다. 60
61 계속 yes 누르고진행한다. 85% 정도에서 PRKC-1002 RAC2 Error 나면서창이뜬다. Error 가안나면계속진행한다. 계속진행하고 100% 가되면아래처럼진행한다. 먼저아래와같이 root 사용자로실행한다. 1>Execute -à /u01/app/oracle/orainventory/orainstroot.sh on rac1. Execute -à /u01/app/oracle/orainventory/orainstroot.sh on rac2. Rac1 에서실행. orainventory]# pwd /u01/app/oracle/orainventory orainventory]# ls Contents install.platform orainst.loc orainstroot.sh sessioncontext.ser ContentsXML logs orainstaller.properties oui orainventory]# pwd /u01/app/oracle/orainventory orainventory]# sh orainstroot.sh Changing permissions of /u01/app/oracle/orainventory to
62 Changing groupname of /u01/app/oracle/orainventory to oinstall. The execution of the script is complete Rac2 에서실행 orainventory]# ls Contents ContentsXML install.platform logs orainst.loc orainstroot.sh orainventory]# sh orainstroot.sh Changing permissions of /u01/app/oracle/orainventory to 770. Changing groupname of /u01/app/oracle/orainventory to oinstall. The execution of the script is complete orainventory]# 먼저아래와같이 root 사용자로실행한다. 2>Execute-à /u01/app/oracle/product/10.2.0/crs_1/root.sh on rac1. * Execute-à /u01/app/oracle/product/10.2.0/crs_1/root.sh on rac2 [root@rac1 crs_1]# pwd /u01/app/oracle/product/10.2.0/crs_1 [root@rac1 crs_1]# ls JRE cfgtoollogs cv install jlib log orainst.loc plsql relnotes srvm OPatch clone diagnostics install.platform jre network oracore precomp root.sh xdk bin crs evm inventory ldap nls oui racg slax cdata css has jdk lib opmn perl rdbms sqlplus [root@rac1 crs_1]# sh root.sh WARNING: directory '/u01/app/oracle/product/10.2.0' is not owned by root WARNING: directory '/u01/app/oracle/product' is not owned by root WARNING: directory '/u01/app/oracle' is not owned by root WARNING: directory '/u01/app' is not owned by root 62
63 WARNING: directory '/u01' is not owned by root Checking to see if Oracle CRS stack is already configured /etc/oracle does not exist. Creating it now. Setting the permissions on OCR backup directory Setting up NS directories Oracle Cluster Registry configuration upgraded successfully WARNING: directory '/u01/app/oracle/product/10.2.0' is not owned by root WARNING: directory '/u01/app/oracle/product' is not owned by root WARNING: directory '/u01/app/oracle' is not owned by root WARNING: directory '/u01/app' is not owned by root WARNING: directory '/u01' is not owned by root assigning default hostname rac1 for node 1. assigning default hostname rac2 for node 2. Successfully accumulated necessary OCR keys. Using ports: CSS=49895 CRS=49896 EVMC=49898 and EVMR= node <nodenumber>: <nodename> <private interconnect name> <hostname> node 1: rac1 rac1-priv rac1 node 2: rac2 rac2-priv rac2 Creating OCR keys for user 'root', privgrp 'root'.. Operation successful. Now formatting voting device: /ocfs/clusterware/votingdisk Format of 1 voting devices complete. Startup will be queued to init within 90 seconds. Adding daemons to inittab Expecting the CRS daemons to be up within 600 seconds. CSS is active on these nodes. rac1 CSS is inactive on these nodes. rac2 Local node checking complete. Run root.sh on remaining nodes to start CRS daemons. 성공적으로끝남. [root@rac2 crs_1]# sh root.sh 63
64 WARNING: directory '/u01/app/oracle/product/10.2.0' is not owned by root WARNING: directory '/u01/app/oracle/product' is not owned by root WARNING: directory '/u01/app/oracle' is not owned by root WARNING: directory '/u01/app' is not owned by root WARNING: directory '/u01' is not owned by root Checking to see if Oracle CRS stack is already configured /etc/oracle does not exist. Creating it now. Setting the permissions on OCR backup directory Setting up NS directories Oracle Cluster Registry configuration upgraded successfully WARNING: directory '/u01/app/oracle/product/10.2.0' is not owned by root WARNING: directory '/u01/app/oracle/product' is not owned by root WARNING: directory '/u01/app/oracle' is not owned by root WARNING: directory '/u01/app' is not owned by root WARNING: directory '/u01' is not owned by root clscfg: EXISTING configuration version 3 detected. clscfg: version 3 is 10G Release 2. assigning default hostname rac1 for node 1. assigning default hostname rac2 for node 2. Successfully accumulated necessary OCR keys. Using ports: CSS=49895 CRS=49896 EVMC=49898 and EVMR= node <nodenumber>: <nodename> <private interconnect name> <hostname> node 1: rac1 rac1-priv rac1 node 2: rac2 rac2-priv rac2 clscfg: Arguments check out successfully. NO KEYS WERE WRITTEN. Supply -force parameter to override. -force is destructive and will destroy any previous cluster configuration. Oracle Cluster Registry for cluster has already been initialized Startup will be queued to init within 90 seconds. Adding daemons to inittab Expecting the CRS daemons to be up within 600 seconds. CSS is active on these nodes. rac1 64
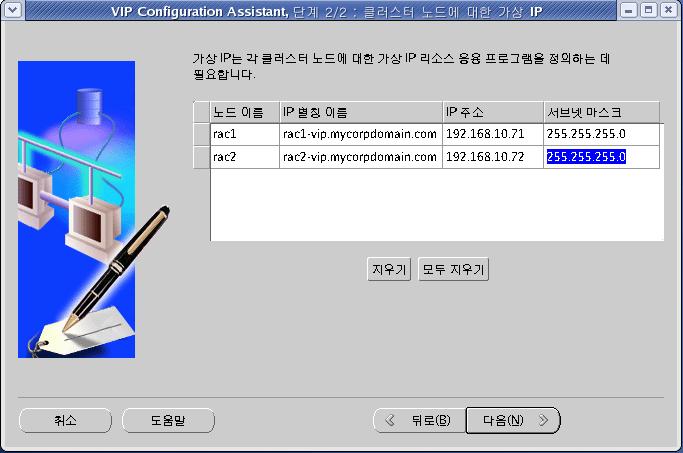
65 rac2 CSS is active on all nodes. Waiting for the Oracle CRSD and EVMD to start Waiting for the Oracle CRSD and EVMD to start Oracle CRS stack installed and running under init(1m) Running vipca(silent) for configuring nodeapps 진행하다가다음과같은 message 발생함. 제공된인터페이스 "eth0" 가공용이아닙니다. 가상 ip 를구성하려면공용인터페이스를 사용해야합니다. < 참고 > rac2의 root.sh 스크립트는 VIPCA를자동으로호출하지만, "The given interface(s), "eth0" is not public. Public interfaces should be used to configure virtual IPs" 에러와함께실패합니다. public 인터페이스에사설 IP 주소 ( ) 가사용되고있기때문에 Oracle Cluster Verification Utility(CVU) 가적절한 Public 인터페이스를찾을수없는것입니다. * 이문제를해결하려면 VIPCA 를수동으로실행해야합니다. root 사용자로로그인하여두번째 node ( rac2) 에서 VIPCA 를수동으로실행합니다. # /u01/app/oracle/product/10.2.0/crs_1/bin/vipca Ex> [root@rac2 bin]# pwd /u01/app/oracle/product/10.2.0/crs_1/bin [root@rac2 bin]#./vipca Welcome: Next를클릭합니다. Network Interfaces: eth0를선택합니다. Virtual IPs for cluster nodes: Node name: rac1 IP Alias Name: rac1-vip 65


66 IP address: Subnet Mask: Node name: rac2 IP Alias Name: rac2-vip IP address: Subnet Mask: Summary: Finish를클릭합니다. 나머지그림자료참조한다. 66
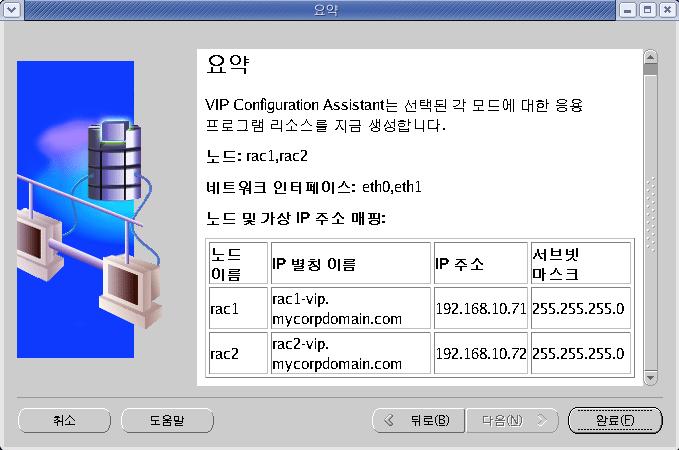
67 모두선택한다. 위의내용을입력한후다음클릭한다. 성공적으로설정되어완료를클릭한다. 67

68 설치를시작합니다. 설치가완료되어확인을클릭합니다. 68

69 종료를클릭합니다. 화면이사라지면 rac1 의 Execute Configuration 스크립트스크린으로아래로 돌아가 OK 를클릭합니다. 69

70 OK 클릭함. 70
71 성공적으로끝났음. cluster 잘설치됐는지확인한다. Configuration Assistants: 모든점검이성공적으로완료되었는지확인합니다. EXIT 아직하지말고 Clusterware 설치아래와같이해서성공적인확인후에한다. OUI 는 Clusterware 설치가완료된후사후점검작업을수행합니다. CVU 가실패한경우문제를해결하고다시 oracle 사용자로아래명령을재실행합니다 Rac1 에서실행한다. rac1->/u01/app/oracle/product/10.2.0/crs_1/bin/cluvfy stage -post crsinst -n rac1,rac2 Performing post-checks for cluster services setup Checking node reachability... Node reachability check passed from node "rac1". 71
72 Checking user equivalence... User equivalence check passed for user "oracle". Checking Cluster manager integrity... Checking CSS daemon... Daemon status check passed for "CSS daemon". Cluster manager integrity check passed. Checking cluster integrity... Cluster integrity check passed Checking OCR integrity... Checking the absence of a non-clustered configuration... All nodes free of non-clustered, local-only configurations. Uniqueness check for OCR device passed. Checking the version of OCR... OCR of correct Version "2" exists. Checking data integrity of OCR... Data integrity check for OCR passed. OCR integrity check passed. Checking CRS integrity... Checking daemon liveness... Liveness check passed for "CRS daemon". Checking daemon liveness... 72
73 Liveness check passed for "CSS daemon". Checking daemon liveness... Liveness check passed for "EVM daemon". Checking CRS health... CRS health check passed. CRS integrity check passed. Checking node application existence... Checking existence of VIP node application (required) Check passed. Checking existence of ONS node application (optional) Check passed. Checking existence of GSD node application (optional) Check passed. Post-check for cluster services setup was successful. 정상적으로확인되었음. EXIT 클릭하고종료한다. Oracle cluster services 성공적으로완료되었습니다. rac1-> crs_stat -t Name Type Target State Host ora.rac1.gsd application ONLINE ONLINE rac1 ora.rac1.ons application ONLINE ONLINE rac1 ora.rac1.vip application ONLINE ONLINE rac1 73
74 ora.rac2.gsd application ONLINE ONLINE rac2 ora.rac2.ons application ONLINE ONLINE rac2 ora.rac2.vip application ONLINE ONLINE rac2 rac1-> crsctl check crs CSS appears healthy CRS appears healthy EVM appears healthy. ~]# su - oracle rac2-> crs_stat -t Name Type Target State Host ora.rac1.gsd application ONLINE ONLINE rac1 ora.rac1.ons application ONLINE ONLINE rac1 ora.rac1.vip application ONLINE ONLINE rac1 ora.rac2.gsd application ONLINE ONLINE rac2 ora.rac2.ons application ONLINE ONLINE rac2 ora.rac2.vip application ONLINE ONLINE rac2 rac2-> crsctl check crs CSS appears healthy CRS appears healthy EVM appears healthy 클러스터정상적으로설치됨. ( 완료 ) 74
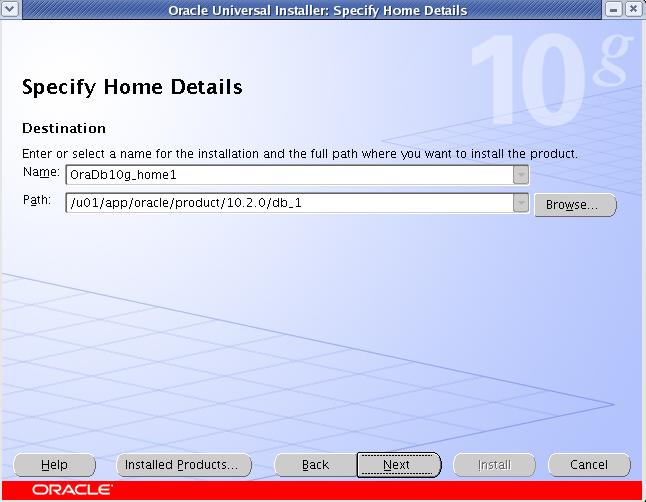
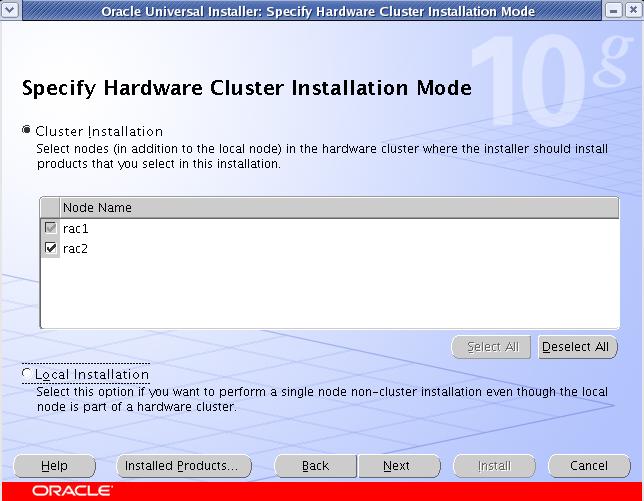
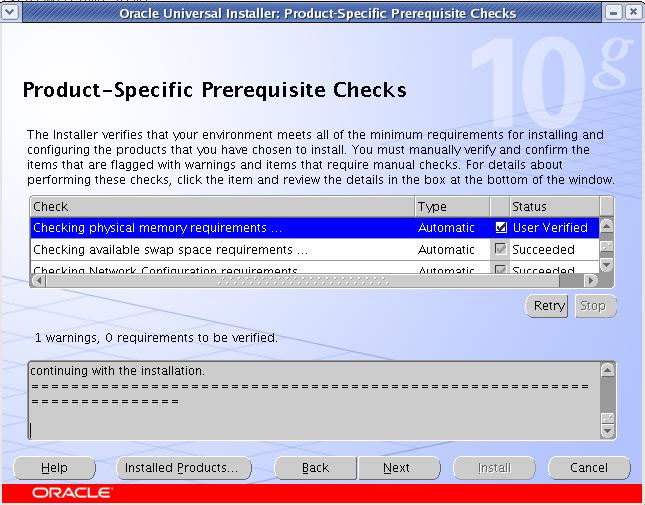
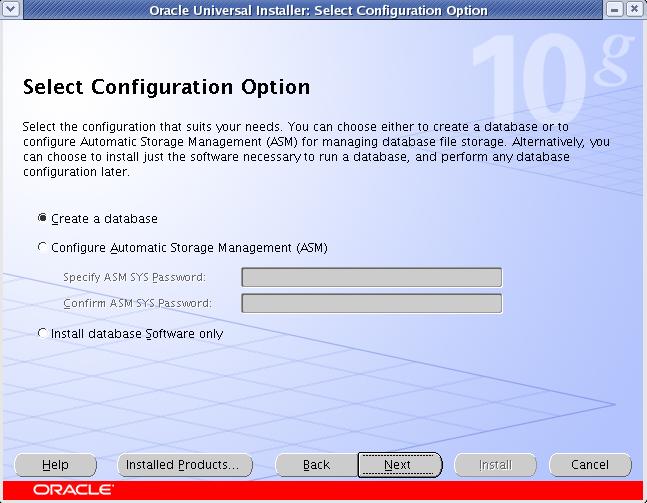
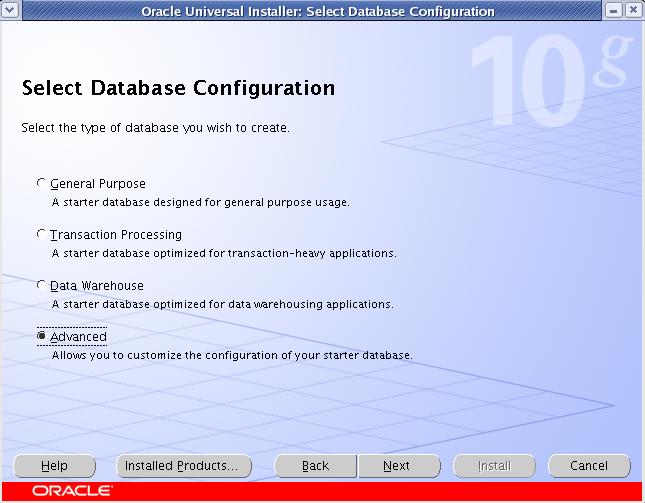
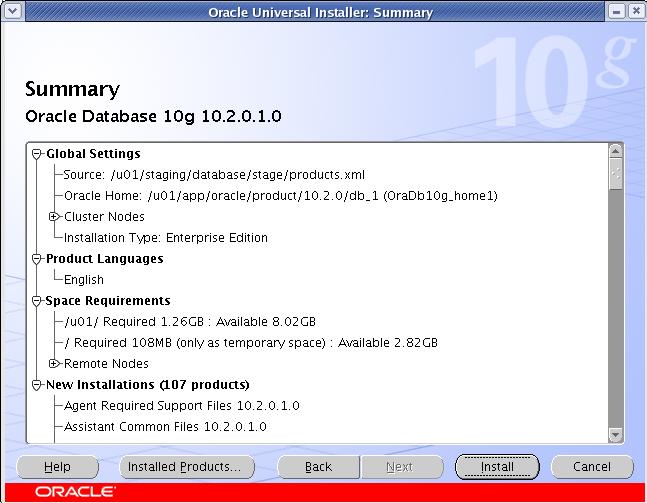
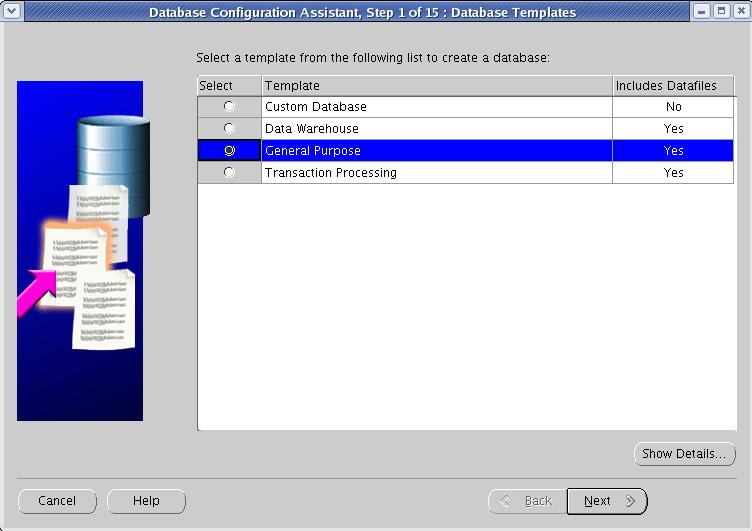
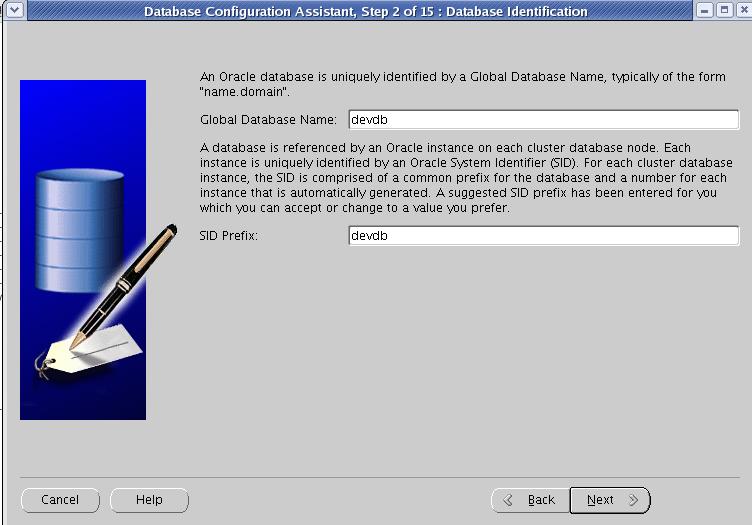
75 Oracle Database 10g Release 2 설치 다운로드를완료한후, rac1 에 oracle 사용자로로그인하여아래와같이 실행함. rac1-> /u01/staging/database/runinstaller 1. Welcome: Next 를클릭합니다. 2. Select Installation Type: o Enterprise Edition 을선택합니다. 3. Specify Home Details: o Name: OraDb10g_home1 o Path: /u01/app/oracle/product/10.2.0/db_1 4. Specify Hardware Cluster Installation Mode: o Cluster Installation 을선택합니다. o Select All 을클릭합니다. 5. Product-Specific Prerequisite Checks: o 물리적메모리요구사항에관련한경고를무시합니다. 6. Select Configuration Option: o Create a Database 를선택합니다. 7. Select Database Configuration: o Advanced 를선택합니다. 8. Summary: Install 을클릭합니다. 9. Database Templates: o General Purpose 를선택합니다. 10. Database identification: o Global Database Name: devdb o SID Prefix: devdb 11. Management Options: o Configure the Database with Enterprise Manager 를선택합니다. 12. Database Credentials: 75
 을선택합니다. 15. ASM Disk Groups: o Create New 를클릭합니다. 16. Create Disk Group: 두개의디스크그룹 (DG1, RECOVERYDEST) 을생성합니다.")
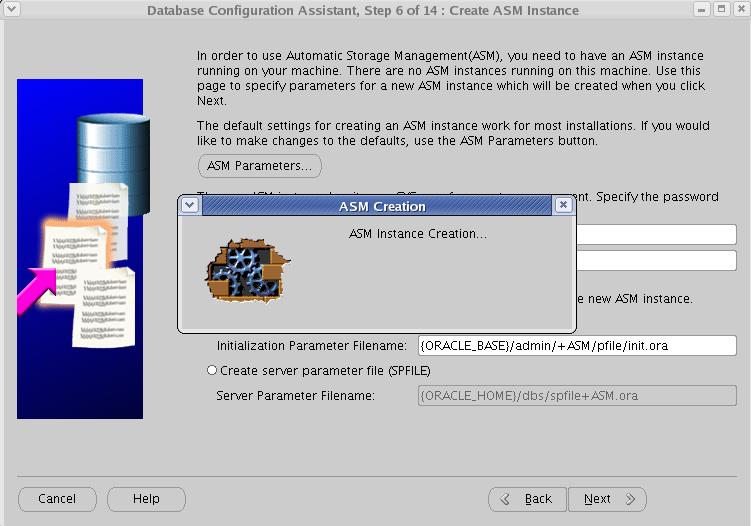
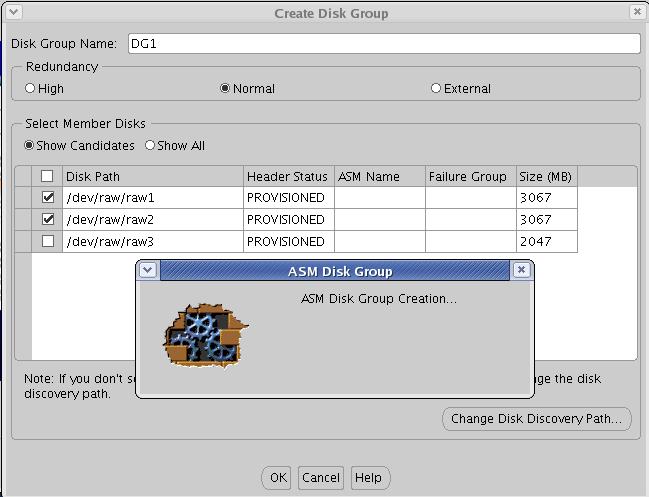
76 o Use the Same Password for All Accounts 를선택합니다. 13. Storage Options: o Automatic Storage Management (ASM) 을선택합니다. 14. Create ASM Instance: o SYS password: <SYS 패스워드를입력합니다 >. o Create initialization parameter file (IFILE) 을선택합니다. 15. ASM Disk Groups: o Create New 를클릭합니다. 16. Create Disk Group: 두개의디스크그룹 (DG1, RECOVERYDEST) 을생성합니다. o Disk Group Name: DG1 o Normal redundancy 를선택합니다. o Disk Path, ORCL:VOL1, ORCL:VOL2 를선택합니다. 표준 Linux I/O 를이용하여 ASM 디스크를설정한경우, /u01/oradata/devdb/asmdisk1 와 /u01/oradata/devdb/asmdisk2 를선택해주어야합니다. o OK 를클릭합니다. 76
77 77
78 78
79 79
80 92% 15 분정도조금오랜시간이걸린다. 80
81 81


82 Password : oracle 이라고입력한다. 82


83 아래의 ASM parameters 클릭해서아래의내용확인한다. 위의그림의 asm_diskstring 의 /dev/raw/raw* 을설정안해도상관없다. 아래처럼해도관계없다. 83


84 Sys password : oracle 로입력한다. Next 한다. 84

85 OK 클릭한다. 85

86 위의그림에서 create New 을클릭한다. 다음과같은화면이나온다. 86

87 OK 클릭한다. 87


88 Create New 을클릭한다. OK 을클릭한다. 88

89 ASM Disk Groups: Next 를클릭. 89


90 NEXT 클릭한다. Database File Locations: Use Oracle-Managed Files 를선택합니다. Database Area : +DG1 90


91 Recovery Configuration: Specify Flash Recovery Area 를선택 Flash Recovery Area: +RECOVERYDEST Flash Recovery Area Size: 1500M * Enable Archiving 를선택 Database Content : 샘플스키마를선택또는해제하고 NEXT 클릭. Database Services : Next 를클릭. 나중에 DBCA 또는 srvctl 을이용하여서비스를추가로생성, 변경할수있음 ( EX> TAF ) NEXT 클릭한다. 91
 Initialization Parameters")

92 나머지는 default 설정함.( 경우에따라서다르게설정가능함 ) Initialization Parameters : Custom 를선택 Shared Memory Management : Automatic *SGA Size : 200MB *PGA Size : 25MB * 필요에따라나머지매개변수를변경해줍니다 NEXT 클릭함. 92


93 Finish 클릭함. 아래와같은화면나옴. OK 클릭하면아래화면나오면서 Database Configuration Assistant 화면시작. 93


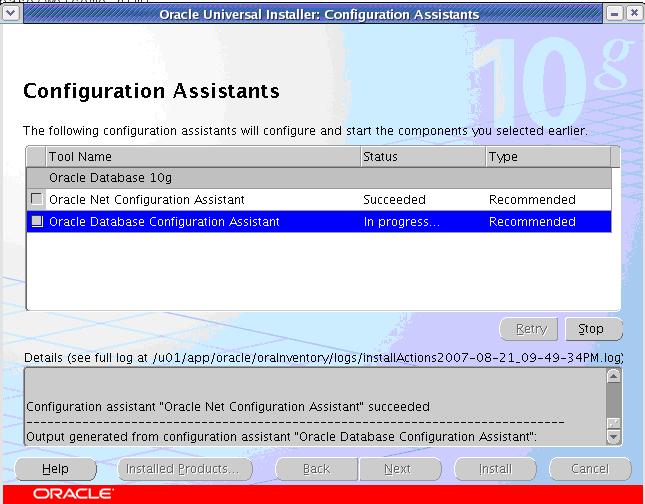
94 아래의그림처럼 100% 완료되면 Exit 클릭한다. 아래와같은화면생성됨. 94

95 Start cluster Database 실행중이므로창을닫으면절대안됨. Vmware 라시간이상당히걸림.(10~20 분 ) 기다리면아래와같이 succeeded. 성공적으로끝남. 그리고다음화면이나옴. 주의할점은. Execute Configuration scripts : root 사용자로로그인하여아래스크립트를실행합니다. rac1 에서 /u01/app/oracle/product/10.2.0/db_1/root.sh 스크립트를실행함. rac2 에서 /u01/app/oracle/product/10.2.0/db_1/root.sh 스크립트를실행함. 그리고완료되면아래의화면에서 OK 클릭한다. 95


96 rac1 의 Execute Configuration 스크립트스크린으로돌아가 OK 를클릭함. EXIT 을클릭합니다. 모든 RAC2 구성과구축이끝났습니다. 직원여러분수고하셨습니다. 감사합니다. 96
슬라이드 1
 Oracle RAC Installation with Raw device Vmware server 와 oracle 에서제공하는 RHEL4 기반 Linux x86 (32-bit) 대상정보기술 DB 지원팀여현승 설정된 OS환경 node1, node2(hostname) 해상도 : 1024X768 호스트머신과시간동기화 Network setting Eth0 () Eth1
휠세미나3 ver0.4
 andromeda@sparcs:/$ ls -al dev/sda* brw-rw---- 1 root disk 8, 0 2014-06-09 18:43 dev/sda brw-rw---- 1 root disk 8, 1 2014-06-09 18:43 dev/sda1 brw-rw---- 1 root disk 8, 2 2014-06-09 18:43 dev/sda2 andromeda@sparcs:/$
Oracle Database 11g R2 Installation Guide for OEL5(x86) Writer : 이경호
 Writer : 이경호") Oracle Database 11g R2 Installation Guide for OEL5(x86) Writer : 이경호 - 1 - 1. 시스템구성 1.1. 개요 1.1.1. 정의 - VMware 7 을이용하여 Oracle Database 11g R2 를설치합니다. 1.1.2. 목적 - 실습을위한 Oracle Database 11g R2 설치가이드를작성합니다.
Oracle Database 11g R2 Installation Guide for OEL5(x86) Writer : 이경호 - 1 - 1. 시스템구성 1.1. 개요 1.1.1. 정의 - VMware 7 을이용하여 Oracle Database 11g R2 를설치합니다. 1.1.2. 목적 - 실습을위한 Oracle Database 11g R2 설치가이드를작성합니다.
K7VT2_QIG_v3
 1......... 2 3..\ 4 5 [R] : Enter Raid setup utility 6 Press[A]keytocreateRAID RAID Type: JBOD RAID 0 RAID 1: 2 7 " RAID 0 Auto Create Manual Create: 2 RAID 0 Block Size: 16K 32K
ORANGE FOR ORACLE V4.0 INSTALLATION GUIDE (Online Upgrade) ORANGE CONFIGURATION ADMIN O
 ORANGE CONFIGURATION ADMIN O") Orange for ORACLE V4.0 Installation Guide ORANGE FOR ORACLE V4.0 INSTALLATION GUIDE...1 1....2 1.1...2 1.2...2 1.2.1...2 1.2.2 (Online Upgrade)...11 1.3 ORANGE CONFIGURATION ADMIN...12 1.3.1 Orange Configuration
Orange for ORACLE V4.0 Installation Guide ORANGE FOR ORACLE V4.0 INSTALLATION GUIDE...1 1....2 1.1...2 1.2...2 1.2.1...2 1.2.2 (Online Upgrade)...11 1.3 ORANGE CONFIGURATION ADMIN...12 1.3.1 Orange Configuration
Solaris Express Developer Edition
 Solaris Express Developer Edition : 2008 1 Solaris TM Express Developer Edition Solaris OS. Sun / Solaris, Java, Web 2.0,,. Developer Solaris Express Developer Edition System Requirements. 768MB. SPARC
01장
 뇌를자극하는 Windows Server 2012 R2 부록 NAS4Free 의설치와환경설정 네트워크상에서저장공간이제공되는 NAS(Network Attached Storage) 환경을 VMware에서구성해야한다. 이책에서는그중 Unix 계열의운영체제이며무료로사용할수있는 NAS4Free 운영체제를설치하고사용할것이다. 결국지금설치하는 NAS4Free는쿼럼디스크와클러스터디스크를제공하는것이목적이다.
슬라이드 1
 UGENS SNC Techinical Report OEL6 + 12C RAC 사원최재정 UGENS SNC 목차 1. 12c 설치된곳에자료수집 2. SERVER DB 삭제 3. 12c grid 설치 4. oracle 12c 설치 5. 확인 2 Vi.bash_profile if [ -f ~/.bashrc ]; then. ~/.bashrc fi # User specific
슬라이드 1
 OEL 5. Oracle 11g R2 RAC_ASM 차범철 2012. 3. 7 목 목 차 차 Step 1. 리눅스설치 Step 2. 설치환경설정 Step 3. GRID 설치 Step 4. Oracle 엔진설치 Step 5. ASMCA Step 6. Database 생성 Step 7. 테스트 Step 1. 리눅스설치 Vmware workstation 세팅 OEL
소개 TeraStation 을 구입해 주셔서 감사합니다! 이 사용 설명서는 TeraStation 구성 정보를 제공합니다. 제품은 계속 업데이트되므로, 이 설명서의 이미지 및 텍스트는 사용자가 보유 중인 TeraStation 에 표시 된 이미지 및 텍스트와 약간 다를 수
 사용 설명서 TeraStation Pro II TS-HTGL/R5 패키지 내용물: 본체 (TeraStation) 이더넷 케이블 전원 케이블 TeraNavigator 설치 CD 사용 설명서 (이 설명서) 제품 보증서 www.buffalotech.com 소개 TeraStation 을 구입해 주셔서 감사합니다! 이 사용 설명서는 TeraStation 구성 정보를
1217 WebTrafMon II
 (1/28) (2/28) (10 Mbps ) Video, Audio. (3/28) 10 ~ 15 ( : telnet, ftp ),, (4/28) UDP/TCP (5/28) centralized environment packet header information analysis network traffic data, capture presentation network
Microsoft PowerPoint - 02_Linux_Fedora_Core_8_Vmware_Installation [호환 모드]
![Microsoft PowerPoint - 02_Linux_Fedora_Core_8_Vmware_Installation [호환 모드]](/thumbs/39/20119028.jpg "Microsoft PowerPoint - 02_Linux_Fedora_Core_8_Vmware_Installation [호환 모드]") 리눅스 설치 Vmware를 이용한 Fedora Core 8 설치 소프트웨어실습 1 Contents 가상 머신 실습 환경 구축 Fedora Core 8 설치 가상 머신 가상 머신 가상 머신의 개념 VMware의 설치 VMware : 가상 머신 생성 VMware의 특징 실습 환경 구축 실습 환경 구축 Fedora Core 8 설치 가상 머신의 개념 가상 머신 (Virtual
리눅스 설치 Vmware를 이용한 Fedora Core 8 설치 소프트웨어실습 1 Contents 가상 머신 실습 환경 구축 Fedora Core 8 설치 가상 머신 가상 머신 가상 머신의 개념 VMware의 설치 VMware : 가상 머신 생성 VMware의 특징 실습 환경 구축 실습 환경 구축 Fedora Core 8 설치 가상 머신의 개념 가상 머신 (Virtual
10X56_NWG_KOR.indd
 디지털 프로젝터 X56 네트워크 가이드 이 제품을 구입해 주셔서 감사합니다. 본 설명서는 네트워크 기능 만을 설명하기 위한 것입니다. 본 제품을 올바르게 사 용하려면 이 취급절명저와 본 제품의 다른 취급절명저를 참조하시기 바랍니다. 중요한 주의사항 이 제품을 사용하기 전에 먼저 이 제품에 대한 모든 설명서를 잘 읽어 보십시오. 읽은 뒤에는 나중에 필요할 때
CD-RW_Advanced.PDF
 HP CD-Writer Program User Guide - - Ver. 2.0 HP CD-RW Adaptec Easy CD Creator Copier, Direct CD. HP CD-RW,. Easy CD Creator 3.5C, Direct CD 3.0., HP. HP CD-RW TEAM ( 02-3270-0803 ) < > 1. CD...3 CD...5
PowerPoint 프레젠테이션
 CentOS 6.x 설치매뉴얼 작성일자 : 2013.05 cafe24 IDC 사업팀 설치이미지부팅 1. CentOS CD(DVD) 를넣고해당미디어로부팅을시킵니다. 2. Install or upgrade an exitsing system 에서 키를눌러다음단계로진행합니다. 미디어테스트 1. 설치화면에진입하였습니다. 미디어 (CD/DVD) 테스트를하겠냐는메시지가출력됩니다.
ENT5_ora11g_R2_ hwp
 Linux Ent 5 환경에 oracle 11g R2 설치 step 2 커널설정 아래오라클설치는카페의게시판에제공되는 11gR2 설치를위한리눅스설치과정을수행한경우보장한다. 리눅스설치가궁금하다면 'OS, Network' 게시판에 RedHat 5.X 설치 - 오라클 11g R2 설치를위한 게시물을참고한다. 1. Linux 환경설정 step 1 oracle 관리계정및그룹생성
APOGEE Insight_KR_Base_3P11
 Technical Specification Sheet Document No. 149-332P25 September, 2010 Insight 3.11 Base Workstation 그림 1. Insight Base 메인메뉴 Insight Base Insight Insight Base, Insight Base Insight Base Insight Windows
Copyright 2012, Oracle and/or its affiliates. All rights reserved.,,,,,,,,,,,,,.,..., U.S. GOVERNMENT END USERS. Oracle programs, including any operat
 Sun Server X3-2( Sun Fire X4170 M3) Oracle Solaris : E35482 01 2012 9 Copyright 2012, Oracle and/or its affiliates. All rights reserved.,,,,,,,,,,,,,.,..., U.S. GOVERNMENT END USERS. Oracle programs, including
Simplify your Job Automatic Storage Management DB TSC
 Simplify your Job Automatic Storage Management DB TSC 1. DBA Challenges 2. ASM Disk group 3. Mirroring/Striping/Rebalancing 4. Traditional vs. ASM 5. ASM administration 6. ASM Summary Capacity in Terabytes
본교재는수업용으로제작된게시물입니다. 영리목적으로사용할경우저작권법제 30 조항에의거법적처벌을받을수있습니다. [ 실습 ] 스위치장비초기화 1. NVRAM 에저장되어있는 'startup-config' 파일이있다면, 삭제를실시한다. SWx>enable SWx#erase sta
![본교재는수업용으로제작된게시물입니다. 영리목적으로사용할경우저작권법제 30 조항에의거법적처벌을받을수있습니다. [ 실습 ] 스위치장비초기화 1. NVRAM 에저장되어있는 'startup-config' 파일이있다면, 삭제를실시한다. SWx>enable SWx#erase sta](/thumbs/88/116915514.jpg "본교재는수업용으로제작된게시물입니다. 영리목적으로사용할경우저작권법제 30 조항에의거법적처벌을받을수있습니다. [ 실습 ] 스위치장비초기화 1. NVRAM 에저장되어있는 'startup-config' 파일이있다면, 삭제를실시한다. SWx>enable SWx#erase sta") [ 실습 ] 스위치장비초기화 1. NVRAM 에저장되어있는 'startup-config' 파일이있다면, 삭제를실시한다. SWx>enable SWx#erase startup-config Erasing the nvram filesystem will remove all configuration files Continue? [confirm] ( 엔터 ) [OK] Erase
[ 실습 ] 스위치장비초기화 1. NVRAM 에저장되어있는 'startup-config' 파일이있다면, 삭제를실시한다. SWx>enable SWx#erase startup-config Erasing the nvram filesystem will remove all configuration files Continue? [confirm] ( 엔터 ) [OK] Erase
PowerPoint 프레젠테이션
 (Host) set up : Linux Backend RS-232, Ethernet, parallel(jtag) Host terminal Target terminal : monitor (Minicom) JTAG Cross compiler Boot loader Pentium Redhat 9.0 Serial port Serial cross cable Ethernet
Oracle Database 11g R2 Installation Guide for RHEL5(x86) Writer : 이경호
 Writer : 이경호") Oracle Database 11g R2 Installation Guide for RHEL5(x86) Writer : 이경호 목차 1. 시스템구성... - 2-1.1. 개요... - 2-1.1.1. 정의... - 2-1.1.2. 목적... - 2-1.1.3. 환경... - 2-2. 준비사항... - 2-3. Oracle Install configuration...
Oracle Database 11g R2 Installation Guide for RHEL5(x86) Writer : 이경호 목차 1. 시스템구성... - 2-1.1. 개요... - 2-1.1.1. 정의... - 2-1.1.2. 목적... - 2-1.1.3. 환경... - 2-2. 준비사항... - 2-3. Oracle Install configuration...
Remote UI Guide
 Remote UI KOR Remote UI Remote UI PDF Adobe Reader/Adobe Acrobat Reader. Adobe Reader/Adobe Acrobat Reader Adobe Systems Incorporated.. Canon. Remote UI GIF Adobe Systems Incorporated Photoshop. ..........................................................
Splentec V-WORM Quick Installation Guide Version: 1.0 Contact Information 올리브텍 주소 : 경기도성남시분당구구미로 11 ( 포인트타운 701호 ) URL: E-M
 URL: E-M") Splentec V-WORM Quick Installation Guide Version: 1.0 Contact Information 올리브텍 주소 : 경기도성남시분당구구미로 11 ( 포인트타운 701호 ) URL: http://www.olivetech.co.kr E-Mail: tech@olivetech.co.kr TEL: 031-726-4217 FAX: 031-726-4219
Splentec V-WORM Quick Installation Guide Version: 1.0 Contact Information 올리브텍 주소 : 경기도성남시분당구구미로 11 ( 포인트타운 701호 ) URL: http://www.olivetech.co.kr E-Mail: tech@olivetech.co.kr TEL: 031-726-4217 FAX: 031-726-4219
Microsoft Word - ntasFrameBuilderInstallGuide2.5.doc
 NTAS and FRAME BUILDER Install Guide NTAS and FRAME BUILDER Version 2.5 Copyright 2003 Ari System, Inc. All Rights reserved. NTAS and FRAME BUILDER are trademarks or registered trademarks of Ari System,
본문서는 초급자들을 대상으로 최대한 쉽게 작성하였습니다. 본문서에서는 설치방법만 기술했으며 자세한 설정방법은 검색을 통하시기 바랍니다. 1. 설치개요 워드프레스는 블로그 형태의 홈페이지를 빠르게 만들수 있게 해 주는 프로그램입니다. 다양한 기능을 하는 플러그인과 디자인
 스마일서브 CLOUD_Virtual 워드프레스 설치 (WORDPRESS INSTALL) 스마일서브 가상화사업본부 Update. 2012. 09. 04. 본문서는 초급자들을 대상으로 최대한 쉽게 작성하였습니다. 본문서에서는 설치방법만 기술했으며 자세한 설정방법은 검색을 통하시기 바랍니다. 1. 설치개요 워드프레스는 블로그 형태의 홈페이지를 빠르게 만들수 있게
Microsoft PowerPoint - Linux_10gRAC_3Node
 Linux 환경에서 3 Node 10g RAC 구성및 Data 이관하기 일시 : 2006. 08. 10 Contents I. RAC 구성환경및전체순서 II. Volume 및 Server 환경 Setup III. CRS 및 DB S/W 설치 IV. CRS 및 DB S/W Patchset V. File-System DBF raw-device 이관 VI. Sinlge
Copyright 2012, Oracle and/or its affiliates. All rights reserved.,.,,,,,,,,,,,,.,...,. U.S. GOVERNMENT END USERS. Oracle programs, including any oper
 Windows Netra Blade X3-2B( Sun Netra X6270 M3 Blade) : E37790 01 2012 9 Copyright 2012, Oracle and/or its affiliates. All rights reserved.,.,,,,,,,,,,,,.,...,. U.S. GOVERNMENT END USERS. Oracle programs,
PWR PWR HDD HDD USB USB Quick Network Setup Guide xdsl/cable Modem PC DVR 1~3 1.. DVR DVR IP xdsl Cable xdsl Cable PC PC DDNS (
 PWR PWR HDD HDD USB USB Quick Network Setup Guide xdsl/cable Modem PC DVR 1~3 1.. DVR DVR IP xdsl Cable xdsl Cable PC PC DDNS (http://ddns.hanwha-security.com) Step 1~5. Step, PC, DVR Step 1. Cable Step
Assign an IP Address and Access the Video Stream - Installation Guide
 설치 안내서 IP 주소 할당 및 비디오 스트림에 액세스 책임 본 문서는 최대한 주의를 기울여 작성되었습니다. 잘못되거나 누락된 정보가 있는 경우 엑시스 지사로 알려 주시기 바랍니다. Axis Communications AB는 기술적 또는 인쇄상의 오류에 대해 책 임을 지지 않으며 사전 통지 없이 제품 및 설명서를 변경할 수 있습니다. Axis Communications
작성자 : saint Overview BackTrack 는 LILO 를부트로더로사용한다. BactTrack 을기본환경설정그대로설치하면부팅할수없는경우가있는데, 이것은실린더크기가 1024 보다큰하드디스크에설치하면 LILO 가 OS 를정상적으로읽어올수없기때문이다. 요즘나오는
 작성자 : saint Overview BackTrack 는 LILO 를부트로더로사용한다. BactTrack 을기본환경설정그대로설치하면부팅할수없는경우가있는데, 이것은실린더크기가 1024 보다큰하드디스크에설치하면 LILO 가 OS 를정상적으로읽어올수없기때문이다. 요즘나오는 LILO 는이문제를해결했다고하는데 (lba32 옵션을사용하면된다고한다 ), 불행히도 BackTrack
untitled
 Push... 2 Push... 4 Push... 5 Push... 13 Push... 15 1 FORCS Co., LTD A Leader of Enterprise e-business Solution Push (Daemon ), Push Push Observer. Push., Observer. Session. Thread Thread. Observer ID.
Microsoft PowerPoint Android-SDK설치.HelloAndroid(1.0h).pptx
.pptx") To be an Android Expert 문양세강원대학교 IT 대학컴퓨터학부 Eclipse (IDE) JDK Android SDK with ADT IDE: Integrated Development Environment JDK: Java Development Kit (Java SDK) ADT: Android Development Tools 2 JDK 설치 Eclipse
To be an Android Expert 문양세강원대학교 IT 대학컴퓨터학부 Eclipse (IDE) JDK Android SDK with ADT IDE: Integrated Development Environment JDK: Java Development Kit (Java SDK) ADT: Android Development Tools 2 JDK 설치 Eclipse
USB USB DV25 DV25 REC SRN-475S REC SRN-475S LAN POWER LAN POWER Quick Network Setup Guide xdsl/cable Modem PC DVR 1~3 1.. DVR DVR IP xdsl Cable xdsl C
 USB USB DV25 DV25 REC SRN-475S REC SRN-475S LAN POWER LAN POWER Quick Network Setup Guide xdsl/cable Modem PC DVR 1~3 1.. DVR DVR IP xdsl Cable xdsl Cable PC PC Step 1~5. Step, PC, DVR Step 1. Cable Step
bn2019_2
 arp -a Packet Logging/Editing Decode Buffer Capture Driver Logging: permanent storage of packets for offline analysis Decode: packets must be decoded to human readable form. Buffer: packets must temporarily
Solaris 10 (x86) Installation Guide for VMware 7 Writer : 이경호
 Installation Guide for VMware 7 Writer : 이경호") Solaris 10 (x86) Installation Guide for VMware 7 Writer : 이경호 목차 1. 시스템구성... - 2-1.1. 개요... - 2-1.1.1. 정의... - 2-1.1.2. 목적... - 2-1.1.3. 환경... - 2-2. 준비사항... - 2-3. Virtual Machine Setup... - 3-4. Solaris10
Solaris 10 (x86) Installation Guide for VMware 7 Writer : 이경호 목차 1. 시스템구성... - 2-1.1. 개요... - 2-1.1.1. 정의... - 2-1.1.2. 목적... - 2-1.1.3. 환경... - 2-2. 준비사항... - 2-3. Virtual Machine Setup... - 3-4. Solaris10
PowerPoint 프레젠테이션
 Install the PDI on CentOS 2013.04 G L O B E P O I N T 1 Ⅰ linux 구성 II Pentaho Install 2013, Globepoint Inc. All Rights Reserved. 2 I. Linux 구성 2013, Globepoint Inc. All Rights Reserved. 3 IP 설정 1. 설정파일
Copyright 2004 Sun Microsystems, Inc Network Circle, Santa Clara, CA U.S.A..,,. Sun. Sun. Berkeley BSD. UNIX X/Open Company, Ltd.. Sun, Su
 Java Desktop System 2 Sun Microsystems, Inc. 4150 Network Circle Santa Clara, CA 95054 U.S.A. : 817 7757 10 2004 9 Copyright 2004 Sun Microsystems, Inc. 4150 Network Circle, Santa Clara, CA 95054 U.S.A..,,.
Chapter 1
 3 Oracle 설치 Objectives Download Oracle 11g Release 2 Install Oracle 11g Release 2 Download Oracle SQL Developer 4.0.3 Install Oracle SQL Developer 4.0.3 Create a database connection 2 Download Oracle 11g
Microsoft PowerPoint SDK설치.HelloAndroid(1.5h).pptx
.pptx") To be an Android Expert 문양세강원대학교 IT 대학컴퓨터학부 개발환경구조및설치순서 JDK 설치 Eclipse 설치 안드로이드 SDK 설치 ADT(Androd Development Tools) 설치 AVD(Android Virtual Device) 생성 Hello Android! 2 Eclipse (IDE) JDK Android SDK with
To be an Android Expert 문양세강원대학교 IT 대학컴퓨터학부 개발환경구조및설치순서 JDK 설치 Eclipse 설치 안드로이드 SDK 설치 ADT(Androd Development Tools) 설치 AVD(Android Virtual Device) 생성 Hello Android! 2 Eclipse (IDE) JDK Android SDK with
SQL Developer Connect to TimesTen 유니원아이앤씨 DB 기술지원팀 2010 년 07 월 28 일 문서정보 프로젝트명 SQL Developer Connect to TimesTen 서브시스템명 버전 1.0 문서명 작성일 작성자
 SQL Developer Connect to TimesTen 유니원아이앤씨 DB 팀 2010 년 07 월 28 일 문서정보 프로젝트명 SQL Developer Connect to TimesTen 서브시스템명 버전 1.0 문서명 작성일 2010-07-28 작성자 김학준 최종수정일 2010-07-28 문서번호 20100728_01_khj 재개정이력 일자내용수정인버전
FlexCloud Linux Server 원격접속및볼륨확장매뉴얼 Date: Hostway IDC Corporation Copyright 2011 Hostway IDC Inc. All rights reserved. TEL: URL:
 FlexCloud Linux Server 원격접속및볼륨확장매뉴얼 Date: 2011.01.24 Hostway IDC Corporation 1 목차 1. Linux VM 원격접속... 3 가 ) WEB Console 사용... 3 나 ) SSH 접속프로그램사용... 3 2. Linux VM 볼륨확장... 5 가 ) Disk 확장방법 1 ( 새로운파티션에마운트
6. 설치가시작되는동안 USB 드라이버가자동으로로드됩니다. USB 드라이버가성공적으로로드되면 Setup is starting( 설치가시작되는중 )... 화면이표시됩니다. 7. 화면지침에따라 Windows 7 설치를완료합니다. 방법 2: 수정된 Windows 7 ISO
... 화면이표시됩니다. 7. 화면지침에따라 Windows 7 설치를완료합니다. 방법 2: 수정된 Windows 7 ISO") Windows 7 설치및 PCIE RAID 설정정보 DK173 초판 11월 2016 A. Windows 7 및 USB 드라이버설치 칩셋사양에따라 Windows 7 설치중에 USB 키보드 / 마우스를사용하려면시스템에서 USB 드라이버를사전로드해야합니다. 이절에서는 USB 드라이버사전로드방법과 Windows 7 설치방법에대해서설명합니다. 방법 1: SATA ODD
Windows 7 설치및 PCIE RAID 설정정보 DK173 초판 11월 2016 A. Windows 7 및 USB 드라이버설치 칩셋사양에따라 Windows 7 설치중에 USB 키보드 / 마우스를사용하려면시스템에서 USB 드라이버를사전로드해야합니다. 이절에서는 USB 드라이버사전로드방법과 Windows 7 설치방법에대해서설명합니다. 방법 1: SATA ODD
Mango220 Android How to compile and Transfer image to Target
 Mango220 Android How to compile and Transfer image to Target http://www.mangoboard.com/ http://cafe.naver.com/embeddedcrazyboys Crazy Embedded Laboratory www.mangoboard.com cafe.naver.com/embeddedcrazyboys
Microsoft Word - CNVZNGWAIYSE.docx
 Print Date: 2010-12-18 DATE : 2010-12-18 01:40 Writer : 박상수 License : 개인자료 CALMMASS.TISTORY.COM - 본문서는모든사람에게열람및수정모두가능합니다 - 버전수정일작성자변경내역 1.0 2010/12/16 박상수 Oracle Database 머신설치, Patch Set 설치, 1.5 2010/12/17
목차 제 1 장 inexio Touch Driver소개... 3 1.1 소개 및 주요 기능... 3 1.2 제품사양... 4 제 2 장 설치 및 실행... 5 2.1 설치 시 주의사항... 5 2.2 설치 권고 사양... 5 2.3 프로그램 설치... 6 2.4 하드웨
 최종 수정일: 2010.01.15 inexio 적외선 터치스크린 사용 설명서 [Notes] 본 매뉴얼의 정보는 예고 없이 변경될 수 있으며 사용된 이미지가 실제와 다를 수 있습니다. 1 목차 제 1 장 inexio Touch Driver소개... 3 1.1 소개 및 주요 기능... 3 1.2 제품사양... 4 제 2 장 설치 및 실행... 5 2.1 설치 시
Network seminar.key
 Intro to Network .. 2 4 ( ) ( ). ?!? ~! This is ~ ( ) /,,,???? TCP/IP Application Layer Transfer Layer Internet Layer Data Link Layer Physical Layer OSI 7 TCP/IP Application Layer Transfer Layer 3 4 Network
ODS-FM1
 OPTICAL DISC ARCHIVE FILE MANAGER ODS-FM1 INSTALLATION GUIDE [Korean] 1st Edition (Revised 4) 상표 Microsoft, Windows 및 Internet Explorer는 미국 및 / 또는 다른 국가에서 Microsoft Corporation 의 등록 상표입 Intel 및 Intel Core
chapter4
 Basic Netw rk 1. ก ก ก 2. 3. ก ก 4. ก 2 1. 2. 3. 4. ก 5. ก 6. ก ก 7. ก 3 ก ก ก ก (Mainframe) ก ก ก ก (Terminal) ก ก ก ก ก ก ก ก 4 ก (Dumb Terminal) ก ก ก ก Mainframe ก CPU ก ก ก ก 5 ก ก ก ก ก ก ก ก ก ก
슬라이드 1
 1 ORACLE DB Installation Guide 9i R2 OS : LINUX 4 x86 DB : ORACLE 9i R2 DB : (9.2.0.4) OS 파일명 : Enterprise-R4-U8-i386-dvd DB 파일명 : B1349(6,7,8)-01 작성자 : 정태준 문서 : v.002 작업날짜 : 2011.08.05 2 Version Management
Microsoft PowerPoint - 알고리즘_1주차_2차시.pptx
 Chapter 2 Secondary Storage and System Software References: 1. M. J. Folk and B. Zoellick, File Structures, Addison-Wesley. 목차 Disks Storage as a Hierarchy Buffer Management Flash Memory 영남대학교데이터베이스연구실
오라클 데이터베이스 10g 핵심 요약 노트
 1 10g 10g SYSAUX 10g 22 Oracle Database 10g, 10g. 10g. (Grid), 10g.. 10g SYSAUX (ASM, Automatic Storage Management) 10g 10g. g. (DBA).,., 1).,..? 10g,.. (Larry Ellison).. (Leverage Components), (ASM) (
목차 BUG offline replicator 에서유효하지않은로그를읽을경우비정상종료할수있다... 3 BUG 각 partition 이서로다른 tablespace 를가지고, column type 이 CLOB 이며, 해당 table 을 truncate
 ALTIBASE HDB 6.1.1.5.6 Patch Notes 목차 BUG-39240 offline replicator 에서유효하지않은로그를읽을경우비정상종료할수있다... 3 BUG-41443 각 partition 이서로다른 tablespace 를가지고, column type 이 CLOB 이며, 해당 table 을 truncate 한뒤, hash partition
PowerPoint 프레젠테이션
 임베디드리눅스개발환경실습 Jo, Heeseung 타겟보드모니터링동작실습 호스트 PC 에서시리얼포트를통해서타겟보드를모니터링 타겟보드가프로그램을실행하는동안일어나는일을시리얼포트로메시지를출력하면호스트 PC 에서는시리얼포트를통해메시지를수신하여이를화면에출력 minicom 프로그램사용 - minicom 이정상적으로설정이되고, 타겟보드에최소한부트로더가올라간상태라면 minicom
MySQL-Ch10
 10 Chapter.,,.,, MySQL. MySQL mysqld MySQL.,. MySQL. MySQL....,.,..,,.,. UNIX, MySQL. mysqladm mysqlgrp. MySQL 608 MySQL(2/e) Chapter 10 MySQL. 10.1 (,, ). UNIX MySQL, /usr/local/mysql/var, /usr/local/mysql/data,
4. 스위치재부팅을실시한다. ( 만약, Save 질문이나오면 'no' 를실시한다.) SWx#reload System configuration has been modified. Save? [yes/no]: no Proceed with reload? [confirm] (
![4. 스위치재부팅을실시한다. ( 만약, Save 질문이나오면 'no' 를실시한다.) SWx#reload System configuration has been modified. Save? [yes/no]: no Proceed with reload? [confirm] (](/thumbs/91/104875642.jpg "4. 스위치재부팅을실시한다. ( 만약, Save 질문이나오면 'no' 를실시한다.) SWx#reload System configuration has been modified. Save? [yes/no]: no Proceed with reload? [confirm] (") [ 실습 ] 스위치장비초기화 1. NVRAM 에저장되어있는 'startup-config' 파일이있다면, 삭제를실시한다. SWx>enable SWx#erase startup-config Erasing the nvram filesystem will remove all configuration files Continue? [confirm] ( 엔터 ) [OK] Erase
[ 실습 ] 스위치장비초기화 1. NVRAM 에저장되어있는 'startup-config' 파일이있다면, 삭제를실시한다. SWx>enable SWx#erase startup-config Erasing the nvram filesystem will remove all configuration files Continue? [confirm] ( 엔터 ) [OK] Erase
주식회사커브 Oracle 12c CentOS 7 에설치 이문서는 Atlassian 제품군을설치하기위한 Oracle 12c 를 CentOS 7 에설치하는방법에대한가이드를공유하기위해작성되었다. Version OS : Cent OS 7 64bit DB : Oracle 12c
 Oracle 12c CentOS 7 에설치 이문서는 Atlassian 제품군을설치하기위한 Oracle 12c 를 CentOS 7 에설치하는방법에대한가이드를공유하기위해작성되었다. Version OS : Cent OS 7 64bit DB : Oracle 12c R2(12.2.0.1.0) prerequisites: swap 5G 공간추천 오라클설치 패키지설치 Oracle
<C0CCBCBCBFB52DC1A4B4EBBFF82DBCAEBBE7B3EDB9AE2D313939392D382E687770>
 i ii iii iv v vi 1 2 3 4 가상대학 시스템의 국내외 현황 조사 가상대학 플랫폼 개발 이상적인 가상대학시스템의 미래상 제안 5 웹-기반 가상대학 시스템 전통적인 교수 방법 시간/공간 제약을 극복한 학습동기 부여 교수의 일방적인 내용전달 교수와 학생간의 상호작용 동료 학생들 간의 상호작용 가상대학 운영 공지사항,강의록 자료실, 메모 질의응답,
Install stm32cubemx and st-link utility
 STM32CubeMX and ST-LINK Utility for STM32 Development 본문서는 ST Microelectronics 의 ARM Cortex-M 시리즈 Microcontroller 개발을위해제공되는 STM32CubeMX 와 STM32 ST-LINK Utility 프로그램의설치과정을설명합니다. 본문서는 Microsoft Windows 7
McAfee Email Security Virtual Appliance 5.6 설치 안내서
 McAfee Email Security Virtual Appliance 5.6 설치 안내서 저작권 Copyright 2011 McAfee, Inc. All Rights Reserved. 이 문서의 어떠한 부분도 McAfee, Inc. 또는 그 제공업체나 계열 회사의 명시적인 서명 승인 없이는 어떠한 형식이나 수단으로도 검색 시스템에 복제, 전송, 기록되거나
목차 1. 시스템구성 개요 정의 목적 환경 준비사항 Oracle Install configuration Xshell 에
 Oracle Database 8i R1 Installation Guide for RHEL3(x86) Writer : 이경호 목차 1. 시스템구성... - 2-1.1. 개요... - 2-1.1.1. 정의... - 2-1.1.2. 목적... - 2-1.1.3. 환경... - 2-2. 준비사항... - 2-3. Oracle Install configuration...
NTD36HD Manual
 Upnp 사용 D7 은 UPNP 를지원하여 D7 의네크워크에연결된 UPNP 기기에별다른설정없이연결하여, 유무선으로네트워크상의연결된 UPNP 기기의콘텐츠를재생할수있습니다. TV 화면의 브라우저, UPNP 를선택하면연결가능한 UPNP 기기가표시됩니다. 주의 - UPNP 기능사용시연결된 UPNP 기기의성능에따라서재생되지않는콘텐츠가있을수있습니다. NFS 사용 D7
K_R9000PRO_101.pdf
 GV-R9000 PRO Radeon 9000 PRO Upgrade your Life REV 101 GV-R9000 PRO - 2-2002 11 1 12 ATi Radeon 9000 PRO GPU 64MB DDR SDRAM 275MHz DirectX 81 SMARTSHADER ATI SMOOTHVISION 3D HYDRAVISION ATI CATLYST DVI-I
운영체제실습_명령어
 운영체제실습 리눅스네트워크기본개념및설정 서 기옥 Contents 네트워크용어정의 IP 주소 네트워크기본명령어 네트워크관리명령어 네트워크설정파일 telnet 서버설정 네트워크용어정의 네트워크 (Network) : 전자적으로데이터를주고받기위한목적으로연결된 2 개이상의컴퓨터시스템 IP 주소와 Ethernet 주소 IP 주소 : 네트워크에연결된시스템을구분하는소프트웨어적인주소
GNU/Linux 1, GNU/Linux MS-DOS LOADLIN DOS-MBR LILO DOS-MBR LILO... 6
 GNU/ 1, qkim@pecetrirekr GNU/ 1 1 2 2 3 4 31 MS-DOS 5 32 LOADLIN 5 33 DOS- LILO 6 34 DOS- 6 35 LILO 6 4 7 41 BIOS 7 42 8 43 8 44 8 45 9 46 9 47 2 9 5 X86 GNU/LINUX 10 1 GNU/, GNU/ 2, 3, 1 : V 11, 2001
MF5900 Series MF Driver Installation Guide
 한국어 MF 드라이버설치설명서 사용자소프트웨어 CD-ROM................................................ 1.................................................................... 1..............................................................................
Pacemaker/Corosync 클러스터에서 GFS2구성
 2019/07/09 23:42 1/2 Pacemaker/Corosync 클러스터에서 GFS2 구성 목차 Pacemaker/Corosync 클러스터에서 GFS2구성... 1 작업개요... 1 구성환경... 1 패키지설치... 2 Clustered Locking LVM사용... 2 DLM 및 CLVMD 클러스터리소스작성... 3 리소스순서및코로케이션... 4 LVM
Microsoft Word - windows server 2003 수동설치_non pro support_.doc
 Windows Server 2003 수동 설치 가이드 INDEX 운영체제 설치 준비과정 1 드라이버를 위한 플로피 디스크 작성 2 드라이버를 위한 USB 메모리 작성 7 운영체제 설치 과정 14 Boot Sequence 변경 14 컨트롤러 드라이버 수동 설치 15 운영체제 설치 17 운영체제 설치 준비 과정 Windows Server 2003 에는 기본적으로
1. GigE Camera Interface를 위한 최소 PC 사양 CPU : Intel Core 2 Duo, 2.4GHz이상 RAM : 2GB 이상 LANcard : Intel PRO/1000xT 이상 VGA : PCI x 16, VRAM DDR2 RAM 256MB
 Revision 1.0 Date 11th Nov. 2013 Description Established. Page Page 1 of 9 1. GigE Camera Interface를 위한 최소 PC 사양 CPU : Intel Core 2 Duo, 2.4GHz이상 RAM : 2GB 이상 LANcard : Intel PRO/1000xT 이상 VGA : PCI x
문서 제목
 1 : Oracle9i JRE(Java Runtime Environment) OUI(Oracle Universal Installer) OS 25MB Memory 512 MB RAM # grep MemTotal /proc/meminfo Swap Space RAM 2 400 MB # /sbin/swapon s CD-ROM Drive Disk Space Temporary
PowerPoint 프레젠테이션
 Deep Learning 작업환경조성 & 사용법 ISL 안재원 Ubuntu 설치 작업환경조성 접속방법 사용예시 2 - ISO file Download www.ubuntu.com Ubuntu 설치 3 - Make Booting USB Ubuntu 설치 http://www.pendrivelinux.com/universal-usb-installer-easy-as-1-2-3/
PowerPoint 프레젠테이션
 Ubuntu 13.04 설치매뉴얼 작성일자 : 2013.05 cafe24 IDC 사업팀 설치이미지부팅 1. Ubuntu CD(DVD) 를넣고해당미디어로부팅을시킵니다. 2. 처음설치화면에서한국어를선택합니다. Ubuntu 설치 1. 우분투서버설치를선택합니다. 번역안내 1. 한국어설정에대한안내화면이출력됩니다. 아직은번역이완벽하지않다는내용임으로 무시하고 < 예 >
Solaris 9 (x86) Installation Guide for VMware 7 Writer : 이경호
 Installation Guide for VMware 7 Writer : 이경호") Solaris 9 (x86) Installation Guide for VMware 7 Writer : 이경호 목차 1. 시스템구성... - 2-1.1. 개요... - 2-1.1.1. 정의... - 2-1.1.2. 목적... - 2-1.1.3. 환경... - 2-2. 준비사항... - 2-3. Virtual Machine Setup... - 3-4. Solaris9
Solaris 9 (x86) Installation Guide for VMware 7 Writer : 이경호 목차 1. 시스템구성... - 2-1.1. 개요... - 2-1.1.1. 정의... - 2-1.1.2. 목적... - 2-1.1.3. 환경... - 2-2. 준비사항... - 2-3. Virtual Machine Setup... - 3-4. Solaris9
DE1-SoC Board
 실습 1 개발환경 DE1-SoC Board Design Tools - Installation Download & Install Quartus Prime Lite Edition http://www.altera.com/ Quartus Prime (includes Nios II EDS) Nios II Embedded Design Suite (EDS) is automatically
PCServerMgmt7
 Web Windows NT/2000 Server DP&NM Lab 1 Contents 2 Windows NT Service Provider Management Application Web UI 3 . PC,, Client/Server Network 4 (1),,, PC Mainframe PC Backbone Server TCP/IP DCS PLC Network
Windows 네트워크 사용 설명서
 Windows 네트워크 사용 설명서 (Wireless Manager mobile edition 5.5) 그림의 예로 사용된 프로젝터는 PT-FW300NTEA 입니다. 한국어 TQBH0205-5 (K) 목차 소프트웨어 라이센스 계약 3 무선 연결 사용 시 참고 사항 4 보안 관련 참고 사항 6 소프트웨어 요구 사항 12 시스템 요구 사항 12 Wireless
ARMBOOT 1
 100% 2003222 : : : () PGPnet 1 (Sniffer) 1, 2,,, (Sniffer), (Sniffer),, (Expert) 3, (Dashboard), (Host Table), (Matrix), (ART, Application Response Time), (History), (Protocol Distribution), 1 (Select
R50_51_kor_ch1
 S/N : 1234567890123 Boot Device Priority NumLock [Off] Enable Keypad [By NumLock] Summary screen [Disabled] Boor-time Diagnostic Screen [Disabled] PXE OPROM [Only with F12]
PowerChute Personal Edition v3.1.0 에이전트 사용 설명서
 PowerChute Personal Edition v3.1.0 990-3772D-019 4/2019 Schneider Electric IT Corporation Schneider Electric IT Corporation.. Schneider Electric IT Corporation,,,.,. Schneider Electric IT Corporation..
Windows 8에서 BioStar 1 설치하기
 / 콘텐츠 테이블... PC에 BioStar 1 설치 방법... Microsoft SQL Server 2012 Express 설치하기... Running SQL 2012 Express Studio... DBSetup.exe 설정하기... BioStar 서버와 클라이언트 시작하기... 1 1 2 2 6 7 1/11 BioStar 1, Windows 8 BioStar
무시하고진행합니다. $ sudo rootstock -d precise --seed ubuntu-standard -x en_us.utf-8 -f ubuntu -l ubuntu -p ubuntu -i 2G I: Running on a x86_64 machine I: Cre
 ( 망고 220 ubuntu 포팅 ) $ wget http://launchpadlibrarian.net/52888742/rootstock_0.1.99.4-0ubuntu1_i386.deb --2014-09-23 18:02:26-- http://launchpadlibrarian.net/52888742/rootstock_0.1.99.4-0ubuntu1_i386.deb
공개 SW 기술지원센터
 - 1 - 일자 VERSION 변경내역작성자 2007. 8. 27 0.1 초기작성손명선 - 2 - 1. 문서개요 4 가. 문서의목적 4 나. 본문서의사용방법 4 2. 테스트절차내역 5 가. Encluster HA 설치테스트 5 나. OCFS2 설치테스트 6 다. Oracle 10g 설치테스트 8 라. MySQL 설치테스트 14 마. Encluster HA 구동테스트
Sun Java System Messaging Server 63 64
 Sun Java System Messaging Server 6.3 64 Sun Java TM System Communications Suite Sun Microsystems, Inc. 4150 Network Circle Santa Clara, CA 95054 U.S.A. : 820 2868 2007 7 Copyright 2007 Sun Microsystems,
Windows Server 8
 Windows Server 8 Configuring a Highly Available iscsi Target 본문서에서는, 공유저장소를사용하여클러스터를구축하고, 구축된클러스터에 iscsi high-availability 인스턴스를생성합니다. 이러한환경에서, 클러스터 failover 동안에어플리케이션 IO 가중단없이지속적으로사용가능한지확인합니다. 이동철부장 2012-03-05
Document Server Information Items Description Last Edit Date 2011 / 06 / 13 CPU Intel(R) Xeon(R) CPU 2.40GHz X 8 Main Memory 4GB O/S version O
 Xeon(R) CPU 2.40GHz X 8 Main Memory 4GB O/S version O") Enterprise Manager Grid Control (11g R1 11.1) Author: Hyun-Ho, Jung Creation Date: 2011-06-18 JOB: Oracle DBA Site: http://www.commit.co.kr Email: admin@commit.co.kr cleanto@naver.com Document Server Information
Enterprise Manager Grid Control (11g R1 11.1) Author: Hyun-Ho, Jung Creation Date: 2011-06-18 JOB: Oracle DBA Site: http://www.commit.co.kr Email: admin@commit.co.kr cleanto@naver.com Document Server Information
05Àå
 CHAPTER 05 NT,, XP,. NT NTFS, XP. D,,. XP x NT,,, ( x, x ). NT/ /XP,.. PC NT NT. + Guide to Software: Understanding and Installing Windows 2000 and Windows NT + SOFTWARE Guide to Software 3/e SOFTWARE
TTA Verified : HomeGateway :, : (NEtwork Testing Team)
") TTA Verified : HomeGateway :, : (NEtwork Testing Team) : TTA-V-N-05-006-CC11 TTA Verified :2006 6 27 : 01 : 2005 7 18 : 2/15 00 01 2005 7 18 2006 6 27 6 7 9 Ethernet (VLAN, QoS, FTP ) (, ) : TTA-V-N-05-006-CC11
TTA Verified : HomeGateway :, : (NEtwork Testing Team) : TTA-V-N-05-006-CC11 TTA Verified :2006 6 27 : 01 : 2005 7 18 : 2/15 00 01 2005 7 18 2006 6 27 6 7 9 Ethernet (VLAN, QoS, FTP ) (, ) : TTA-V-N-05-006-CC11
vm-웨어-01장
 Chapter 16 21 (Agenda). (Green),., 2010. IT IT. IT 2007 3.1% 2030 11.1%, IT 2007 1.1.% 2030 4.7%, 2020 4 IT. 1 IT, IT. (Virtualization),. 2009 /IT 2010 10 2. 6 2008. 1970 MIT IBM (Mainframe), x86 1. (http
28 THE ASIAN JOURNAL OF TEX [2] ko.tex [5]
![28 THE ASIAN JOURNAL OF TEX [2] ko.tex [5]](/thumbs/91/105270926.jpg "28 THE ASIAN JOURNAL OF TEX [2] ko.tex [5]") The Asian Journal of TEX, Volume 3, No. 1, June 2009 Article revision 2009/5/7 KTS THE KOREAN TEX SOCIETY SINCE 2007 2008 ko.tex Installing TEX Live 2008 and ko.tex under Ubuntu Linux Kihwang Lee * kihwang.lee@ktug.or.kr
The Asian Journal of TEX, Volume 3, No. 1, June 2009 Article revision 2009/5/7 KTS THE KOREAN TEX SOCIETY SINCE 2007 2008 ko.tex Installing TEX Live 2008 and ko.tex under Ubuntu Linux Kihwang Lee * kihwang.lee@ktug.or.kr
Integ
 HP Integrity HP Chipset Itanium 2(Processor 9100) HP Integrity HP, Itanium. HP Integrity Blade BL860c HP Integrity Blade BL870c HP Integrity rx2660 HP Integrity rx3600 HP Integrity rx6600 2 HP Integrity
Mars OS 1.0.2 System Administration Guide
 Mars OS 1.0.2 시스템 관리 가이드 NetApp, Inc. www.netapp.com/kr 부품 번호:215-09731_A0 2015년 2월 4일 수요일 2 목차 목차 Mars OS 정보 12 Mars OS의 기능 13 고성능 13 업계 최고의 스토리지 효율성 13 시스템 모니터링 13 비휘발성 메모리를 사용하여 안정성 및 성능 향상 13 클러스터링
ICAS CADWorx SPLM License 평가판설치가이드
 ICAS CADWorx SPLM License 평가판설치가이드 CADWorx SPLM License 평가판설치가이드 설치권장사항 Operating System Compatibility ( 반드시 AutoCAD 가설치되어있어야합니다.) 추천시스템 3.0 GHz Intel Pentium IV or greater Windows XP Professional or later
Copyright 0, Oracle and/or its affiliates. All rights reserved.,.,,,,,,,,,,,,.,...,. U.S. GOVERNMENT RIGHTS Programs, software, databases, and related
 Virtual Machine Sun Fire X4800 M : E4570 0 8 Copyright 0, Oracle and/or its affiliates. All rights reserved.,.,,,,,,,,,,,,.,...,. U.S. GOVERNMENT RIGHTS Programs, software, databases, and related documentation
목차 1. 시스템요구사항 암호및힌트설정 ( 윈도우 ) JetFlash Vault 시작하기 ( 윈도우 ) JetFlash Vault 옵션 ( 윈도우 )... 9 JetFlash Vault 설정... 9 JetFlash Vault
 JetFlash Vault 시작하기 ( 윈도우 ) JetFlash Vault 옵션 ( 윈도우 )... 9 JetFlash Vault 설정... 9 JetFlash Vault") 사용자매뉴얼 JetFlash Vault 100 ( 버전 1.0) 1 목차 1. 시스템요구사항... 3 2. 암호및힌트설정 ( 윈도우 )... 3 3. JetFlash Vault 시작하기 ( 윈도우 )... 7 4. JetFlash Vault 옵션 ( 윈도우 )... 9 JetFlash Vault 설정... 9 JetFlash Vault 찾아보기... 10 JetFlash
사용자매뉴얼 JetFlash Vault 100 ( 버전 1.0) 1 목차 1. 시스템요구사항... 3 2. 암호및힌트설정 ( 윈도우 )... 3 3. JetFlash Vault 시작하기 ( 윈도우 )... 7 4. JetFlash Vault 옵션 ( 윈도우 )... 9 JetFlash Vault 설정... 9 JetFlash Vault 찾아보기... 10 JetFlash
AKG 설 맞이 사내 특판 이벤트
 ORACLE RAC 설치매뉴얼 (11g+HACMP 6.1+RAWDEVICE) OTS 유명수, 정명호 2015.08.04 Contents 1. HACMP 설치 2. HACMP 설정 3. 사전준비사항 4. Grid 설치 5. DB 엔진설치 6. DB 생성 7. 설치확인및설정사항 1. HACMP 설치 (1/5) HACMP S/W 를특정디렉토리에압축해제 smit installp
시스코 무선랜 설치운영 매뉴얼(AP1200s_v1.1)
") [ Version 1.3 ] Access Point,. Access Point IP 10.0.0.1, Subnet Mask 255.255.255.224, DHCP Client. DHCP Server IP IP,, IP 10.0.0.X. (Tip: Auto Sensing Straight, Cross-over.) step 1]. step 2] LAN. step
[ Version 1.3 ] Access Point,. Access Point IP 10.0.0.1, Subnet Mask 255.255.255.224, DHCP Client. DHCP Server IP IP,, IP 10.0.0.X. (Tip: Auto Sensing Straight, Cross-over.) step 1]. step 2] LAN. step
(SW3704) Gingerbread Source Build & Working Guide
 Gingerbread Source Build & Working Guide") (Mango-M32F4) Test Guide http://www.mangoboard.com/ http://cafe.naver.com/embeddedcrazyboys Crazy Embedded Laboratory www.mangoboard.com cafe.naver.com/embeddedcrazyboys CRZ Technology 1 Document History
(Mango-M32F4) Test Guide http://www.mangoboard.com/ http://cafe.naver.com/embeddedcrazyboys Crazy Embedded Laboratory www.mangoboard.com cafe.naver.com/embeddedcrazyboys CRZ Technology 1 Document History
vm-웨어-앞부속
 VMware vsphere 4 This document was created using the official VMware icon and diagram library. Copyright 2009 VMware, Inc. All rights reserved. This product is protected by U.S. and international copyright
Portal_9iAS.ppt [읽기 전용]
![Portal_9iAS.ppt [읽기 전용]](/thumbs/104/163081918.jpg "Portal_9iAS.ppt [읽기 전용]") Application Server iplatform Oracle9 A P P L I C A T I O N S E R V E R i Oracle9i Application Server e-business Portal Client Database Server e-business Portals B2C, B2B, B2E, WebsiteX B2Me GUI ID B2C
Application Server iplatform Oracle9 A P P L I C A T I O N S E R V E R i Oracle9i Application Server e-business Portal Client Database Server e-business Portals B2C, B2B, B2E, WebsiteX B2Me GUI ID B2C
Oracle Regular Expression
 Installing Oracle Cloud Control 12c on Oracle Linux 6.1 SEUNGCHEOL HAN 설치에앞서 현재설치과정은 Oracle Linux Enterprise 6.1 (64bit) 에서진행됩니다. Oracle Cloud Control 12c 설치를위해 Repository DB 로사용할 Oracle 11g R2 (11.2.0.3)