SOLARIS 10 INSTALLATION
|
|
|
- 덕화 변
- 4 years ago
- Views:
Transcription
1 - 1 -

2 NOTICE l l l l l l l l - 2 -
3 네트워크설정 1.1 기본네트워크설정 IP 설정 Defaultrouter 설정 DNS Client 설정 1.2 네트워크작업시나리오 호스트이름변경작업 IP 변경작업 NIC 카드추가 서버이전 2. 디렉토리구조 2.1 /(root) 하위디렉토리 2.2 /dev 하위디렉토리 2.3 /etc 하위디렉토리 2.4 /kernel 하위디렉토리 2.5 /platform 하위디렉토리 2.6 /var 하위디렉토리 2.7 /usr 하위디렉토리 3. 로컬디스크디바이스관리 3.1 물리적인디스크의구조 3.2 디스크슬라이스 3.3 디스크이름주는규칙방식 3.4 솔라리스디스크디바이스이름 3.5 디바이스이름목록확인 3.6 디바이스재인식과정 3.7 format 명령어를통한파티션작업 4. 파일시스템관리 4.1 파일시스템이란? 4.2 솔라리스파일시스템종류 디스크에기반한파일시스템 분산파일시스템 가상파일시스템 4.3 UFS 파일시스템의구조 Disk Label bootblk Super Block Cylinder Group Block Inodes Data Blocks 4.4 newfs CMD 4.5 Minfree 4.6 파일시스템점검 fsck CMD 4.7 파일시스템모니터링 df CMD du CMD quot CMD
4 마운트 & 언마운트 5.1 마운트확인 5.2 장치마운트 마운트에관련한파일들 /etc/mnttab /etc/vfstab 마운트에관련한명령어 mount CMD umount CMD mountall CMD umountall CMD 5.3 트러블슈팅 5.4 이동장치마운트 볼륨관리개요 vold 데몬관리 CD-ROM 사용 Floppy 사용 vold 데몬이떠있지않은경우 vold 데몬이떠있는경우 트러블슈팅 ISO 이미지마운트 USB 마운트 6. 패키지관리 6.1 프로그램설치방법의종류 6.2 패키지관련파일들 6.3 패키지관련명령어 6.4 패키지추가 / 삭제실습 6.5 패키지형식변경 7. 패치관리 7.1 패치개요 7.2 솔라리스패치의종류 7.3 패치관련문서들 7.4 패치명령어 7.5 패치추가 / 삭제실습 8. 부팅과정 9. 사용자 / 그룹관리 9.1 사용자정보파일 /etc/passwd 파일 /etc/shadow 파일 9.2 그룹정보파일 /etc/group 파일 9.3 사용자관리명령어 useradd CMD usermod CMD userdel CMD 9.4 그룹관리명령어 groupadd CMD groupmod CMD groupdel CMD 9.5 사용자확장관리 smuser CMD smgroup CMD
5 보안관련파일 10.1 /etc/default/login 파일 CONSOLE 변수 PASSREQ 변수 10.2 /etc/default/passwd 파일 PASSLENGTH 변수 10.3 /etc/default/su 파일 SULOG 변수 10.4 /var/adm/loginlog 파일 10.5 솔라리스 10 버전의새로운기능 패스워드히스토리점검 패스워드길이변경 사용자락 (Lock) 11. 스케줄링 11.1 at CMD at 작업선언 at 작업확인 at 작업삭제 11.2 crontab CMD crontab 작업전환경설정 crontab 작업 crontab 명령어접근제어 12. 백업과복구 12.1 백업개요 12.2 백업과복구명령어의종류 12.3 백업매체 12.4 백업매체제어명령어 12.5 백업정책 12.6 백업과복구 ufsdump CMD ufsrestore CMD 12.7 스냅샷 스냅샷개요 fssnap 명령어 스냅샷실습
6 Solaris 10 Admin I Guide INDEX l l l l l l l l l l l l Network Configuration Directory Hierarchy Managing Local Disk Devices Managing Filesystems Mount & Umount Package Administration Patch Administration Boot Sequence User/Group Administration System Security Job Scheduling Backup & Recovery - 6 -
7 Solaris 10 Admin I Guide 1. Network Configuration l Network Configuration l l l IP Configuration Defaultrouter Configuration DNS Client Configuration l Network Scenario l l l l Hostname Chaing IP Chaing NIC Add Server Migration 네트워크인터페이스관리 (Administering Network Interfaces) 네트워크인터페이스 (Network Interface) l Physical Interface (EX: e1000g0) l Logical Interface(= Virtual Interface) (EX: e1000g0:1) [ 참고 ] NIC(Network Interface Card) Network interfaces provide the connection between a system and a network. A Solaris OS-based system can have two types of interfaces, physical and logical. Physical interfaces consist of a software driver and a connector into which you connect network media, such as an Ethernet cable. Physical interfaces can be grouped for administrative or availability purposes. Logical interfaces are configured onto existing physical interfaces, usually for adding addresses and creating tunnel endpoints on the physical interfaces. 네트워크인터페이스는시스템과네트워크사이에연결을담당하게된다. 솔라리스운영체제기반의시스템은 2 가지타입의인터페이스를가지게된다. 물리적인또는논리적인인터페이스다. 물리적인인터페이스는소프트웨어드라이버와네트워크매체 (Ethernet Cable 과같은 ) 에연결하는커넥터 (Connector) 로구성된다. 물리적인인터페이스는관리상또는사용가능한목적에따라그룹화된다. 논리적인인터페이스는현재존재하는물리적인인터페이스에설정된다. 일반적으로물리적인인터페이스위에추가적인주소추가나, 종단의터널을구성할때사용한다
8 Most computer systems have at least one physical interface that is built-in by the manufacturer on the main system board. Some systems can also have more than one built-in interface. 대부분의시스템에서최소한하나의물리적인인터페이스가존재한다. 이것은시스템보드제조업자에의해서만들어진다. 때론하나이상의인터페이스가존재하는경우도있다. In addition to built-in interfaces, you can add separately purchased interfaces to a system. A separately purchased interface is known as a network interface card (NIC). You physically install a NIC according to the manufacturer's instructions. 추가적인인터페이스는시스템에추가로구분하여구매할수있다. 구분되어진추가인터페이스를네트워크인터페이스카드 (NIC) 라고부른다. 제조업자의명령에따라물리적인 NIC 를추가하게된다. During system installation, the Solaris installation program detects any interfaces that are physically installed and displays each interface's name. You must configure at least one interface from the list of interfaces. The first interface to be configured during installation becomes the primary network interface. The IP address of the primary network interface is associated with the configured host name of the system, which is stored in the /etc/nodename file. However, you can configure any additional interfaces during installation or later. 시스템설치시에솔라리스설치프로그램은물리적으로추가된인터페이스를검색하고, 각인터페이스의이름을출력한다. 관리자는이러한인테페이스의목록중에서최소한한개를설정해야한다. 첫번째인터페이스설치세에설정하게된다. 주네트워크인터페이스의 IP 주소는시스템의이름으로설정맵핑이된다. 이이름은 /etc/nodename 파일에저장된다. 하지만관리자는설치할때또는이후에어떤인터페이스던지설정할수있다. 네트워크인터페이스이름 (Network Interface Names) Each physical interface is identified by a unique device name.device names have the following syntax: <driver-name><instance-number> ( 예 ) eri0, eri1, eri2,... hme0, hme1, hme2,... pcn0, pcn1, pcn2,... e1000g0, e1000g1, e1000g2,... Driver names on Solaris systems could include ce, hme, bge, e1000g and many other driver names. The variable instance-number can have a value from zero to n, depending on how many interfaces of that driver type are installed on the system. 솔라리스시스템에서디바이스드라이버의이름이 ce, hme, bge, e1000g 등많은드라이버의이름이존재한다. 시스템에설치된드라이버에따라서인스턴스번호 (Instance Number) 가 0 부터 N 까지결정된다. For example, consider a 100BASE-TX Fast Ethernet interface, which is often used as the primary network interface on both host systems and server systems. Some typical driver names for this interface are eri, qfe, and hme. When used as the primary network interface, the Fast Ethernet interface has a device name such as eri0 or qfe0. 예를들어 100BASE-TX Fast Ethernet 인터페이스는서버나호스트시스템에서주네트워크인터페이스 (Primary Network Interface) 로서자주사용된다. 때때로전형적인드라이버의이름으로 eri, qfe, hme 등이있다. NICs such as eri and hme have only one interface. However, many brands of NICs have multiple interfaces. For example, the Quad Fast Ethernet (qfe) card has four interfaces, qfe0 through qfe3. eri, hme 와같은 NIC 는하나의인터페이스만존재한다. 그러나여러개의인터페이스를가지고많은대역폭을줄수있따. 예를들어 Quad Fast Ethernet(qfe) Card 는 4 개의인터페이스를가진다. qfe
9 [ 참고 ] 네트워크인터페이스의 Instance Name 리눅스시스템에서는 NIC 의이름은 NIC 카드의벤더나카드와상관없이일정한이름을가지고있다. 하지만솔라리스시스템은 NIC 벤더회사마다, 또는제품의종류에따라서이름이틀리다. 썬에서출시된 NIC 도종류가여러가지이기때문에, NIC Instance Name 이다틀리다. /etc/hostname.xxxn 파일의종류 (Linux) NIC > eth0, eth1,... NIC2 NIC3... (Solaris) NIC > pcn0, pcn1,... NIC > elxl0, elxl1,... NIC > rtls0, rtls1, 솔라리스에서는네트워크인터페이스파일에대한 IP 설정은 /etc/hostname.xxn 파일가지고설정하게된다. 다음은 /etc/hostname.xxn 파일의종류를나타낸다. /etc/hostname.xxxn /etc/hostname.le0 (10M, Lance Ethernet) /etc/hostname.hme0 (10M/100M) /etc/hostname.qfe0 (800M/Giga,2G Quadfast Ethernet) /etc/hostname.eri0 (eri Fast-Ethernet) /etc/hostname.ce0 (Cassini Gigabit-Ethernet) /etc/hostname.e1000g0 (Intel PRO/1000 Gigabit family Ethernet) /etc/hostname.bge0 (Broadcom Gigabit Ethernet) /etc/hostname.nge0 (Nvidia Gigabit Ethernet) [ 참고 ] Network Interface Instance Name(Solaris 10 기준 ) NIC Description bge - SUNW,bge Gigabit Ethernet driver for Broadcom BCM57xx nge - Nvidia Gigabit Ethernet driver ce - Cassini Gigabit-Ethernet device driver chxge - Chelsio Ethernet network interface controllers dmfe - Davicom Fast Ethernet driver for Davicom DM9102A dnet - Ethernet driver for DEC 21040, 21041, Ethernet cards e1000g - Intel PRO/1000 Gigabit family device driver elxl - 3Com Ethernet device driver eri - eri Fast-Ethernet device driver ge - GEM Gigabit-Ethernet device driver hme - SUNW,hme Fast-Ethernet device driver ipge - PCI-E Gigabit-Ethernet device driver for Intel 82571?based ethernet controller. ixgb - SUNWixgb, 10 Gigabit Ethernet driver for Intel 82597ex controllers and Sun Kirkwood adapters nge - Nvidia ck8-04 Gigabit Ethernet driver nxge - Sun 10/1 Gigabit Ethernet network driver pcelx - 3COM EtherLink III PCMCIA Ethernet Adapter pcn - AMD PCnet Ethernet controller device driver(pcn0, pcn1 -> e1000g0, e1000g1.) qfe - SUNW,qfe Quad Fast-Ethernet device driver rge - Realtek Gigabit Ethernet Network Adapter driver rtls - Realtek Fast Ethernet 8139?based network interface controllers sk98sol - SysKonnect Gigabit Ethernet SK-98xx device driver spwr - SMC EtherPower II 10/100 (9432) Ethernet device driver xge - Neterion Xframe 10Gigabit Ethernet Network Adapter driver

10 다음은 Windows XP 운영체제에서 IP, Defaultrouter, DNS Client 설정에대해서확인한예이다. IP 설정 (IP Configuration) NIC 설정에관해서는 (a) 현재설정과 (b) 부팅시의설정으로나누어볼수있다. 현재설정하는방식은 ifconfig 명령어를사용해서설정할수있다. 부팅시의설정은 /etc/hosts 파일과 /etc/hostname."interface Instance Name" 파일을사용하여설정할수있다. ( 여기서 Interface Instance Name 은 pcn0, hme0, qfe0 등의이름을나타낸다.) (1) IP 현재설정확인 ifconfig 명령어를사용하여현재설정되어있는 NIC 마다의 IP 설정값과 IP 에관련된값들을확인할수있다. -a 옵션을사용하면활성화되어있는또는비활성화되어있는모든네트워크인터페이스에대해서정보확인이가능하다. 또한, IPv4 와 IPv6 에대한설정정보가있는경우에도모든정보를보여준다. ifconfig 명령어에 NIC 이름을지정하게되면지정된 NIC 에대한정보만따로확인이가능하다. ( 리눅스시스템처럼 ifconfig 명령어단독으로사용하는경우는없다.) ( 명령어형식 ) # ifconfig -a /* 활성화 / 비활성화된모든인터페이스의정보를확인 */ (# ifconfig (X)) # ifconfig eri0 /* 지정된인터페이스에대한정보를확인 */ [EX1] 현재 IP 설정확인 (Solaris 10 05/08 on Ultra10) hme0/hme1 # ifconfig -a lo0: flags= <up,loopback,running,multicast,ipv4> mtu 8232 index 1 inet netmask ff hme0: flags= <up,broadcast,running,multicast,ipv4> mtu 1500 index 2 inet netmask ffffff00 broadcast ether 8:0:20:cb:28:8b hme1: flags= <up,broadcast,running,multicast,ipv4> mtu 1500 index 3 inet netmask ffff0000 broadcast ether 8:0:20:cb:28:8b
11 (Solaris 10 10/08 on Blade150) eri0 # ifconfig -a lo0: flags= <up,loopback,running,multicast,ipv4,virtual> mtu 8232 index 1 inet netmask ff eri0: flags= <up,broadcast,running,multicast,ipv4> mtu 1500 index 2 inet netmask ffff0000 broadcast ether 0:3:ba:4e:3c:58 eri0:1: flags= <up,broadcast,running,multicast,ipv4> mtu 1500 index 2 inet netmask ffffff00 broadcast > eri0 : Physical NIC -> eri0:1 : Logical NIC (Solaris 10 10/09 on Blade2500) bge0 # ifconfig -a lo0: flags= <up,loopback,running,multicast,ipv4,virtual> mtu 8232 index 1 inet netmask ff bge0: flags= <up,broadcast,running,multicast,ipv4,cos> mtu 1500 index 2 inet netmask ffff0000 broadcast ether 0:3:ba:5c:c9:3b (Solaris 10 10/09 Intel on VMWare) e1000g0/e1000g1 # ifconfig -a lo0: flags= <up,loopback,running,multicast,ipv4,virtual> mtu 8232 index 1 inet netmask ff e1000g0: flags= <up,broadcast,running,multicast,ipv4> mtu 1500 index 2 inet netmask ffff0000 broadcast ether 0:c:29:d:8c:aa e1000g1: flags= <up,broadcast,running,multicast,ipv4> mtu 1500 index 3 inet netmask ffffff00 broadcast ether 0:c:29:d:8c:b4 (Intel Platform on VMWare) pcn0/pcn1 # ifconfig -a lo0: flags= <up,loopback,running,multicast,ipv4,virtual> mtu 8232 index 1 inet netmask ff pcn0: flags= <up,broadcast,running,multicast,ipv4> mtu 1500 index 2 inet netmask ffff0000 broadcast ether 0:c:29:65:9:4e pcn1: flags= <up,broadcast,running,multicast,ipv4> mtu 1500 index 3 inet netmask ffffff00 broadcast ether 0:c:29:65:9:58 ( 출력화면해석 ) 필드 설명 pcn0 NIC 이름 (NIC Instance Name) flags UP NIC 활성화상태 (Active Status) BROADCAST NIC Broadcast 주소지원 RUNNING NIC 커널이인식할수있는상태 MULTICAST NIC Muticast 주소지원 IPv4 IPv4 주소지원 (inet IPv4) mtu 최대전송단위 (Maximum Transmission Unit) index 물리적인 NIC 번호 (Physical Interface Number) inet IPv4 주소 (Internet Address) netmask Netmask 주소 broadcast Broadcast 주소 ether Ethernet 주소 ( 예 : 08:00:20:XX:XX:XX)
12 [ 참고 ] ifconfig 명령어 NAME ifconfig - configure network interface parameters DESCRIPTION The command ifconfig is used to assign an address to a network interface and to configure network interface parameters. The ifconfig command must be used at boot time to define the network address of each interface present on a machine; it may also be used at a later time to redefine an interface's address or other operating parameters. If no option is specified, ifconfig displays the current configuration for a network interface. If an address family is specified, ifconfig reports only the details specific to that address family. Only privileged users may modify the configuration of a network interface. Options appearing within braces ({}) indicate that one of the options must be specified. OPTIONS The following options are supported: plumb Open the device associated with the physical interface name and set up the streams needed for IP to use the device. When used with a logical interface name, this command is used to create a specific named logical interface. An interface must be separately plumbed for use by IPv4 and IPv6. The address_family parameter controls whether the ifconfig command applies to IPv4 or IPv6. 물리적인인터페이스이름을가진디바이스를오픈 (Open) 하고, 스트림통신을하기위한 IP 설정을하기위해사용한다. 논리적인인터페이스이름 (Logical Interface Name) 을지정하게되면, 지정된논리적인인테페이스를생성한다. 인터페이스설정은 IPv4, IPv6 로구분되며, address_family 패러미터를가지고 IPv4 로설정할것인지 IPv6 로설정할것인지를결정하게된다. Before an interface has been plumbed, the interface will not show up in the output of the ifconfig -a command. 인터페이스가 plumb 되기전까지 ifconfig -a 명령어를통해출력되는결과에서인터페이스는보이지않는다. unplumb Close the device associated with this physical interface name and any streams that ifconfig set up for IP to use the device. When used with a logical interface name, the logical interface is removed from the system. After this command is executed, the device name will no longer appear in the output of ifconfig -a. up Mark a logical interface "up". This happens automatically when assigning the first address to a logical interface. The up option enables an interface after an ifconfig down, which reinitializes the hardware. down Mark a logical interface as "down". (That is, turn off the IFF_UP bit.) When a logical interface is marked "down," the system does not attempt to use the address assigned to that interface as a source address for outbound packets and will not recognize inbound packets destined to that address as being addressed to this host. Additionally, when all logical interfaces on a given physical interface are "down," the physical interface itself is disabled. When a logical interface is down, all routes that specify that interface as the output (using the -ifp
13 option in the route(1m) command or RTA_IFP in a route(7p) socket) are removed from the forwarding table. Routes marked with RTF_STATIC are returned to the table if the interface is brought back up, while routes not marked with RTF_STATIC are simply deleted. When all logical interfaces that could possibly be used to reach a particular gateway address are brought down (specified without the interface option as in the previous paragraph), the affected gateway routes are treated as though they had the RTF_BLACKHOLE flag set. All matching packets are discarded because the gateway is unreachable. INTERFACE FLAGS The ifconfig command supports the following interface flags. The term "address" in this context refers to a logical interface, for example, eri0:0, while "interface " refers to the physical interface, for example, eri0. MULTICAST Indicates that the broadcast address is used for multicast on this interface. UP Indicates that the interface is up, that is, all the routing entries and the like for this interface have been set up. RUNNING Indicates that the required resources for an interface are allocated. For some interfaces this also indicates that the link is up. BROADCAST This broadcast address is valid. This flag and POINTTO- POINT are mutually exclusive mtu n Set the maximum transmission unit of the interface to n. For many types of networks, the mtu has an upper limit, for example, 1500 for Ethernet. This option sets the FIXEDMTU flag on the affected interface. index n Change the interface index for the interface. The value of n must be an interface index (if_index) that is not used on another interface. if_index will be a non-zero positive number that uniquely identifies the network interface on the system. CoS This interface supports some form of Class of Service (CoS) marking. An example is the 802.1D user priority marking supported on VLAN interfaces. VIRTUAL Indicates that the physical interface has no underlying hardware. It is not possible to transmit or receive packets through a virtual interface. These interfaces are useful for configuring local addresses that can be used on multiple interfaces. (See also the -usesrc option.)
14 (2). IP 현재설정 l 현재네트워크인터페이스에대한정보를설정할때도 ifconfig 명령어를사용한다. l ifconfig -a 명령어를통해출력되는모든내용은 ifconfig 명령어를통해설정한다. l 가상인터페이스에대한설정과 IPv6 에대한설정도가능하다. l 인터페이스를설정하는순서는 plumb -> up -> IP 설정순이다. l ifconfig 명령어를통해 IPv4 설정시 "inet" 은생략할수있다. l ifconfig 명령어를통해설정된인터페이스설정은메모리테이블에올라가고, reboot 이되면, 정보는삭제된다. 따라서, 부팅시에설정을하기위해서는파일 (/etc/hostname.<interface>) 에인터페이스설정을하기위한파일에정보를넣어야한다. ( 명령어형식 ) # ifconfig eri0 plumb/unplumb # ifconfig eri0 up/down # ifconfig eri XXX netmask [EX1] down/up, unplumb/plumb 정확한의미필요에따라서아래와같이이름을변경하여사용한다. eri0 -> pcn0 (Intel Platform on VMWare) vmxnet0 (Intel Platform on VMWare) e1000g0 (Intel Platform on VMWare) # ifconfig -a # ifconfig eri0 down # ifconfig -a # ifconfig eri0 unplumb # ifconfig -a # ifconfig eri0 plumb # ifconfig -a # ifconfig eri0 up # ifconfig -a # ifconfig eri XXX netmask [ 참고 ] IP 설정에이상이없는데안되는경우에러를찾아보는것보다새로설정하는것이더빠를때가많다.( 예 : 강사용서버 ( ) 와통신이되지않는경우 ) # ifconfig eri0 down unplumb # ifconfig eri0 plumb up # ifconfig eri XXX netmask [ 참고 ] 기존의 IP 을변경하는설정 # ifconfig eri XXX netmask
15 (3) IP 부팅시적용설정 l l l 솔라리스10 버전에서는부팅시에 svc:/network/physical:default(/lib/svc/method/net-physical) 서비스에의해서네트워크인터페이스의 IP 설정이이루어진다. 솔라리스 8,9 버전에서는부팅시에 /etc/rcs.d/s30network.sh 시작스크립트에의해서네트워크인터페이스의 IP 설정이이루어졌다. 솔라리스 7 이하버전에서는 /etc/rcs.d/s30rootusr.sh 시작스크립트에의해서네트워크인터페이스의 IP 설정이이루어졌다. ifconfig 명령어를통한현재 IP 설정은메모리에올라가고, 이설정은서버시스템이다운 (Power Off) 되면없어지게된다. 서버시스템이부팅시에디스크의파일 (/etc/hosts, /etc/hostname.xxn) 의정보를가지고다시현재 IP 설정이된다. Solaris 10 버전의 2006 년도 11 월버전과그이전버전은새로운네트워크인터페이스의 IP 설정을할때 /etc/inet/ipnodes 파일에도등록하여야한다. 이때까지의버전은 /etc/hosts 파일은 /etc/inet/hosts 파일을심볼릭링크되어있었다. 그리고 /etc/inet/ipnodes 파일은별도의파일로존재했었다. 하지만 Solaris 년도 06 월버전부터는 /etc/hosts, /etc/inet/ipnode 파일은 /etc/inet/hosts 파일을심볼릭링크되어있어서모두같은파일로통합되었다. (Solaris 10 11/06 이하버전 ) /etc/hosts -> /etc/inet/hosts ( 심볼릭링크 ) /etc/inet/ipnodes ( 별도의파일 ) (Solaris 10 06/07 이상버전 ) /etc/hosts -> /etc/inet/hosts ( 심볼릭링크 ) /etc/inet/ipnodes -> /etc/inet/hosts ( 심볼릭링크 ) /etc/hosts 파일이나 /etc/inet/ipnodes 파일은 IP 와 hostname/domainname 을맵핑 (Mapping) 하는역할을가진파일이다. /etc/hostname.<interface Instance Name><Interface Instance number> 파일은안에호스트이름이나 IP 가정의될수있으며, 만약 IP 가정의되어있다면부팅시에해당 NIC 에 IP 가할당되고, 호스트이름 (NIC Nodename) 이들어있다면 /etc/hosts 파일을참조하여해당호스트이름에맵핑된 IP 가할당된다. ( 단, Solaris 10 11/06 이하버전이라면 /etc/hosts 파일뿐만아니라 /etc/inet/ipnodes 파일도같이변경해야한다.) l l 기존의 NIC와같은네트워크대역에추가시 : ( 예 ) /etc/hosts,/etc/hostname.eri1 기존의 NIC와다른네트워크대역에추가시 : ( 예 ) /etc/hosts,/etc/hostname.eri1,/etc/netmasks 1 /etc/hosts 파일설정 # cat /etc/hosts (/etc/inet/ipnodes -> /etc/inet/hosts, /etc/hosts -> /etc/inet/hosts)... ( 중략 ) XXX solarisxxx 2 /etc/hostname.xxn 파일설정 # ls /etc/hostname.* /etc/hostname.eri0 # cat /etc/hostname.eri0 solarisxxx or XXX /etc/hostname.eri0:1-15 -
16 (4) 가상인터페이스설정 (Virtual Interface, Logical Interface) 가상인터페이스 (Virtual Interface, Logical Interface) l 가상인터페이스의이름 : eri0:# (hme0:#, eri0:#, pcn0:#,...) l eri0 = eri0:0 l eri0 => eri0:# (Such as 1, 2, 3...) l 가상인터페이스의개수는기본적으로 256개정도사용가능 ( 최대 : 8192개 ) (a). 현재설정 (current Setting) ifconfig 명령어를통해서네트워크인터페이스 (Network Interface) 의 IP 설정을할수있다. IP 를설정하는방법은 NIC plumb 을통해서커널이인식할수있는상태로만들고 ( 필요한 NIC 커널모듈을메모리에올림 ), up 을통해 NIC 를활성화시키고, IP 설정을하면된다. or or # ifconfig eri0:1 plumb up # ifconfig eri0: YYY netmask # ifconfig -a # ping -s # ifconfig eri0:1 plumb # ifconfig eri0: YYY netmask up # ifconfig -a # ifconfig eri0:1 plumb YYY netmask up [ 참고 ] # ifconfig eri0:1 plumb YYY up
17 (b). 부팅시의설정 (Setting at Boot) ifconfig 명령어를통한현재가상인터페이스의 IP 설정은메모리에올라가고, 이설정은서버시스템이다운 (Power Off) 되면없어지게된다. 서버시스템이부팅시에디스크의파일 (/etc/hosts, /etc/hostname.eri0:1) 의정보를가지고다시현재가상인터페이스의 IP 설정이된다. 물리적인네트워크인터페이스에 IP 를할당하는것과같이, 가상인터페이스를추가하면새로운가상인터페이스에할당될수있는 IP 설정이이루어지게된다. 따라서부팅시의설정을하기위해서 /etc/hosts, /etc/hostname.eri0:1, /etc/netmasks 파일에등록하고, 현재설정은 ifconfig 명령어를사용하여설정하면된다. 1 /etc/hosts 파일설정 # vi /etc/hosts # # Internet host table # ::1 localhost localhost solaris253 solaris253.example.com loghost YYY nic2 <----- 새로운라인추가 2 /etc/hostname.xxn 파일설정 # vi /etc/hostname.eri0:1 (# echo "nic2" > /etc/hostname.eri0:1) nic2 3 /etc/netmasks 파일설정 # vi /etc/netmasks # # The netmasks file associates Internet Protocol (IP) address # masks with IP network numbers. # # network-number netmask # # The term network-number refers to a number obtained from the Internet Network # Information Center. # # Both the network-number and the netmasks are specified in # "decimal dot" notation, e.g: # # # <----- 새로운라인추가 -> (IP 현재 ) # ifconfig eri0 <IP> netmask <NETMASK> -> (IP 부팅 ) <IP> : /etc/hostname.eri0 <NETMASK> : /etc/netmasks 4 reboot 후확인 # reboot 부팅후에확인해본다. # ifconfig -a lo0: flags= <up,loopback,running,multicast,ipv4,virtual> mtu 8232 index 1 inet netmask ff eri0: flags= <up,broadcast,running,multicast,ipv4> mtu 1500 index 2 inet netmask ffff0000 broadcast ether 0:3:ba:4e:3c:58 eri0:1: flags= <up,broadcast,running,multicast,ipv4> mtu 1500 index 2 inet netmask ffffff00 broadcast > eri0 ( XXX) : 서버 ( 예 : ) 와통신할때사용 -> eri0:1( ) : 인터넷사용
18 [Q & A] 부팅시의 NIC 설정에대해서 [ 질문 ] 부팅시키면 NIC 설정이사라집니다. Oracle SE 인데요, 솔라리스 9 버전에 NIC 카드를한장더달고 ifconfig 명령어를통해설정하고테스트해보면잘됩니다. 하지만 reboot 후에살펴보면 NIC 카드의설정들이없습니다. 어떻게해야하나요? [ 답변 ] 부팅시에설정하기위해서는파일에정의해야합니다. l /etc/hosts, /etc/hostname.xxxn, /etc/netmasks 파일등을점검하셔야합니다
19 기본라우터설정 (Default Router Configuration) 기본라우터 (Defaultrouter) 설정은 (a) 현재설정과 (b) 부팅시의설정으로구분할수있다. 현재설정은 route 명령어를사용해서설정하고, 부팅시의설정은 /etc/defaultrouter 파일을사용한다. route 명령어를통해기본라우터설정을하게되면, 이정보는메모리상의라우팅테이블에기록이되고, reboot 이되면, 이정보는삭제된다. 따라서, 부팅시의설정을하기위해서는부팅시에설정할수있는파일 (/etc/defaultrouter) 에정보를등록해야한다. (1). 기본라우터현재설정확인 현재커널라우팅테이블의정보를확인하기위해서는 netstat 명령어에 -r 옵션을사용할수있다. 또한, netstat 명령어의 -n 옵션을사용하게되면출력되는내용을이름으로변환하지않고, 숫자로만표시하게된다. ( 명령어형식 ) # netstat -nr (-n : numeric, -r : routing table) [EX] 기본라우터정보확인 # netstat -nr Routing Table: IPv4 Destination Gateway Flags Ref Use Interface default UG U 1 40 eri0: U 1 10 eri U 1 0 eri UH 4 90 lo0 (2). Defaultrouter 현재설정 현재기본라우터 (Defaultrouter) 설정을하기위해서는 route 명령어를사용한다. ( 명령어형식 ) # route add default (# route add default gw (X)) [EX] 기본라우터설정테스트 1 Default Router 정보삭제 # route flush default done -> 기본정보외에나머지 route 정보는없어진다. # netstat -nr Routing Table: IPv4 Destination Gateway Flags Ref Use Interface U 1 40 eri0: U 1 10 eri U 1 0 eri UH 4 90 lo0 -> default 정보가삭제되어서출력되지않는다
20 2 Default Router 정보새로입력 # route add default add net default: gateway # netstat -nr Routing Table: IPv4 Destination Gateway Flags Ref Use Interface default UG U 1 40 eri0: U 1 10 eri U 1 0 eri UH 4 90 lo0 [ 참고 ] netstat 명령어 NAME netstat - show network status DESCRIPTION The netstat command displays the contents of certain network-related data structures in various formats, depending on the options you select. OPTIONS -a -i -n -r -s Show the state of all sockets, all routing table entries, or all interfaces, both physical and logical. Normally, listener sockets used by server processes are not shown. Under most conditions, only interface, host, network, and default routes are shown and only the status of physical interfaces is shown. Show the state of the interfaces that are used for IP traffic. Normally this shows statistics for the physical interfaces. When combined with the -a option, this will also report information for the logical interfaces. See ifconfig(1m). Show network addresses as numbers. netstat normally displays addresses as symbols. This option may be used with any of the display formats. Show the routing tables. Normally, only interface, host, network, and default routes are shown, but when this option is combined with the -a option, all routes will be displayed, including cache. Show per-protocol statistics. When used with the -M option, show multicast routing statistics instead. When used with the -a option, per-interface statistics will be displayed, when available, in addition to statistics global to the system. See DISPLAYS, below
21 (3). Defaultrouter 부팅시적용설정 l /etc/defaultrouter 파일은부팅시에기본라우터 (Defaultrouter) 설정 IP 정보를담는다. l 이파일안에는여러개의라우터정보가있으면안된다. ( 예 ) # cat /etc/defaultrouter (X) l 이파일안에는주석 (#) 처리사용할수없다. ( 예 ) # cat /etc/defaultrouter (X) # l 이파일안에는공백라인이있어도안된다. ( 예 ) # vi /etc/defaultrouter (X) <Enter> <Blank Line> [EX1] Default Router 부팅시의설정테스트 # cat > /etc/defaultrouter <CTRL + D> # cat /etc/defaultrouter
22 DNS 클라이언트설정 (DNS Client Configuration) DNS Client 설정은부팅시의설정과현재설정이따로있지않고시스템에서도메인요청이있는경우 /etc/nsswitch.conf, /etc/resolv.conf 파일을실시간적으로참조하게된다. # cp /etc/nsswitch.dns /etc/nsswitch.conf # vi /etc/nsswitch.conf (Name Service Switching Configuration) (Linux 예 : /etc/host.conf)... ( 중략 )... # You must also set up the /etc/resolv.conf file for DNS name # server lookup. See resolv.conf(4). hosts: files dns... ( 중략 )... # vi /etc/resolv.conf ( : kns.kornet.net) nameserver [EX] DNS 클라이언트실습 ==Web Browser=== > (1). /etc/hosts 정보존재? > (2). DNS 정보존재? [ 그림 ] 도메인요청과정 # nslookup Server: Address: #53 Non-authoritative answer: canonical name = fp.wg1.b.yahoo.com. fp.wg1.b.yahoo.com canonical name = any-fp.wa1.b.yahoo.com. Name: any-fp.wa1.b.yahoo.com Address: Name: any-fp.wa1.b.yahoo.com Address: ( 정리 ) Network Interface 설정 (1). IP 설정 현재설정 : ifconfig -a, ifconfig (plumb -> up -> IP) 부팅설정 : /etc/hosts, /etc/hostname.xxn, /etc/netmasks (2). 기본게이트웨이설정 ( 기본라우터설정 ) 현재설정 : netstat -nr, route add default <IP> 부팅설정 : /etc/defaultrouter (3). DNS 클라이언트설정 /etc/nsswitch.conf, /etc/resolv.conf
23 네트워크시나리오작업 (Network Scenario) 다음과같은주제에대해네트워크시나리오를가지고작업해보자. Hostname 변경작업 IP 변경작업 NIC 추가작업 서버이전작업 위와같은작업을하기위해서는네트워크에관련한파일들에대한이해력이선수적으로필요하다. 다음문서모든설정은 Solaris 10 05/09 on Blade150 에서테스트하였다. 1. 네트워크정보관련파일 (Network Files) 네트워크에관련한파일은 7 개가존재한다. 다음과같은파일들은호스트이름변경, 아이피변경, 네트워크카드추가, 서버이전과같이네트워크설정등과관련한파일이다. /etc/hosts IP에관련한파일 (+ /etc/inet/ipnodes( 이하버전 )) /etc/hostname.xxn IP에관련한파일 /etc/nodename 호스트이름에관련한파일 /etc/netmasks 네트워크대역에관련한파일 /etc/defaultrouter 기본라우터에관련한파일 /etc/nsswitch.conf DNS 클라이언트에관련한파일 /etc/resolv.conf DNS 클라이언트에관련한파일 [ 참고 ] Solaris 8, Solaris 9, Solaris 10(2006 년 11 월버전이하 ) l 솔라리스 8/9 버전에서는다음과같은 3 개의파일 ( 호스트이름관련파일들 ) 을더포함한다. - /etc/net/ticlts/hosts, /etc/net/ticotsord/hosts, /etc/net/ticots/hosts - 네트워크에관련한설정파일을다시정리해보면다음과같다. /etc/hosts /etc/hostname.<interface> /etc/nodename /etc/netmasks /etc/net/ticlts/hosts /etc/net/ticotsord/hosts /etc/net/ticots/hosts /etc/defaultrouter /etc/nsswitch.conf /etc/resolv.conf l 솔라리스 10 버전 (2006 년 11 월이하버전 ) 에서는다음과같은파일도별도로구성되어있다. - /etc/inet/ipnodes 파일이별도로존재하였다. - 네트워크에관련한설정파일을다시정리해보면다음과같다. /etc/hosts /etc/inet/ipnodes /etc/hostname.<interface> /etc/nodename /etc/netmasks /etc/defaultrouter /etc/nsswitch.conf /etc/resolv.conf
24 (a). /etc/hosts 파일 /etc/hosts 파일은도메인 / 호스트이름과 IP 를맵핑 (Mapping) 하는역할을가진다. 이파일은세개의필드로되어져있다. 첫번째필드는 IP 가오고, 두번째필드는도메인 / 호스트이름이온다. 그리고마지막필드는모두별칭 (Alias Name) 로구성이된다. 필드와필드의구분은탭이나공백모두가능하다.(White Space:<TAB>, <SPACE>) # cat /etc/hosts # # Internet host table # ::1 localhost localhost solaris200 solaris200.example.com loghost solaris solaris202 /etc/inet/hosts 파일이원본파일 (Original File) 이며, /etc/hosts 파일과 /etc/inet/ipnodes 파일이 /etc/inet/hosts 파일을심볼릭링크로걸고있다. 모두같은파일로쓰이게된다. 다음과같이 /etc/hosts, /etc/inet/hosts, /etc/inet/ipnodes 파일은같은파일이된다. # ls -l /etc/hosts lrwxrwxrwx 1 root root 12 Sep 5 03:09 /etc/hosts ->./inet/hosts # ls -l /etc/inet/ipnodes lrwxrwxrwx 1 root root 7 Sep 5 03:09 /etc/inet/ipnodes ->./hosts (b). /etc/hostname.xxn 파일 /etc/hostname.xxn 파일 ( 예 : /etc/hostname.eri0) 은부팅시에 NIC 의 IP 를설정할때사용하는파일이고, NIC Node Name( 예 : solaris254) 또는 NIC(Network Interface Card) 에주어지는 IP 가설정될수있다. /etc/hostname.xxxn 파일안에도메인이름 (NIC Node Name) 이있다면반드시 /etc/hosts 파일안에도이이름이존재하는라인이존재해야하고상응하는 IP 가있어야한다. 그렇지않다면 xxxn NIC 에 IP 설정이되지않고부팅후에 ifconfig 명령어를통해확인한경우 NIC 의 IP 설정부분에는 " " 으로표시된다. /etc/hostname.xxn 파일은서버시스템에현재존재하고있는 NIC 카드만큼만들어질수있다. NIC 카드의이름은여러가지가있을수있으며, 여러종류의 NIC 마다존재해야한다. 또한가상인터페이스가존재한다면가상인터페이스에대한이름도존재해야한다. # cat /etc/hostname.eri0 or solaris253 # cat /etc/hostname.eri 이파일에등록될수있는정보는 NIC Nodename 또는 IP 이다. NIC Nodename 은 hostname 과는틀린의미를갖는다. NIC Nodename 은 NIC 카드당할당하는이름이라고생각하면된다. 하지만 hostname 은서버를구별할때사용하는이름이고, 하나만존재하는이름이다. NIC Nodename 은 NIC 카드당존재한다
25 (c). /etc/nodename 파일 /etc/nodename 파일은부팅시에서버의호스트이름을설정할때사용하는파일이다. /etc/nodename 시스템을위한호스트이름을넣는다. 파일안에시스템을위한호스트이름이정의되어있지않다면부팅시에호스트이름은설정되지않고부팅후에 uname 명령어를통해확인해보면, 'unkown' 으로표시된다. 정상적으로설정이되고부팅이되고나면시스템에서는 hostname 또는 uname -n 명령어를통해서운영체제의호스트이름을확인할수있다. /etc/nodename 파일에는한개의라인만존재해야하고한개의시스템이름만입력이가능하다. 호스트이름의길이는 256 글자까지가능하며, 호스트이름으로문자, 숫자, -(dash), _(underbar),.(dot) 사용이가능하다. 현재호스트이름을변경하는명령어를통해서호스트이름을변경하는것을썬에서는권장하지않는다. 호스트이름변경에관해서는 /etc/nodename, /etc/hosts, /etc/hostname.xxn 파일과같은호스트이름이들어있는파일은모두수정하고리부팅을통해확인하는것을권장한다. # cat /etc/nodename solaris253 -> ( 주의 ) "solaris253" 호스트이름은 /etc/hosts 파일에하나 ( 서버가가지고있는 NIC 카드의이름 ) 와는맵핑이되어있어야한다. (d). /etc/netmasks 파일 /etc/netmasks 파일은 NIC 의네트워크대역 / 넷마스크에관련한파일이다. /etc/netmasks 파일은부팅시에 NIC 의 IP 설정할당시에넷마스크값을참조하는파일이다. 따라서, 이파일안에는많은설정이있을수있지만반드시필요한정보는시스템에존재하고설정된 NIC 의 IP 대역 ( 네트워크대역 ) 들은등록이되어있어야한다. 만약시스템에서 NIC1(eri0: ), NIC2(eri0:1: ) 를가지고있다면 2 개의 IP 에대한네트워크대역정보 ( 네트워크번호와넷마스크값 ) 의정보는 /etc/netmasks 파일에존재해야한다. 이파일안에들어가는정보는크게 2 개의필드로되어있으며, 첫번째필드에는네트워크번호와두번째필드에는넷마스크값 / 서브넷마스크값이선언된다. # cat /etc/netmasks # # The netmasks file associates Internet Protocol (IP) address # masks with IP network numbers. # # network-number netmask # # The term network-number refers to a number obtained from the Internet Network # Information Center. # # Both the network-number and the netmasks are specified in # "decimal dot" notation, e.g: # # # > ( 주의 ) 서버에존재하는 NIC 카드의 IP 에대한네트워크대역과넷마스크값은존재해야한다
26 (e). /etc/defaultrouter 파일 /etc/defaultrouter 파일은부팅시에기본라우터를설정할때사용하는파일이다. 이안에는부팅시에기본라우터로사용할려고하는 IP 정보가들어있어야한다. 만약솔라리스설치시에기본라우터를따로지정하지않는다면이파일은존재하지않는다. /etc/defaultrouter 파일에지정되는기본라우터의 IP 주소는반드시시스템에존재하는 NIC 의 IP 중한개와통신할수있는 IP 를설정해야한다. 만약정상적으로설정이되지않는다면부팅시에기본라우터정보는설정되지않는다. # cat /etc/defaultrouter (f). /etc/nsswitch.conf 파일 /etc/nsswitch.conf 파일은네임서비스 (Naming Service) 를선택할때사용하는파일이다. 네임서비스를제공할수있는서비스의종류는로컬의파일 (files), NIS(nis), NIS+(nisplus), LDAP(ldap), DNS(dns) 등이있다. 만약 DNS 클라이언트로설정하기위해서는 /etc/nsswitch.dns 파일을 /etc/nsswitch.conf 파일로복사하여사용하면된다. # cp /etc/nsswitch.dns /etc/nsswitch.conf # cat /etc/nsswitch.conf... ( 중략 )... # You must also set up the /etc/resolv.conf file for DNS name # server lookup. See resolv.conf(4). hosts: files dns... ( 중략 )... ( 예 ) hosts: files nis ldap dns (g). /etc/resolv.conf 파일 /etc/resolv.conf 파일은 DNS 서버 ( 예 : kns.kornet.net) 를지정하는파일이다. 이파일안에서지정할수있는지시자 (directive) 는 nameserver, search, domain 등이다. 일반적으로 DNS 클라이언트인경우 nameserver 지시자다음에 DNS 서버의 IP 를지정하고, nameserver 지시자는최대 3 개까지지정하여사용이가능하다. nameserver 지시자를통해 DNS 서버를더여러개를지정해도상단의 3 개까지밖에인식이되지않는다. # cat /etc/resolv.conf nameserver nameserver nameserver
27 2. 네트워크작업실습시나리오 (1). 호스트이름변경작업 서버시스템에서호스트이름을변경하는것은자주있는일은아니다. 하지만기존의한대의서버에서여러대의서버가추가되어서같은서비스를하게된다면호스이름의변화가필요하게될것이다. 다음은작업상의예상시나리오이다. ( 시나리오 ) 호스트이름변경이슈웹서비스를담당하는 test 라는이름을가진서버가존재했지만서비스의증가로인해서새로운서버 3 대가추가되었다. 그리고서버들의부하분산을위해 L4 스위치를사용하였다. 그래서서버들의이름을 test01, test02, test03, test04 로변경하기로했다. 솔라리스운영체제에서호스트이름을변경하는작업시다음과같이 3 개의파일을변경해야한다. 다음은모두호스트이름이등록되어있는파일을나타낸다. 그리고파일변경후반드시리부팅을해야한다. /etc/hosts /etc/hostname.xxxn /etc/nodename 예를들어, 만약변경하고싶은호스트이름이 solaris254 라면 /etc/nodename 에 solaris254 를정의해야하고, /etc/hosts, /etc/hostname.xxxn 파일에도 solaris254 와맵핑된 IP 가존재해야한다. ( 주의 ) 호스트이름을변경하는작업시주의호스트이름을변경시에다음과같이 uname, hostname 명령어를사용하여할수도있지만솔라리스시스템에서는자신의호스트이름 (Nodename) 만바꾸었다고해서바로적용되는것은아니다. 아래와같이만변경하는경우 RPC 서비스에기반한서비스부분에서이상이발생하고, CDE/JDE 환경을사용할수없게될수도있다. 따라서솔라리스에서호스트이름을변경하면반드시리부팅시켜서적용할것을권장한다. [EX] hostname, uname 명령어를통한현재호스트이름변경 l ( 주의 ) 아래와같이명령어를통해현재변경하는것을권장하지는않는다. # hostname /* 현재호스트이름확인 */ # hostname knitxxx /* 현재호스트이름변경 */ # hostname /* 현재호스트이름확인 */ # uname -n /* 현재호스트이름확인 */ # uname -S solarisxxx /* 현재호스트이름변경 */ # uname -n /* 현재호스트이름확인 */
28 ( 실습시나리오 ) 호스트이름을다음과같이변경한다고가정한다. - HOSTNAME : solarisxxx -> knitxxx ( 예 : solaris253 -> knit253) 다음과같은파일을편집하고 reboot 한다. /etc/hosts /etc/hostname.xxn /etc/nodename [ 참고 ] Solaris 9 버전이하에서는 /etc/net/*/hosts(3 개의파일 ) 도변경해야한다. [ 참고 ] Solaris 10 버전 버전이하버전에서는 /etc/inet/ipnodes 파일도변경해야한다. 1 /etc/hosts 파일설정 # vi /etc/hosts [ 변경전 ] ::1 localhost localhost XXX solarisxxx solarisxxx.example.com loghost YYY nic2 [ 변경후 ] ::1 localhost localhost XXX knitxxx solarisxxx.example.com loghost <---- (solarisxxx -> knitxxx) YYY nic2 2 /etc/hostname.xxn 파일설정 # vi /etc/hostname.eri0 [ 변경전 ] solarisxxx [ 변경후 ] knitxxx 3 /etc/nodename 파일설정 # vi /etc/nodename [ 변경전 ] solarisxxx [ 변경후 ] knitxxx <---- (solarisxxx -> knitxxx) <---- (solarisxxx -> knitxxx) # reboot 리부팅후다음과같은부팅시의메세지확인 부팅이된이후에는 hostname 명령어나혹은 uname 명령어의 -n 옵션을통해서현재호스트이름을잘설정되어있는지확인한다. # hostname # uname -n
29 [ 참고 ] Solaris 8/9/10 버전에서호스트이름변경시주의사항 솔라리스 10 버전에서호스트이름을변경하기위해서는다음과같은파일들을변경해야합니다. - /etc/hosts (/etc/inet/hosts, /etc/inet/ipnodes, /etc/net/*/hosts) - /etc/hostname.e1000g0 - /etc/nodename 하지만한가지를더고려하셔야합니다. 그것은 /var/crash/`hostname` 디렉토리입니다. /var/crash/`hostname` 디렉토리는시스템클래쉬 (System Crash) 가발생했을때, 클래쉬덤프파일이떨어질위치입니다. 호스트이름이변경이되었다고해서 /var/crash/solarisxxx 디렉토리의이름이자동으로변경되지않습니다. 그러므로디렉토리이름을아래와같이변경해주어야합니다. # mv /var/crash/solaris254 /var/crash/solaris154 /* solaris254: 변경전호스트이름, solaris154: 변경후호스트이름 */ # dumpadm -s /var/crash/solaris154 # dumpadm Dump content: kernel pages Dump device: /dev/dsk/c1t0d0s1 (swap) Savecore directory: /var/crash/solaris154 Savecore enabled: yes Save compressed: on
30 (2). IP 변경작업 Network Interface Card 의 IP 를변경하는것도자주일어나는작업은아니다. 기존에설정된 IP 에대해서새로운 IP 가 ( 변경될 IP) 같은네트워크대역에존재한다면, /etc/hosts, /etc/hostname.pcn0 파일들만편집하면되지만, 다른대역으로변경이된다면 /etc/netmasks 파일에도설정을해야한다. l l 같은네트워크대역으로변경 : /etc/hosts, /etc/hostname.eri0 다른네트워크대역으로변경 : /etc/hosts, /etc/hostname.eri0, /etc/netmasks ( 실습시나리오 ) 다음과같이같은네트워크대역으로변경이된다고가정한다. - IP : XX -> XX ( 예 : > ) 다음과같은파일을편집하고 ifconfig 명령어를수행한다. /etc/hosts /etc/hostname.eri0 ( 예 : /etc/hostname.e1000g0) 1 /etc/hosts 파일설정 # vi /etc/hosts [ 변경전 ] ::1 localhost localhost XX knitxxx solarisxxx.example.com loghost YYY nic2 [ 변경후 ] ::1 localhost localhost XX knitxxx solarisxxx.example.com loghost YYY nic2 2 /etc/hostname.xxn 파일확인 # cat /etc/hostname.eri0 ( 예 : /etc/hostname.e1000g0) knitxxx 3 ifconfig 명령어를통해현재 IP 변경 # ifconfig eri XX netmask # ifconfig -a lo0: flags= <up,loopback,running,multicast,ipv4,virtual> mtu 8232 index 1 inet netmask ff eri0: flags= <up,broadcast,running,multicast,ipv4> mtu 1500 index 2 inet XX netmask ffff0000 broadcast ether 0:3:ba:4e:3c:58 eri0:1: flags= <up,broadcast,running,multicast,ipv4> mtu 1500 index 2 inet netmask ffffff00 broadcast
31 (3). Network Interface Card 추가작업 네트워크인터페이스카드가추가된다면추가된아이피가같은네트워크대역으로추가되는경우와다른네트워크대역으로추가되는경우를예를들수있겠다. 만약같은네트워크대역으로추가된다면 /etc/hosts, /etc/hostname.pcn1 파일만편집하면되고다른네트워크대역으로추가되는경우에는 /etc/netmasks 파일에도정보를등록해야한다. l l 같은네트워크대역으로추가 : /etc/hosts, /etc/hostname.hme0 다른네트워크대역으로추가 : /etc/hosts, /etc/hostname.hme0, /etc/netmasks ( 실습시나리오 ) 다음과같이다른네트워크대역으로 NIC가추가되는것으로가정한다. - 추가되는 NIC IP : XXX ( 예 : ) - NIC Nodename : nic3 - Network Number : Netmask : ::1 localhost localhost XX knitxxx solarisxxx.example.com loghost YYY nic XXX nic3 <----- 새로운라인추가 nic3 <Ctrl + D> (VMWare 환경에서 ) 새로운 NIC 카드추가 ( ㄱ ) 서버 Power OFF # poweroff ( ㄴ ) NIC 카드추가 VMWare > VM > Setting > Add > Network Adapter > NAT > FINISH ( ㄷ ) 서버 Power ON ( ㄹ ) 장치인식 # devfsadm -v # cat /etc/path_to_inst grep e1000g (# dladm show-dev) ( ㅁ ) VMWare > Edit > Virutual Network Editor > VMnet8 > 대역 : 다음과같은파일을편집하고 ifconfig 명령어를수행한다. /etc/hosts /etc/hostname.hme0 /etc/netmasks 1 /etc/hosts 파일설정 # vi /etc/hosts 2 /etc/hostname.xxn 파일설정 # cat > /etc/hostname.hme0 (# echo "nic3" > /etc/hostname.hme0) 3 /etc/netmasks 파일설정 # vi /etc/netmasks <----- 새로운라인추가
32 4 현재작업 # ifconfig hme0 plumb up # ifconfig hme XXX netmask # ifconfig -a lo0: flags= <up,loopback,running,multicast,ipv4,virtual> mtu 8232 index 1 inet netmask ff eri0: flags= <up,broadcast,running,multicast,ipv4> mtu 1500 index 2 inet netmask ffff0000 broadcast ether 0:3:ba:4e:3c:58 eri0:1: flags= <up,broadcast,running,multicast,ipv4> mtu 1500 index 2 inet netmask ffffff00 broadcast hme0: flags= <up,broadcast,multicast,ipv4> mtu 1500 index 4 inet netmask ffffff00 broadcast ether 0:3:ba:1d:50:98 # ifconfig qfe0 plumb up ifconfig: plumb: qfe0: no such interface -> NIC( 예 : qfe0) 카드가장착이되지않은경우 -> NIC( 예 : qfe0) 카드가장착이되었지만, 인식이되지않은경우 -> qfe0 이름을잘못지정한경우 ( 오타 ) (VMWare 환경에서 ) # cat > /etc/defaultrouter # cat /etc/defaultrouter # route flush # route add default # nslookup
33 (4). 서버이전작업 DefaultRouter ( ) NIC solarisxxx DefaultRouter ( ) NIC solarisxxx [ 그림 ] 서버이전 ( 실습시나리오 ) 다른네트워크로서버를이전한다고해보자. - IP 변경 : > Defaultrouter 변경 : > Network Number 변경 : > /etc/hosts (ifconfig) /etc/hostname.eri0 /etc/defaultrouter (netstat, route) /etc/netmasks (vi) ( 알림 ) 작업내용에관해서는생략한다. # ifconfig eri netmask # route flush # route add default (VMWare 환경에서 ) ( 복원 ) 서버상태 (Hostname/IP/Defaultrouter) 를복원한다. Hostname : solarisxxx (EX: knitxxx -> solarisxxx) IP 설정 - e1000g0 (Bridge, XX) (EX: XX -> XX) - e1000g1 (NAT, XX) (EX: e1000g0:1 -> 삭제 ) Defaultrouter (NAT) 점검방법재부팅이후에 # hostname => solarisxxx # ifconfig -a => e1000g0( xx), e1000g1( xx) # netstat -nr => # nslookup
34 [ 정리 1] 네트워크작업후재부팅이필요한가? Hostname Changing : Reboot IP Changing : Not Reboot NIC Add : Not Reboot Network Changing : Not Reboot [ 정리 2] 파일관련 IP 관련파일 : /etc/hosts, /etc/hostname.pcn0 Hostname 관련파일 : /etc/hosts, /etc/hostname.pcn0, /etc/nodename Network 대역관련파일 : /etc/netmasks Defaultrouter 관련파일 : /etc/defaultrouter DNS Client 관련파일 : /etc/nsswitch.conf, /etc/resolv.conf [ 정리 3] 테스트작업관련파일 호스이름변경 : /etc/hosts, /etc/hostname.pcn0, /etc/nodename -> reboot IP 변경 : /etc/hosts, /etc/hostname.pcn0 NIC 추가 : /etc/hosts, /etc/hostname.pcn1, /etc/netmasks 서버이전 : /etc/hosts, /etc/hostname.pcn0, /etc/defaultrouter, /etc/netmasks
35 [ 참고 ] sys-unconfig 명령어 /usr/bin/sys-unconfig 명령어를사용하여시스템설정을재설정할수있다. ( 주의 ) VMWare 환경이라면 snapshot 를수행하고작업을진행한다. sys-unconfig 명령어수행동작 Ÿ /etc/inet/hosts -> /etc/inet/hosts.saved 파일로백업 Ÿ /etc/vfstab -> /etc/vfstab.orig 파일로백업 Ÿ /etc/inet/hosts 파일복구 Ÿ /etc/hostname.xxn 파일에등록된기본호스트이름삭제 Ÿ /etc/defaultdomain 파일의기본도메인정보삭제 Ÿ /etc/timezone 파일의 Time Zone을 PST8PDT로복구 Ÿ /etc/nsswitch.files -> /etc/nsswitch.conf 복사 Ÿ /etc/inet/netmasks 파일삭제 Ÿ /etc/defaultrouter 파일삭제 Ÿ /etc/shadow 파일의 root 사용자암호삭제 Ÿ NIS+ 서비스를위한 /etc/.rootkey 파일삭제 Ÿ /etc/resolv.conf 파일삭제 Ÿ LDAP 서비스 diable /var/ldap/ldap_client_cache 파일 /var/ldap/ldap_client_file 파일 /var/ldap/ldap_client_cred 파일 /var/ldap/cachemgr.log 파일 Ÿ sshd 데몬을위한키재생성 # sys-unconfig WARNING This program will unconfigure your system. It will cause it to revert to a "blank" system - it will not have a name or know about other systems or networks. This program will also halt the system. Do you want to continue (y/n)? y <---- 'y' 입력 Unable to check SMF status Cannot stop ${instance}, security keys wont updating /platform/i86pc/boot_archive... ( 자동재부팅 )... Press any key to reboot.... ( 부팅과정중 )... Select a Language -> 1.Korean Select a Locale -> 0.Korean EUC Keyboard Layout -> Korean... ( 설정과정중 )... Networked -> Yes Network Interface -> e1000g0 Use DHCP for e1000g0 -> No Host name for e1000g0 -> solarisxxx IP address for e1000g0 -> XXX System part of a subnet -> Yes Netmask for e1000g0 -> Enable IPv6 for e1000g0 -> No... ( 설정과정중 )... Default Route for e1000g0 -> Specify one Router IP Address for e1000g0 -> Confirm Information for e1000g0 -> Continue
36 Configure Kerberos Security -> No Confirm Information -> Continue Name service -> None Confirm Information -> Continue NFSv4 Domain Configuration -> Use the NFSv4 domain derived by the system Confirm Information for NFSv4 Domain -> Continue Continents and Oceans -> Asia Contries and Regions -> Korea (South) Date and Time -> Continue Confirm Information -> Continue Root password: ( 암호입력 )... ( 자동재부팅 )... 부팅후시스템정보확인 VMWare 환경인경우 snapshot 으로복원
37 [ 참고 ] NIC 카드의물리적인 Link 상태확인 여러장의 NIC 카드가서버에존재하는경우물리적으로 NIC 카드의꽂혀있는포트를확인하는방법도있지만운영체제안에서확인방법도있다. NIC 카드의종류 ( 하드웨어종류 ), 운영체제의버전의종류, 운영체제플랫폼의종류에따라서차이가날수있지만아래 3 가지명령어를사용하면모든버전, 모든하드웨어에서확인이가능하다. ndd 명령어사용하는방법 # ndd -get /dev/hme link_status 1 /* 0 : Down, 1 : Up */ # ndd -get /dev/hme link_speed 1 /* 0 : 10M, 1 : 100M */ # ndd -get /dev/hme link_mode 1 /* 0 : Half Duplex, 1 : Full Duplex */ dladm 명령어사용하는방법 # dladm show-link e1000g0 type: non-vlan mtu: 1500 device: e1000g0 e1000g1 type: non-vlan mtu: 1500 device: e1000g1 # dladm show-dev e1000g0 link: up speed: 1000 Mbps duplex: full e1000g1 link: up speed: 1000 Mbps duplex: full kstat 명령어사용하는방법 # kstat -m e1000g -i 0 egrep '(link_state link_speed)' link_state 1 /* 0 : Down, 1 : Up */ link_speed 1000 /* 1000Mbps */ -m Kernel Module Name (EX: e1000g) -i Instance Number (EX: e1000g0) # kstat -m e1000g -i 1 egrep '(link_state link_speed)' link_state 1 /* 0 : Down, 1 : Up */ link_speed 1000 /* 1000Mbps */ -m Kernel Module Name (EX: e1000g) -i Instance Number (EX: e1000g1)
38 Solaris 10 Admin I Guide 2. Directory Hierarchy l Solaris 10 Directory Structure l l l l l l l l # man -s 5 filesystem / (root) Subdirectory l /bin, /sbin, /dev, /devices, /etc, /export, /home, /kernel l /mnt, /opt, /platform, /system, /tmp, /usr, /var /dev Subdirectory l /dev/dsk, /dev/rdsk, /dev/pts, /dev/term, /dev/fd /etc Subdirectory l /etc/cron.d, /etc/default, /etc/dfs, /etc/inet, /etc/init.d l /etc/skel, /etc/svc, /etc/ssh, /etc/zones /kernel Subdirectory /platform Subdirectory /var Subdirectory /usr Subdirectory 윈도우즈 (Windows) 시스템의예 -> 데이터의저장하는공간 D:\ 선택 D:\ 영화 +-- Solaris (Solaris9, Solaris10) +-- Linux (CentOS, RHEL4, RHEL5) +-- Windows Download +-- Program 왜디렉토리를나누는가? -> 파일이적을때는상관없지만파일의개수가많아진다면관리가힘들다. -> 따라서, 디렉토리를나누면좀더효율적으로파일을관리할수있다. -> 솔라리스디렉토리구조도목적에맞게나누어져있다. -> 이런디렉토리의만들어진의미를안다면원하는파일을좀더빠를게검색할수있다
39 솔라리스디렉토리구조 (Solaris Directory Structure) 솔라리스환경에서디렉토리의구조를살펴보자. [ 참고 ] # man -s5 filesystem The file system tree is organized for administrative convenience. Distinct areas within the file system tree are provided for files that are private to one machine, files that can be shared by multiple machines of a common platform, files that can be shared by all machines, and home directories. This organization allows sharable files to be stored on one machine but accessed by many machines using a remote file access mechanism such as NFS. Grouping together similar files makes the file system tree easier to upgrade and manage. The file system tree consists of a root file system and a collection of mountable file systems. The mount(2) program attaches mountable file systems to the file system tree at mount points (directory entries) in the root file system or other previously mounted file systems. Two file systems, / (the root) and /usr, must be mounted and /var must be accessible to have a functional system. The root file system is mounted automatically by the kernel at boot time; the /usr file system is mounted by the system start-up script, which is run as part of the booting process. /var can be mounted as its own file system or be part of /usr, as it is by default. Certain locations, noted below, are approved installation locations for bundled Foundation Solaris software. In some cases, the approved locations for bundled software are also approved locations for add-on system software or for applications. The following descriptions make clear where the two locations differ. For example, /etc is the installation location for platform-dependent configuration files that are bundled with Solaris software. The analogous location for applications is /etc/opt/packagename. In the following descriptions, subsystem is a category of application or system software, such as a window system (dt) or a language (java1.2) The following descriptions make use of the terms platform, platform-dependent, platform-independent, and platformspecific. Platform refers to a machines Instruction Set Architecture or processor type, such as is returned by uname -i. Platform-dependent refers to a file that is installed on all platforms and whose contents vary depending on the platform. Like a platform-dependent file, a platform-independent file is installed on all platforms. However, the contents of the latter type remains the same on all platforms. An example of a platform-dependent file is compiled, executable program. An example of a platform-independent file is a standard configuration file, such as /etc/hosts. Unlike a platform-dependent or a platform-independent file, the platform-specific file is installed only on a subset of supported platforms. Most platform-specific files are gathered under /platform and /usr/platform. In the following file or directory descriptions, GNOME stands for GNU Network Object Model Environment. The GNOME Desktop is shipped with the Solaris operating system
40 시스템중요디렉토리 (Important System Directory) (1). /(root) 하위디렉토리 # ls Desktop/ cdrom/ dev/ home/ mnt/ sbin/ var/ Documents/ data1/ devices/ kernel/ net/ system/ vol/ TT_DB/ data2/ etc/ lib/ opt/ test/ bin@ data3/ export/ lost+found/ platform/ tmp/ boot/ data4/ hgfs/ mbox proc/ usr/ The root file system contains files that are unique to each machine. It contains the following directories: /(root) Root of the overall file system name space. 모든파일시스템의마운트포인터가존재한다. 모든파일시스템의네임스페이스가전부존재한다. ( 예 ) 내컴퓨터 /bin A symbolic link to the /usr/bin directory. It is the directory location for the binary files of standard system command. 사용자가수행할수있는명령어가존재한다. # find / -name bin -type d # find / -name sbin -type d (bin 디렉토리 ) /bin ---Symbolic Link--> /usr/bin ( 예 ) # ls -ld /bin # ls -l /bin/ls # ls -l /usr/bin/ls (bin 디렉토리의종류 ) /usr/bin (/bin) bin : 일반사용자용명령어 /usr/sbin sbin: 관리자용명령어 /sbin [ 참고 ] Other bin Directory (# find / -name bin -type d) /usr/dt/bin CDE 환경에관련한명령어 /usr/ccs/bin C 관련명령어 /usr/openwin/bin Openwin 환경에관련한명령어 (bin/sbin 디렉토리의특성 ) /sbin <-----> /usr/bin, /usr/sbin /usr/bin <-----> /usr/sbin ( 예 ) # ls -l /sbin/mount /* 부팅시에사용되는관리자용명령어 */ # ls -l /usr/sbin/format /* 부팅이후에사용되는관리자용명령어 */ # ls -l /usr/sbin/newfs /* 부팅이후에사용되는관리자용명령어 */ # ls -l /usr/sbin/fsck # ls -l /usr/bin/vi /* 부팅이후에사용되는일반사용자용명령어 */ # ls -l /usr/bin/ls /dev Primary location for special files. Typically, device files are built to match the kernel and hardware configuration of the machine. 논리적인디바이스이름이존재한다. logical device name ( /dev/* --- Symbolic Link ---> /devices/* ) ( 예 ) /dev/dsk/c0t0d0s7 # ls /dev/dsk c0t0d0s0@ c0t0d0s4@ c0t1d0s0@ c0t1d0s4@ c0t2d0s0@ c0t2d0s4@ c0t0d0s1@ c0t0d0s5@ c0t1d0s1@ c0t1d0s5@ c0t2d0s1@ c0t2d0s5@ c0t0d0s2@ c0t0d0s6@ c0t1d0s2@ c0t1d0s6@ c0t2d0s2@ c0t2d0s6@ c0t0d0s3@ c0t0d0s7@ c0t1d0s3@ c0t1d0s7@ c0t2d0s3@ c0t2d0s7-40 -
41 # ls -l /dev/dsk/c0t2d0s0 lrwxrwxrwx 1 root root 38 Apr 9 17:10 /dev/dsk/c0t2d0s0 ->../../devices/pci@1f,0/ide@d/dad@2,0:a /devices The primary directory for physical device names. 물리적인디바이스이름이존재한다.( 실제장치명 ) physical device name ( 예 ) /devices/pci@0,0/pci-ide@7,1/ide@0/cmdk@0,0:a /devices/pci@1f,0/ide@d/dad@2,0:a /etc Platform-dependent administrative and configuration files and databases that are not shared among systems. /etc may be viewed as the directory that defines the machine's identity. An approved installation location for bundled Solaris software. The analogous location for add-on system software or for applications is /etc/opt/packagename. System/Service Configuration Files, Startup Script, User/Group DB, etc ( 예 ) 제어판 # ls -l /etc/passwd # ls -l /etc/group /export Default root of the shared file system tree. 공유되는자원들을정의할때사용한다. export <--> share ( 예 ) /export/pkg, /export/patch, /export/home /home Default root of a subtree for user directories. 사용자의기본홈디렉토리이다. User automount Directory ( 예 ) /home/user01, /home/user02, etc /kernel Subtree of platform-dependent loadable kernel modules required as part of the boot process. It includes the generic part of the core kernel that is platformindependent, /kernel/genunix. See kernel(1m) An approved installation location for bundled Solaris software and for add-on system software. 커널 (Kernel) 과커널모듈 (Kernel Module) 이존재한다. ( 커널모듈디렉토리의종류 ) kernel modules (/kernel, /usr/kernel, /platform/`uname -i`, /platform/`uname -m`) ( 커널모듈디렉토리의특성비교 ) /kernel, /usr/kernel <----> /platform /kernel <----> /usr/kernel ( 예 ) # modinfo (# modinfo -c) # modinfo egrep '(eri hme)' (x86) # modinfo egrep '(pcn e1000g)' # cd /kernel/drv/sparcv9 ; ls eri* ; ls hme* (x86) # cd /kernel/drv ; ls pcn* ; ls e1000g* # cd /usr/kernel/drv ; ls pts* /mnt Default temporary mount point for file systems. This is an empty directory on which file systems can be temporarily mounted. 임시적인마운트포인터가존재한다. ( 예 ) /mnt/cdrom, /mnt/floppy, /mnt/server, /mnt/shell, etc /net Temporary mount point for file systems that are mounted by the automounter. automount에의해서임시적으로생성되는마운트포인터이다. 자세한정보는 NFS(automount) 부분을참고한다
42 /opt Root of a subtree for add-on application packages. 부가적인패키지 (Optional Packages) 가설치되는디렉토리이다. ( 패키지디렉토리비교 ) /usr Bundle Packages (CD1, CD2, CD3, CD4...) /opt Unbudle Packages(Companion CD) /usr/local GNU Packages ( ( 예 ) "Program Files" ( 예 ) # cd /usr/local/bin ; ls -l vim /platform Subtree of platform-specific objects which need to reside on the root filesystem. It contains a series of directories, one per supported platform. The semantics of the series of directories is equivalent to / (root). root 파일시스템안에존재해야한다. 플랫폼과상관있는커널모듈이들어있다. /proc Root of a subtree for the process file system. 프로세스의정보를담고있는디렉토리이다. ( 예 ) ps 명령어의출력결과들에대한정보를저장하고있다. /proc/pid -> pcmd(ps, pstack, pfiles, pmap, ptree,...) ( 예 ) # ls /proc /sbin Essential executables used in the booting process and in manual system recovery. The full complement of utilities is available only after /usr is mounted. /sbin is an approved installation location for bundled Solaris software. 부팅시에필요한필수명령어나복구용으로사용하는명령어들이있다. /system Mount point for the contract (CTFS) and object (OBJFS) file systems. CTFS & OBJFS Filesystem 을위한마운트포인터가존재한다. ( 예 ) # df -h Filesystem size used avail capacity Mounted on /dev/md/dsk/d35 15G 10G 4.8G 69% / /devices 0K 0K 0K 0% /devices ctfs 0K 0K 0K 0% /system/contract objfs 0K 0K 0K 0% /system/object... ( 중략 )... # cd /system/contract /* 효율적인프로세스관리를위해서 */ # cd /system/object /* 효율적인커널모듈관리를위해서 */ /tmp Temporary files; cleared during the boot operation. 임시파일들이생성되는디렉토리이다. /tmp 디렉토리안의내용은부팅시에삭제된다. ( 예 ) /tmp, /var/tmp [TERM1] # vi /etc/passwd :set all <----- Last Line Mode에서수행... directory=/var/tmp [TERM2] # cd /var/tmp # ls -altr... -rw root root # strings ExwKaase -> 내용확인 24K Jul 22 12:04 ExwKaase
43 /usr Mount point for the /usr file system. See description of /usr file system, below. 시스템대부분의패키지가설치되는디렉토리이다. /var Root of a subtree for varying files. Varying files are files that are unique to a machine but that can grow to an arbitrary (that is, variable) size. An example is a log file. An approved installation location for bundled Solaris software. The analogous location for add-on system software or for applications is /var/opt/packagename. 가변적인데이터가남는디렉토리이다. 데이터스풀 (Spool), 로그기록 (Log), 캐싱 (Caching) 되는데이터, 기타 ( 예 ) /var/spool/lp, /var/mail, /var/spool/mqueue, /var/adm/sulog /var/spool/proxy, /var/adm/messages,
44 [ 참고 ] 메모리상의시스템디렉토리 (Important In-Memory System Directory) 커널과시스템서비스에의해관리되는메모리상에올라가는디렉토리가있다. 사용자는이런디렉토리안의파일들을직접생성, 변경, 삭제할수는없다. # df -h Filesystem size used avail capacity Mounted on /dev/md/dsk/d35 15G 10G 4.8G 69% / /devices 0K 0K 0K 0% /devices ctfs 0K 0K 0K 0% /system/contract proc 0K 0K 0K 0% /proc mnttab 0K 0K 0K 0% /etc/mnttab swap 2.2G 1.7M 2.2G 1% /etc/svc/volatile objfs 0K 0K 0K 0% /system/object sharefs 0K 0K 0K 0% /etc/dfs/sharetab fd 0K 0K 0K 0% /dev/fd swap 2.2G 48K 2.2G 1% /tmp swap 2.2G 88K 2.2G 1% /var/run /dev/dsk/c0t0d0s3 470M 1.0M 422M 1% /data1 /dev/dsk/c0t0d0s4 470M 1.0M 422M 1% /data2 /dev/dsk/c0t0d0s5 470M 1.0M 422M 1% /data3 /dev/dsk/c0t0d0s6 470M 1.0M 422M 1% /data4 /dev/dsk/c0t0d0s7 470M 1.0M 422M 1% /export/home /dev/fd /devices 파일종류설명 /etc/mnttab /etc/svc/volatile /proc /system/contract /system/object /tmp /var/run The directory that contains special files relating to current file-descriptors in use by the system. The primary directory for physical device names. A memory-based file, in its own file system, that contains details of current file system mounts. The directory that contains log files and reference files relating to the current state of system services. The directory that stores current process-related information. Every process has its own set of subdirectories below the /proc directory. CTFS(Contract file system) is the interface for creating, controlling, and observing contracts. A contract enhances the relationship between a process and the system resources it depends on by providing richer error reporting and (optionally) a means of delaying the removal of a resource. The service management facility(smf) uses process contracts to track the processes which compose a service, so that a failure in a part of a multi-process service can be identified as a failure of that service The contrat file system supports all the SMF services. The OBJFS(object) file system describes the state of all modules currently loaded by the kernel. This file system is used by debuggers to access information about kernel symbols without having to access the kernel directly. It is used primarily for Dtrace activity. The directory for temporary files. This directory is cleared during the boot sequence. Temporary files which are not needed across reboots. Only root may modify the contents of this directory
45 Solaris 10 Admin I Guide 2. Management Local Disk l Management Local Disk l l l l Device Reconfiguration l # devfsadm -v Partition(Slice) l # format Filesystem l Mount l # newfs /dev/rdsk/c0t1d0s0 # mount /dev/dsk/c0t1d0s0 /oracle
46 Solaris 10 Admin I Guide 2. Management Local Disk l l l l l Physical Disk Structure l Conponents of a Disk l Spindle, Platters, Head actuator arm, Head l Sector, Track, Cylinder Disk Slice Disk Partition Naming Convention l IDE/SCSI Disk Naming Convention Solaris Disk Device Name l l Physical/Logical Device Name Instance Name Listing System s Disk Devices l l l # cat /etc/path_to_inst grep [dad sd] # prtconf grep -v not # format
 와읽고쓸수있는헤드 (Heads) 논리적인구성요소 : 디스크슬라이스 (Slice), 실린더 (Cylinders), 트랙 (Tracks), 섹터 (Sectors) [ 참고문서 ] 하드디스크분해과정 l http://cafe.daum.net/bscsolaris -> 일반자료실 -> 138번자료 ~ 143번자료 (1).")
47 물리적인디스크구조 (Physical Disk Structure) 디스크장치 (Disk Device) 는물리적인구성요소 (Physical Components) 와논리적인구성요소 (Logical Components) 가있다. 물리적인구성요소 : 플랫터 (Platters) 와읽고쓸수있는헤드 (Heads) 논리적인구성요소 : 디스크슬라이스 (Slice), 실린더 (Cylinders), 트랙 (Tracks), 섹터 (Sectors) [ 참고문서 ] 하드디스크분해과정 l -> 일반자료실 -> 138번자료 ~ 143번자료 (1). 디스크의물리적인구조 (Physical Disk Sructure) 디스크구성요소 (Components of a Disk) 스핀들 (Spindle) : 플래터를돌러주는축 플래터 (Platters) : 원판 ( 플랫터 ), 데이터가저장되는공간 헤드 (Heads) : 데이터를읽어들이는부분 헤드암 (Head actuator arm) : 데이터를읽어들이는팔 [ 그림 ] 물리적인디스크의구조 썬공인교재그림참고
48 (2). 디스크플래터의구조 (Data Organization on Disk Platters) [ 그림 ] 디스크플랫터의데이터구조 썬공인교재그림참고 종류 섹터 (Sector) 특랙 (Track) 설명 플랫터 (Platter) 에서가장작은단위이며 1 Secotr 는 512bytes 이다. 섹터는디스크블럭 (Disk Blocks) 이라고불리기도한다. 여러개의섹터들이모여서트랙을구성하며, 트랙당섹터수는플랫터의종류에따라다양하다. 밖에존재하는트랙이안에존재하는트랙보다더많은섹터를가지고있다. 실린더 (Cyliner) 각플랫터의같은위치의트랙들의모임이다
49 디스크슬라이스 (Disk Slice, Disk Partition) 솔라리스에서디스크슬라이스는시작실린더 (Start Cylinder) 부터끝실린더 (End Cylinder) 로정의된다. l 솔라리스10 설치시필요한최소파티션은 /, swap 이다. l /var 파티션은 Crash Dump 기능 (savecore(1m)) 을사용하면 /var 파일시스템에물리적메모리의 두배를할당한다. l /usr 파티션은대부분의프로그램이설치되는파티션이므로 Software Group 선택시의용량이상 만큼은주어져야한다. l Entire + OEM : 6.8G l Entire : 6.7G l Developer : 6.6G l End User : 5.3G l Core : 2.0G l Language CD 중단일언어 ( 예 : 한국어 ) 를설치하려면 0.7G 추가디스크공간을할당한다. (1). 파티션정책 (Partition Policy) 수립시고려사항 소스 ( 추가패키지 ) 가있는위치를나누어야하는가? 추가적인패키지설치위치를나누어야하는가? 데이터가있는위치를나누어야하는가? 로그기록을남기는위치를나누어야하는가? 기본적인프로그램이위치한곳을나눌것인가? 운영체제의 /tmp, /var, /export/home을나눌것인가? 스토리지는붙일것인가? NAS의일부파일시스템을사용할것인가? RAID 구성을할것인가? 예 : /var/apache/htdocs 예 : /oracle 예 : /data1, /data2 예 : /data1/logs 예 : /usr, /opt, /usr/local 예 : /tmp, /var, /export/home (2). 파티션계획과용량 ( 주의 ) 다음예들은실무에바로적용할수있는예는아니다. 하지만파티션정책과파티션용량을결정할때한가지참고사항사용하도록한다. (a). 일반적인파티션계획과용량 / 500M - 1G swap MEM / 2 ~ MEM x 2 /usr 6G - 7G /var MEM x 2 /tmp 500M ~ 2G (b). 서버의목적에맞는파티션정책 /oracle /data1 /data2 /was /logs

50 (3). 파티션번호의의미 Slice Name Function s0 / The root directory's system files. s1 swap Swap area. s2 Entire disk. s4 /usr System executables and programs. s5 /export/home User files and directories. s6 /oracle Database program area. s7 /database Database tablespace area [ 참고 ] 위의파티션번호중 3 번슬라이스는? 0 ~ 7 : Partition ID ( 예 ) Windows XP (Partition ID : A ~ Z) ( 예 ) Linux (Partition ID : /dev/hda1 ~ 32) [ 그림 ] 실린더와슬라이스 썬공인교재그림참고 [ 참고 ] 솔라리스10 설치시설정했던파티션정보 (c0t0d0s2/c0d0s2) -> "# df -h -F ufs" > "# swap -l" 15G 기준 ) Sparc / Intel(VMWare) Slice Mount Pointer Size s0 / (Free) s1 swap 1024 s2 overlap (Entire) s3 /data1 500 s4 /data2 500 s5 /data3 500 s6 /data4 500 s7 /export/home
51 (4). 파티션정책과용량예제 다음은파티션정책에대한하나의예이다. 실무에바로적용할수있는예는아니다. 각각의서버의목적에맞는사용자정의가필요하다. ( 주의 ) 다음은실무적으로바로쓸수있는예제는아니다. 단순한참고로만확인한다. 시스템자원사항 CPU : 2.4GHz * 2 Total Disk : 15G Total Mem : 1G Web Server 0 / 3G 1 swap 2G 2 overlap 15G ( 전체용량 ) 3 /usr 5G 4 /tmp 500M 5 6 /WAS 2G 7 /www * ( 나머지용량 ) Anonymous FTP Server 0 / 8G 1 swap 2G 2 overlap 15G ( 전체용량 ) 3 /tmp 2G /export/ftp * ( 나머지용량 ) Mail Server 0 / 1G 1 swap 2G 2 overlap 15G ( 전체용량 ) 3 /usr 5G 4 /tmp 1G /var * ( 나머지용량 ) [ 참고 ] Solaris 10 버전의파티션정책 ( 실무예 ) ( 권장 ) 한장의디스크 (EX: 300GB) - OS(/, /var) - 서비스 (/oracle, /data1)
52 디스크디바이스이름규칙방식 (Disk Device Naming Convention) 디스크디바이스의이름주는규칙방식은다음과같다. /dev/dsk/c#t#d#s# 디스크파티션이름규칙방식 (Disk Slice Naming Convention) l Controller number c# (c0, c1, c2, and so on) -> SCSI Adapter(SCSI Card) l Target number t# (t0, t1, t2, and so on) l Disk number(lun) d# (d0, d1, d2, and so on) l Slice number s# (s0, s1, s2, and so on) [ 참고 ] LUN(Logical Unit Number) [ 참고 ] IDE/SCSI Disk Naming Convention (SCSI) Sparc Platform t0 t1 t2 t3 Computer c0 d0 d0 d0 d0... c0t0d0 c0t1d0 c0t2d0 c0t3d0 c0t6d0 (E-IDE) Sparc Platform t0 t1 Computer c0 d0 d0 c0t0d0 c0t1d0 t2 t d0 d0 c0t2d0 c0t3d0 (SCSI) Intel Platform(x86) (E-IDE) Intel Platform(x86) d0 d1 Computer c0 c0d0 c0d1 d0 d c1 c1d0 c1d1 c0d0 : Primary Master c0d1 : Primary Slave c1d0 : Secondary Master c1d1 : Secondary Slave
53 솔라리스디스크다바이스이름 (Solaris Disk Device Name) 솔라리스는 1 개의디스크장치 (Device) 에 3 가지이름이존재한다. Physical device names( 물리장치명 ) Logical device names( 논리장치명 ) Instance names( 인스턴스명 ) (1). 논리장치명 (Logical Device Names) 논리장치명은물리적인장치명으로장치 (Device) 를다루기힘들기때문에좀더다루기쉬우면서체계적인이름을사용하기위해만들어졌다. 논리적인장치명은 /dev 디렉토리에서확인해볼수있다. /dev 디렉토리에존재하는논리장치명은 /devices 디렉토리에존재하는물리장치명에하나씩심볼릭링크가걸려있다. 따라서논리장치명이나물리장치명이나같은디바이스를나타내는것이다. 다음은스팍플랫폼에서확인한것이다. (SPARC Platform, Blade 150) # ls /dev/dsk c0t0d0s0@ c0t0d0s4@ c0t1d0s0@ c0t1d0s4@ c0t2d0s0@ c0t2d0s4@ c0t0d0s1@ c0t0d0s5@ c0t1d0s1@ c0t1d0s5@ c0t2d0s1@ c0t2d0s5@ c0t0d0s2@ c0t0d0s6@ c0t1d0s2@ c0t1d0s6@ c0t2d0s2@ c0t2d0s6@ c0t0d0s3@ c0t0d0s7@ c0t1d0s3@ c0t1d0s7@ c0t2d0s3@ c0t2d0s7@ # ls -l /dev/dsk/c0t0d0s0 lrwxrwxrwx 1 root root 38 Apr 9 17:10 /dev/dsk/c0t0d0s0 ->../../devices/pci@1f,0/ide@d/dad@0,0:a # ls -l /dev/hme lrwxrwxrwx 1 root other 29 Apr 9 17:00 /dev/hme ->../devices/pseudo/clone@0:hme # ls -l /dev/eri lrwxrwxrwx 1 root other 29 Apr 9 17:00 /dev/eri ->../devices/pseudo/clone@0:eri (Intel Platform on VMWare) # ls -l /dev/dsk # ls -l /dev/dsk/c1t0d0s0 # ls -l /dev/e1000g # ls -l /dev/e1000g*
54 (2). 물리장치명 (Physical Device Names) 실제물리적인장치의이름을나타낸다. 장치의이름은곧, 디바이스드라이버의이름이다. 논리장치명은물리장치명을심볼릭링크로걸고있다. 물리장치명은 /devices 디렉토리안에존재한다. 물리장치명은장치의종류별로이름이틀리기때문에 H/W 에따라서많은이름이존재할수있다. 또한이름이직관적으로보고, 이해하기어려운형태로생겼기때문에논리장치명에심볼릭링크를걸어서, 편리하게다루는경우가대부분이다. 물리장치명의이름체계를보면, 이장치가어떤부분에물려있는지확인할수있다. 하지만초보엔지니어에게는이것또한어려운것이다. 다음은물리장치명의이름체계에대한설명이다. # ls -l /dev/dsk/c0t0d0s0 lrwxrwxrwx 1 root root 38 Apr 9 17:10 /dev/dsk/c0t0d0s0 ->../../devices/pci@1f,0/ide@d/dad@0,0:a [ 참조 ] Intel Platform(Solaris 9 X86 on VMWare) /devices/pci@0,0/pci-ide@7,1/ide@0/cmdk@0,0:a (cmdk : IDE Disk) [ 참고 ] Intel Platform(Solaris 10 x86 u9 on VMWare 7.1.0) /devices/pci@0,0/pci15ad,1976@10/sd@0,0:a (sd : SCSI Disk) [ 참고 ] SPARC-based System /devices/pci@1f,0/ide@d/dad@0,0:a (Solaris 10 05/09 on Blade150, IDE Disk) /devices/pci@1d,700000/scsi@4/sd@0,0:a (Solaris 10 05/09 on Blade2500, SCSI Disk) /devices/pci@1f,0/pci@1,1/ide@3/dad@0,0:a (Solaris 9 on Ultra10, IDE Disk) /devices/pci@0,0/pci1022,7450@a/pci1077,10a@5/fp@0,0/disk@w266000c0fff7c140,1f:c (Ultra 20, IDE Disk) Ultra10 Workstation Device Tree /devices +-- pci@1f +-- pci@1,1 +-- ebus@1 +-- fdthree@14, +-- se@14, +-- ide@3 +-- dad@0,0 +-- sd@2,0 [ 그림 ] /devices Directory Structure Ultra20 Workstation Device Tree /devices +-- pci@0,0 +-- pci@6,1 +-- pci@7,1 +-- ide@0 +-- cmdk@0,0 +-- cmdk@0,0:a +-- cmdk@0,0:a,raw +-- cmdk@0,0:b +-- cmdk@0,0:b,raw ide@1 +-- cmdk@0,0 +-- cmdk@0,0:a +-- cmdk@0,0:a,raw +-- cmdk@0,0:b +-- cmdk@0,0:a,raw
55 (3). 인스턴스장치명 (Instance names) 인스턴스장치명은가장짧은디바이스의이름이다. 보통물리장치명이생성이되면, 이름의일부분을인스턴스장치명으로사용하게된다. 다음은디스크다비이스에관련한내용이다. sdn - sd(scsi disk) disk name, n is number, such as 0, 1, 2 dadn - dad(direct access device) disk name, n is number, such as 0, 1, 2) cmdkn- cmdk(common disk driver) disk name, n is number, such as 0, 1,2) atan - ata(advanced Technology Attachment) = IDE(Integrated Drive Electronics) disk name n is nuber, such as 0, 1, 2 [ 참고 ] 다른예 eri0, hme0, pcn0, e1000g0 ( 정리 ) 장치이름 (Disk Device Names) Physical Device Name : /devices/pci@1f,0/pci@1,1/ide@3/dad@0,0:a Logical Device Name : /dev/dsk/c0t0d0s0 Instance Name : dad0(/etc/path_to_inst) Physical Device Name : /devices/pci@0,0/pci15ad,790@11/pci15ad,750@0:e1000g0 Logical Device Name : /dev/e1000g0 Instance Name : e1000g0(/etc/path_to_inst)

56 디스크디바이스목록확인 (Listing System's Disk Devices) 다음은 MS 윈도우시스템의장치관리자를확인한예이다. ᄀ새로운장치를추가한후에장치가잘인식이되었는지, 또는ᄂ현재인식이된장치의종류는어떻게되는지확인할때아래와같은툴을사용하게된다. [ 그림 ] MS 윈도우장치관리자와비교 솔라리스운영체제환경에서도다음과같은명령어또는파일들을사용해서디스크디바이스파일의이름을확인할수있다. /etc/path_to_inst 파일을사용하는방법 prtconf (sysdef, prtdiag v, iostat -En, cfgadm -al) 명령어를사용하는방법 format 명령어를사용하는방법
57 (1). /etc/path_to_inst 파일 l /etc/path_to_inst 파일은 Physical Device Name 과 Instance Name 을맵핑하는역할을가진다. l 시스템에있는붙어있는모든디바이스정보가존재한다. ( 예 ) 새로운 NIC 장착후잘되었는지확인시 ( 예 ) 새로운 Disk 장착후잘되었는지확인시 # cat /etc/path_to_inst (Solaris 9 on Ultra10) # # Caution! This file contains critical kernel state # "/pci@1f,0" 0 "pcipsy" /* PCI bus controller, "psycho" chip */ "/pci@1f,0/pci@1,1" 0 "simba" /* PCI bus Controller */ "/pci@1f,0/pci@1,1/ebus@1" 0 "ebus" /* extended bus */ "/pci@1f,0/pci@1,1/ebus@1/power@14,724000" 0 "power" /* power managemnet bus */ "/pci@1f,0/pci@1,1/ebus@1/fdthree@14,3023f0" 0 "fd" /* floppy disk */ "/pci@1f,0/pci@1,1/ebus@1/sunw,cs4231@14,200000" 0 "audiocs" /* crystal semiconductor */ "/pci@1f,0/pci@1,1/ebus@1/su@14,3062f8" 1 "su" /* mouse */ "/pci@1f,0/pci@1,1/ebus@1/se@14,400000" 0 "se" /* serial ports */ "/pci@1f,0/pci@1,1/ebus@1/su@14,3083f8" 0 "su" /* keyboard */ "/pci@1f,0/pci@1,1/ebus@1/ecpp@14,3043bc" 0 "ecpp" /* extended capability paralled port */ "/pci@1f,0/pci@1,1/ide@3" 0 "uata" /* ATA controller */ "/pci@1f,0/pci@1,1/ide@3/sd@2,0" 0 "sd" /* SCSI-Disk, CD-ROM */ "/pci@1f,0/pci@1,1/ide@3/dad@0,0" 0 "dad" /* IDE-Disk */ "/pci@1f,0/pci@1,1/network@1,1" 0 "hme" /* Fast Ethernet(NIC) Card */ "/pci@1f,0/pci@1,1/sunw,m64b@2" 0 "m64" /* color memory frame buffer */ "/pci@1f,0/pci@1" 1 "simba" "/options" 0 "options" "/scsi_vhci" 0 "scsi_vhci" "/pseudo" 0 "pseudo" ( 파일안의내용해석 ) Intel Platform on VMWare "/pci@1f,0/pci@1,1/ide@3/dad@0,0" 0 "dad" 필드설명 "/pci@1f,0/pci@1,1/ide@3/dad@0,0" 물리적인장치명 (Physical Device Name) 0 인스턴스번호 (Instance Number) dad 인스턴스장치명 (Instance Name)
58 # cat /etc/path_to_inst (Solaris10 05/09 on Blade150) # # Caution! This file contains critical kernel state # "/iscsi" 0 "iscsi" "/pseudo" 0 "pseudo" "/scsi_vhci" 0 "scsi_vhci" "/options" 0 "options" "/pci@1f,0" 0 "pcipsy" "/pci@1f,0/pmu@3" 0 "pmubus" "/pci@1f,0/pmu@3/ppm@0,b3" 0 "grppm" "/pci@1f,0/pmu@3/beep@0,b2" 0 "grbeep" "/pci@1f,0/pmu@3/i2c@0,0" 0 "smbus" "/pci@1f,0/pmu@3/i2c@0,0/temperature@30" 0 "max1617" "/pci@1f,0/pmu@3/i2c@0,0/dimm@a0" 0 "seeprom" /* RAM 0 512M */ "/pci@1f,0/pmu@3/i2c@0,0/dimm@a2" 1 "seeprom" /* RAM 1 512M */ "/pci@1f,0/pmu@3/i2c@0,0/card-reader@40" 0 "scmi2c" "/pci@1f,0/pmu@3/i2c@0,0/dimm@a4" 2 "seeprom" /* RAM 2 512M */ "/pci@1f,0/pmu@3/i2c@0,0/dimm@a6" 3 "seeprom" /* RAM 3 512M */ "/pci@1f,0/pmu@3/fan-control@0,c8" 0 "grfans" "/pci@1f,0/isa@7" 1 "ebus" "/pci@1f,0/isa@7/power@0,800" 0 "power" /* POWER */ "/pci@1f,0/isa@7/dma@0,0" 0 "isadma" "/pci@1f,0/isa@7/dma@0,0/floppy@0,3f0" 0 "fd" "/pci@1f,0/isa@7/dma@0,0/parallel@0,378" 0 "ecpp" "/pci@1f,0/isa@7/serial@0,3f8" 0 "su" "/pci@1f,0/isa@7/serial@0,2e8" 1 "su" "/pci@1f,0/sunw,m64b@13" 0 "m64" /* VGA Card */ "/pci@1f,0/usb@c,3" 0 "ohci" "/pci@1f,0/usb@c,3/mouse@1" 2 "hid" /* USB Mouse */ "/pci@1f,0/usb@c,3/keyboard@2" 0 "hid" /* USB Keyboard */ "/pci@1f,0/usb@c,3/mouse@3" 1 "hid" "/pci@1f,0/usb@c,3/keyboard@4" 3 "hid" "/pci@1f,0/usb@c,3/mouse@4" 4 "hid" "/pci@1f,0/usb@c,3/storage@3" 0 "scsa2usb" "/pci@1f,0/usb@c,3/storage@3/disk@0,0" 0 "sd" "/pci@1f,0/ebus@c" 0 "ebus" "/pci@1f,0/network@c,1" 0 "eri" /* NIC(eri0) */ "/pci@1f,0/sound@8" 0 "audiots" /* Sound Card */ "/pci@1f,0/ide@d" 0 "uata" "/pci@1f,0/ide@d/sd@1,0" 2 "sd" /* CD-ROM */ "/pci@1f,0/ide@d/dad@0,0" 1 "dad" /* IDE DISK 0 */ "/pci@1f,0/ide@d/dad@2,0" 0 "dad" /* IDE DISK 1 */ "/pci@1f,0/pci@5" 0 "pci_pci" "/pci@1f,0/pci@5/pci@1" 1 "pci_pci" "/pci@1f,0/pci@5/pci@1/sunw,hme@0,1" 0 "hme" /* NIC(hme0) */ "/pci@1f,0/pci@5/pci@1/sunw,isptwo@4" 0 "isp" "/pci@1f,0/firewire@c,2" 0 "hci1394" "/ramdisk-root" 0 "ramdisk" "/SUNW,UltraSPARC-IIe@0,0" 0 "us" /* CPU */
59 # cat /etc/path_to_inst (Solaris10 05/09 on Blade2500) # # Caution! This file contains critical kernel state # "/iscsi" 0 "iscsi" "/pseudo" 0 "pseudo" "/scsi_vhci" 0 "scsi_vhci" "/options" 0 "options" "/pci@1e,600000" 2 "pcisch" "/pci@1e,600000/pmu@6" 0 "pmubus" "/pci@1e,600000/pmu@6/ppm@0,b3" 0 "m1535ppm" "/pci@1e,600000/pmu@6/beep@0,b2" 0 "grbeep" "/pci@1e,600000/pmu@6/i2c@0,0" 0 "smbus" "/pci@1e,600000/pmu@6/i2c@0,0/card-reader@40" 0 "scmi2c" "/pci@1e,600000/isa@7" 0 "ebus" "/pci@1e,600000/isa@7/i2c@0,320" 0 "pcf8584" "/pci@1e,600000/isa@7/i2c@0,320/clock-generator@0,d2" 0 "ics951601" "/pci@1e,600000/isa@7/i2c@0,320/gpio@0,30" 0 "pca9556" "/pci@1e,600000/isa@7/i2c@0,320/hardware-monitor@0,58" 0 "adm1031" "/pci@1e,600000/isa@7/i2c@0,320/hardware-monitor@0,5c" 1 "adm1031" "/pci@1e,600000/isa@7/i2c@0,320/audio-card-fru-prom@0,a0" 0 "seeprom" "/pci@1e,600000/isa@7/i2c@0,320/motherboard-fru-prom@0,a2" 1 "seeprom" "/pci@1e,600000/isa@7/i2c@0,320/scsi-backplane-fru-prom@0,a8" 2 "seeprom" "/pci@1e,600000/isa@7/i2c@0,320/dimm-spd@0,b6" 3 "seeprom" /* Memory : 512MB */ "/pci@1e,600000/isa@7/i2c@0,320/dimm-spd@0,b8" 4 "seeprom" /* Memory : 512MB */ "/pci@1e,600000/isa@7/i2c@0,320/dimm-spd@0,ba" 5 "seeprom" /* Memory : 512MB */ "/pci@1e,600000/isa@7/power@0,800" 0 "power" /* POWER */ "/pci@1e,600000/isa@7/serial@0,3f8" 0 "su" /* Serial Port A */ "/pci@1e,600000/isa@7/serial@0,2e8" 1 "su" /* Serial Port B */ "/pci@1e,600000/isa@7/dma@0,0" 0 "isadma" "/pci@1e,600000/isa@7/dma@0,0/parallel@0,378" 0 "ecpp" "/pci@1e,600000/usb@a" 0 "ohci" "/pci@1e,600000/usb@a/device@1" 1 "usb_mid" "/pci@1e,600000/usb@a/device@1/keyboard@0" 0 "hid" "/pci@1e,600000/usb@a/device@1/input@1" 1 "hid" "/pci@1e,600000/usb@a/mouse@2" 3 "hid" "/pci@1e,600000/usb@a/device@2" 2 "usb_mid" "/pci@1e,600000/usb@a/device@2/keyboard@0" 6 "hid" "/pci@1e,600000/usb@a/device@2/input@1" 7 "hid" "/pci@1e,600000/usb@a/mouse@1" 8 "hid" "/pci@1e,600000/pci@4" 0 "pci_pci" "/pci@1e,600000/pci@4/usb@8,2" 0 "ehci" "/pci@1e,600000/pci@4/usb@8" 2 "ohci" "/pci@1e,600000/pci@4/usb@8,1" 3 "ohci" "/pci@1e,600000/pci@4/firewire@b" 0 "hci1394" "/pci@1e,600000/usb@b" 1 "ohci" "/pci@1e,600000/usb@b/device@1" 0 "usb_mid" "/pci@1e,600000/usb@b/device@1/keyboard@0" 4 "hid" "/pci@1e,600000/usb@b/device@1/input@1" 5 "hid" "/pci@1e,600000/usb@b/mouse@2" 2 "hid" "/pci@1e,600000/usb@b/mouse@1" 9 "hid" "/pci@1e,600000/usb@b/device@2" 3 "usb_mid" "/pci@1e,600000/usb@b/device@2/keyboard@0" 10 "hid" "/pci@1e,600000/usb@b/device@2/input@1" 11 "hid" "/pci@1e,600000/sound@8" 0 "audiots" "/pci@1e,600000/ide@d" 0 "uata" "/pci@1e,600000/ide@d/sd@2,0" 30 "sd" /* CD-ROM */ "/ppm@1c,0" 0 "jbusppm" "/ppm@1e,0" 1 "jbusppm" "/pci@1c,600000" 0 "pcisch" "/pci@1c,600000/network@3" 0 "bge" /* NIC(bge0) */ "/pci@1d,700000" 1 "pcisch" "/pci@1d,700000/scsi@4" 0 "glm" "/pci@1d,700000/scsi@4/sd@0,0" 3 "sd" /* SCSI Disk */ "/pci@1d,700000/scsi@4/sd@1,0" 0 "sd" /* SCSI Disk */ "/pci@1d,700000/scsi@4,1" 1 "glm" "/ramdisk-root" 0 "ramdisk" "/memory-controller@0,0" 0 "mc-us3i" "/memory-controller@1,0" 1 "mc-us3i" "/pci@1f,700000" 3 "pcisch" "/pci@1f,700000/sunw,xvr-1200@2" 0 "jfb" "/pci@1f,700000/display@2,1" 1 "jfb" "/SUNW,UltraSPARC-IIIi@0,0" 0 "us" /* CPU(UltraSPARC-IIIi) */ "/SUNW,UltraSPARC-IIIi@1,0" 1 "us" /* CPU(UltraSPARC-IIIi) */
60 # cat /etc/path_to_inst (Solaris 9, Ultra Sparc Enterprise 3500) # # Caution! This file contains critical kernel state # "/options" 0 "options" "/pseudo" 0 "pseudo" "/sbus@2,0" 0 "sbus" "/sbus@2,0/sunw,socal@d,10000" 0 "socal" "/sbus@2,0/sunw,socal@d,10000/sf@0,0" 0 "sf" "/sbus@2,0/sunw,socal@d,10000/sf@0,0/ssd@w e586f,0" 0 "ssd" /* FC-AL DISK 0 */ "/sbus@2,0/sunw,socal@d,10000/sf@0,0/ssd@w e563b,0" 1 "ssd" /* FC-AL DISK 1 */ "/sbus@2,0/sunw,socal@d,10000/sf@0,0/ssd@w e573e,0" 2 "ssd" /* FC-AL DISK 2 */ "/sbus@2,0/sunw,socal@d,10000/sf@0,0/ssd@w e08f1,0" 3 "ssd" /* FC-AL DISK 3 */ "/sbus@2,0/sunw,socal@d,10000/sf@1,0" 1 "sf" "/sbus@2,0/sbusmem@1,0" 0 "sbusmem" "/sbus@2,0/sbusmem@2,0" 1 "sbusmem" "/sbus@2,0/sbusmem@d,0" 2 "sbusmem" "/sbus@3,0" 1 "sbus" "/sbus@3,0/sunw,hme@3,8c00000" 0 "hme" /* NIC : hme0 */ "/sbus@3,0/sunw,fas@3, " 0 "fas" "/sbus@3,0/sunw,fas@3, /sd@0,0" 15 "sd" "/sbus@3,0/sunw,fas@3, /sd@1,0" 16 "sd" "/sbus@3,0/sunw,fas@3, /sd@2,0" 17 "sd" "/sbus@3,0/sunw,fas@3, /sd@3,0" 18 "sd" "/sbus@3,0/sunw,fas@3, /sd@4,0" 19 "sd" "/sbus@3,0/sunw,fas@3, /sd@5,0" 20 "sd" "/sbus@3,0/sunw,fas@3, /sd@6,0" 21 "sd" "/sbus@3,0/sunw,fas@3, /sd@8,0" 22 "sd" "/sbus@3,0/sunw,fas@3, /sd@9,0" 23 "sd" "/sbus@3,0/sunw,fas@3, /sd@a,0" 24 "sd" "/sbus@3,0/sunw,fas@3, /sd@b,0" 25 "sd" "/sbus@3,0/sunw,fas@3, /sd@c,0" 26 "sd" "/sbus@3,0/sunw,fas@3, /sd@d,0" 27 "sd" "/sbus@3,0/sunw,fas@3, /sd@e,0" 28 "sd" "/sbus@3,0/sunw,fas@3, /sd@f,0" 29 "sd" "/sbus@3,0/sunw,fas@3, /st@0,0" 7 "st" "/sbus@3,0/sunw,fas@3, /st@1,0" 8 "st" "/sbus@3,0/sunw,fas@3, /st@2,0" 9 "st" "/sbus@3,0/sunw,fas@3, /st@3,0" 10 "st" "/sbus@3,0/sunw,fas@3, /st@4,0" 11 "st" "/sbus@3,0/sunw,fas@3, /st@5,0" 12 "st" "/sbus@3,0/sunw,fas@3, /st@6,0" 13 "st" "/sbus@3,0/sunw,fas@3, /ses@0,0" 16 "ses" "/sbus@3,0/sunw,fas@3, /ses@1,0" 17 "ses" "/sbus@3,0/sunw,fas@3, /ses@2,0" 18 "ses" "/sbus@3,0/sunw,fas@3, /ses@3,0" 19 "ses" "/sbus@3,0/sunw,fas@3, /ses@4,0" 20 "ses" "/sbus@3,0/sunw,fas@3, /ses@5,0" 21 "ses" "/sbus@3,0/sunw,fas@3, /ses@6,0" 22 "ses" "/sbus@3,0/sunw,fas@3, /ses@7,0" 23 "ses" "/sbus@3,0/sunw,fas@3, /ses@8,0" 24 "ses" "/sbus@3,0/sunw,fas@3, /ses@9,0" 25 "ses" "/sbus@3,0/sunw,fas@3, /ses@a,0" 26 "ses" "/sbus@3,0/sunw,fas@3, /ses@b,0" 27 "ses" "/sbus@3,0/sunw,fas@3, /ses@c,0" 28 "ses" "/sbus@3,0/sunw,fas@3, /ses@d,0" 29 "ses" "/sbus@3,0/sunw,fas@3, /ses@e,0" 30 "ses" "/sbus@3,0/sunw,fas@3, /ses@f,0" 31 "ses" "/sbus@3,0/sbusmem@0,0" 3 "sbusmem" "/sbus@3,0/sbusmem@3,0" 4 "sbusmem" "/sbus@3,0/sunw,qfe@0,8c00000" 0 "qfe" /* NIC : qfe0 */ "/sbus@3,0/sunw,qfe@0,8c10000" 1 "qfe" /* NIC : qfe1 */ "/sbus@3,0/sunw,qfe@0,8c20000" 2 "qfe" /* NIC : qfe2 */ "/sbus@3,0/sunw,qfe@0,8c30000" 3 "qfe" /* NIC : qfe3 */ "/sbus@6,0" 2 "sbus" "/sbus@6,0/sunw,socal@d,10000" 1 "socal" "/sbus@6,0/sunw,socal@d,10000/sf@0,0" 2 "sf" "/sbus@6,0/sunw,socal@d,10000/sf@1,0" 3 "sf" "/sbus@6,0/qlgc,isp@1,10000" 0 "isp" "/sbus@6,0/qlgc,isp@1,10000/sd@0,0" 0 "sd" "/sbus@6,0/qlgc,isp@1,10000/sd@1,0" 1 "sd"
61 2 "sd" "/sbus@6,0/qlgc,isp@1,10000/sd@3,0" 3 "sd" "/sbus@6,0/qlgc,isp@1,10000/sd@4,0" 4 "sd" "/sbus@6,0/qlgc,isp@1,10000/sd@5,0" 5 "sd" "/sbus@6,0/qlgc,isp@1,10000/sd@6,0" 6 "sd" "/sbus@6,0/qlgc,isp@1,10000/sd@8,0" 7 "sd" "/sbus@6,0/qlgc,isp@1,10000/sd@9,0" 8 "sd" "/sbus@6,0/qlgc,isp@1,10000/sd@a,0" 9 "sd" "/sbus@6,0/qlgc,isp@1,10000/sd@b,0" 10 "sd" "/sbus@6,0/qlgc,isp@1,10000/sd@c,0" 11 "sd" "/sbus@6,0/qlgc,isp@1,10000/sd@d,0" 12 "sd" "/sbus@6,0/qlgc,isp@1,10000/sd@e,0" 13 "sd" "/sbus@6,0/qlgc,isp@1,10000/sd@f,0" 14 "sd" "/sbus@6,0/qlgc,isp@1,10000/st@0,0" 0 "st" "/sbus@6,0/qlgc,isp@1,10000/st@1,0" 1 "st" "/sbus@6,0/qlgc,isp@1,10000/st@2,0" 2 "st" "/sbus@6,0/qlgc,isp@1,10000/st@3,0" 3 "st" "/sbus@6,0/qlgc,isp@1,10000/st@4,0" 4 "st" "/sbus@6,0/qlgc,isp@1,10000/st@5,0" 5 "st" "/sbus@6,0/qlgc,isp@1,10000/st@6,0" 6 "st" "/sbus@6,0/qlgc,isp@1,10000/ses@0,0" 0 "ses" "/sbus@6,0/qlgc,isp@1,10000/ses@1,0" 1 "ses" "/sbus@6,0/qlgc,isp@1,10000/ses@2,0" 2 "ses" "/sbus@6,0/qlgc,isp@1,10000/ses@3,0" 3 "ses" "/sbus@6,0/qlgc,isp@1,10000/ses@4,0" 4 "ses" "/sbus@6,0/qlgc,isp@1,10000/ses@5,0" 5 "ses" "/sbus@6,0/qlgc,isp@1,10000/ses@6,0" 6 "ses" "/sbus@6,0/qlgc,isp@1,10000/ses@7,0" 7 "ses" "/sbus@6,0/qlgc,isp@1,10000/ses@8,0" 8 "ses" "/sbus@6,0/qlgc,isp@1,10000/ses@9,0" 9 "ses" "/sbus@6,0/qlgc,isp@1,10000/ses@a,0" 10 "ses" "/sbus@6,0/qlgc,isp@1,10000/ses@b,0" 11 "ses" "/sbus@6,0/qlgc,isp@1,10000/ses@c,0" 12 "ses" "/sbus@6,0/qlgc,isp@1,10000/ses@d,0" 13 "ses" "/sbus@6,0/qlgc,isp@1,10000/ses@e,0" 14 "ses" "/sbus@6,0/qlgc,isp@1,10000/ses@f,0" 15 "ses" "/sbus@6,0/sbusmem@1,0" 5 "sbusmem" "/sbus@6,0/sbusmem@2,0" 6 "sbusmem" "/sbus@6,0/sbusmem@d,0" 7 "sbusmem" "/sbus@7,0" 3 "sbus" "/sbus@7,0/sunw,hme@3,8c00000" 1 "hme" /* NIC : hme1 */ "/sbus@7,0/cgsix@0,0" 0 "cgsix" "/sbus@7,0/sunw,fas@3, " 1 "fas" "/sbus@7,0/sunw,fas@3, /sd@0,0" 30 "sd" "/sbus@7,0/sunw,fas@3, /sd@1,0" 31 "sd" "/sbus@7,0/sunw,fas@3, /sd@2,0" 32 "sd" "/sbus@7,0/sunw,fas@3, /sd@3,0" 33 "sd" "/sbus@7,0/sunw,fas@3, /sd@4,0" 34 "sd" "/sbus@7,0/sunw,fas@3, /sd@5,0" 35 "sd" "/sbus@7,0/sunw,fas@3, /sd@6,0" 36 "sd" "/sbus@7,0/sunw,fas@3, /sd@8,0" 37 "sd" "/sbus@7,0/sunw,fas@3, /sd@9,0" 38 "sd" "/sbus@7,0/sunw,fas@3, /sd@a,0" 39 "sd" "/sbus@7,0/sunw,fas@3, /sd@b,0" 40 "sd" "/sbus@7,0/sunw,fas@3, /sd@c,0" 41 "sd" "/sbus@7,0/sunw,fas@3, /sd@d,0" 42 "sd" "/sbus@7,0/sunw,fas@3, /sd@e,0" 43 "sd" "/sbus@7,0/sunw,fas@3, /sd@f,0" 44 "sd" "/sbus@7,0/sunw,fas@3, /st@0,0" 14 "st" "/sbus@7,0/sunw,fas@3, /st@1,0" 15 "st" "/sbus@7,0/sunw,fas@3, /st@2,0" 16 "st" "/sbus@7,0/sunw,fas@3, /st@3,0" 17 "st" "/sbus@7,0/sunw,fas@3, /st@4,0" 18 "st" "/sbus@7,0/sunw,fas@3, /st@5,0" 19 "st" "/sbus@7,0/sunw,fas@3, /st@6,0" 20 "st" "/sbus@7,0/sunw,fas@3, /ses@0,0" 32 "ses" "/sbus@7,0/sunw,fas@3, /ses@1,0" 33 "ses" "/sbus@7,0/sunw,fas@3, /ses@2,0" 34 "ses" "/sbus@7,0/sunw,fas@3, /ses@3,0" 35 "ses" "/sbus@7,0/sunw,fas@3, /ses@4,0" 36 "ses" "/sbus@7,0/sunw,fas@3, /ses@5,0" 37 "ses" "/sbus@7,0/sunw,fas@3, /ses@6,0" 38 "ses"
62 39 "ses" 40 "ses" 41 "ses" 42 "ses" 43 "ses" 44 "ses" 45 "ses" 46 "ses" 47 "ses" 8 "sbusmem" 9 "sbusmem" 0 "fhc" 0 "ac" 0 "environ" 0 "simmstat" 0 "sram" 1 "fhc" 1 "ac" 1 "environ" 1 "simmstat" 1 "sram" 2 "fhc" 2 "ac" 2 "environ" 3 "fhc" 3 "ac" 3 "environ" 0 "central" 4 "fhc" 0 "sysctrl" 0 "zs" 1 "zs" "/scsi_vhci" 0 "scsi_vhci"
63 [EX] Disk 확인 & NIC 확인 (Solaris10 05/09 on Blade150) 1 dad 디스크확인 # cat /etc/path_to_inst grep dad "/pci@1f,0/ide@d/dad@0,0" 1 "dad" /* IDE DISK 0 */ "/pci@1f,0/ide@d/dad@2,0" 0 "dad" /* IDE DISK 1 */ 2 (eri hme) NIC 확인 # cat /etc/path_to_inst grep eri "/pci@1f,0/network@c,1" 0 "eri" /* NIC(eri0) */ # cat /etc/path_to_inst grep hme "/pci@1f,0/pci@5/pci@1/sunw,hme@0,1" 0 "hme" /* NIC(hme0) */ 3 keyboad/mouse 확인 # cat /etc/path_to_inst egrep '(keyboard mouse)' "/pci@1f,0/usb@c,3/mouse@1" 2 "hid" "/pci@1f,0/usb@c,3/keyboard@2" 0 "hid" "/pci@1f,0/usb@c,3/mouse@3" 1 "hid" "/pci@1f,0/usb@c,3/keyboard@4" 3 "hid" "/pci@1f,0/usb@c,3/mouse@4" 4 "hid" 4 CPU 확인 # cat /etc/path_to_inst grep SPARC "/SUNW,UltraSPARC-IIe@0,0" 0 "us" # psrinfo 0 on-line since 07/21/ :15:13 # psrinfo -pv The physical processor has 1 virtual processor (0) UltraSPARC-IIe (portid 0 impl 0x13 ver 0x33 clock 650 MHz) # psrinfo -v Status of virtual processor 0 as of: 07/22/ :30:11 on-line since 07/21/ :15:13. The sparcv9 processor operates at 650 MHz, and has a sparcv9 floating point processor
64 [EX] Disk 확인 & NIC 확인 (Solaris10 05/09 on Blade2500) 1 dad 디스크확인 # cat /etc/path_to_inst grep sd "/pci@1e,600000/ide@d/sd@2,0" 30 "sd" /* CD-ROM */ "/pci@1d,700000/scsi@4/sd@0,0" 3 "sd" /* SCSI Disk */ "/pci@1d,700000/scsi@4/sd@1,0" 0 "sd" /* SCSI Disk */ 2 (eri hme) NIC 확인 # cat /etc/path_to_inst grep bge "/pci@1c,600000/network@3" 0 "bge" /* NIC(eri0) */ 3 keyboad/mouse 확인 # cat /etc/path_to_inst egrep '(keyboard mouse)' "/pci@1e,600000/usb@a/device@1/keyboard@0" 0 "hid" "/pci@1e,600000/usb@a/mouse@2" 3 "hid" "/pci@1e,600000/usb@a/device@2/keyboard@0" 6 "hid" "/pci@1e,600000/usb@a/mouse@1" 8 "hid" "/pci@1e,600000/usb@b/device@1/keyboard@0" 4 "hid" "/pci@1e,600000/usb@b/mouse@2" 2 "hid" "/pci@1e,600000/usb@b/mouse@1" 9 "hid" "/pci@1e,600000/usb@b/device@2/keyboard@0" 10 "hid" 4 CPU 확인 # cat /etc/path_to_inst grep SPARC "/SUNW,UltraSPARC-IIIi@0,0" 0 "us" "/SUNW,UltraSPARC-IIIi@1,0" 1 "us" # psrinfo 0 on-line since 06/18/ :55:28 1 on-line since 06/18/ :55:31 # psrinfo -pv The physical processor has 1 virtual processor (0) UltraSPARC-IIIi (portid 0 impl 0x16 ver 0x24 clock 1280 MHz) The physical processor has 1 virtual processor (1) UltraSPARC-IIIi (portid 1 impl 0x16 ver 0x24 clock 1280 MHz) # psrinfo -v Status of virtual processor 0 as of: 06/22/ :09:11 on-line since 06/18/ :55:28. The sparcv9 processor operates at 1280 MHz, and has a sparcv9 floating point processor. Status of virtual processor 1 as of: 06/22/ :09:11 on-line since 06/18/ :55:31. The sparcv9 processor operates at 1280 MHz, and has a sparcv9 floating point processor
65 [EX] Disk 확인 & NIC 확인 (Intel Platform on VMWare) 1 디스크확인 # cat /etc/path_to_inst grep cmdk "/pci@0,0/pci-ide@7,1/ide@0/cmdk@0,0" 0 "cmdk" /* IDE Disk */ or # cat /etc/path_to_inst grep sd "/pci@0,0/pci-ide@7,1/ide@1/sd@0,0" 1 "sd" /* CD-ROM */ "/pci@0,0/pci15ad,1976@10/sd@0,0" 0 "sd" /* SCSI Disk */ 2 NIC 확인 # cat /etc/path_to_inst grep pcn "/pci@0,0/pci15ad,790@11/pci1022,2000@0" 0 "pcn" "/pci@0,0/pci15ad,790@11/pci1022,2000@2" 1 "pcn" or # cat /etc/path_to_inst grep e1000g "/pci@0,0/pci15ad,790@11/pci15ad,750@0" 0 "e1000g" "/pci@0,0/pci15ad,790@11/pci15ad,750@3" 1 "e1000g" 3 keyboad/mouse 확인 # cat /etc/path_to_inst egrep '(keyboard mouse)' "/isa/i8042@1,60/keyboard@0" 0 "kb8042" "/isa/i8042@1,60/mouse@1" 0 "mouse8042" 4 CPU 확인 # cat /etc/path_to_inst grep -i cpu "/cpus" 0 "cpunex" "/cpus/cpu@0" 0 "cpudrv" "/cpus/cpu@1" 1 "cpudrv" ( 다른출력결과 ) "/cpus" 0 "cpunex" "/cpus/cpu@0" 0 "cpudrv" "/cpus/cpu@1" 1 "cpudrv" "/cpus/cpu@2" 2 "cpudrv" "/cpus/cpu@3" 3 "cpudrv" # psrinfo 0 on-line since 06/23/ :57:47 1 on-line since 06/23/ :57:48 2 on-line since 06/23/ :57:49 3 on-line since 06/23/ :57:49 # psrinfo -pv The physical processor has 4 virtual processors (0-3) x86 (chipid 0x0 AuthenticAMD family 16 model 4 step 2 clock 2800 MHz) AMD Phenom(tm) II X4 925 Processor # psrinfo -v Status of virtual processor 0 as of: 06/23/ :19:26 on-line since 06/23/ :57:47. The i386 processor operates at 2800 MHz, and has an i387 compatible floating point processor. Status of virtual processor 1 as of: 06/23/ :19:26 on-line since 06/23/ :57:48. The i386 processor operates at 2800 MHz, and has an i387 compatible floating point processor.... ( 중략 )
66 (2). prtconf 명령어 NAME prtconf - print system configuration DESCRIPTION The prtconf command prints the system configuration information. The output includes the total amount of memory, and the configuration of system peripherals formatted as a device tree. If a device path is specified on the command line for those command options that can take a device path, prtconf will only display information for that device node. OPTIONS -p Displays information derived from the device tree provided by the firmware (PROM) on SPARC platforms or the booting system on x86 platforms.the device tree information displayed using this option is a snapshot of the initial configuration and may not accurately reflect reconfiguration events that occur later. -v Specifies verbose mode. -V Displays platform-dependent PROM (on SPARC platforms) or booting system (on x86 platforms) version information. This flag must be used by itself. The output is a string. The format of the string is arbitrary and platform-dependent. NOTES The output of the prtconf command is highly dependent on the version of the PROM installed in the system. The output will be affected in potentially all circumstances. The driver not attached message means that no driver is currently attached to that instance of the device. In general, drivers are loaded and installed (and attached to hardware instances) on demand, and when needed, and may be uninstalled and unloaded when the device is not in use. On x86 platforms, the use of prtconf -vp provides a subset of information from prtconf -v. The value of integer properties from prtconf -vp might require byte swapping for correct interpretation. prtconf 명령어를통해서인식된장치에대한정보를확인할수있다. 이때 grep 명령어를같이사용하면유용하다. prtconf 명령어를수행하면인식된장치들에대한인스턴스이름을확인할수있다. prtconf 명령어는시스템설정정보들을확인할때사용하는명령어이다. 시스템전체메모리나시스템디바이스들의디바이스트리구조별로디바이스목록을보여준다. 그리고 prtconf 명령어에특별한옵션을지정하지않는경우디바이스노드 (Device Node) 만을출력한다. Instnace name ( 명령어형식 ) # prtconf /* 시스템설정정보출력 */ # prtconf -D /* Device Driver 이름도표시 */ # prtconf grep -v not /* 붙어있는장비만출력 */ # prtconf -v /* 장비에대한자세한정보출력 */ # prtconf -pv # prtconf -V /* PROM 버전확인 */ # prtconf grep Memory /* 서버의메모리전체크기확인 */
67 # prtconf grep -v not (Solaris 9, Sparc Platform, Ultra 10) System Configuration: Sun Microsystems sun4u /* 머신아키텍쳐 : sun4u */ Memory size: 512 Megabytes /* 시스템메모리총량 : 512MB */ System Peripherals (Software Nodes): SUNW,Ultra-5_10 /* Ultra 5_10 계열 ( 하드웨어구현플랫폼 ) */ options, instance #0 pci, instance #0 pci, instance #0 ebus, instance #0 power, instance #0 /* 전원장치 */ se, instance #0 /* 시리얼포트 */ su, instance #0 /* 키보드 : PS/2 */ su, instance #1 /* 마우스 : PS/2 */ fdthree, instance #0 network, instance #0 /* Network Interface Card : hme0 */ SUNW,m64B, instance #0 /* VGA Card */ ide, instance #0 dad, instance #0 /* IDE 방식 DISK */ sd, instance #0 /* CD-ROM */ pci, instance #1 pseudo, instance #0 # prtconf grep -v not (Solaris 10 05/09 on Blade150) System Configuration: Sun Microsystems sun4u /* 머신아키텍쳐 : sun4u */ Memory size: 2048 Megabytes /* 시스템메모리총량 : 2GB */ System Peripherals (Software Nodes): SUNW,Sun-Blade-100 /* Sun Blade 100 계열 ( 하드웨어구현플랫폼 ) */ scsi_vhci, instance #0 options, instance #0 pci, instance #0 ebus, instance #0 isa, instance #1 dma, instance #0 floppy, instance #0 parallel, instance #0 power, instance #0 serial, instance #0 serial, instance #1 network, instance #0 /* eri0 : Network Interface Card */ firewire, instance #0 usb, instance #0 keyboard, instance #0 /* USB 키보드 */ mouse, instance #4 /* USB 마우스 */ pmu, instance #0 i2c, instance #0 temperature, instance #0 card-reader, instance #0 dimm, instance #0 /* 메모리 0 : 512MB */ dimm, instance #1 /* 메모리 1 : 512MB */ dimm, instance #2 /* 메모리 2 : 512MB */ dimm, instance #3 /* 메모리 3 : 512MB */ ppm, instance #0 beep, instance #0 fan-control, instance #0 sound, instance #0 ide, instance #0 sd, instance #2 /* CD-ROM */ dad, instance #1 /* IDE DISK1 */ dad, instance #0 /* IDE DISK0 */ pci, instance #0 pci, instance #1 SUNW,hme, instance #0 /* NIC(hme0) */ SUNW,isptwo, instance #0 SUNW,m64B, instance #0 SUNW,UltraSPARC-IIe, instance #0 /* CPU : UltraSPARC-IIe */ ramdisk-root, instance #0 iscsi, instance #0 pseudo, instance #0-67 -
68 # prtconf grep -v not (Solaris 9 x86 on VMWare) System Configuration: Sun Microsystems i86pc /* 머신아키텍쳐 : x86 */ Memory size: 400 Megabytes /* 시스템메모리총량 : 400MB */ System Peripherals (Software Nodes): i86pc options, instance #0 isa, instance #0 asy, instance #0 asy, instance #1 i8042, instance #0 mouse, instance #0 /* 마우스 */ keyboard, instance #0 /* 키보드 */ pci, instance #0 pci-ide, instance #0 ide, instance #0 cmdk, instance #0 /* IDE DISK0 : Primary Master */ cmdk, instance #1 /* IDE DISK1 : Primary Slave */ ide, instance #1 cmdk, instance #2 /* IDE DISK2 : Secondary Slave */ display, instance #0 pci15ad,790, instance #0 pci1022,2000, instance #0 /* NIC(pcn0) */ pci1022,2000, instance #1 /* NIC(pcn1) */ pci1022,2000, instance #2 /* NIC(pcn2) */ objmgr, instance #0 pseudo, instance #0 # prtconf grep -v not (Solaris 10 10/08 x86 on VMWare 6.0.0) System Configuration: Sun Microsystems i86pc /* 머신아키텍쳐 : x86 */ Memory size: 800 Megabytes /* 시스템메모리총량 : 800MB */ System Peripherals (Software Nodes): i86pc scsi_vhci, instance #0 isa, instance #0 i8042, instance #0 keyboard, instance #0 /* 키보드 */ mouse, instance #0 /* 마우스 */ fdc, instance #0 pci, instance #0 pci8086,7191, instance #0 pci-ide, instance #0 ide, instance #0 cmdk, instance #0 /* IDE DISK0 : Primary Master */ cmdk, instance #1 /* IDE DISK1 : Primary Slave */ ide, instance #1 sd, instance #0 /* CD-ROM : Secondary Master */ pci15ad,1976, instance #0 display, instance #0 pci1000,30, instance #0 pci15ad,790, instance #1 pci1022,2000, instance #0 /* NIC 0 */ pci1274,1371, instance #0 pci15ad,770, instance #0 /* NIC 1 */ iscsi, instance #0 pseudo, instance #0 options, instance #0 xsvc, instance #0 objmgr, instance #0 cpus, instance #0-68 -
69 # prtconf grep -v not (Solaris 10 10/08 x86 on VMWare 6.5) System Configuration: Sun Microsystems i86pc /* 시스템아키텍쳐 : x86 */ Memory size: 1000 Megabytes /* 시스템메모리총량 : 1GB */ System Peripherals (Software Nodes): i86pc scsi_vhci, instance #0 isa, instance #0 i8042, instance #0 keyboard, instance #0 /* 키보드 */ mouse, instance #0 /* 마우스 */ pci, instance #0 pci8086,7191, instance #0 pci-ide, instance #0 ide, instance #0 cmdk, instance #0 /* IDE DISK0 : Primary Master */ cmdk, instance #1 /* IDE DISK1 : Primary Slave */ display, instance #0 pci15ad,1976, instance #0 pci15ad,790, instance #1 pci15ad,750, instance #0 /* e1000g0 : NIC */ pci15ad,750, instance #1 /* e1000g1 : NIC */ pci15ad,7a0, instance #0 pci15ad,7a0, instance #1 pci15ad,7a0, instance #2 pci15ad,7a0, instance #3 pci15ad,7a0, instance #4 pci15ad,7a0, instance #5 pci15ad,7a0, instance #6 pci15ad,7a0, instance #7 pci15ad,7a0, instance #8 pci15ad,7a0, instance #9 pci15ad,7a0, instance #10 pci15ad,7a0, instance #11 pci15ad,7a0, instance #12 pci15ad,7a0, instance #13 pci15ad,7a0, instance #14 pci15ad,7a0, instance #15 pci15ad,7a0, instance #16 pci15ad,7a0, instance #17 pci15ad,7a0, instance #18 pci15ad,7a0, instance #19 pci15ad,7a0, instance #20 pci15ad,7a0, instance #21 pci15ad,7a0, instance #22 pci15ad,7a0, instance #23 pci15ad,7a0, instance #24 pci15ad,7a0, instance #25 pci15ad,7a0, instance #26 pci15ad,7a0, instance #27 pci15ad,7a0, instance #28 pci15ad,7a0, instance #29 pci15ad,7a0, instance #30 pci15ad,7a0, instance #31 iscsi, instance #0 pseudo, instance #0 options, instance #0 xsvc, instance #0 cpus, instance #0-69 -
70 # prtconf grep -v not (Solaris 10 10/09 x86 on VMWare 6.5) System Configuration: Sun Microsystems i86pc Memory size: 1500 Megabytes System Peripherals (Software Nodes): i86pc /* 하드웨어구현플랫폼 */ scsi_vhci, instance #0 isa, instance #0 i8042, instance #0 keyboard, instance #0 /* 키보드 */ mouse, instance #0 /* 마운스 */ fdc, instance #0 fd, instance #0 /* 플로피디스크 */ pci, instance #0 pci8086,7191, instance #0 pci-ide, instance #0 ide, instance #1 sd, instance #1 /* CD-ROM */ display, instance #0 /* VGA */ pci15ad,1976, instance #0 sd, instance #0 /* SCSI Disk */ pci15ad,790, instance #1 pci15ad,750, instance #0 pci1274,1371, instance #0 pci15ad,750, instance #1 pci15ad,7a0, instance #0 pci15ad,7a0, instance #1 pci15ad,7a0, instance #2 pci15ad,7a0, instance #3 pci15ad,7a0, instance #4 pci15ad,7a0, instance #5 pci15ad,7a0, instance #6 pci15ad,7a0, instance #7 pci15ad,7a0, instance #8 pci15ad,7a0, instance #9 pci15ad,7a0, instance #10 pci15ad,7a0, instance #11 pci15ad,7a0, instance #12 pci15ad,7a0, instance #13 pci15ad,7a0, instance #14 pci15ad,7a0, instance #15 pci15ad,7a0, instance #16 pci15ad,7a0, instance #17 pci15ad,7a0, instance #18 pci15ad,7a0, instance #19 pci15ad,7a0, instance #20 pci15ad,7a0, instance #21 pci15ad,7a0, instance #22 pci15ad,7a0, instance #23 pci15ad,7a0, instance #24 pci15ad,7a0, instance #25 pci15ad,7a0, instance #26 pci15ad,7a0, instance #27 pci15ad,7a0, instance #28 pci15ad,7a0, instance #29 pci15ad,7a0, instance #30 pci15ad,7a0, instance #31 iscsi, instance #0 pseudo, instance #0 options, instance #0 objmgr, instance #0 xsvc, instance #0 cpus, instance #0 /* CPU */
71 (3). format 명령어 NAME format - disk partitioning and maintenance utility DESCRIPTION format enables you to format, label, repair and analyze disks on your system. Unlike previous disk maintenance programs, format runs under SunOS. Because there are limitations to what can be done to the system disk while the system is running, format is also supported within the memoryresident system environment. For most applications, however, running format under SunOS is the more convenient approach. format 명령어를통해서디바이스의물리장치명 (Physical Device Name) 과논리장치명 (Logical Device Name) 을확인해볼수있다. 인식된디스크디바이스를확인할때가장편하게확인이가능하다. Physical device name (dad@0,0:a) Logical device name (c0t0d0s0) ( 명령어형식 ) # format # format -d c0t0d0 (# format -d /dev/dsk/c0t0d0) [EX] format 명령어출력결과 # format (Sparc Platform, Blade150) l Searching for disks...done AVAILABLE DISK SELECTIONS: 0. c0t0d0 <ST320011A cyl alt 2 hd 16 sec 63> /pci@1f,0/ide@d/dad@0,0 1. c0t2d0 <DEFAULT cyl alt 2 hd 16 sec 63> /pci@1f,0/ide@d/dad@2,0 Specify disk (enter its number): <Ctrl + D> # Press <Ctrl + D> to exit the format command. # format (Sparc Platform, Ultra10) l Searching for disks...done AVAILABLE DISK SELECTIONS: 0. c0t0d0 <ST39120A cyl alt 2 hd 16 sec 63> /pci@1f,0/pci@1,1/ide@3/dad@0,0 Specify disk (enter its number): <Ctrl + D> # Press <Ctrl + D> to exit the format command. # format (Intel Platform on VMWare) l Searching for disks...done AVAILABLE DISK SELECTIONS: 0. c0d0 <DEFAULT cyl 1955 alt 2 hd 255 sec 63> /pci@0,0/pci-ide@7,1/ide@0/cmdk@0,0 Specify disk (enter its number): <Ctrl + D> # Press <Ctrl + D> to exit the format command
72 ( 정리 ) 디스크디바이스이름확인 # cat /etc/path_to_inst egrep '(cmdk dad sd)' Physical Device Name Instance Name # prtconf grep -v not (# prtconf grep -v not egrep '(sd dad cmdk)') Instance Name # format (# iostat -En) Logical Device Name Physical Device Name [ 참고 ] # iostat En # cfgadm al # prtdiag -v
73 Solaris 10 Admin I Guide 2. Management Local Disk l l l Device Reconfiguration l # touch /reconfigure ; reboot l ok boot -r l # reboot -- -r l # devfsadm -v l # drvconfig ; disks Partitioning the Hard Disk using format CMD l # format Manging Disk Label l l l # format # prtvtoc /dev/rdsk/c0t1d0s2 # fmthard?s /vtoc/c0t1d0.txt /dev/rdsk/c0t1d0s2 솔라리스서버시스템에서는디스크추가작업이빈번하게일어난다. 이것은서버시스템자체가항상서비스중이기때문에빈번한디스크 I/O 가일어나서디스크가고장나거나, 또는대용량서비스를제공하기위해서디스크공간이많이필요하기때문이다. 디스크공간을논리적으로확장하기위해서 RAID 구성 (Virtual Volume) 구성을많이하지만이문서에서는 RAID 에관해서는다루고있지않다. RAID 부분은 Solaris Server Admin II 과정을참고하기바란다. 솔라리스운영체제에서디스크를추가하는작업은다음과같이 4개의단계로구분한다. Device Reconfiguration -> 장치이름생성하는과정 format(slice) -> format 명령어를통해서파티션을나누는과정 newfs(filesystem, UFS) -> newfs 명령어를통해서파일시스템을생성하는과정 mount(device Mount) -> mount 명령어를통해서장치를쓸수있는상태로만드는과정
74 디바이스재인식 (Device Reconfiguration) (1). 장치명 (Device Name) 솔라리스시스템에서는한개의장치에 3 가지이름을만들어서사용하고있다. 장치의명칭은 (a) 물리적인장치명 (b) 논리적인장치명 (c) 인스탄스장치명으로구분한다. 또한한개의물리 / 논리장치명을 I/O 의차이에따라서 (a) 블럭장치명과 (b) 캐릭터장치명으로구분한다. 디바이스명 (Device Naming) 물리장치명 (Physical Device Name) - /devices ( 예 : /devices/pci@1f,0/pci@1,1/ide@3/dad@0,0:a) 논리장치명 (Logical Device Name) - /dev ( 예 : /dev/dsk/c0t0d0s0) 인스턴스명 (Instance Name) - /etc/path_to_inst ( 예 : dad0, sd0) [ 참고 ] 장치이름의상관관계 /dev 디렉토리하위의논리장치명은모두 /devices 디렉토리하위의물리적인장치명에심볼릭링크되어져있다. /etc/path_to_inst 파일에서는물리적인장치명과인스탄스장치명을맵핑 (Mapping) 되어져있다. 따라서 /dev 디렉토리하위의논리장치명이나 /devices 디렉토리하위의물리장치명이나 /etc/path_to_inst 파일의인스턴스명은같은것을나타낸다. 모두물리적인장치명을나타내고있다. /devices/pci@1f,0/pci@1,1/ide@3/dad@0,0:a v v Symbolic Link Mapping v v /dev/dsk/c0t0d0s0 /etc/path_to_inst(instance Name) [ 그림 ] 디바이스장치명의상관관계 (2). 장치주번호 / 부번호 (Major / Minor Device Number) 디스크디바이스에관련해서주장치번호 (Major Device Number) 는장치의종류를나타내고, 부장치번호 (Minor Device Number) 는파티션번호 (Partition Number, Slice Number) 를나타낸다. l Disk Device Major number : 장치의종류를나타낸다. l Disk Device Minor number : 장치의파티션번호를나타낸다. [ 참고 ] 장치 (Device) 관련파일들 장치 (Device) 에관련한파일은다음과같다. l /etc/path_to_inst : 장치의이름에대한인스턴스이름이정의되어있다. l /etc/name_to_major : 장치에대한주장치번호가정의되어있다. l /etc/driver_classes : 디바이스드라이버의클래스정의되어있다. l /etc/driver_aliases : 장치에대한엘리어스이름이정의되어있다. l /etc/minor_perm : 생성되는장치에대한퍼미션 / 소유권 / 그룹권이정의되어있다
75 [EX1] Major Device Number / Minor Device Number 확인 (Sparc Platform on Blade 150) (Major Device Number) 주장치번호는장치의종류를나타낸다. # ls -l /dev/dsk/c0t0d0s0 lrwxrwxrwx 1 root root 38 Apr 9 17:10 /dev/dsk/c0t0d0s0 ->../../devices/pci@1f,0/ide@d/dad@0,0:a # ls -l /devices/pci@1f,0/ide@d/dad@0,0:a brw-r root sys # grep 136 /etc/name_to_major 136, 0 Jul 22 00:56 /devices/pci@1f,0/ide@d/dad@0,0:a V V Major Minor dad 136 -> /etc/name_to_major 파일안에디바이스의인스턴스이름 (Device Instance Name) 과주디바이스번호 (Major Device Number) 가맵핑되어있다. 인스턴스이름에대한정보는 /etc/path_to_inst 파일을참고한다. (Minor Device Number) 부장치번호는파티션번호를의미한다. # ls -l /dev/dsk/c0t0d0s0 lrwxrwxrwx 1 root root 46 Feb 2 16:05 /dev/dsk/c0t0d0s0 ->../../devices/pci@1f,0/pci@1,1/ide@3/dad@0,0:a # ls -l /devices/pci@1f,0/pci@1,1/ide@3/dad@0,0:a brw-r root sys 136, 0 Feb 2 16:05 /devices/pci@1f,0/pci@1,1/ide@3/dad@0,0:a # ls -l /dev/dsk/c0t0d0s1 lrwxrwxrwx 1 root root 46 Feb 2 16:05 /dev/dsk/c0t0d0s1 ->../../devices/pci@1f,0/pci@1,1/ide@3/dad@0,0:b # ls -l /devices/pci@1f,0/pci@1,1/ide@3/dad@0,0:b brw-r root sys 136, 1 Feb 24 10:32 /devices/pci@1f,0/pci@1,1/ide@3/dad@0,0:b # ls -l /dev/dsk/c0t0d0s3 lrwxrwxrwx 1 root root 46 Feb 2 16:05 /dev/dsk/c0t0d0s3 ->../../devices/pci@1f,0/pci@1,1/ide@3/dad@0,0:d # ls -l /devices/pci@1f,0/pci@1,1/ide@3/dad@0,0:d brw-r root sys 136, 3 Feb 2 16:05 /devices/pci@1f,0/pci@1,1/ide@3/dad@0,0:d c0t0d0s0 -> 136,0 (dad@0,0:a) c0t0d0s1 -> 136,1 (dad@0,0:b) c0t0d0s3 -> 136,3 (dad@0,0:d)
76 [ 참고 ] Major Device Number / Minor Device Number 확인 (Intel Platform on VMWare) (Major Device Number 확인 ) 주장치번호는장치의종류를나타낸다. # ls -l /dev/dsk/c0d0s0 lrwxrwxrwx 1 root root 50 9 월 8 20:35 /dev/dsk/c0d0s0 ->../../devices/pci@0,0/pci-ide@7,1/ide@0/cmdk@0,0:a # ls -l /devices/pci@0,0/pci-ide@7,1/ide@0/cmdk@0,0:a brw-r root sys 102, 0 9 월 24 12:42 /devices/pci@0,0/pci-ide@7,1/ide@0/cmdk@0,0:a # grep 102 /etc/name_to_major cmdk 102 (Minor Device Number 확인 ) 부장치번호는파티션번호를나타낸다. # ls -l /dev/dsk/c0d0s0 lrwxrwxrwx 1 root root 50 1 월 7 12:22 /dev/dsk/c0d0s0 ->../../devices/pci@0,0/pci-ide@7,1/ide@0/cmdk@0,0:a # ls -l /devices/pci@0,0/pci-ide@7,1/ide@0/cmdk@0,0:a brw-r root sys 102, 0 # ls -l /dev/dsk/c0d0s1 1 월 7 12:22 /devices/pci@0,0/pci-ide@7,1/ide@0/cmdk@0,0:a lrwxrwxrwx 1 root root 50 9 월 8 20:35 /dev/dsk/c0d0s1 ->../../devices/pci@0,0/pci-ide@7,1/ide@0/cmdk@0,0:b # ls -l /devices/pci@0,0/pci-ide@7,1/ide@0/cmdk@0,0:b brw-r root sys # ls -l /dev/dsk/c0d0s3 102, 1 1 월 22 10:07 /devices/pci@0,0/pci-ide@7,1/ide@0/cmdk@0,0:b lrwxrwxrwx 1 root root 50 9 월 8 20:35 /dev/dsk/c0d0s3 ->../../devices/pci@0,0/pci-ide@7,1/ide@0/cmdk@0,0:d # ls -l /devices/pci@0,0/pci-ide@7,1/ide@0/cmdk@0,0:d brw-r root sys 102, 3 1 월 7 12:22 /devices/pci@0,0/pci-ide@7,1/ide@0/cmdk@0,0:d c0d0s0 -> 102,0 (cmdk@0,0:a) c0d0s1 -> 102,1 (cmdk@0,0:b) c0d0s3 -> 102,3 (cmdk@0,0:d)
77 (3). 블럭장치명, 캐릭터장치명 솔라리스시스템에서는장치의 I/O 단위에따라서한개의장치에 2 가지의장치파일이름을갖도록구성되었다. 하나는 (a) 블럭장치명이고다른하나는 (b) 캐릭터장치명이다. 블럭장치의 I/O 의단위는 8 Kbytes 이고캐릭터장치의 I/O 단위는 512 Bytes 단위이다. 디스크디바이스를다룰때캐릭터디바이스이름을지정하게되면캐릭터단위 (512 Bytes, 1 Sector) 의 I/O 가발생한다. 또한디스크다비이스를다룰때블럭디바이스이름을지정하게되면블럭단위 (8 KB, 16 Sectore) 의 I/O 가발생하게된다. 디스크디바이스를다루는경우블럭디바이스이름을사용하게되면캐릭터디바이스이름을지정하는것에비해성능이좋아진다. 한번에 16 개의섹터씩 I/O 가발생하기때문이다. 솔라리스시스템에서디스크디바이스에대한블럭디바이스이름을사용하는대표적인경우는디스크 ( 파티션 ) 를마운트해서사용하는경우이다. 솔라리스시스템에서디스크디바이스에대한캐릭터디바이스이름을사용하는대표적인경우는디스크 ( 파티션 ) 를마운트하지않고파일시스템 ( 파티션 ) 을직접다루는경우 (newfs 명령어나 fsck 명령어수행등 ) 이다. Block Device Name : Input/Output 블럭단위로발생하는장치파일 ( 예 : DISK 일때, I/O 단위 8kbytes(512bytes * 16)) Character Device Name : Input/Output 바이트 ( 캐릭터 ) 단위로발생하는장치파일 = Raw Device Name ( 예 : DISK 일때, I/O 단위 512bytes(1 Sector)) 일반적인파일 / 디렉토리을다루는명령어 cp, mv, rm, mkdir 명령어등을사용하는경우블럭디비아스파일을사용하는경우이므로 I/O 단위가 8K 단위로발생한다. (Block Device File) I/O 가블럭단위로발생하는장치파일이다. # ls -l /dev/dsk/c0t0d0s0 lrwxrwxrwx 1 root root 46 Feb 2 16:05 /dev/dsk/c0t0d0s0 ->../../devices/pci@1f,0/pci@1,1/ide@3/dad@0,0:a # ls -l /devices/pci@1f,0/pci@1,1/ide@3/dad@0,0:a brw-r root sys 136, 0 Feb 2 16:05 /devices/pci@1f,0/pci@1,1/ide@3/dad@0,0:a (Character Device File) I/O 가캐릭터단위로발생하는장치파일이다. # ls -al /dev/rdsk/c0t0d0s0 lrwxrwxrwx 1 root root 46 Feb 2 16:05 /dev/dsk/c0t0d0s0 ->../../devices/pci@1f,0/pci@1,1/ide@3/dad@0,0:a,raw # ls -l /devices/pci@1f,0/pci@1,1/ide@3/dad@0,0:a,raw crw-r root sys 136, 0 Feb 2 16:05 /devices/pci@0,0/pci-ide@7,1/ide@0/dad@0,0:a,raw
78 ( 정리 ) Device Reconfiguration 을배우기위한선수지식 Device File Name 3 가지존재 (a). Physical Device Name /devices/pci@1f,0/pci@1,1/ide@3/dad@0,0:a /devices/pci@1f,0/pci@1,1/ide@3/dad@0,0:a,raw (b). Logical Device Name /dev/dsk/c0t0d0s0 /dev/rdsk/c0t0d0s0 (c). Instance Name dad0, sd0, e1000g0... Device File 확인명령어 /etc/path_to_inst prtconf grep -v not format Device File Information (Major Device Number / Minor Device Number) Major Device Number(Device Type, /etc/name_to_major) Minor Device Number(Slice Number) Disk Device File Block Device File Character Device File
79 (4). 장치재인식 (Device Reconfiguration) 과정 솔라리스시스템에서어떤장치가올바르게동작하기위해서는장치 (Device) 가존재하고, 디바이스드라이버 (Device Driver) 가존재하고, 장치파일의이름 (Device File Name) 이존재하면이장치를다룰수있다. 솔라리스시스템에서새로운장치를붙였다면장치을재인식시켜야한다. 장치재인식과정은새로붙은장치에대해서 3 가지파일이름을만드는과정을말한다. 다시말해서물리장치명을만들고심볼릭링크를통해논리장치명을만들고 /etc/path_to_inst 파일에물리장치면과인스탄스장치명을매핑시키는과정이다. 장치재인식과정은부팅을시키는경우 (a, b, c) 와부팅을시키지않는경우 (d, e) 로나누어볼수있다. 장치재인식방법 (How To Device Reconfiguration) (a). # touch /reconfigure # init 5 /* Power Off */ (b). ok boot -r (c). # reboot -- -r (-r : reconfiguration) (-r : reconfiguration) (d). # devfsadm -i dad (Solaris 8 버전에서나온새로운명령어 ) # devfsadm -i sd (-i : specific) EX) # devfsadm -i st # devfsadm -c disk (-c : class (disk, tape, port, audio, and pseudo)) EX) # devfsadm -c disk -c tape -c audio # devfsadm -C (-C : CleanUp) # devfsadm -v (-v : verbose) (e). # drvconfig -i dad (Solaris 7 이하 ) # drvconfig -i sd # drvconfig -c disk # disks (disks(1m), tapes(1m), ports(1m)) [ 참고 ] 장치재인식 (Device Reconfiguration) 과정의의미 ( 예 ) 새로운디스크를추가하는경우 -> 기존의디스크 ( 예 : c0t0d0) 한개가존재 -> 새로운디스크 ( 예 : c0t1d0) 추가 -> 부팅 -> 부팅시에자동으로장치가인식되지않음 # format AVAILABLE DISK SELECTIONS: 0. c0t0d0 <Maxtor 53073H4 cyl alt 2 hd 16 sec 63> /pci@1f,0/pci@1,1/ide@3/dad@0,0 # devfsadm -c disk # format AVAILABLE DISK SELECTIONS: 0. c0t0d0 <Maxtor 53073H4 cyl alt 2 hd 16 sec 63> /pci@1f,0/pci@1,1/ide@3/dad@0,0 1. c0t1d0<maxtor 53073H4 cyl alt 2 hd 16 sec 63> /pci@1f,0/pci@1,1/ide@3/dad@1,0-79 -
80 [Q & A] Device Reconfiguration 업데이트되는디렉토리 < 질문 > 디스크를장작하고 devfsadm 명령어를수행한경우업데이트되는업데이트되는파일이나디렉토리는어떻게되나요? < 답변 > 다음과같은디렉토리를참고하세요. - /devices : Block / Character Device Files(Physical Device Files) - /dev/dsk : Block Device File(Logical Device File) - /dev/rdsk : Character(=Raw) Device File(Logical Device File) - /etc/path_to_inst : Physical Device Name, Instance Name [ 실습 ] Disk 추가실습 (Solari10 05/09 x86 on VMWare) Disk 추가 (Disk 장착 ) Device Reconfiguration( 장치인식 ) (a). Disk 추가 # sync ; sync ; poweroff ( 주의 ) VMWare 을끄지않은상태에서는 SCSI-DISK 만추가가가능하다. VMWare > VM > Setting > Add > Hard Disk > "Create a new virtual disk" > IDE 선택 > 용량 : 1G PowerON (b). Device Reconfiguration # format AVAILABLE DISK SELECTIONS: 0. c0d0 <DEFAULT cyl alt 2 hd 15 sec 63> /pci@0,0/pci-ide@7,1/ide@0/cmdk@0,0 Specify disk (enter its number): <Ctrl + D> <----- '<Ctrl + D>' 입력 # devfsadm -v ( 출력화면 ) # format AVAILABLE DISK SELECTIONS: 0. c0d0 <DEFAULT cyl alt 2 hd 15 sec 63> /pci@0,0/pci-ide@7,1/ide@0/cmdk@0,0 1. c0d1 <DEFAULT cyl 2077 alt 2 hd 16 sec 63> /pci@0,0/pci-ide@7,1/ide@0/cmdk@1,0 Specify disk (enter its number): <Ctrl + D> <----- '<Ctrl + D>' 입력 # cat /etc/path_to_inst egrep '(sd cmdk)' "/pci@0,0/pci-ide@7,1/ide@0/cmdk@0,0" 0 "cmdk" "/pci@0,0/pci-ide@7,1/ide@0/cmdk@1,0" 1 "cmdk" ( 알림 ) VMWare 6.5 버전에설치된 Solaris 10 5/08 버전에서는부팅시에자동으로새로운디바이스를위한정보 (Physical Device Name) 가생성되고, /etc/path_to_inst 파일에도추가된다. 하지만논리적인디바이스이름 (Logical Device Name) 은생성된상태가아니기때문에 devfsadm 명령어등을통해서생성해줘야한다
81 [EX1] 디바이스파일 (Device File) 생성 l 파일생성방법 & 파일삭제방법 ( 일반파일 ) # touch file1 -> # rm file1 ( 링크파일 ) # ln -s file1 file2 -> # rm file2 ( 디렉토리 ) # mkdir dir1 -> # rm -r dir1 ( 장치파일 )? -> # rm <Device File> l 장치파일은어떻게만들어지는지 mknod 명령어를통해만들어보자. 1 기존디바이스파일정보확인 # cd /test # ls -ll /dev/dsk/c0t2d0s0 brw-r root sys 136, 0 Jul 22 00:56 /dev/dsk/c0t2d0s0 2 블럭디바이스파일생성 # mknod testfile b l b : Block Device l 136 : Major Device Number l 7 : Minor Device Number # ls -l testfile brw-r--r-- 1 root root 136, 7 Jul 23 12:21 testfile OPTIONS -L If an argument is a symbolic link, this option evaluates the file information and file type of the file or directory that the link references, rather than those of the link itself. However, the name of the link is displayed, rather than the referenced file or directory. [EX2] Device Reconfiguration 실습 l /dev/dsk/*, /dev/rdsk/* 파일삭제후재생성 1 /dev/dsk/*, /dev/rdsk/* 파일확인 # ls /dev/dsk c0t0d0s0@ c0t0d0s4@ c0t1d0s0@ c0t1d0s4@ c0t2d0s0@ c0t2d0s4@ c0t0d0s1@ c0t0d0s5@ c0t1d0s1@ c0t1d0s5@ c0t2d0s1@ c0t2d0s5@ c0t0d0s2@ c0t0d0s6@ c0t1d0s2@ c0t1d0s6@ c0t2d0s2@ c0t2d0s6@ c0t0d0s3@ c0t0d0s7@ c0t1d0s3@ c0t1d0s7@ c0t2d0s3@ c0t2d0s7@ # ls /dev/rdsk c0t0d0s0@ c0t0d0s4@ c0t1d0s0@ c0t1d0s4@ c0t2d0s0@ c0t2d0s4@ c0t0d0s1@ c0t0d0s5@ c0t1d0s1@ c0t1d0s5@ c0t2d0s1@ c0t2d0s5@ c0t0d0s2@ c0t0d0s6@ c0t1d0s2@ c0t1d0s6@ c0t2d0s2@ c0t2d0s6@ c0t0d0s3@ c0t0d0s7@ c0t1d0s3@ c0t1d0s7@ c0t2d0s3@ c0t2d0s7@ 2 /dev/dsk/*, /dev/rdsk/* 파일삭제 # rm /dev/rdsk/* # rm /dev/dsk/* 3 /dev/dsk/*, /dev/rdsk/* 파일재생성및확인 # devfsadm -v -> 출력결과생략 # ls /dev/rdsk -> 원상태로복귀되었다. # ls /dev/dsk -> 원상태로복귀되었다
![[ 참고 ] Tape Device(External Tape Device) 장치인식과정 (Tape Device 미리장착되어있는경우라고가정 ) 1 /dev/rmt 디렉토리확인 # cd /dev/rmt # ls -> Tape 장치가없는상태이므로아무런출력결과도없다.](/docs-images/104/164712495/images/82-0.jpg "2 런레벨 0 으로이동 # init 0 -> 새로운 External Device 에전원을 ON 하기전에 init 명령어를통해런레벨을 0 으로변경한다. -> 장치가미리장착이되어있는경우에는 init 0 수행한다. -> 장치가안된경우에는 init 5 수행한고, Tape 을장착한다.")
82 [ 참고 ] Tape Device(External Tape Device) 장치인식과정 (Tape Device 미리장착되어있는경우라고가정 ) 1 /dev/rmt 디렉토리확인 # cd /dev/rmt # ls -> Tape 장치가없는상태이므로아무런출력결과도없다. 2 런레벨 0 으로이동 # init 0 -> 새로운 External Device 에전원을 ON 하기전에 init 명령어를통해런레벨을 0 으로변경한다. -> 장치가미리장착이되어있는경우에는 init 0 수행한다. -> 장치가안된경우에는 init 5 수행한고, Tape 을장착한다. 3 External Device Power On 시스템을 shutdown 상태에서 External Device 에 Power ON 한다. 4 부팅후 root 사용자로로그인 ok boot -> 로그인창이뜨면, root 사용자로로그인 5 장치인식명령어수행 # devfsadm -v -> 출력결과생략 ( 장치이름이생성되는화면확인 ) 6 장치인식확인 # cd /dev/rmt # ls 0 0bn 0cb 0cn 0hb 0hn 0lb 0ln 0mb 0mn 0u 0ubn 0b 0c 0cbn 0h 0hbn 0l 0lbn 0m 0mbn 0n 0ub 0un
83 [ 참고 ] devfsadm NAME devfsadm, devfsadmd - administration command for /dev /usr/lib/devfsadm/devfsadmd DESCRIPTION devfsadm(1m) maintains the /dev namespace. It replaces the previous suite of devfs administration tools including drvconfig(1m), disks(1m), tapes(1m), ports(1m), audlinks(1m), and devlinks(1m). devfsadm(1m) 명령어는 /dev 디렉토리의이름을관리한다. devfs 관리하기위한이전툴들의기능을포함한다. (drvconfig, disks, tapbes, ports, audlinks, devlinks) The default operation is to attempt to load every driver in the system and attach to all possible device instances. Next, devfsadm creates logical links to device nodes in /dev and /devices and loads the device policy. 기본동작은시스템에사용가능한모든디바이스인스턴스에대해모든시스템드라이버를로드 (Load) 한다. 또한, devfsadm 명령어는 /devices, /dev 디렉토리에디바이스노드 (Node) 에디바이스정책에따라논리적인링크를만든다. devfsadmd(1m) is the daemon version of devfsadm(1m). The daemon is started during system startup and is responsible for handling both reconfiguration boot processing and updating /dev and /devices in response to dynamic reconfiguration event notifications from the kernel. For compatibility purposes, drvconfig(1m), disks(1m), tapes(1m), ports(1m), audlinks(1m), and devlinks(1m) are implemented as links to devfsadm. In addition to managing /dev, devfsadm also maintains the path_to_inst(4) database. OPTIONS The following options are supported: -C Cleanup mode. Prompt devfsadm to cleanup dangling /dev links that are not normally removed. If the -c option is also used, devfsadm only cleans up for the listed devices' classes. -c device_class Restrict operations to devices of class device_class. Solaris defines the following values for device_class: disk, tape, port, audio, and pseudo. This option might be specified more than once to specify multiple device classes. -i driver_name Configure only the devices for the named driver, driver_name. -v Print changes to /dev in verbose mode. SEE ALSO svcs(1), add_drv(1m), modinfo(1m), modload(1m), modunload(1m), rem_drv(1m), svcadm(1m), tapes(1m), path_to_inst(4), attributes(5), privileges(5), smf(5), devfs(7fs) NOTES This document does not constitute an API. The /devices directory might not exist or might have different contents or interpretations in a future release. The existence of this notice does not imply that any other documentation that lacks this notice constitutes an API
84 devfsadm no longer manages the /devices name space. See devfs(7fs). The device configuration service is managed by the service management facility, smf(5), under the service identifier, and can be used to start devfsadm during reconfiguration boot by: svc:/system/device/local:default Otherwise, devfsadm is started by: svc:/system/sysevent:default Administrative actions on this service, such as enabling, disabling, or requesting restart, can be performed using svcadm(1m). The service's status can be queried using the svcs(1) command. NAME [ 참고 ] drvconfig drvconfig - apply permission and ownership changes to devices DESCRIPTION devfsadm(1m) is now the preferred command and should be used instead of drvconfig. The default operation of drvconfig is to apply permission and ownership changes to devices. Normally, this command is run automatically after a new driver has been installed (with add_drv(1m)) and the system has been rebooted. OPTIONS The following options are supported: -cclass_name -idrivername The driver being added to the system exports the class class_name. This option is not normally used directly, but is used by other utilities. It is only effective when used with the -b option. Only configure the devices for the named driver. The following options are used by the implementation of add_drv(1m) and rem_drv(1m), and may not be supported in future versions of Solaris: FILES /devices /etc/minor_perm /etc/name_to_major /etc/driver_classes Device nodes directory Minor mode permissions Major number binding Driver class binding file SEE ALSO sh(1), add_drv(1m), modinfo(1m), modload(1m), modunload(1m), rem_drv(1m), update_drv(1m), path_to_inst(4), attributes(5), devfs(7fs)
85 NAME [ 참고 ] disks disks - creates /dev entries for hard disks attached to the system DESCRIPTION devfsadm(1m) is now the preferred command for /dev and should be used instead of disks. disks creates symbolic links in the /dev/dsk and /dev/rdsk directories pointing to the actual disk device special files under the /devices directory tree. It performs the following steps: 1. disks searches the kernel device tree to see what hard disks are attached to the system. It notes the /devices pathnames for the slices on the drive and determines the physical component of the corresponding /dev/dsk or /dev/rdsk name. 2. The /dev/dsk and /dev/rdsk directories are checked for disk entries - that is, symbolic links with names of the form cn[tn]dnsn, or cn[tn]dnpn, where N represents a decimal number. cn is the logical controller number, an arbitrary number assigned by this program to designate a particular disk controller. The first controller found on the first occasion this program is run on a system, is assigned number 0. tn is the bus-address number of a subsidiary controller attached to a peripheral bus such as SCSI or IPI (the target number for SCSI, and the facility number for IPI controllers). dn is the number of the disk attached to the controller. sn is the slice number on the disk. pn is the FDISK partition number used by fdisk(1m). (x86 Only) 3. If only some of the disk entries are found in /dev/dsk for a disk that has been found under the /devices directory tree, disks creates the missing symbolic links. If none of the entries for a particular disk are found in /dev/dsk, disks checks to see if any entries exist for other disks attached to the same controller, and if so, creates new entries using the same controller number as used for other disks on the same controller. If no other /dev/dsk entries are found for slices of disks belonging to the same physical controller as the current disk, disks assigns the lowest-unused controller number and creates entries for the disk slices using this newlyassigned controller number. disks is run automatically each time a reconfiguration-boot is performed or when add_drv(1m) is executed. When invoking disks(1m) manually, first run drvconfig(1m) to ensure /devices is consistent with the current device configuration
86 format 명령어를통한디스크파티션구성 솔라리스시스템에서파티션작업을수행하기위해서는 (a)format 명령어를사용하거나 (b)fmthard 명령어를사용할수있다. 이문서에서는 format 명령어를통해서작업하는내용을담고있다. [ 참고 ] 솔라리스설치시에최소한 /(root), swap 파티션은필요하다. (1). format CMD NAME format - disk partitioning and maintenance utility DESCRIPTION format enables you to format, label, repair and analyze disks on your system. Unlike previous disk maintenance programs, format runs under SunOS. Because there are limitations to what can be done to the system disk while the system is running, format is also supported within the memoryresident system environment. For most applications, however, running format under SunOS is the more convenient approach. format first uses the disk list defined in data-file if the -x option is used. format then checks for the FORMAT_PATH environment variable, a colon-separated list of filenames and/or directories. In the case of a directory, format searches for a file named format.dat in that directory; a filename should be an absolute pathname, and is used without change. format adds all disk and partition definitions in each specified file to the working set. Multiple identical definitions are silently ignored. If FORMAT_PATH is not set, the path defaults to /etc/format.dat. disk-list is a list of disks in the form c?t?d? or /dev/rdsk/c?t?d?s?. With the latter form, shell wildcard specifications are supported. For example, specifying /dev/rdsk/c2* causes format to work on all drives connected to controller c2 only. If no disk-list is specified, format lists all the disks present in the system that can be administered by format. OPTIONS The following options are supported: Removable media devices are listed only when users execute format in expert mode (option -e). This feature is provided for backward compatibility. Use rmformat(1) for rewritable removable media devices. -e Enable SCSI expert menu. Note this option is not recommended for casual use
87 (1.1) 윈도우 format & 솔라리스 format 비교 솔라리스는 format 명령어를사용하여파티션작업을하고 newfs 명령어를사용하여파일시스템을생성한다. MS 윈도우시스템에서의 format 명령어는파일시스템을만들때사용하는명령어이다 파티션작업파일시스템작업 Winows fdisk format Linux fdisk mkfs -t ext3 Solaris format newfs(=mkfs -F ufs) (1.2) Slice(Partition) 란? 솔라리스시스템에서의슬라이스 (Slice) 는실린더 (Cyliner) 단위로주게된다. 실린더는트랙 (Track) 단위로환산이가능하고, 트랙은다시섹터 (Sector) 단위로환산이가능하다. 이문서에서는슬라이스와파티션을혼용하여사용하고있다. 같은개념의명칭으로생각하면된다. sector => track => cylinder => slice(partition) (1.3) 파티션작업시주의점 Recognizing Disk Space and Undesirable Conditions l Recongnizing Wasted Disk Space l Recongnizing Overlapping Disk Slices Cyliner Number Slice0 Slice1 ( 주의 ) 파티션작업시실린더번호를잘못주어파티션과파티션사이에실린더번호가중첩되어도특별한에러메세지가나오지않기때문에주의해야한다. 또한낭비되는공간이생성되어도특별한에러메세지가나오지않는다. 실린더번호를잘못주어서파티션이중첩되는것은문제점를가지고있다. 하지만실린더번호를잘못주어서낭비되는공간이할당된것은특별한문제점을야기하지는않는다. 궂이낭비되는공간 ( 할당하지않는공간 ) 을만들필요는없다
88 (2). format 명령어을통한디스크파티션작업 [DISK] [MEMORY] [/etc/format.dat] VTOC --disk-> -name/save-> <--label- <-select bootblk verify print [ 그림 ] 파티션작업 format 명령어를통해서파티션작업을할때, disk 명령어가수행이되면디스크에존재하는 VTOC(Volume Table Of Contents, 일명 disk label) 내용이작업메모리에올라오게된다. 작업메모리에있는내용의수정을통해작업내용이완료되었다면 label 명령어를통해서, 현재작업메모리에있는내용을디스크의 VTOC 공간에다시저장할수있다. 작업메모리공간에존재하는작업내용은 name 명령어를통해서이름을붙일수있고 ( 예 : chan01) save 명령어를통해서 /etc/format.dat 파일에저장할수있다. 저장되어진내용은나중에필요한경우 select 명령어를사용하여작업메모리상으로다시불러들일수있다. 이경우 label 명령어를통해 VTOC 공간에저장할수도있다
89 (2-1). format 명령어의하위명령어 (Sub Command) Sparc Platform(On Blade150) 에서작업할때 ( 선수작업 ) dad0(c0t0d0), dad1(c0t2d0) Disk 의 VTOC 백업 # mkdir -p /vtoc # prtvtoc /dev/rdsk/c0t0d0s2 > /vtoc/solarisxxx.vtoc 다음은 format 명령어를통해서작업할디스크를선택하는예제이다. 다음내용은 Intel Platform 솔라리스에서작업한내용이므로, Sparc Platform 솔라리스에서실습할때는디스크장치의이름이다름에주의한다. # format (Solaris10 05/09 x86 on VMWare) Searching for disks...done AVAILABLE DISK SELECTIONS: 0. c0d0 <DEFAULT cyl alt 2 hd 15 sec 63> /pci@0,0/pci-ide@7,1/ide@0/cmdk@0,0 1. c0d1<default cyl 2077 alt 2 hd 16 sec 63> /pci@0,0/pci-ide@7,1/ide@0/cmdk@1,0 Specify disk (enter its number): 1 FORMAT MENU: disk - select a disk /* 작업디스크선택 */ type - select (define) a disk type /* 디스크타입선택 */ partition - select (define) a partition table /* 파티션작업 */ current - describe the current disk /* 현재디스크정보확인 */ format - format and analyze the disk /* 디스크 Raw-Format */ repair - repair a defective sector show - translate a disk address label - write label to the disk /* 현재작업내용을 VTOC에저장 */ analyze - surface analysis /* 디스크표면테스트 */ defect - defect list management backup - search for backup labels verify - read and display labels /* 디스크의 VTOC 내용확인 */ save - save new disk/partition definitions/* 작업내용을저장할파일선택 */ inquiry - show vendor, product and revision /* 디스크벤더정보, 제품, 버전정보 */ volname - set 8-character volume name /* 볼륨이름설정 */!<cmd> - execute <cmd>, then return quit format> inquiry 명령어는 SCSI 디스크에만존재한다. [ 참고 ] Intel Platform 의 8, 9 번슬라이스 ( 파티션 )? Intel Platoform 은 8 번 /9 번슬라이스가존재한다. 이것은 Sparc Platform 에는없는것이다. 8 번파티션 Contains GRUB boot information.(x86 only) 9 번파티션 Provides an area that is reserved for alternate disk blocks. Slice 9 is known as the alternate sector slice.(x86 only)
90 [ 참고 ] format Subcommand analyze backup cache current defect disk fdisk format inquiry label partition quit repair save type verify volname Run read, write, compare tests, and data purge. The data purge function implements the National Computer Security Center Guide to Understanding Data Remnance (NCSC-TG-025 version 2) Overwriting Algorithm. See NOTES. Search for backup labels. VTOC. Searches for backup labels. EFI.Not supported. Enable, disable, and query the state of the write cache and read cache. This menu item only appears when format is invoked with the -e option, and is only supported on SCSI devices.. Display the device name, the disk geometry, and the pathname to the disk device. Displays the following information about the current disk: Device name and device type Number of cylinders, alternate cylinders, heads and sectors Physical device name Retrieve and print defect lists. This option is supported only on SCSI devices. IDE disks perform automatic defect management. Upon using the defect option on an IDE disk, you receive the message: Controller does not support defect management or disk supports automatic defect management. Choose the disk that will be used in subsequent operations (known as the current disk.) Run the fdisk(1m) program to create a fdisk partition for Solaris software (x86 based systems only). Format and verify the current disk. This option is supported only on SCSI devices. IDE disks are pre-formatted by the manufacturer. Upon using the format option on an IDE disk, you receive the message: Cannot format this drive. Please use your manufacturer-supplied formatting utility. Display the vendor, product name, and revision level of the current drive. Write a new label to the current disk. Create and modify slices. Exit the format menu. Repair a specific block on the disk. Save new disk and slice information. VTOC. Saves new disk and partition information. EFI.Not applicable. Select (define) a disk type. Read and display labels. Print information such as the number of cylinders, alternate cylinders, heads, sectors, and the partition table. Displays the following information about the current disk: Device name and device type Number of cylinders, alternate cylinders, heads and sectors Partition table Label the disk with a new eight character volume name. 8 character
91 [ 참고문서 ] SMI(VTOC) Disk Label를 EFI Disk Label로변경 l -> 솔라리스강좌 [ 관리자 ] -> 307번자료 디스크베드섹터치료 l -> 솔라리스질문 & 답변 -> 673번자료
92 (2-2) 파티션작업 일반적으로디스크디바이스를장착하고 format 명령어를통해파티션 ( 슬라이스 ) 작업을할수있는방법은 3 가지이다. (a) 직접사용자하나하나정의하는방식, (b)free hog 파티션을전체로잡고작업하는방식, (c) 현재파티션정보를기반에 free hog 파티션을선언하여사용하는방식이다. [DISK] [MEMORY] [/etc/format.dat] VTOC --disk-> -name/save-> <--label- <-select bootblk verify print 파티션작업방법 (Slice, Partition) 1st) 직접설정하는방식 2nd) "All free hog partition" 을사용하는경우 (Free Hog Partition) 3rd) "Current partition table" 을사용하는경우 (Free Hog partition) 파티션작업을위한슬라이스정책과용량은다음과같다. 새로운디스크를추가하여작업하면된다. 다음에오는표는 1G 기준일때의작업계획에관한것이다. 파티션계획 (Disk Slice Plan) slice mount pointer s0 /oracle 200M /* 오라클프로그램설치공간 */ s1 swap 200M /* 스왑공간늘리기위한공간 */ s2 overlap 1G s3 /data1 200M /* 오라클테이블스페이스공간 */ s4 /data2 200M /* 오라클테이블스페이스공간 */ s5 s6 s7 /logs * /* 로그기록을늘리기위한공간 */
93 (a). Partition 작업 ( 첫번째방법 ) 관리자가파티션설정을위해서실린더번호들을직접설정하는예제이다. 이경우실린더번호를잘못주게되면파티션이중첩되거나, 낭비되는경우가발생할수있으므로주의하여야한다. (Solaris10 05/09 x86 on VMWare) format> partition /* 파티션작업 */ PARTITION MENU: 0 - change `0' partition 1 - change `1' partition 2 - change `2' partition 3 - change `3' partition 4 - change `4' partition 5 - change `5' partition 6 - change `6' partition 7 - change `7' partition select - select a predefined table modify - modify a predefined partition table name - name the current table print - display the current table label - write partition map and label to the disk!<cmd> - execute <cmd>, then return quit partition> print /* 현재메모리의작업내용확인 */ Current partition table (original): Total disk cylinders available: (reserved cylinders) Part Tag Flag Cylinders Size Blocks 0 unassigned wm 0 0 (0/0/0) 0 1 unassigned wm 0 0 (0/0/0) 0 2 backup wu MB (1020/0/0) unassigned wm 0 0 (0/0/0) 0 4 unassigned wm 0 0 (0/0/0) 0 5 unassigned wm 0 0 (0/0/0) 0 6 unassigned wm 0 0 (0/0/0) 0 7 unassigned wm 0 0 (0/0/0) 0 8 boot wu MB (1/0/0) alternates wm MB (2/0/0) 4096 partition> 0 /* 0 번슬라이스선택 */ Part Tag Flag Cylinders Size Blocks 0 unassigned wm 0 0 (0/0/0) 0 Enter partition id tag[root]:? Expecting one of the following: (abbreviations ok): unassigned boot root swap usr backup stand var home alternates reserved /* Tag : value that indicates how the slice is being used. 0 = unassigned, 1 = boot, 2 = root, 3 = swap, 4 = usr, 5 = backup, 6 = stand, 8 = home, 9 = alternates Veritas Volume Manager array tags: 14 = public region), 15 = private region) */ Enter partition id tag[root]: unassigned Enter partition permission flags[wm]:? Expecting one of the following: (abbreviations ok): wm - read-write, mountable /* 다른파티션 */ wu - read-write, unmountable /* swap 파티션 */ rm - read-only, mountable ru - read-only, unmountable /* Flag : 00 wm = The disk slice is writable and mountable. 01 wu = The disk slice is writable and unmountable. This is the default state of slices dedicated for swap areas
94 */ 10 rm = The disk slice is read-only and mountable. 11 ru = The disk slice is read-only and unmountable. Enter partition permission flags[wm]: wm Enter new starting cyl[0]: 3 /* sparc : 0, intel : 3 */ Enter partition size[0b, 0c, 3e, 0.00mb, 0.00gb]: 200mb partition> print Current partition table (unnamed): Total disk cylinders available: (reserved cylinders) Part Tag Flag Cylinders Size Blocks 0 unassigned wm MB (200/0/0) unassigned wm 0 0 (0/0/0) 0 2 backup wu MB (1020/0/0) unassigned wm 0 0 (0/0/0) 0 4 unassigned wm 0 0 (0/0/0) 0 5 unassigned wm 0 0 (0/0/0) 0 6 unassigned wm 0 0 (0/0/0) 0 7 unassigned wm 0 0 (0/0/0) 0 8 boot wu MB (1/0/0) alternates wm MB (2/0/0) 4096 partition> 1 Part Tag Flag Cylinders Size Blocks 1 unassigned wm 0 0 (0/0/0) 0 Enter partition id tag[unassigned]:? Expecting one of the following: (abbreviations ok): unassigned boot root swap usr backup stand var home alternates reserved Enter partition id tag[unassigned]: swap Enter partition permission flags[wm]: wu Enter new starting cyl[3]: 203 Enter partition size[0b, 0c, 203e, 0.00mb, 0.00gb]: 200mb partition> print Current partition table (unnamed): Total disk cylinders available: (reserved cylinders) Part Tag Flag Cylinders Size Blocks 0 unassigned wm MB (200/0/0) swap wu MB (200/0/0) backup wu MB (1020/0/0) unassigned wm 0 0 (0/0/0) 0 4 unassigned wm 0 0 (0/0/0) 0 5 unassigned wm 0 0 (0/0/0) 0 6 unassigned wm 0 0 (0/0/0) 0 7 unassigned wm 0 0 (0/0/0) 0 8 boot wu MB (1/0/0) alternates wm MB (2/0/0) 4096 partition> 3 Part Tag Flag Cylinders Size Blocks 3 unassigned wm 0 0 (0/0/0) 0 Enter partition id tag[unassigned]: [Enter] Enter partition permission flags[wm]: [Enter] Enter new starting cyl[0]: 403 Enter partition size[0b, 0c, 403e, 0.00mb, 0.00gb]: 200mb partition> print Current partition table (unnamed): Total disk cylinders available: (reserved cylinders) Part Tag Flag Cylinders Size Blocks 0 unassigned wm MB (200/0/0) swap wu MB (200/0/0) backup wu MB (1020/0/0) unassigned wm MB (200/0/0) unassigned wm 0 0 (0/0/0) 0 5 unassigned wm 0 0 (0/0/0)
95 6 unassigned wm 0 0 (0/0/0) 0 7 unassigned wm 0 0 (0/0/0) 0 8 boot wu MB (1/0/0) alternates wm MB (2/0/0) 4096 partition> 4 Part Tag Flag Cylinders Size Blocks 4 unassigned wm 0 0 (0/0/0) 0 Enter partition id tag[unassigned]: [Enter] Enter partition permission flags[wm]: [Enter] Enter new starting cyl[0]: 603 Enter partition size[0b, 0c, 603e, 0.00mb, 0.00gb]: 200mb partition> print Current partition table (unnamed): Total disk cylinders available: (reserved cylinders) Part Tag Flag Cylinders Size Blocks 0 unassigned wm MB (200/0/0) swap wu MB (200/0/0) backup wu MB (1020/0/0) unassigned wm MB (200/0/0) unassigned wm MB (200/0/0) unassigned wm 0 0 (0/0/0) 0 6 unassigned wm 0 0 (0/0/0) 0 7 unassigned wm 0 0 (0/0/0) 0 8 boot wu MB (1/0/0) alternates wm MB (2/0/0) 4096 partition> 7 Part Tag Flag Cylinders Size Blocks 7 unassigned wm 0 0 (0/0/0) 0 Enter partition id tag[unassigned]: [Enter] Enter partition permission flags[wm]: [Enter] Enter new starting cyl[0]: 803 Enter partition size[0b, 0c, 803e, 0.00mb, 0.00gb]: $ /* 마지막용량까지 */ partition> print Current partition table (unnamed): Total disk cylinders available: (reserved cylinders) Part Tag Flag Cylinders Size Blocks 0 unassigned wm MB (200/0/0) swap wu MB (200/0/0) backup wu MB (1020/0/0) unassigned wm MB (200/0/0) unassigned wm MB (200/0/0) unassigned wm 0 0 (0/0/0) 0 6 unassigned wm 0 0 (0/0/0) 0 7 unassigned wm MB (217/0/0) boot wu MB (1/0/0) alternates wm MB (2/0/0) 4096 partition> label Ready to label disk, continue? y partition> quit FORMAT MENU: disk - select a disk type - select (define) a disk type partition - select (define) a partition table current - describe the current disk format - format and analyze the disk fdisk - run the fdisk program repair - repair a defective sector show - translate a disk address label - write label to the disk analyze - surface analysis defect - defect list management backup - search for backup labels
96 verify save volname!<cmd> quit - read and display labels - save new disk/partition definitions - set 8-character volume name - execute <cmd>, then return format> verify Primary label contents:... ( 중략 )... Part Tag Flag Cylinders Size Blocks 0 unassigned wm MB (200/0/0) swap wu MB (200/0/0) backup wu MB (1020/0/0) unassigned wm MB (200/0/0) unassigned wm MB (200/0/0) unassigned wm 0 0 (0/0/0) 0 6 unassigned wm 0 0 (0/0/0) 0 7 unassigned wm MB (217/0/0) boot wu MB (1/0/0) alternates wm MB (2/0/0)
97 (b). Partition 작업 ( 두번째방법 ) 다음은전체 Free Hog 파티션을사용하여디스크파티션작업을수행하는경우의예이다. 이경우실린더번호는자동으로맞추어지기때문에관리자가새로운디스크작업을수행할때빠르고, 편리하게작업이가능하다. format> partition PARTITION MENU: 0 - change `0' partition 1 - change `1' partition 2 - change `2' partition 3 - change `3' partition 4 - change `4' partition 5 - change `5' partition 6 - change `6' partition 7 - change `7' partition select - select a predefined table modify - modify a predefined partition table name - name the current table print - display the current table label - write partition map and label to the disk!<cmd> - execute <cmd>, then return quit partition> modify Select partitioning base: 0. Current partition table (unnamed) 1. All Free Hog Choose base (enter number) [0]? 1 Part Tag Flag Cylinders Size Blocks 0 root wm 0 0 (0/0/0) 0 1 swap wu 0 0 (0/0/0) 0 2 backup wu MB (1020/0/0) unassigned wm 0 0 (0/0/0) 0 4 unassigned wm 0 0 (0/0/0) 0 5 unassigned wm 0 0 (0/0/0) 0 6 usr wm 0 0 (0/0/0) 0 7 unassigned wm 0 0 (0/0/0) 0 8 boot wu MB (1/0/0) alternates wm MB (2/0/0) 4096 Do you wish to continue creating a new partition table based on above table[yes]? yes Free Hog partition[6]? 7 Enter size of partition '0' [0b, 0c, 0.00mb, 0.00gb]: 200mb Enter size of partition '1' [0b, 0c, 0.00mb, 0.00gb]: 200mb Enter size of partition '3' [0b, 0c, 0.00mb, 0.00gb]: 200mb Enter size of partition '4' [0b, 0c, 0.00mb, 0.00gb]: 200mb Enter size of partition '5' [0b, 0c, 0.00mb, 0.00gb]: [Enter] Enter size of partition '6' [0b, 0c, 0.00mb, 0.00gb]: [Enter] Part Tag Flag Cylinders Size Blocks 0 root wm MB (200/0/0) swap wu MB (200/0/0) backup wu MB (1020/0/0) unassigned wm MB (200/0/0) unassigned wm MB (200/0/0) unassigned wm 0 0 (0/0/0) 0 6 usr wm 0 0 (0/0/0) 0 7 unassigned wm MB (217/0/0) boot wu MB (1/0/0) alternates wm MB (2/0/0) 4096 Okay to make this the current partition table[yes]? yes Enter table name (remember quotes): chan01 /* name 명령어자동수행 */ Ready to label disk, continue? y /* label 명령어자동수행 */
98 partition> print Current partition table (chan01): Total disk cylinders available: (reserved cylinders) Part Tag Flag Cylinders Size Blocks 0 unassigned wm MB (200/0/0) swap wu MB (200/0/0) backup wu MB (1020/0/0) unassigned wm MB (200/0/0) unassigned wm MB (200/0/0) unassigned wm 0 0 (0/0/0) 0 6 unassigned wm 0 0 (0/0/0) 0 7 unassigned wm MB (217/0/0) boot wu MB (1/0/0) alternates wm MB (2/0/0) 4096 partition> quit FORMAT MENU: disk - select a disk type - select (define) a disk type partition - select (define) a partition table current - describe the current disk format - format and analyze the disk fdisk - run the fdisk program repair - repair a defective sector show - translate a disk address label - write label to the disk analyze - surface analysis defect - defect list management backup - search for backup labels verify - read and display labels save - save new disk/partition definitions volname - set 8-character volume name!<cmd> - execute <cmd>, then return quit format> verify Primary label contents: Volume name = < > ascii name = <DEFAULT cyl 1020 alt 2 hd 64 sec 32> pcyl = 1022 ncyl = 1020 acyl = 2 bcyl = 0 nhead = 64 nsect = 32 Part Tag Flag Cylinders Size Blocks 0 unassigned wm MB (200/0/0) swap wu MB (200/0/0) backup wu MB (1020/0/0) unassigned wm MB (200/0/0) unassigned wm MB (200/0/0) unassigned wm 0 0 (0/0/0) 0 6 unassigned wm 0 0 (0/0/0) 0 7 unassigned wm MB (217/0/0) boot wu MB (1/0/0) alternates wm MB (2/0/0)
99 (c). Partition 작업 ( 세번째방법 ) 다음은 Free Hog 파티션을사용하여기존에사용하던파티션을일부변경하여사용하는경우의예이다. 이런경우에도실린더번호들은자동으로설정되기때문에편리하게기존파티션을재설정할수있게된다. format> partition PARTITION MENU: 0 - change `0' partition 1 - change `1' partition 2 - change `2' partition 3 - change `3' partition 4 - change `4' partition 5 - change `5' partition 6 - change `6' partition 7 - change `7' partition select - select a predefined table modify - modify a predefined partition table name - name the current table print - display the current table label - write partition map and label to the disk!<cmd> - execute <cmd>, then return quit partition>? Expecting one of the following: (abbreviations ok): 0 - change `0' partition 1 - change `1' partition 2 - change `2' partition 3 - change `3' partition 4 - change `4' partition 5 - change `5' partition 6 - change `6' partition 7 - change `7' partition select - select a predefined table modify - modify a predefined partition table name - name the current table print - display the current table label - write partition map and label to the disk!<cmd> - execute <cmd>, then return quit partition> modify Select partitioning base: 0. Current partition table (original) 1. All Free Hog Choose base (enter number) [0]? 0 Part Tag Flag Cylinders Size Blocks 0 unassigned wm MB (200/0/0) swap wu MB (200/0/0) backup wu MB (1020/0/0) unassigned wm MB (200/0/0) unassigned wm MB (200/0/0) unassigned wm 0 0 (0/0/0) 0 6 unassigned wm 0 0 (0/0/0) 0 7 unassigned wm MB (217/0/0) boot wu MB (1/0/0) alternates wm MB (2/0/0) 4096 Do you wish to continue creating a new partition table based on above table[yes]? yes Free Hog partition[6]? 7 Enter size of partition '0' [409600b, 200c, mb, 0.20gb]: 100mb Enter size of partition '1' [409600b, 200c, mb, 0.20gb]: 300mb Enter size of partition '3' [409600b, 200c, mb, 0.20gb]: 200mb Enter size of partition '4' [409600b, 200c, mb, 0.20gb]: 200mb Enter size of partition '5' [0b, 0c, 0.00mb, 0.00gb]: [Enter] Enter size of partition '6' [0b, 0c, 0.00mb, 0.00gb]: [Enter]
100 Part Tag Flag Cylinders Size Blocks 0 unassigned wm MB (100/0/0) swap wu MB (300/0/0) backup wu MB (1020/0/0) unassigned wm MB (200/0/0) unassigned wm MB (200/0/0) unassigned wm 0 0 (0/0/0) 0 6 unassigned wm 0 0 (0/0/0) 0 7 unassigned wm MB (217/0/0) boot wu MB (1/0/0) alternates wm MB (2/0/0) 4096 Okay to make this the current partition table[yes]? yes Enter table name (remember quotes): chan02 Ready to label disk, continue? y partition> quit FORMAT MENU: disk - select a disk type - select (define) a disk type partition - select (define) a partition table current - describe the current disk format - format and analyze the disk fdisk - run the fdisk program repair - repair a defective sector show - translate a disk address label - write label to the disk analyze - surface analysis defect - defect list management backup - search for backup labels verify - read and display labels save - save new disk/partition definitions volname - set 8-character volume name!<cmd> - execute <cmd>, then return quit format> verify Primary label contents:... ( 중략 )... Part Tag Flag Cylinders Size Blocks 0 unassigned wm MB (100/0/0) swap wu MB (300/0/0) backup wu MB (1020/0/0) unassigned wm MB (200/0/0) unassigned wm MB (200/0/0) unassigned wm 0 0 (0/0/0) 0 6 unassigned wm 0 0 (0/0/0) 0 7 unassigned wm MB (217/0/0) boot wu MB (1/0/0) alternates wm MB (2/0/0) 4096 l 첫번째방법 ( 직접설정하는방식 ) : 마운트된디스크도작업이가능하다. -> 파티션별로세세한설정이가능하다. l 두 / 세번째방법 (Free Hog 사용 ) : 마운트된디스크는작업이불가능하다. -> 새로운디스크추가시작업에편리하다. partition> modify Cannot modify disk partitions while it has mounted partitions
101 ( 문제 1) 하나의디스크를하나의파티션으로생성한다. 디스크 : c1t1d0(c1t1d0s2) 파티션 : c1t1d0s0 -> 전체용량 ( 문제 2) 하나의디스크를 2 개의파티션으로생성한다. 디스크 : c1t1d0(c1t1d0s2) 파티션 : c1t1d0s0 -> 500MB c1t1d0s7 -> 나머지용량 ( 문제 3) 하나의디스크를 3 개의파티션으로생성한다. 디스크 : c1t1d0(c1t1d0s2) 파티션 : c1t1d0s0 -> 500MB c1t1d0s1 -> 나머지용량 c1t1d0s7 -> 20MB ( 원복 ) 테스트작업이다끝났다면원래계획했던파티션으로다시설정한다. l 파티션계획 (Disk Slice Plan) 슬라이스마운트포인터 용량 s0 /oracle 200M s1 swap 200M s2 overlap 1G s3 /data1 200M s4 /data2 200M s5 s6 s7 /logs *
102 (d). /etc/format.dat 파일을이용한파티션백업 다음은현재작업메모리에있는내용을 /etc/format.dat 파일에저장하고다시메모리로불려들이는작업에대한예이다. 다중디스크작업할때사용하면편리하다. 하지만잘사용하지는않는방법이다. 이것은 fmthard/prtvtoc 명령어를통해서더간편하게같은기능을구현할수있기때문이다. [Disk] [MEMORY] [/etc/format.dat] VTOC --disk-> -name/save-> <--label- <-select bootblk 수정 V < 현재작업1> > < 현재작업1> 수정 V < 현재작업2> 복 < < 현재작업1> 구 format> partition PARTITION MENU: 0 - change `0' partition 1 - change `1' partition 2 - change `2' partition 3 - change `3' partition 4 - change `4' partition 5 - change `5' partition 6 - change `6' partition 7 - change `7' partition select - select a predefined table modify - modify a predefined partition table name - name the current table print - display the current table label - write partition map and label to the disk!<cmd> - execute <cmd>, then return quit partition> print Current partition table (chan02): Total disk cylinders available: (reserved cylinders) Part Tag Flag Cylinders Size Blocks 0 unassigned wm MB (100/0/0) swap wu MB (300/0/0) backup wu MB (1020/0/0) unassigned wm MB (200/0/0) unassigned wm MB (200/0/0) unassigned wm 0 0 (0/0/0) 0 6 unassigned wm 0 0 (0/0/0) 0 7 unassigned wm MB (217/0/0) boot wu MB (1/0/0) alternates wm MB (2/0/0) 4096 l Slice 3 번을삭제한다. -> ( 삭제하는방법 ) Start Cylinder : 0, Size :
103 partition> 3 Part Tag Flag Cylinders Size Blocks 3 unassigned wm MB (200/0/0) Enter partition id tag[unassigned]: [Enter] Enter partition permission flags[wm]: [Enter] Enter new starting cyl[403]: 0 Enter partition size[409600b, 200c, 199e, mb, 0.20gb]: 0 partition> print Current partition table (unnamed): Total disk cylinders available: (reserved cylinders) Part Tag Flag Cylinders Size Blocks 0 unassigned wm MB (100/0/0) swap wu MB (300/0/0) backup wu MB (1020/0/0) unassigned wm 0 0 (0/0/0) 0 4 unassigned wm MB (200/0/0) unassigned wm 0 0 (0/0/0) 0 6 unassigned wm 0 0 (0/0/0) 0 7 unassigned wm MB (217/0/0) boot wu MB (1/0/0) alternates wm MB (2/0/0) 4096 partition>? Expecting one of the following: (abbreviations ok): 0 - change `0' partition 1 - change `1' partition 2 - change `2' partition 3 - change `3' partition 4 - change `4' partition 5 - change `5' partition 6 - change `6' partition 7 - change `7' partition select - select a predefined table modify - modify a predefined partition table name - name the current table print - display the current table label - write partition map and label to the disk!<cmd> - execute <cmd>, then return quit partition> name Enter table name (remember quotes): chan03 partition> quit FORMAT MENU: disk - select a disk type - select (define) a disk type partition - select (define) a partition table current - describe the current disk format - format and analyze the disk fdisk - run the fdisk program repair - repair a defective sector show - translate a disk address label - write label to the disk analyze - surface analysis defect - defect list management backup - search for backup labels verify - read and display labels save - save new disk/partition definitions volname - set 8-character volume name!<cmd> - execute <cmd>, then return quit format> save Saving new disk and partition definitions Enter file name["./format.dat"]: /etc/format.dat
104 format>! tail /etc/format.dat /* /etc/format.dat 파일의내용을확인 */ disk_type = "DEFAULT" \ : ctlr = ata : ncyl = 1020 : acyl = 2 : pcyl = 1022 \ : nhead = 64 : nsect = 32 : rpm = 3600 partition = "chan03" \ : disk = "DEFAULT" : ctlr = ata \ : 0 = unassigned, wm, 3, : 1 = 103, \ : 2 = 0, : 4 = 603, : 7 = 803, \ : 8 = 0, 2048 : 9 = 1, 4096 [Hit Return to continue] [Enter] <----- 메세지확인 <----- '[ENTER]' 입력 FORMAT MENU: disk - select a disk type - select (define) a disk type partition - select (define) a partition table current - describe the current disk format - format and analyze the disk fdisk - run the fdisk program repair - repair a defective sector show - translate a disk address label - write label to the disk analyze - surface analysis defect - defect list management backup - search for backup labels verify - read and display labels save - save new disk/partition definitions volname - set 8-character volume name!<cmd> - execute <cmd>, then return quit format> partition PARTITION MENU: 0 - change `0' partition 1 - change `1' partition 2 - change `2' partition 3 - change `3' partition 4 - change `4' partition 5 - change `5' partition 6 - change `6' partition 7 - change `7' partition select - select a predefined table modify - modify a predefined partition table name - name the current table print - display the current table label - write partition map and label to the disk!<cmd> - execute <cmd>, then return quit partition> print Current partition table (chan03): Total disk cylinders available: (reserved cylinders) Part Tag Flag Cylinders Size Blocks 0 unassigned wm MB (100/0/0) swap wu MB (300/0/0) backup wu MB (1020/0/0) unassigned wm 0 0 (0/0/0) 0 4 unassigned wm MB (200/0/0) unassigned wm 0 0 (0/0/0) 0 6 unassigned wm 0 0 (0/0/0) 0 7 unassigned wm MB (217/0/0) boot wu MB (1/0/0) alternates wm MB (2/0/0) 4096 l Slice 4 번을삭제한다. -> ( 삭제하는방법 ) Start Cylinder : 0, Size :
105 partition> 4 Part Tag Flag Cylinders Size Blocks 4 unassigned wm MB (200/0/0) Enter partition id tag[unassigned]: [Enter] Enter partition permission flags[wm]: [Enter] Enter new starting cyl[603]: 0 Enter partition size[409600b, 200c, 199e, mb, 0.20gb]: 0 partition> print Current partition table (unnamed): Total disk cylinders available: (reserved cylinders) Part Tag Flag Cylinders Size Blocks 0 unassigned wm MB (100/0/0) swap wu MB (300/0/0) backup wu MB (1020/0/0) unassigned wm 0 0 (0/0/0) 0 4 unassigned wm 0 0 (0/0/0) 0 5 unassigned wm 0 0 (0/0/0) 0 6 unassigned wm 0 0 (0/0/0) 0 7 unassigned wm MB (217/0/0) boot wu MB (1/0/0) alternates wm MB (2/0/0) 4096 partition> select 0. original 1. chan02 2. chan03 3. unnamed Specify table (enter its number)[3]: 2 partition> print Current partition table (chan03): Total disk cylinders available: (reserved cylinders) Part Tag Flag Cylinders Size Blocks 0 unassigned wm MB (100/0/0) swap wu MB (300/0/0) backup wu MB (1020/0/0) unassigned wm 0 0 (0/0/0) 0 4 unassigned wm MB (200/0/0) unassigned wm 0 0 (0/0/0) 0 6 unassigned wm 0 0 (0/0/0) 0 7 unassigned wm MB (217/0/0) boot wu MB (1/0/0) alternates wm MB (2/0/0) 4096 partition> label Ready to label disk, continue? y partition> quit FORMAT MENU: disk - select a disk type - select (define) a disk type partition - select (define) a partition table current - describe the current disk format - format and analyze the disk fdisk - run the fdisk program repair - repair a defective sector show - translate a disk address label - write label to the disk analyze - surface analysis defect - defect list management backup - search for backup labels verify - read and display labels save - save new disk/partition definitions volname - set 8-character volume name!<cmd> - execute <cmd>, then return quit
106 format> verify Primary label contents: Volume name = < > ascii name = <DEFAULT cyl 1020 alt 2 hd 64 sec 32> pcyl = 1022 ncyl = 1020 acyl = 2 bcyl = 0 nhead = 64 nsect = 32 Part Tag Flag Cylinders Size Blocks 0 unassigned wm MB (100/0/0) swap wu MB (300/0/0) backup wu MB (1020/0/0) unassigned wm 0 0 (0/0/0) 0 4 unassigned wm MB (200/0/0) unassigned wm 0 0 (0/0/0) 0 6 unassigned wm 0 0 (0/0/0) 0 7 unassigned wm MB (217/0/0) boot wu MB (1/0/0) alternates wm MB (2/0/0) 4096 format> quit ( 원복 ) 테스트작업이다끝났다면원래계획했던파티션으로다시설정한다. l 파티션계획 (Disk Slice Plan) 슬라이스마운트포인터 용량 s0 /oracle 200M s1 swap 200M s2 overlap 1G s3 /data1 200M s4 /data2 200M s5 s6 s7 /logs *
107 (e). select 명령어를사용한다중디스크작업 [Disk] [MEMORY] [/etc/format.dat] VTOC --disk-> -name/save-> <--label- <-select bootblk verify print 1: c0t0d0s2 (format 명령어를통해 partition 작업이수행된상태 ) 2: c0t1d0s2 3: c0t2d0s2 4: c0t3d0s3 f> disk Disk Select : 2 f> partition p> select Partition Select : <chan03's number> p> label p> quit f> disk Disk Select : 3 f> partition p> select Partition Select : <chan03's number> p> label p> quit f> disk Disk Select : 4 f> partition p> select Partition Select : <chan03's number> p> label p> quit f> verify f> quit
108 디스크레이블관리 (Managing Disk Labels) Disk Label 은디스크장치의첫번째섹터로파티션에대한경계점에대한정보가있는부분이다. Disk Label 의정보를확인하기위해서는 prtvtoc 명령어를사용하여확인이가능하다. Disk Label 을 VTOC(Volume Table Of Contents) 라고부르기도한다. Disk Label 관리 -> Disk Label 생성 (format, fmthard CMD) -> Disk Label 확인 (format, prtvtoc CMD) -> Disk Label 삭제및수정 (format, fmthard CMD) prtvtoc CMD fmthard CMD format CMD Print VTOC Format Hard Disk Format (1). prtvtoc CMD NAME prtvtoc - report information about a disk geometry and partitioning DESCRIPTION The prtvtoc command allows the contents of the label to be viewed. The command can be used only by the super-user. prtvtoc 명령어는 label 의내용을볼수있다. 이명령어는슈퍼유저만사용이가능하다. The device name can be the file name of a raw device in the form of /dev/rdsk/c?t?d?s2 or can be the file name of a block device in the form of /dev/dsk/c?t?d?s2. 디바이스명은 /dev/rdsk/c#t#d#s2(raw device) 나 /dev/dsk/c#t#d#s2 (block device) 형식을사용할수있다. 솔라리스시스템에서 prtvtoc 명령어를사용하여 Disk Label 의정보를확인할수있다. 장치명은 c#t#d#s2 와같이디스크전체를지칭해야하지만다른슬라이스번호를사용해도같은정보를보여준다. 이것은한개의디스크장치에한개의 Disk Label 정보만존재하기때문이다. ( 명령어형식 ) # prtvtoc /dev/rdsk/c#t#d#s2 # prtvtoc /dev/rdsk/c0t0d0s0 # prtvtoc -h /dev/rdsk/c0t0d0s0 prtvtoc 명령어의출력결과는다음과같이 3가지섹션으로구분할수있다. l Dimensions l Flags l Partition Table
109 ( 출력화면해석 ) Solaris 10 10/09 on Blade 150 # prtvtoc /dev/rdsk/c0t0d0s2 * /dev/rdsk/c0t0d0s2 partition map * * Dimensions: * 512 bytes/sector /* 1 sector = 512bytes */ * 63 sectors/track /* 1 track = 63 sectore */ * 16 tracks/cylinder /* 1 cyliner= 16 tracks */ * 1008 sectors/cylinder /* 1 cyliner= 63 * 16 */ * cylinders * accessible cylinders * * Flags: * 1: unmountable * 10: read-only * * First Sector Last * Partition Tag Flags Sector Count Sector Mount Directory /data /data /data /data /export/home ( 출력화면해석 ) Solaris 10 X86 on VMWare # prtvtoc /dev/rdsk/c0d1s2 (# prtvtoc -h /dev/rdsk/c0d1s2) * /dev/rdsk/c0d1s2 partition map * * Dimensions: * 512 bytes/sector /* 1 sector = 512bytes */ * 63 sectors/track /* 1 track = 63 sector */ * 16 tracks/cylinder /* 1 cyliner= 16 tracks */ * 1008 sectors/cylinder /* 1 cyliner= 63 * 16 */ * 2079 cylinders * 2077 accessible cylinders * * Flags: X X X 1 - u (Unmountable) * 1: unmountable X 0 - m (Mountable) * 10: read-only 1 X r - (Read Only) * 0 X w - (Read-Write) * First Sector Last * Partition Tag Flags Sector Count Sector Mount Directory
110 (2). fmthard(format Hard Disk) CMD NAME fmthard - populate label on hard disks SYNOPSIS SPARC fmthard -d data -n volume_name -s datafile [-i] /dev/rdsk/c?[t?]d?s2 x86 fmthard -d data -n volume_name -s datafile [-i] /dev/rdsk/c?[t?]d?s2 DESCRIPTION The fmthard command updates the VTOC (Volume Table of Contents) on hard disks and, on x86 systems, adds boot information to the Solaris fdisk partition. One or more of the options -s datafile, -d data, or -n volume_name must be used to request modifications to the disk label. To print disk label contents, see prtvtoc(1m). The /dev/rdsk/c?[t?]d?s2 file must be the character special file of the device where the new label is to be installed. On x86 systems, fdisk(1m) must be run on the drive before fmthard. If you are using an x86 system, note that the term ``partition'' in this page refers to slices within the x86 fdisk partition on x86 machines. Do not confuse the partitions created by fmthard with the partitions created by fdisk. OPTIONS The following options are supported: -d data The data argument of this option is a string representing the information for a particular partition in the current VTOC. The string must be of the format part:tag:flag:start:size where part is the partition number, tag is the ID TAG of the partition, flag is the set of permission flags, start is the starting sector number of the partition, and size is the number of sectors in the partition. See the description of the datafile below for more information on these fields. -s datafile This option is used to populate the VTOC according to a datafile created by the user. If the datafile is "-", fmthard reads from standard input. The datafile format is described below. This option causes all of the disk partition timestamp fields to be set to zero
111 fmthard 명령어를사용하여파티션작업을수행할수도있고, Disk Label 의정보를수정할수도있다. 하지만 fmthard 명령어를사용하여파티션작업을하기는힘들다. 이것을 size 을표시할때섹터단위로표시하다보니용량을표시하기힘들기때문이다. (2-1). fmthard 명령어를사용한파티션작업 (Partition Works Using fmthard CMD) ( 명령어형식 ) # fmthard -d data /dev/rdsk/c0t0d0s2 data is "slice:tag:flag:start:size" V V start sector sector count # prtvtoc /dev/rdsk/c0t0d0s2 # fmthard -d 0:0:0x00:0: /dev/rdsk/c0t1d0s2 # prtvtoc /dev/rdsk/c0t0d0s2 # fmthard -d 1:0:0x00:100801: /dev/rdsk/c0t1d0s2 # prtvtoc /dev/rdsk/c0t0d0s2 # fmthard -d 3:0:0x00: : /dev/rdsk/c0t1d0s2 # prtvtoc /dev/rdsk/c0t0d0s2 (2-2). fmthard 명령어를사용한다중디스크작업 Muti-Disk Partition Works using the fmthard CMD # prtvtoc /dev/rdsk/c0t1d0s2 > /vtoc/c0t1d0.vtoc # fmthard -s /vtoc/c0t1d0.vtoc /dev/rdsk/c0t2d0s2 다음과같이 c0t0d0s0 디스크의작업이되어있다면 VTOC 의내용을다른디스크쪽으로복사하여사용할때 fmthard 명령어는유용하다. [c0t0d0s0] -> c0t0d0s2 -> c0t1d0s2 -> c0t2d0s2 -> c0t3d0s3 # prtvtoc /dev/rdsk/c0t0d0s2 > /VTOC/c0t0d0s2.vtoc # fmthard -s /VTOC/c0t0d0s2.vtoc /dev/rdsk/c0t1d0s2 # fmthard -s /VTOC/c0t0d0s2.vtoc /dev/rdsk/c0t2d0s2 # fmthard -s /VTOC/c0t0d0s2.vtoc /dev/rdsk/c0t3d0s2 or # prtvtoc /dev/rdsk/c0t0d0s2 fmthard -s - /dev/rdsk/c0t1d0s2 # prtvtoc /dev/rdsk/c0t0d0s2 fmthard -s - /dev/rdsk/c0t2d0s2 # prtvtoc /dev/rdsk/c0t0d0s2 fmthard -s - /dev/rdsk/c0t3d0s
112 (2-3). prtvtoc, fmthard 명령어를사용한 VTOC 백업과복구 VTOC Backup & Recovery (prtvtoc, fmthard) (a). VTOC 백업방법 # prtvtoc /dev/dsk/c0t1d0s2 > /vtoc/c0t1d0s /vtoc/c0t1d0s ( 다른저장매체에담아야한다.) ( 또는전체백업시같이백업될수있도록한다.) (b). VTOC 복구방법 # fmthard -s /vtoc/c0t1d0s /dev/rdsk/c0t1d0s2 [EX1] VTOC 백업 / 복구실습 ( 다른서버에 VTOC 내용저장 ) 전제조건 : sparc Platform, 한개의디스크사용 VTOC Delete Sample # dd if=/dev/zero of=/dev/rdsk/c0t2d0s2 bs=512 count=1 ====HOSTA==== ====HOSTB===== VTOC --backup--> /vtoc/c0t2d0s ============= ============== <STOP + A> ok boot cdrom -s # fsck -y /dev/rdsk/c0t2d0s0 # ksh # set -o vi # export TERM=vt100 # stty erase ^H # ifconfig hme0 # ifconfig hme XXX netmask broadcast + up # rcp :/vtoc/solarisXXX.vtoc /tmp # fmthard -s /tmp/solarisxxx.vtoc /dev/rdsk/c0t2d0s2 # prtvtoc /dev/rdsk/c0t2d0s2 # init
113 [EX2] VTOC 백업 & 복구실습 ( 자신의서버에 VTOC 내용저장 ) ( 전제조건 ) Solaris 10 10/09 on Blade 150 c0t0d0s2 c0t2d0s2 (OS 설치 ) /vtoc/solarisxxx.vtoc (a) 자신의서버에 VTOC 백업 # mkdir -p /vtoc # prtvtoc /dev/dsk/c0t0d0s2 > /vtoc/solarisxxx.vtoc c0t0d0s2(vtoc) -----> c0t2d0s2(/vtoc/solarisxxx.vtoc) (b) 백업서버에 VTOC 백업 # rcp /vtoc/solarisxxx.vtoc :/vtoc # rsh cat /vtoc/solarisxxx.vtoc (c) VTOC 삭제 # dd if=/dev/zero of=/dev/rdsk/c0t0d0s2 bs=512 count=1 /* if: input file, of: output file, bs: block size, count: block count */ /* 해석 : /dev/zero 포맷으로 c0t0d0s2 디스크에대해서블럭사이즈는 512 bytes(=sector) 단위로 1 개만큼채운다. */ # prtvtoc /dev/rdsk/c0t0d0s2 * /dev/rdsk/c0t0d0s2 partition map * * Dimensions: * 512 bytes/sector * 63 sectors/track * 16 tracks/cylinder * 1008 sectors/cylinder * cylinders * accessible cylinders * * Flags: * 1: unmountable * 10: read-only * * First Sector Last * Partition Tag Flags Sector Count Sector Mount Directory (d) VTOC 복구 # fmthard -s /vtoc/solarisxxx.vtoc /dev/rdsk/c0t0d0s2 # prtvtoc /dev/rdsk/c0t0d0s2 * /dev/rdsk/c0t0d0s2 partition map... ( 중략 )... * First Sector Last * Partition Tag Flags Sector Count Sector Mount Directory /data /data /data /data /export/home
114 [EX3] VTOC 백업 & 복구실습 (Intel Platform on VMWare) ( 주의 ) Intel Platform Solaris(x86) 에서는 VTOC의위치가틀리므로 format 명령어를통해서 1 ~ 3 실린더뒤에존재하는섹터번호를확인하고삭제해야실습할수있다 Part Tag Flag Cylinders Size Blocks 0 unassigned wm MB (100/0/0) swap wu MB (300/0/0) backup wu MB (1020/0/0) unassigned wm 0 0 (0/0/0) 0 4 unassigned wm MB (200/0/0) unassigned wm 0 0 (0/0/0) 0 6 unassigned wm 0 0 (0/0/0) 0 7 unassigned wm MB (217/0/0) boot wu MB (1/0/0) alternates wm MB (2/0/0) 개의실린터를섹터로환산 # prtvtoc /dev/dsk/c0d1s2... * 2048 sectors/cylinder... # expr 2048 \* 3 /* 3 cyliner = 6144 sector */ c0d1s2 디스크의 VTOC 백업 # mkdir /vtoc # prtvtoc /dev/rdsk/c0d1s2 > /vtoc/c0d1s2.txt ( 운영체제디스크 ) ( 새로장착한디스크 ) -----c0d0s2(os) c0d1s /vtoc/c0d1s2.txt < VTOC 3 c0d1s2 디스크의 VTOC 삭제및확인 # dd if=/dev/zero of=/dev/rdsk/c0d1s2 bs=512 skip=6144 count=2 2+0 records in 2+0 records out if : iput file ( 예 ) if=/dev/zero : /dev/zero 포맷으로 of : output file ( 예 ) of=/dev/rdsk/c0d1s2 : c0d1s2 디스크에대해서 bs : block size ( 예 ) bs=512 : 512bytes 단위로 (Sector 단위로 ) skip : skip ( 예 ) skip=6144 : 6144 섹터는넘기고 count: count ( 예 ) count=2 : 2개의섹터를 [ 참고 ] # fmthard -s /dev/zero /dev/rdsk/c0d1s2 # prtvtoc /dev/rdsk/c0d1s2... * First Sector Last * Partition Tag Flags Sector Count Sector Mount Directory
115 4 c0d1s2 디스크의 VTOC 복구및확인 # fmthard -s /vtoc/c0d1s2.txt /dev/rdsk/c0d1s2 fmthard: New volume table of contents now in place. <----- 메세지확인 # prtvtoc /dev/rdsk/c0d1s2... * First Sector Last * Partition Tag Flags Sector Count Sector Mount Directory ( 정리 ) VTOC 관리 (DISK Label 관리 ) Device Admin(EX: DISK Device Admin) Device Reconfiguration # touch /reconfigure ; init 5 ok boot -r # reboot -- -r # devfsadm -v # drvconfig -c disk ; disks Slice(format) [DISK] <------> [MEM] <------> [/etc/format.dat] disk/label name/save/select verify print Disk Label 관리 Disk Label 생성 (format, fmthard) Disk Label 확인 (format, prtvtoc) Disk Label 삭제 / 수정 (format, fmthard) prtvtoc CMD # prtvtoc /dev/rdsk/c0d1s2 fmthard CMD # prtvtoc /dev/rdsk/c0d1s2 > /vtoc/c0d1s2.txt # fmthard -s /vtoc/c0d1s2.txt /dev/rdsk/c0d1s
116 Solaris 10 Admin I Guide 3. Managing Filesystems l l l l l l Filesystem Type UFS Filesystem Structure newfs CMD minfree Checking the Filesystem by Using the fsck CMD Monitoring Filesystem 파일시스템의종류 (Filesystem Type) > File Write File search V < File read [ 그림 ] 파일시스템이해 파일시스템이란? 파일을빠르게저장하고, 빠르게찾고, 빠르게읽을수있도록구조적으로만들어진파일관리시스템이다. 파일시스템의이름이틀리다면, 파일시스템을만들사람도틀리고, 구조도틀리다는말이다. 하지만거의모든파일시스템의기본구조는비슷한구조를가지고있다. 다음은여러가지파일시스템에대한예이다. 예 ) EXT, EXT2, EXT3 FAT32, NTFS, CIFS UFS, ZFS, NFS, QFS JFS,
117 (1). 파일시스템개요 (Filesystem Overview) A file system is a collection of files and directories that make up a structured set of information. The Solaris OE supports three differnet types of filesystems. A file system is a structure of directories that is used to organize and store files. The term file system is used to describe the following: A particular type of file system: disk-based, network-based, or virtual The entire file tree, beginning with the root (/) directory The data structure of a disk slice or other media storage device A portion of a file tree structure that is attached to a mount point on the main file tree so that the files are accessible Usually, you know from the context which meaning is intended. The Solaris OS uses the virtual file system (VFS) architecture, which provides a standard interface for different file system types. The VFS architecture enables the kernel to handle basic operations, such as reading, writing, and listing files. The VFS architecture also makes it easier to add new file systems. 솔라리스운영체제에서는가상파일시스템아키텍쳐를가지고있으며, 이구조는다른파일시스템의종류를제공하기위한표준인터페이스다. 가상파일시스템아키텍쳐는기본적인동작들을다루기위해서커널에의해서활성화된다. 기본적인동작들은파일에대한 reading, writing, listing 등이다. 또한가상파일시스템아키텍쳐는새로운파일시스템을더쉽게추가할수있도록해준다. 솔라리스에서지원하는파일시스템 (Sun Support Filesystems) Disk-based Filesystem : UFS, ZFS, HSFS, PCFS, UDFS Ram-based Filesystem : SWAPFS, CacheFS, TMPFS, LOFS, PROCFS (= Virtual Filesystem) (= Pseudo Filesystem) Distributed Filesystem : NFS(NFSv4) (=Network-based Filesystem) [ 참고 ] Additional Virtual Filesystems(Solaris 10 기준 ) CTFS, FIFOFS, FDFS, MNTFS, NAMEFS, OBJFS, SPECFS 여러가지파일시스템의비교 [ 참고 ] 여러가지파일시스템의비교 (1). 다음사이트에서반드시각파일시스템에대한특성들을확인한다. (2). 다음사이트에서반드시 ZFS 파일시스템에대한특성을확인한다. > Solaris10 > ZFS 게시판 > 24 번자료
118 (2). 디스크에기반한파일시스템 (Disk-Based File Systems) Disk-based file systems are stored on physical media such as hard disks, CD-ROMs, and diskettes. Disk-based file systems can be written in different formats. The available formats are described in the following table Disk-Based File System Format Description UFS UNIX file system (based on the BSD Fat Fast File system that was provided in the 4.3 Tahoe release). UFS is the default disk-based file system for the Solaris OS. Enhancements in the Solaris 10 OS allow the ufs to grow to multiple terabytes in size. 유닉스파일시스템은기본디스크기반 (Disk-based) 파일시스템이다. Before you can create a UFS file system on a disk, you must format the disk and divide it into slices. For information on formatting disks and dividing disks into slices. UFS 파일시스템에디스크에만들기이전에, 관리자는파티션 ( 슬라이스 ) 를미리만들어야한다. DISK ZFS HSFS PCFS The ZFS(Zetta Filesystem) file system is new in the Solaris 10 6/06 release. For more information, see the Solaris ZFS Administration Guide. ZFS 파일시스템은 Solaris10 6/06 릴리즈의새로운기능이다. DISK High Sierra, Rock Ridge, and ISO 9660 file system. High Sierra is the first CD-ROMfile system. ISO 9660 is the official standard version of thehigh Sierra file system. The HSFS file system is used on CD-ROMs, and is a read-only file system. Solaris HSFS supports Rock Ridge extensions to ISO When present on a CD-ROM, these extensions provide all UFS file system features and file types, except for writability and hard links. CD PC file system, which allows read- and write- access to data and programs on DOS-formatted disks that are written for DOS-based personal computers. Floppy UDFS The Universal Disk Format (UDFS) file system, the industry-standard format for storing information on the optical media technology called DVD(Digital Versatile Disc or Digital Video Disc). DVD (3). 분산파일시스템 (Distributed File Systems) Distributed File System Format Description NFS The network file system allows users to share files among many types of systems on the network. The NFS file system makes part of a file system on one system appear as though it were part of the local directory tree. NFSv2, NFSv3, NFSv
119 (4). 가상파일시스템 (Pseudo File Systems) Pseudo file systems are memory based. These file systems provide for better system Performance, in addition to providing access to kernel information and facilities. Pseudo file systems include: Pseudo File System Format Description tmpfs The temporary file system stores files in memory, which avoids the overhead of writing to a disk-based file system. The tmpfs file system is created and destroyed every time the system is rebooted. /tmp 관리 swapfs The swap file system is used by the kernel to manage swap space on disks. swap 공간관리 fdfs procfs mntfs objfs devfs The file descriptor file system provides explicit names for opening files by using file descriptors (for example, /dev/fd/0, /dev/fd/1, /dev/fd/2) in the /dev/fd directory. /dev/fd/# 관리 The process file system contains a list of active processes in the /proc directory The processes are listed by process number. Information in this directory is used by commands, such as the ps command. /proc/pid 관리 The mount file system provides read-only information from the kernel about locally mounted file systems. /etc/mnttab 관리 The kernel object file system. This file system is used by the kernel to store details relating to the modules currently loaded by the kernel. The object file system is used for the /system/object directory. /system/object 관리 The device file system is used to manage the namespace of all devices on the system. This file system is used for the /devices directory. /devices 관리 ctfs The contract file system. This is used by the Solaris zones feature and is associated with the /system/contract directory. /system/contract 관리
120 UFS 파일시스템의구조 (UFS Filesystem Structure) ( 예 ) # newfs /dev/rdsk/c0t2d0s0 UFS 파일시스템구조 ======================== 0 VTOC(=disk label) ======================== 1 bootblk 15 ======================== Super block A 31 ======================== Cylinder Group - Backup Super Block - Cyliner Group Block - Inode Table - Data Block ======================== UFS Filesystem Cylinder Group - Backup Super Block - Cyliner Group Block - Inode Table - Data Block ========================... V ======================== [ 그림 ] UFS Filesystem (EX) UFS 파일시스템설명예제 / file file file file file100 / dir file1 (Table1) (Table2) Status Status +--- file file dir dir10 [ 그림 ] Super Block 과 Cyliner Group Block 의이해
121 UFS 파일시스템설명 (1). Disk Label (= VTOC, Sector 0) The disk label (=VTOC) contains the partition table for the disk. The VTOC resides in the first disk sector (512-byte blocks). Only the first disk slice contains a VTOC, although file systems created on any slice reserve the first sector to allow for a VTOC. Slice Information(Partition Information) VTOC(Volume Table of Contents) ( 예 ) prtvtoc, fmthard, format(verify,partition) Disk Label(VTOC) 는디스크당하나씩존재한다. 디스크의첫번째섹터를나타낸다. (2). bootblk (Sector 1 ~ 15) The bootstrap program (bootblk) resides in the 15 disk sectors (Sectors 1-15) that follow the VTOC. Only the / (root) file system has an active boot block. However, space is allocated for a boot block at the beginning of each file system. The boot block stores objects that are used in booting the system. If a file system is not to be used for booting, the boot block is left blank. The boot block appears only in the first cylinder group (cylinder group 0) and is the first 8 Kbytes(16 sectors) in a slice. (a). 부트프로그램 (Boot Program) First Boot Program : bootblk Second Boot Program : ufsboot (b). installboot CMD l /(root) 파티션에 bootblk(boot block) 을생성하는역할을가진다. l 그리고 bootblk 가 ufsboot 를포인터하도록한다. SPARC Platform - UFS Boot Block # installboot /usr/platform/`uname -i`/lib/fs/ufs/bootblk /dev/rdsk/c0t0d0s0 or # cd /usr/platform/`uname -i`/lib/fs/ufs # installboot bootblk /dev/rdsk/c0t0d0s0 (c0t0d0s0 : root Filesystem) SPARC Platform - ZFS Boot Block # installboot -F zfs /usr/platform/`uname -i`/lib/fs/zfs/bootblk /dev/rdsk/c0t0d0s0 or # cd /usr/platform/`uname -i/lib/fs/zfs # installboot -F zfs bootblk /dev/rdsk/ct0t0d0s0 (c0t0d0s0 : root Filesystem) INTEL Platform - UFS Grub # installgrub /boot/grub/stage1 /boot/grub/stage2 /dev/rdsk/c0d0s0 or # cd /boot/grub # installgrub stage1 stage2 /dev/rdsk/c0d0s0 (c0d0s0 : root Filesystem) [ 참고 ] bad PBR (Primary Boot Record) 에러 Intel Platform 에서부팅시에 "bad PBR" 에러표시가나고부팅이되지않을때 => installgrub 명령어
122 # man installboot [ 참고 ] man installboot NAME installboot - install bootblocks in a disk partition SYNOPSIS installboot [-F zfs ufs hsfs] bootblk raw-disk-device DESCRIPTION The boot(1m) program, ufsboot, is loaded from disk by the bootblock program which resides in the boot area of a disk partition. This program is filesystem-specific, and must match the type of filesystem on the disk to be booted. The installboot utility is a SPARC only program. It is not supported on the x86 architecture. x86 users should use installgrub(1m) instead. SPARC Platform : installboot(1m) Intel Platform : installgrub(1m) <-> Linux: grub-install /EXAMPLES <----- Last Line Mode 에서수행 EXAMPLES Example 1 Installing UFS Boot Block To install a ufs boot block on slice 0 of target 0 on controller 1 of the platform where the command is being run, use: # installboot /usr/platform/`uname -i`/lib/fs/ufs/bootblk \ /dev/rdsk/c1t0d0s0 (c1t0d0s0 : /(root) 파티션 ) Example 2 Installing ZFS Boot Block To install a ZFS boot block on slice 0 of target 0 on controller 1 of the platform where the command is being run, use syntax such as the following: # installboot -F zfs /usr/platform/`uname -i`/lib/fs/zfs/bootblk \ /dev/rdsk/c0t1d0s0 (c1t0d0s0 : /(root) 파티션 ) (3). Super Block (Sector 16 ~ 31) The superblock stores much of the information about the file system, which includes the following: The number of cylinder groups(cylinder group size) The number of data blocks(size of the file system logical block, Summary data block) The size of a data block and fragment A description of the hardware, derived from the label The name of the mount point(path name of the last mount point) File system state flag: clean, stable, active, logging, or unknown clean, stable : 파일시스템이안전한상태 active : 마운트된상태 unknown : 파일시스템에점검이필요한상태 (EX: fsck) logging : 저널링기능설정된상태 Because the superblock contains critical data, multiple superblocks are made when the file system is created. (Backup Super Block). A summary information block is kept within the superblock. The summary information block is not replicated, but is grouped with the primary superblock, usually in cylinder group 0. The summary block records changes that take place as the file system is used. In addition, the summary block lists the number of inodes, directories, fragments, and storage blocks within
123 the file system. [ 참고 ] Backup Super Blocks When the file system is created, each cylinder group replicates the superblock beginning at Sector 32. This replication protects the critical data in the superblock against catastrophic loss. (4). Cylinder Group Blocks [ 참고 ] Cylinder Groups Each file system is divided into cylinder groups with a minimum default size of 16 cylinders per group. Cylinder groups improve disk access. The file system constantly optimizes disk performance by attempting to place a file 's data into a single cylinder group, which reduces the distance a head has to travel to access the file 's data. The file system stores large files across several cylinder groups, if needed. The cylinder group block is a table in each cylinder group that describes the cylinder group, including: The number of inodes in the cylinder group The number of data blocks in the cylinder group The number of directories Free blocks, free inodes, and free fragments in the cyliner group The free block map The used inode map (5). Inodes (Index Nodes) l Inode (Attribution + Pointer) An inode contains all the information about a file except its name, which is kept in a directory. An inode is 128 bytes. The inode information is kept in the cylinder information block, and contains the following: The type of the file: Regular Directory Block special Character special FIFO, also known as named pipe Symbolic link Socket Other inodes(shadow Inode) Attribute directory and shadow (used for ACLs) The mode of the file (the set of read-write-execute permissions) The number of hard links to the file The user ID of the owner of the file The group ID to which the file belongs The number of bytes in the file An array of 15 disk-block addresses The date and time the file was last accessed The date and time the file was last modified The date and time the inode was changed The array of 15 disk-block addresses (0 to 14) points to the data blocks that store the contents of the file. The first 12 are direct addresses. That is, they point directly to the first 12 logical storage blocks of the file contents. If the file is larger than 12 logical blocks, the 13th address points to an indirect block, which contains direct-block addresses instead of file contents. The 14th address points to a double indirect block, which contains addresses of indirect blocks. The 15th address is for triple indirect addresses. The following figure shows this chaining of address blocks starting from the inode
124 (5.1) 파일의속성 (Attribution) # touch file1 # ls -l file1 (-rw-r--r-- 1 root other size mtime) The file type. The access modes. The link count. The UID/GID number of the file's owner and group. The size of the file. The mtime/atime. The total number of data blocks used by or allocated to the file. [ 참고 ] 파일의속성정보에관한자세한내용은 "# man attribution" 을참고한다. (5.2) 포인터 (Pointer) - 직접포인터 (Direct Pointer(0-11)) 12 * 8K = 96K (0 < SIZE <= 96KB) - 간접포인터 (Indirect Pointer) one pointer : 1 * 2048 * 8K = 16MB (96KB < SIZE <= 16MB) (= Single Indirect Pointer) two pointer : 1 * 2048 * 2048 * 8K = 32GB (16MB < SIZE <= 32GB) (= Double Indirect Pointer) three pointer : 1 * 2048 * 2048 * 2048 * 8K = 64TB (32GB < SIZE <= 64TB) (= Triple Indirect Pointer) l Direct Pointer : 데이터블럭 (Data Block) 을직접가리키는포인터 l Indirect Pointer : 데이터블럭 (Data Block) 을간접적으로가리키는포인터 [ 참고 ] UFS 파일시스템의최대파일크기논리적으로파일이클수있는최대크기는 64TB 이지만 UFS 파일시스템에서최대파일의크기를 1TB 로한정하였다. 그리고 866GB 보다파일의크기가커지게되는순간운영체제의자원 (CPU, MEM, Disk I/O) 이많이낭비되기때문에권장하지않는다. l l l Solaris 9 UFS File Max Size : 1TB (866GB)(VTOC Disk Label) Solaris 10 UFS File Max Size : 2TB (866GB)(VTOC Disk Label) Solaris 10 UFS File Max Size : Unlimited (EFI Disk Label) -> 솔라리스강좌 [ 관리자 ] -> 168번자료. Inode(450) File Attribution > > Data > Data Direct Block 1 Block Pointer (8K) 2 (8K) > > > Data 11 Indirect Direct Block Pointer Pointer (8K) > > > > Data Indirect Indirect Direct Block Pointer Pointer Pointer (8K) [ 그림 ] UFS Inode 구조
125 (6). Data Block Data blocks, also called storage blocks, contain the rest of the space that is allocated to the file system. The size of these data blocks is determined when a file system is created. By default, data blocks are allocated in two sizes: an 8-Kbyte logical block size, and a 1-Kbyte fragment size. (SPARC : 8 KBytes, INTEL : 4 KBytes) For a regular file, the data blocks contain the contents of the file. For a directory, the data blocks contain entries that give the inode number and the file name of the files in the directory. Logical Block Size The logical block size is the size of the blocks that the UNIX kernel uses to read or write files. The logical block size is usually different from the physical block size. The physical block size is usually 512 bytes, which is the size of the smallest block that the disk controller can read or write. Logical block size is set to the page size of the system by default. The default logical block size is 8192 bytes (8 Kbytes) for UFS file systems. The UFS file system supports block sizes of 4096 or 8192 bytes (4 or 8 Kbytes). The recommended logical block size is 8 Kbytes. l l Sparc Platform : 8 Kbytes Intel Platform : 4 Kbytes To choose the best logical block size for your system, consider both the performance you want and the available space. For most UFS systems, an 8-Kbyte file system provides the best performance, offering a good balance between disk performance and the use of space in primary memory and on disk. As a general rule, to increase efficiency, use a larger logical block size for file systems when most of the files are very large. Use a smaller logical block size for file systems when most of the files are very small. You can use the quot -c filesystem command on a file system to display a complete report on the distribution of files by block size. However, the page size set when the file system is created is probably the best size in most cases. Fragment Size As files are created or expanded, they are allocated disk space in either full logical blocks or portions of logical blocks called fragments. When disk space is needed for a file, full blocks are allocated first, and then one or more fragments of a block are allocated for the remainder. For small files, allocation begins with fragments. The ability to allocate fragments of blocks to files, rather than just whole blocks, saves space by reducing fragmentation of disk space that results from unused holes in blocks. You define the fragment size when you create a UFS file system. The default fragment size is 1 Kbyte. Each block can be divided into 1, 2, 4, or 8 fragments, which results in fragment sizes from 8192 bytes to 512 bytes (for 4-Kbyte file systems only). The lower bound is actually tied to the disk sector size, typically 512 bytes. For multiterabyte file systems, the fragment size must be equal to the file system block size. When choosing a fragment size, consider the trade-off between time and space: A small fragment size saves space, but requires more time to allocate. As a general rule, to increase storage efficiency, use a larger fragment size for file systems when most of the files are large. Use a smaller fragment size for file systems when most of the files are small
126 Fragmentation Fragmentation is the method used by the ufs file system to allocate disk space efficiently. Files less than 96 Kbytes in size are stored using fragmentation. By default, data blocks can be divided into eight fragments of 1024 bytes each. Fragments store files and pieces of files smaller than 8192 bytes. For files larger than 96 Kbytes, fragments are never allocated and full blocks are exclusively used. If a file contained in a fragment grows and requires more space, it is allocated one or more additional fragments in the same data block. Data Block Size : 8Kbytes Fragmentation : 1K * 8 Data Block Fragmentation l 운영체제에서는큰파일보다작은파일의개수가더많다. l 따라서, Fragmentation이되어있지않다면낭비되는공간이많이발생하게된다. l Fragmentation 은한개의 Data Block 2 개의파일을저장하여데이터저장효율을높이기위해서존재한다. l 단, 한개의데이터블럭안에 3 개의파일을저장할수는없다. l 또한추가로저장되는파일이 8K 보다크다면다음번째데이터블럭에저장된다. For example, if File1 requires more space than is currently available in the shared data block, the entire contents of that expanding file are moved by the ufs file system into a free data block. This requirement by the ufs file system assures that all of a file s fragments are contained in a whole data block. The ufs file system does not allow fragments of the same file to be stored in two different data blocks
127 newfs 명령어 NAME newfs - construct a UFS file system SYNOPSIS newfs [-NSBTv] [mkfs-options] raw-device DESCRIPTION newfs is a "friendly" front-end to the mkfs(1m) program for making UFS file systems on disk partitions. newfs calculates the appropriate parameters to use and calls mkfs. If run interactively (that is, standard input is a tty), newfs prompts for confirmation before making the file system. If the -N option is not specified and the inodes of the device are not randomized, newfs calls fsirand(1m). You must be super-user or have appropriate write privileges to use this command, except when creating a UFS file system on a diskette. See EXAMPLES. Creating a Multiterabyte UFS File System Keep the following limitations in mind when creating a multiterabyte UFS file system: OPTIONS o nbpi is set to 1 Mbyte unless you specifically set it higher. You cannot set nbpi lower than 1 Mbyte on a multiterabyte UFS file system. o fragsize is set equal to bsize. -N Print out the file system parameters that would be used to create the file system without actually creating the file system. fsirand(1m) is not called here. -T Set the parameters of the file system to allow eventual growth to over a terabyte in total file system size. This option sets fragsize to be the same as bsize, and sets nbpi to 1 Mbyte, unless the -i option is used to make it even larger. If you use the -f or -i options to specify a fragsize or nbpi that is incompatible with this option, the user-supplied value of fragsize or nbpi is ignored. -b bsize The logical block size of the file system in bytes, either 4096 or The default is The sun4u architecture does not support the 4096 block size. -c cgsize The number of cylinders per cylinder group, ranging from 16 to 256. The default is calculated by dividing the number of sectors in the file system by the number of sectors in a gigabyte. Then, the result is multiplied by 32. The default value is always between 16 and 256. mkfs can override this value. See mkfs_ufs(1m) for details. This option is not applicable for disks with EFI labels and is ignored. -C maxcontig
128 The maximum number of logical blocks, belonging to one file, that are allocated contiguously. The default is calculated as follows: maxcontig = disk drive maximum transfer size / disk block size If the disk drive's maximum transfer size cannot be determined, the default value for maxcontig is calculated from kernel parameters as follows: If maxphys is less than ufs_maxmaxphys, which is typically 1 Mbyte, then maxcontig is set to maxphys. Otherwise, maxcontig is set to ufs_maxmaxphys. You can set maxcontig to any positive integer value. The actual value will be the lesser of what has been specified and what the hardware supports. You can subsequently change this parameter by using tunefs(1m). -f fragsize -i nbpi The smallest amount of disk space in bytes that can be allocated to a file. fragsize must be a power of 2 divisor of bsize, where: bsize / fragsize is 1, 2, 4, or 8. This means that if the logical block size is 4096, legal values for fragsize are 512, 1024, 2048, and When the logical block size is 8192, legal values are 1024, 2048, 4096, and The default value is For file systems greater than 1 terabyte or for file systems created with the -T option, fragsize is forced to match block size (bsize). The number of bytes per inode, which specifies the density of inodes in the file system. The number is divided into the total size of the file system to determine the number of inodes to create. This value should reflect the expected average size of files in the file system. If fewer inodes are desired, a larger number should be used. To create more inodes, a smaller number should be given. The default for nbpi is as follows: Disk size Density Less than 1GB 2048 Less than 2GB 4096 Less than 3GB GB to 1 Tbyte 8192 Greater than 1 Tbyte or created with -T The number of inodes can increase if the file system is expanded with the growfs command
129 -m free The minimum percentage of free space to maintain in the file system, between 0% and 99%, inclusively. This space is off-limits to users. Once the file system is filled to this threshold, only the super-user can continue writing to the file system. The default is ((64 Mbytes/partition size) * 100), rounded down to the nearest integer and limited between 1% and 10%, inclusively. This parameter can be subsequently changed using the tunefs(1m) command. -n nrpos The number of different rotational positions in which to divide a cylinder group. The default is 8. This option is not applicable for disks with EFI labels and is ignored. -o space time The file system can either be instructed to try to minimize the time spent allocating blocks, or to try to minimize the space fragmentation on the disk. The default is time. This parameter can subsequently be changed with the tunefs(1m) command. (1). UFS 파일시스템생성 l 파일시스템은파티션당하나씩생성한다. ( 명령어형식 ) # newfs [ OPTIONS ] /dev/rdsk/c0t1d0s0 (# mkfs -F ufs /dev/rdsk/c0t1d0s0) ( 명령어사용예 ) # newfs /dev/rdsk/c1t3d0s0 /* UFS 파일시스템생성 */ # newfs -m 3 /dev/rdsk/c1t3d0s0 /* Minfree 3% 로 UFS 파일시스템생성 */ # newfs -N /dev/rdsk/c1t3d0s0 /* 파일시스템을생성하진않고정보만확인 */ # newfs -T /dev/md/rdsk/d50 /* 1TB 파일시스템생성 */ # newfs -T 사용법 : newfs [ -v ] [ mkfs 옵션 ] 원시장치 mkfs- 옵션위치 : -N 파일시스템을작성하지않고매개변수만인쇄합니다. -T 테라바이트이상으로점진적으로증가하도록파일시스템을구성합니다. -s 파일시스템크기 ( 섹터 ) -b 블록크기 -f 조각크기 -t 트랙 / 실린더 -c 실린더 / 그룹 -m 최소사용가능공간 % -o 최적화선택사항 (` 공간 ' 또는 ` 시간 ') -r 회전수 / 분 -i inode 당바이트수 -a 실린더당대체수 -C maxcontig -d 회전지연 -n 회전위치수 -S stdout 에계산된수퍼블록의텍스트버전인쇄 -B stdout 에계산된수퍼블록의바이너리버전덤프
130 [EX1] newfs 명령어실습 (Sparc Platform on Blade 150) ( 시나리오 ) 윈도우즈에서 D:\ 데이터를지워버리기위해서포맷시킨다. # df -h (# df -h -F ufs) Filesystem size used avail capacity Mounted on... ( 중략 )... /dev/dsk/c0t2d0s3 470M 1.0M 422M 1% /data1 /dev/dsk/c0t2d0s4 470M 1.0M 422M 1% /data2 /dev/dsk/c0t2d0s5 470M 1.0M 422M 1% /data3 /dev/dsk/c0t2d0s6 470M 1.0M 422M 1% /data4 /dev/dsk/c0t2d0s7 470M 1.0M 422M 1% /export/home -> /data1 -> c0t2d0s3 # vi /etc/vfstab #device device mount FS fsck mount mount #to mount to fsck point type pass at boot options # fd - /dev/fd fd - no - /proc - /proc proc - no - /dev/dsk/c0t2d0s1 - - swap - no - /dev/dsk/c0t2d0s0 /dev/rdsk/c0t2d0s0 / ufs 1 no - #/dev/dsk/c0t2d0s3 /dev/rdsk/c0t2d0s3 /data1 ufs 2 yes - /dev/dsk/c0t2d0s4 /dev/rdsk/c0t2d0s4 /data2 ufs 2 yes - /dev/dsk/c0t2d0s5 /dev/rdsk/c0t2d0s5 /data3 ufs 2 yes - /dev/dsk/c0t2d0s6 /dev/rdsk/c0t2d0s6 /data4 ufs 2 yes - /dev/dsk/c0t2d0s7 /dev/rdsk/c0t2d0s7 /export/home ufs 2 yes - /devices - /devices devfs - no - sharefs - /etc/dfs/sharetab sharefs - no - ctfs - /system/contract ctfs - no - objfs - /system/object objfs - no - swap - /tmp tmpfs - yes -> /data1 라인앞에주석 (#) 처리한다. -> ( 주석처리를한이유 ) 솔라리스 10 버전부터 newfs 명령어파일시스템을재생성하기위해서는 /etc/vfstab 파일을참조하기때문에반드시 /etc/vfstab 파일에주석처리 되어있어야만 ( 정의가되어있지않아야만 ) 명령어수행이가능하다. # umount /data1 # newfs /dev/rdsk/c0t2d0s3 newfs: /dev/rdsk/c0t2d0s3 last mounted as /data1 newfs: construct a new file system /dev/rdsk/c0t2d0s3: (y/n)? y /dev/rdsk/c0t2d0s3: sectors in 167 cylinders of 48 tracks, 128 sectors 500.1MB in 13 cyl groups (13 c/g, 39.00MB/g, i/g) super-block backups (for fsck -F ufs -o b=#) at: 32, 80032, , , , , , , , , , , (/etc/vfstab 파일에 /data1 정의되어진경우 ) # newfs /dev/rdsk/c1t0d0s3 newfs: /dev/rdsk/c1t0d0s3 last mounted as /data1 newfs: construct a new file system /dev/rdsk/c1t0d0s3: (y/n)? y /dev/dsk/c1t0d0s3 is normally mounted on /data1 according to /etc/vfstab. Please remove this entry to use this device. -> ( 이유 ) /etc/vfstab 파일에 /data1 에대한부분을주석처리하지않았다. ( 복원 ) /data1 다시마운트 # vi /etc/vfstab -> 주석 (#) 다시제거 # mount /data1 # df -h -F ufs ----> 마운트확인 # ls /data1 ----> 내용확인
131 [EX2] newfs 명령어실습 (Intel Platform on VMWare) l 파일시스템은파티션 ( 슬라이스 ) 당개별적으로존재한다. ( 예 : format c:\, format d:\...) l 기존에존재하는파일시스템을새로운만들게되면, 기존의파일시스템내용은지원지고새로만들어진다. 새로장착된디스크 (c0d1s2) # format 디스크선택 : 1 format> verify [x] s0 -> /oracle -> UFS [ ] s1 -> swap -> swapfs [x] s3 -> /disk1 -> UFS [x] s4 -> /disk2 -> UFS [x] s7 -> /logs -> UFS format> quit # newfs /dev/rdsk/c0d1s0 # newfs /dev/rdsk/c0d1s3 # newfs /dev/rdsk/c0d1s4 # newfs /dev/rdsk/c0d1s7 ( 출력화면해석 ) # newfs /dev/rdsk/c0d1s7 newfs: construct a new file system /dev/rdsk/c0d1s7: (y/n)? y /dev/rdsk/c0d1s7: sectors in 217 cylinders of 64 tracks, 32 sectors 217.0MB in 14 cyl groups (16 c/g, 16.00MB/g, 7680 i/g) super-block backups (for fsck -F ufs -o b=#) at: 32, 32832, 65632, 98432, , , , , , , , , , , 32832, 65632,... : 각백업슈퍼블럭 (Backup Superblock) 의첫번째섹터번호각실린더그룹 (Cylinder Group) 의첫번째섹터번호 # fsck -F ufs -o b=32 /dev/rdsk/c0t0d0s0 [ 참고 ] newfs -N 옵션사용법 newfs 명령어의 -N 옵션을사용하면슬라이스에파일시스템을생성하는것이아니라생성될당시의정보를확인할때사용한다. newfs -N 명령어를사용하는대표적인예는백업슈퍼블럭의첫번째섹터번호를확인할때가장많이사용된다. # newfs -N /dev/rdsk/c0t2d0s6 (/data4) /dev/rdsk/c0t2d0s7: sectors in cylinders of 16 tracks, 63 sectors MB in 342 cyl groups (88 c/g, 43.31MB/g, 5504 i/g) super-block backups (for fsck -F ufs -o b=#) at: 32, 88800, , , , , , , , , Initializing cylinder groups:... ( 중략 )... super-block backups for last 10 cylinder groups at: , , , , , , , , , ,... ( 중략 )
132 [EX3] newfs -N 옵션실습 다음예는 c0t0d0s7 파티션를점검하였을때슈퍼블럭이상으로 32 번 sector 에존재하는백업슈퍼블럭을가지고슈퍼블럭복구를수행하였으나, 복구가되지않아서다른백업슈퍼블럭을지정하여슈퍼블럭을복구하는방법에대한예제이다. # fsck -F ufs /dev/rdsk/c0t0d0s7... super-block backups (for fsck -F ufs -o b=#)... # fsck -F ufs -o b=32 /dev/rdsk/c0t0d0s > 복구를수행하였지만정상적으로복구되지않은경우 # fsck -F ufs /dev/rdsk/c0t0d0s7... super-block backups (for fsck -F ufs -o b=#)... # newfs -N /dev/rdsk/c0t0d0s7 /dev/rdsk/c0t0d0s7: sectors in cylinders of 16 tracks, 63 sectors MB in 342 cyl groups (88 c/g, 43.31MB/g, 5504 i/g) super-block backups (for fsck -F ufs -o b=#) at: 32, 88800, , , , , , , , , Initializing cylinder groups:... super-block backups for last 10 cylinder groups at: , , , , , , , , , ,... ( 백업슈퍼블럭의다른번호확인 ) [ 참고 ] newfs -N -T /dev/rdsk/c1t3d0s7 # fsck -F ufs -o b= /dev/rdsk/c0t0d0s
133 Minfree(Minimum Free Space) The minimum free space is the percentage of the total disk space that is held in reserve when you create the file system. The default reserve is ((64 Mbytes/partition size) * 100), rounded down to the nearest integer and limited between 1 percent and 10 percent, inclusively. 최소남은공간 (Mininum Free Space) 는전체공간의퍼센트로할당된다. 이공간은파일시스템이만들어질당시에예약되서생성된다. 기본예약값은 ((64 MB / 파티션크기 ) * 100) 이다. 이값은 1% 에서 10% 사이값이할당이되고, 근사값으로결정이된다. Free space is important because file access becomes less and less efficient as a file system gets full. As long as an adequate amount of free space exists, UFS file systems operate efficiently. When a file system becomes full, using up the available user space, only root can access the reserved free space. 최소남은공간은파일시스템이풀이났을때파일시스템을접근할수있는최소로공간으로남겨져있어야하기때문에중요하다. 오랫동안이공간은 UFS 파일시스템이동작하기에충분한공간이존재해왔었다. 파일시스템이풀나면, root 사용자만사용할수있는공간으로예약되어진남은공간이다. Commands such as df report the percentage of space that is available to users, excluding the percentage allocated as the minimum free space. When the command reports that more than 100 percent of the disk space in the file system is in use, some of the reserve has been used by root. If you impose quotas on users, the amount of space available to them does not include the reserved free space. You can change the value of the minimum free space for an existing file system by using the tunefs command. (1). Minfree 공간 Minfree 공간은하나의파티션에 1 ~ 10% 사이값으로정의된다. Minfree 공간은파티션이풀 (Full) 난경우 root 사용자가사용하기위한공간으로예약된공간이다. 일반사용자는이공간을사용할수없다. 파일시스템에서 Minfree 공간은 0(zero) 일수없다. 최소 minfree 는 1% 이다. [DISK] +================+ / +================+ swap +================+ /usr +================+ /var +================+ /tmp <=== Filesystem Full (warning!!!) +================+ /oracle +================+ [ 그림 ] 파티션풀 (Full)
134 Slice Minfree(1%-10%) [ 그림 ] Minfree 공간 기본체계 : 파일시스템생성될때자동으로 minfree 공간할당 ( 예 ) 파티션의디스크공간이크다면 -> minfree 1% 파티션의디스크공간이작다면 -> minfree 10%
135 (2). Minfree 공간설정 (Solaris10 x86 on VMWare) Minfree 공간은 (a) 파일시스템생성할때주어질수도있고 (b) 파일시스템이생성된이후에조정도가능하다. ufs ( 알림 ) 스팍용으로실습할때는슬라이스번호를변경하여사용한다. ( 예 ) c0d0s3 -> c0t2d0s3 (a) Minfree 공간확인 # fstyp /dev/rdsk/c0d0s3 # fstyp -v /dev/rdsk/c0d0s3 more ufs magic format dynamic time Tue May 26 11:01: sblkno 16 cblkno 24 iblkno 32 dblkno 2360 sbsize 2048 cgsize 8192 cgoffset 64 cgmask 0xffffffc0 ncg 13 size blocks bsize 8192 shift 13 mask 0xffffe000 fsize 1024 shift 10 mask 0xfffffc00 frag 8 shift 3 fsbtodb 1 minfree 10% maxbpg 2048 optim time maxcontig 7 rotdelay 0ms rps 60 csaddr 2360 cssize 1024 shift 9 mask 0xfffffe00 ntrak 48 nsect 128 spc 6144 ncyl 168 cpg 13 bpg 4992 fpg ipg nindir 2048 inopb 64 nspf 2... ( 중략 )... # fstyp -v /dev/rdsk/c0d0s3 grep minfree minfree 10% maxbpg 2048 optim time (b). 파일시스템생성후 Minfree 공간조정 # tunefs -m 8 /dev/rdsk/c0d0s3 (10 ~ 20 초정도시간이흐른후에점검 ) # fstyp -v /dev/rdsk/c0d0s3 grep minfree (c). 파일시스템생성할때 Minfree 공간설정 # newfs -m 4 /dev/rdsk/c0d1s0 [ 참고 ] # newfs /dev/rdsk/c0d1s0 -> minfree 자동지정 # newfs -m 4 /dev/rdsk/c0d1s0 -> minfree 직접지정 # fstyp -v /dev/rdsk/c0d1s0 grep minfree [ 참고 ] Minfree 공간 & 사용가능한공간 l Target : /export/home Filesystem Slice 사용중 남은공간 Minfree(8%) # df -k /export/home 남은공간 => ( minfree 8% ) # tunefs -m 1 /dev/rdsk/c0t0d0s7 # df -k /export/home 남은공간 => ( minfree 1% )
136 [EX] /export/home(c0d0s7) Minfree 공간조정 (Intel Platform on VMWare) ( 알림 ) 스팍용에서실습할때는파티션이름을변경하여실습해야한다. ( 예 ) c0d0s7 -> c0t2d0s7 1 /export/home 파일시스템의사용량점검 # \df -k /export/home (# alias df='df -h') 파일시스템 K 바이트사용가용용량설치지점 /dev/dsk/c0d0s % /export/home 2 /export/home 파일시스템의 minfree 확인 # fstyp -v /dev/rdsk/c0d0s7 grep minfree minfree 10% maxbpg 2048 optim time 3 /export/home 파일시스템의 minfree 조정 (10% -> 1%) 및확인 # tunefs -m 1 /dev/rdsk/c0d0s7 minimum percentage of free space changes from 9% to 1% (10 ~ 20초정도시간이흐른후에점검 ) # fstyp -v /dev/rdsk/c0d0s7 grep minfree minfree 1% maxbpg 2048 optim time 4 /export/home 파일시스템의사용량점검 # \df -k /export/home 파일시스템 K 바이트사용가용용량설치지점 /dev/dsk/c0d0s % /export/home 5 "total size"/used/avail 관계 # df -h /export/home 파일시스템 크기 사용 가용 용량 설치지점 /dev/dsk/c0d0s7 375M 1.0M 370M 1% /export/home l size(total size) = used(1.0m) + avail(370m) = 371M <---> 375M (minfree % 값이작아서크기차이가적다.) [ 참고 ] minfree 공간의활용 ( 시나리오 ) 일반적으로실무에서사용되고있는파티션은대부부은큰용량이할당되는경우가많다. 따라서파일시스템의 minfree 공간은거의 1% 로되어져있는경우가대부분이다. 하지만관리자 (root 사용자 ) 는파일시스템을만들당시에 minfree 공간을할당하는방식에서자동으로할당하는방식을사용하지않고수동으로 ( 직접주는방식, newfs -m minfree) 주는방식을사용하는경우가있다. 이경우 2% 나 3% 정도가적당하다. 이런경우파일시스템이풀나게되면, 관리자는우선첫번째작업이최소남은공간 (Minimum Free Space) 를 1% 로조정한다. 그러면, 서비스는남은공간이생기게되므로다시오픈 (Open) 되고, 관리자는시간을가지고삭제작업이나, 문제의원인을분석할수있는시간이생기게되는것이다. Disk Full!!!! -> 삭제작업 ( 시간필요 ) 원인분석 ( 시간필요 ) => 디스크파티션생성당시 minfree 공간 2% ~ 3% 생성 (a). minfree 공간 2% ~ 3% -> 1% (b). 삭제작업 (c). 원인분석
137 파일시스템점검 (Checking the Filesystem by Using the fsck Command) A file system can become damaged if it is corrupted from a power failure, a software error in the kernel, a hardware failure, or an improper shutdown of the system. The file system check program, fsck, checks the data consistency of a file system and attempts to correct or repair any inconsistencies or damage found. 파일시스템이전원이상이나커널에서동작하는프로그램의이상, 하드웨어적인이상, 비정상적인시스템셧다운이발생하여데미지 (Damaged) 를입게되면, 파일시스템을 fsck 명령어를통해파일시스템의무결성을점검하게된다. Every time you boot a system, the operating system determines which file systems the fsck command should check. The fsck command checks and repairs any problems encountered in file systems before they are mounted. (1) fsck 명령어 NAME newfs - construct a UFS file system DESCRIPTIONS fsck audits and interactively repairs inconsistent file system conditions. If the file system is inconsistent the default action for each correction is to wait for the user to respond yes or no. If the user does not have write permission fsck defaults to a no action. Some corrective actions will result in loss of data. The amount and severity of data loss can be determined from the diagnostic output. OPTIONS -y Y Assume a yes response to all questions asked by fsck. -o specific-options These specific-options can be any combination of the following separated by commas (with no intervening spaces). b=n f p Use block n as the super block for the file system. Block 32 is always one of the alternate super blocks. Determine the location of other super blocks by running newfs(1m) with the -Nv options specified. Force checking of file systems regardless of the state of their super block clean flag. Check and fix the file system non-interactively ("preen"). Exit immediately if there is a problem requiring intervention. This option is required to enable parallel file system checking
138 ( 주의 ) fsck 명령어사용시주의점 Never run the fsck command on a mounted filesystem. The /(root), /usr and /var filesystem should have the fsck command run on them while in single-user mode. 마운트된파일시스템에대해서 fsck 명령어를수행하지말아야한다. /(root), /usr, /var 파일시스템같은경우는싱글유저모드에서 fsck 명령어를수행할것을권장한다 정보 <---- 정보 (2 개의파일존재 ) file1 존재 <---- fsck Level 1 file2 존재 file3 생성 <---- fsck Level ( 명령어형식 ) # fsck /dev/rdsk/c0t0d0s7 /* 대화형모드실행 */ # fsck -o f,p /dev/rdsk/c0t0d0s7 /* 비대화형모드실행 */ (-f : force, -p : preen) # fsck /export/home /* /etc/vfstab 정의된경우 */ # fsck -y /* 모든파일시스템에대해서 fsck 명령어수행 */ # fsck -y /dev/rdsk/c0t0d0s7 /* 지정된파일시스템에대해서 fsck 명령어수행 */ [ 참고 ] fsck 명령어의옵션 fsck -m 마운트된파일시스템인지를확인함. fsck -y 모든복구에서 y로응답함. fsck -n 모든복구에서응답없이실행함. fsck -o p 비대화형모드로실행함. [ 참고 ] 파일시스템슈퍼블럭 (Status Flag) 정보중 The status Filesystem's Flag (Filesystem Status Flag) The status of a filesystem's flag determines whether the filesystem needs to be scanned by the fsck command. When the state flag is "clean", "stable", "logging", filesystem scans are not run
139 UFS(Unix File System) Structure VTOC > format, fmthard bootblk > installboot Superblock > newfs Cyliner Group - Backup Superblock - Cyliner Group Block - Inode Table - Datablock (1). fsck 명령어의점검목록 (The fsck Command Check List) 데이터의불일치성점검 (Data Inconsistencies Checked by the fsck Command) 슈퍼블럭의불일치성점검 (Superblock Consistency) 실린더그룹블럭불일치성점검 (Cylinder Group Block Consistency) Inode 의불일치성 (Inode Consistency) 데이터블럭의불일치성 (Data Block Consistency) 데이터불일치성의해결 (Resolving Filesystem Inconsistencies) 잘못참고되는파일해결 (Allocated unreferenced file) 링크카운트의불일치성해결 (Inconsistent link count) 남은블럭카운트불일치성해결 (Free block count corruption) 슈퍼블럭의불일치성해결 (Superblock corruption) Eash Phase ** Phase 1 - Check Blocks and Sizes ** Phase 2 - Check Pathnames ** Phase 3a - Check Connectivity ** Phase 3b - Verify Shadows/ACLs /* 솔라리스 10 버전에서새로추가된 Phase */ ** Phase 4 - Check Reference Counts ** Phase 5 - Check Cylinder Groups [ 참고 ] The lost+found Directory The fsck command puts files and directories that are allocated but unreferenced in the lost+found directory located in that file system. The inode number of each file is assigned as the file name. If the lost+found directory does not exist, the fsck command creates it. If not enough space exists in the lost+found directory, the fsck command increases the directory s size. lost+found 디렉토리 l 슬라이스 ( 파티션, 파일시스템 ) 에하나씩존재한다.( 예 : /data1(0), /etc(x)) l 슬라이스 ( 파티션, 파일시스템 ) 의최상위에존재한다. l 파일시스템점검시 ( 예 : fsck) 점검된파일 ( 예 : 이상이있는파일들 ) 들이임시적으로저장되는임시폴더이다. l 이디렉토리는공간이부족하게되면 fsck 명령어가수행될때자동으로늘려준다. l 디렉토리가없어진경우 fsck 명령어가수행될때자동으로생성시켜준다
140 (2). fsck 명령어실행모드 fsck 명령어는파일시스템의불일치되는상태를고칠때사용한다. fsck 명령어를수행하는방법은대화형모드형태와비대화형형태로실행이가능하다. fsck 명령어를대화형모드형태로수행하게되면, 파일시스템에이상이발생한경우각상황에맞게고칠것인지를 yes 또는 no 로물어보게된다. fsck 명령어를비대화형모드형태로실행하면, 사용자에게물어보지않고고치게된다. l Noninteractive Mode ( 비대화형모드 ) ==> # fsck -o f,p /dev/rdsk/c1t0d0s0 l Interactive Mode ( 대화형모드 ) ==> # fsck /dev/rdsk/c1t0d0s0 (2-1). 대화형모드 (Interactive Mode) fsck 명령어를대화형모드형태로실행하는것은 fsck 명령어다음은특별한옵션을지정하지않으면된다. 그러면 fsck 명령어는각단계 (Phase) 에따라차근차근점검하게되고점검단계도출력하고, 혹시나이상이발생하는경우관리자에게현재상태를어떠식으로고칠것인지 yes 나 no 로물어보게된다. [EX] fsck 명령어대화형모드로실행 # umount /export/home # fsck /dev/rdsk/c0t2d0s7 (# fsck /export/home) ** /dev/rdsk/c0t2d0s7 ** Last Mounted on /export/home ** Phase 1 - Check Blocks and Sizes ** Phase 2 - Check Pathnames ** Phase 3a - Check Connectivity ** Phase 3b - Verify Shadows/ACLs ** Phase 4 - Check Reference Counts ** Phase 5 - Check Cylinder Groups 12 files, 19 used, free (5 frags, blocks, 0.0% fragmentation) ( 마지막라인의해석 ) files ( 예 ) 12 files, Number of inodes in use used ( 예 ) 19 used, Number of fragments in use free ( 예 ) free, Number of unused fragments frags ( 예 ) 5 frags, Number of unused non-block fragments blocks ( 예 ) blocks, Number of unused full blocks %fragmentation Percentage of fragmentation, where: free fragments x 100 / total fragments in the file system (2-2). 비대화형모드 (Noninteractive Mode) fsck 명령어를비대화형모드형태로수행하는것은 fsck 명령어다음에 f, p 옵션을사용하는것이다. 그러면 fsck 명령어가수행이되지만실행되는각단계에대한출력결과나사용자에게물어보는경우없이바로고치게된다. 또한, 일반적인시스템부팅시에 fsck 명령어가비대화형모드형태로동작이된다. [EX] fsck 명령어비대화형모드로실행 # umount /export/home # fsck -o f,p /dev/rdsk/c0t2d0s7 (# fsck -o f,p /export/home) /dev/rdsk/c0t2d0s7: 12 files, 19 used, free (5 frags, blocks, 0.0% fragmentation) - The f option of the fsck command forces a filesystem check, regardless of the state of the filesystem's superblock state flag. - The p option checks and fixes the filesystem nointeractively(preen). The program exits immediately if a problem requiring intervention is found
141 파일시스템복구실습 Superblock 복구실습 일반파일시스템복구실습 lost+found 실습 [EX1] Superblock 복구실습 (Solaris10 x86 on VMWare) ( 알림 ) 스팍용에서실습할때는파티션이름을변경하여실습한다. ( 예 ) c0d0s4 -> c0t2d0s4 1 /data2(c0d0s4) 언마운트 # umount /data2 # df -k (# df -k -F ufs) -> /data2 는마운트되어있지않다.( 정보가보이지않는다.) 2 c0d0s4 슬라이스의슈퍼블럭 (superblock) 강제삭제 # dd if=/dev/zero of=/dev/rdsk/c0d0s4 bs=512 count= 레코드입력 32+0 레코드출력 3 c0d0s4 슈퍼블럭복구및확인 # mount /data2 mount: /dev/dsk/c0d0s4 is not this fstype -> 슈퍼블럭이깨졌기때문에마운트되지않는다. -> 이파티션은파일시스템종류 (File System Type) 를알수없다. -> 이것은슈퍼블럭에파일시스템 (UFS) 에대한정보가있기때문이다. ( 솔라리스 9 버전이하에서 Superblock 복구방법 ) # fsck /dev/rdsk/c0d0s4... super-block backups (for fsck -F ufs -o b=#)... # fsck -F ufs -o b=32 /dev/rdsk/c0d0s4 (# newfs -N /dev/rdsk/c0d04)
142 # fsck /dev/rdsk/c0d0s4 /* 대화형모드형태로 fsck 명령어수행 */ ** /dev/rdsk/c0d0s4 BAD SUPERBLOCK AT BLOCK 16: MAGIC NUMBER WRONG LOOK FOR ALTERNATE SUPERBLOCKS WITH MKFS? no /* alternate superblock = backup superblock */ LOOK FOR ALTERNATE SUPERBLOCKS WITH NEWFS? yes /* newfs 명령어를통해 alternate superblock 검색 */ FOUND ALTERNATE SUPERBLOCK 32 WITH NEWFS /* newfs -N /dev/rdsk/c0d0s4 */ USE ALTERNATE SUPERBLOCK? yes /* fsck -o b=32 /dev/rdsk/c0d0s4 */ FOUND ALTERNATE SUPERBLOCK AT 32 USING NEWFS If filesystem was created with manually-specified geometry, using auto-discovered superblock may result in irrecoverable damage to filesystem and user data. CANCEL FILESYSTEM CHECK? no /* fsck /dev/rdsk/c0d0s4 */ ** Last Mounted on ** Phase 1 - Check Blocks and Sizes ** Phase 2 - Check Pathnames ** Phase 3a - Check Connectivity ** Phase 3b - Verify Shadows/ACLs ** Phase 4 - Check Reference Counts ** Phase 5 - Check Cylinder Groups CORRECT BAD CG SUMMARIES FOR CG 0? y /* CG: Cylinder Group */ CORRECTED SUPERBLOCK SUMMARIES FOR CG 0 CORRECTED SUMMARIES FOR CG 0 FRAG BITMAP WRONG FIX? y UPDATE STANDARD SUPERBLOCK? y /* standard superblock : superblock */ 2 files, 9 used, free (15 frags, blocks, 0.0% fragmentation) ***** FILE SYSTEM WAS MODIFIED ***** # fsck /dev/rdsk/c0d0s4 (# fsck /data2) ** /dev/rdsk/c0d0s4 ** Last Mounted on ** Phase 1 - Check Blocks and Sizes ** Phase 2 - Check Pathnames ** Phase 3a - Check Connectivity ** Phase 3b - Verify Shadows/ACLs ** Phase 4 - Check Reference Counts ** Phase 5 - Check Cylinder Groups 2 files, 9 used, free (15 frags, blocks, 0.0% fragmentation) -> 정상적인출력결과가나온다. # mount /data2 # df -k /data2 (# df -k -F ufs) -> 정상적으로마운트가된다
143 [EX2] UFS 파일시스템복구실습 (Solaris10 x86 on VMWare) 파일시스템 크기 사용 가용 용량 설치지점 /dev/dsk/c0d0s5 375M 1.0M 336M 1% /data3 4 -rw-r--r-- 1 root other 16 5월 26 11:32 testfile -> Inode Number : 4 clearing 4 ( 알림 ) 스팍용에서실습할때는파티션이름을변경하여사용한다. ( 예 ) c0d0s5 -> c0t2d0s5 1 /data3(c0d0s5) 에 testfile 파일생성및확인 # df -k /data3 (# df -k -F ufs) # cd /data3 # echo "This is a test." > testfile # ls -li testfile 2 /data3(c0d0s5) 언마운트및 testfile 파일 inode 강제삭제 # cd ; umount /data3 # clri /dev/rdsk/c0d0s5 4 (clri : clear inode) # mount /data3 UFS(Unix File System) superblock cylinder group block - inode table - data block mount: The state of /dev/dsk/c1t0d0s5 is not okay and it was attempted to be mounted read/write mount: Please run fsck and try again 3 c0d0s5 파일시스템점검및확인 # fsck /dev/rdsk/c0d0s5 (# fsck /data3) ** /dev/rdsk/c0d0s5 ** Last Mounted on /data3 ** Phase 1 - Check Blocks and Sizes ** Phase 2 - Check Pathnames UNALLOCATED I=4 OWNER=root MODE=0 SIZE=0 MTIME=Jan 1 09: NAME=/testfile REMOVE DIRECTORY ENTRY FROM I=2? y /* I=2 : /data3 */ ** Phase 3a - Check Connectivity ** Phase 3b - Verify Shadows/ACLs ** Phase 4 - Check Reference Counts ** Phase 5 - Check Cylinder Groups CORRECT BAD CG SUMMARIES FOR CG 0? y CORRECTED SUPERBLOCK SUMMARIES FOR CG 0 CORRECTED SUMMARIES FOR CG 0 FILE BITMAP WRONG FIX? y FRAG BITMAP WRONG (CORRECTED) CORRECT GLOBAL SUMMARY SALVAGE? y Log was discarded, updating cyl groups 2 files, 9 used, free (15 frags, blocks, 0.0% fragmentation) ***** FILE SYSTEM WAS MODIFIED *****
144 # mount /data3 # ls /data3 lost+found/ -> testfile이존재하지않는다. -> fsck 명령어수행시자동으로삭제되었다
145 [EX3] lost+found 디렉토리의용도 (Solaris10 x86 on VMWare) ( 알림 ) 스팍용에서실습하기위해서는파티션이름을변경한다. ( 예 ) c0d0s6 -> c0t2d0s6 /data dir dir file01 (c0d0s6) +--- file02 /dev/rdsk/c0d0s6: 3 /lost+found/. 4 /dir01/. 5 /dir01/dir02/. 6 /dir01/dir02/file01 7 /dir01/dir02/file02 ** /dev/dsk/c0d0s6 ** Currently Mounted on /data4 ** Phase 1 - Check Blocks and Sizes ** Phase 2 - Check Pathnames ** Phase 3a - Check Connectivity UNREF DIR I=4 OWNER=root MODE=40755 SIZE=512 MTIME=Sep 25 04: RECONNECT? y /* /data4 -> lost+found -> dir01 */ DIR I=4 CONNECTED. PARENT WAS I=2 /* Inode 2 : /data4, Inode 4 : dir01 */ ** Phase 3b - Verify Shadows/ACLs ** Phase 4 - Check Reference Counts LINK COUNT lost+found I=3 OWNER=root MODE=40700 SIZE=8192 MTIME=Sep 5 03: COUNT 2 SHOULD BE 3 ADJUST? y LINK COUNT DIR I=4 OWNER=root MODE=40755 SIZE=512 MTIME=Sep 25 04: COUNT 2 SHOULD BE 3 ADJUST? y ** Phase 5 - Check Cylinder Groups FILESYSTEM MAY STILL BE INCONSISTENT. 6 files, 11 used, free (13 frags, blocks, 0.0% fragmentation) ***** FILE SYSTEM WAS MODIFIED ***** ORPHANED DIRECTORIES REATTACHED; DIR LINK COUNTS MAY NOT BE CORRECT. ***** PLEASE RERUN FSCK ON UNMOUNTED FILE SYSTEM ***** ***** REBOOT NOW ***** [ 그림 ] 실습환경 1 data4(c0d0s6) 파일시스템의파일들정보확인 # ff /dev/rdsk/c0d0s6 4 : Inode Number /dir01 : Directory Name 2 /data4/dir01 파일 unlink # unlink /data4/dir01 # rm file1 <- 0 -> # unlink file1 # rm -r dir01 <- X -> # unlink dir01 (-r: Recursive) # ls /data4 3 /data4(c0d0s6) 파일시스템점검및확인 # cd # umount /data4 # fsck /dev/rdsk/c0d0s6 (# fsck /data4)
146 # mount /data4 # ls /data4 4 lost+found 디렉토리확인및 dir01 디렉토리복구 # ff /dev/rdsk/c0d0s6 /dev/rdsk/c0d0s6: 3 /lost+found/. 4 /lost+found/#000004/. 5 /lost+found/#000004/dir02/. 6 /lost+found/#000004/dir02/file01 7 /lost+found/#000004/dir02/file02 # cd /data4/lost+found ; ls # mv /data4/lost+found/"#000004" /data4/dir01 # ls -lir /data4 # man ff [ 참고 ] ff 명령어 NAME ff - list file names and statistics for a file system DESCRIPTIONS ff prints the pathnames and inode numbers of files in the file system which resides on the special device special. Other information about the files may be printed using options described below. Selection criteria may be used to instruct ff to only print information for certain files. If no selection criteria are specified, information for all files considered will be printed (the default); the -i option may be used to limit files to those whose inodes are specified. ( 정리 ) 파일시스템점검 (Filesystem Check) super block < fsck -o b= Cylinder Group < fsck / fsck o f,p - Backup super Block - Cylinder Group Block - Inode Table - Data Block [ 참고 ] "# fsck y /export/home" 명령어수행시주의사항 # script a file.log # ff /dev/rdsk/c1t0d0s7 (c1t0d0s7 is /export/home) # fsck y /export/home <CTRL + D> # cat file.log
147 파일시스템모니터링 (Filesystem Monitoring) 솔라리스파일시스템을점검하는명령어로서 df, du, quot 명령어의사용법을확인해본다. df CMD du CMD quot CMD 디스크의남은공간위주로해서파일시스템의사용량을점검하는명령어디렉토리 / 파일의사용량을점검하는명령어파티션 ( 슬라이스 ) 단위로해서사용자가사용하고블록 / 파일사용량점검명령어 (1). df CMD (disk free space) NAME df - displays number of free disk blocks and free files DESCRIPTIONS The df utility displays the amount of disk space occupied by mounted or unmounted file systems, the amount of used and available space, and how much of the file system's total capacity has been used. The file system is specified by device, or by referring to a file or directory on the specified file system. Used without operands or options, df reports on all mounted file systems. df may not be supported for all FSTypes. If df is run on a networked mount point that the automounter has not yet mounted, the file system size will be reported as zero. As soon as the automounter mounts the file system, the sizes will be reported correctly. OPTIONS -h Like -k, except that sizes are in a more human readable format. The output consists of one line of information for each specified file system. This information includes the file system name, the total space allocated in the file system, the amount of space allocated to existing files, the total amount of space available for the creation of new files by unprivileged users, and the percentage of normally available space that is currently allocated to all files on the file system. All sizes are scaled to a human readable format, for example, 14K, 234M, 2.7G, or 3.0T. Scaling is done by repetitively dividing by k Prints the allocation in kbytes. The output consists of one line of information for each specified file system. This information includes the file system name, the total space allocated in the file system, the amount of space allocated to existing files, the total amount of space available for the creation of new files by unprivileged users, and the percentage of normally available space that is currently allocated to all files on the file system. This option overrides the -b, -e, -n, and -t options. -F FSType Specifies the FSType on which to operate. The -F option is intended for use with unmounted file systems. The FSType should be specified here or be determinable from /etc/vfstab (see vfstab(4)) by matching the directory, block_device, or resource with an entry in the table, or by consulting /etc/default/fs. See default_fs(4)
148 df 명령어는남은디스크블럭과남은파일의수를출력하는명령어이다. df 명령어에 -k, -h 옵션등을사용하면출력결과는파일시스템크기, 사용된공간, 남은공간, 전체에서사용중인 % 사용량, 마운트포인트등을출력한다. ( 명령어형식 ) # df /* block 단위로표시 (1 block = 512bytes) */ # df -k /* -k : Kbytes */ # df -h /* -h : human */ # df -k /export/home /* 마운트포인터가지정이된경우 */ # df -k /data1 /export/home # df -h -F ufs /* UFS File System */ # df -h -F zfs /* ZFS File System */ # df -h -F nfs /* NFS File System */ 디스크파티션전체공간표시 (Disk Usage) 디스크파티션사용공간 / 남은공간표시 (Disk Free Space) 마운트포인터를중심으로보여줌 # df -h 파일시스템크기사용가용용량설치지점 /dev/dsk/c0d0s0 12G 5.5G 6.2G 47% / /devices 0K 0K 0K 0% /devices ctfs 0K 0K 0K 0% /system/contract proc 0K 0K 0K 0% /proc mnttab 0K 0K 0K 0% /etc/mnttab swap 2.8G 908K 2.8G 1% /etc/svc/volatile sharefs 0K 0K 0K 0% /etc/dfs/sharetab objfs 0K 0K 0K 0% /system/object /usr/lib/libc/libc_hwcap1.so.1 12G 5.5G 6.2G 47% /lib/libc.so.1 fd 0K 0K 0K 0% /dev/fd swap 2.8G 56K 2.8G 1% /tmp swap 2.8G 36K 2.8G 1% /var/run /dev/dsk/c0d0s3 375M 1.0M 344M 1% /data1 /dev/dsk/c0d0s4 375M 1.0M 336M 1% /data2 /dev/dsk/c0d0s5 375M 1.0M 336M 1% /data3 /dev/dsk/c0d0s6 375M 1.0M 336M 1% /data4 (df -h 출력결과해석 ) 필드설명 /dev/dsk/c0d0s0 마운트자원 12G 총용량 5.5G 사용량 6.2M 남은공간 47% 사용율 (%) / 마운트포인터 # df -h -F ufs Filesystem size used avail capacity Mounted on /dev/dsk/c0t2d0s0 15G 5.1G 9.8G 35% / /dev/dsk/c0t2d0s3 470M 1.0M 450M 1% /data1 /dev/dsk/c0t2d0s6 470M 1.0M 422M 1% /data4 /dev/dsk/c0t2d0s7 470M 1.1M 422M 1% /export/home /dev/dsk/c0t2d0s4 470M 1.0M 422M 1% /data2 /dev/dsk/c0t2d0s5 470M 2.5M 421M 1% /data3 # df -h -F zfs Filesystem size used avail capacity Mounted on users 18G 19K 18G 1% /mypool users/home 18G 21K 18G 1% /mypool/home users/home/user01 18G 18K 18G 1% /mypool/home/user01 users/home/user02 18G 18K 18G 1% /mypool/home/user
149 [ 참고 ] df 명령어를통한파일시스템에남는 Inode 확인 남은공간은있지만, 남은 Inode 는없는상태 작성일 : 플랫폼 : Solaris 10 05/09 on Blade150 INDEX Inode 에러확인 2. 남은 Inode 확인 3. 문제해결 Innode 에러확인 # dmesg (# cat /var/adm/messages) Jun 19 17:41:29 igis ufs: [ID kern.notice] NOTICE: /vol04: out of inodes Jun 19 17:42:27 igis last message repeated 30 times Jun 19 17:42:28 igis ufs: [ID kern.notice] NOTICE: /vol04: out of inodes Jun 19 17:48:53 igis last message repeated 289 times Jun 19 17:49:08 igis ufs: [ID kern.notice] NOTICE: /vol04: out of inodes Jun 19 17:50:58 igis last message repeated times ( 에러상태 ) l 남은공간 ( 쓸수있는공간 ) 은있지만, 남은 Inode는없는상태 ( 예 ) df -k /data 남은공간 30% 존재, 그런데파일이더이상생성되지않는다. l 위와같은에러메세지 ("out of inodes") 만계속출력이된다. # newfs -N /dev/rdsk/c0d0s7 /dev/rdsk/c0d0s7: sectors in 168 cylinders of 48 tracks, 128 sectors 502.0MB in 13 cyl groups (13 c/g, 39.00MB/g, i/g) super-block backups (for fsck -F ufs -o b=#) at: 32, 80032, , , , , , , , , , , l 파일시스템이만들어질때 Cylinder Group 당 inode 개수가지정이된다. l 위의예제에서는 c0d0s7 파티션에대해서 1 Cyliner Group 당 개의 inode 가할당되었다. 2. 남은 Inode 확인 파일시스템에현재남은 inode 개수를확인하기위해서는 df 명령어를수행한다. /usr/sbin/df 명령어 (/usr/bin/df) 를사용하는경우는 -e 옵션을사용하고 /usr/ucb/df 명령어를수행하는경우에는 -i 옵션을사용하면된다. 후자의경우가출력결과가더깔끔하게나온다. ( 첫번째형식 ) # /usr/sbin/df -e (/usr/sbin/df <- /usr/bin/df) ( 두번째형식 ) # /usr/ucb/df -i ( 첫번째형식 ) # /usr/sbin/df -e Filesystem ifree /dev/dsk/c0d0s /devices 0 ctfs proc 8022 mnttab
150 swap objfs sharefs /usr/lib/libc/libc_hwcap1.so fd 0 swap swap /dev/dsk/c0d0s /dev/dsk/c0d0s /dev/dsk/c0d0s /dev/dsk/c0d0s /dev/dsk/c0d0s /export/install/boot /vol/dev/dsk/c1t0d0/sol_10_1008_x86 0 /hgfs ( 두번째형식 ) # man -l df df (1m) -M /usr/share/man df (1b) -M /usr/share/man df (1m) -M /usr/man df (1b) -M /usr/man # man -M /usr/share/man -s 1b df OPTIONS -i Report the number of used and free inodes. Print ` * ' if no information is available. # /usr/ucb/df -i Filesystem iused ifree %iused Mounted on /dev/dsk/c0d0s % / /dev/dsk/c0d0s % /data1 /dev/dsk/c0d0s % /data2 /dev/dsk/c0d0s % /data3 /dev/dsk/c0d0s % /data4 /dev/dsk/c0d0s % /export/home 3. 문제해결 다음과같은방법을고려해볼수있다. ( ㄱ ) 디렉토리마이그레이션 (/data1 -> /data2) 1 # newfs -i #### /dev/rdsk/c0t2d0s4 (c0t2d0s4 -> /data2) 2 /data1 -> /data2 마이그레이션작업 3 (Optional) 필요에따라 /data2 마운트포인터를 /data1 으로변경 ( ㄴ ) ZFS 파일시스템을사용 1 /data2(zfs) 2 /data1(ufs) -> /data2(zfs) 3 (Optional) 필요에따라 /data2 마운트포인터를 /data1 으로변경 [ 참고 ] ~/.kshrc 환경파일에 Alias 선언 # cat ~/.kshrc (# vi ~/.bashrc)... ( 중략 )... alias ddf='/usr/bin/df -h -F ufs ; echo ; echo ; /usr/ucb/df -i' or alias df='/usr/ucb/df' #. ~/.kshrc (#. ~/.bashrc) # ddf or # df -h # df -i
151 (2). du CMD (disk usage) NAME du - summarize disk usage DESCRIPTION The du utility writes to standard output the size of the file space allocated to, and the size of the file space allocated to each subdirectory of, the file hierarchy rooted in each of the specified files. The size of the file space allocated to a file of type directory is defined as the sum total of space allocated to all files in the file hierarchy rooted in the directory plus the space allocated to the directory itself. This sum will include the space allocated to any extended attributes encountered. Files with multiple links will be counted and written for only one entry. The directory entry that is selected in the report is unspecified. By default, file sizes are written in 512-byte units, rounded up to the next 512-byte unit. OPTIONS -h All sizes are scaled to a human readable format, for example, 14K, 234M, 2.7G, or 3.0T. Scaling is done by repetitively dividing by k Write the files sizes in units of 1024 bytes, rather than the default 512-byte units. -s Instead of the default output, report only the total sum for each of the specified files. ( 명령어형식 ) # du /etc # du -k /etc # du -h /etc # du -ak /etc # du -ah /etc # du -sk /etc (-s : sum, -k : Kbytes) # du -sh /etc (-s : sum, -h : human) [EX] du 명령어실습 # du /etc 16 /etc/certs 10 /etc/cron.d 14 /etc/crypto/certs 2 /etc/crypto/crls 26 /etc/crypto 184 /etc/default... ( 중략 )... # du -sk /etc /etc (du -sk 출력결과해석 ) 필드 설명 사용량 (Kbytes) /etc 디렉토리이름 # du -sh /etc 75M /etc
152 [ 참고 ] 윈도우시스템과의비교 du & df 명령어의비교 df 명령어 - 파티션단위의사용량점검 du 명령어 - 디렉토리단위의사용량점검 [ 참고 ] du 명령어사용예디스크사용량이풀이난경우점검 (Disk Full Check) - Sfecific Directory Disk Usage Check - Report the disk used current directory in reverse order # cd /var # du -sk * sort -nr more (CMD sort -k 2 -n) # du -ak sort -nr more [ 참고 ] du & df 명령어의출력결과의차이점 # \df -k /export/home Filesystem kbytes used avail capacity Mounted on /dev/dsk/c0d0s % /export/home # du -sk /export/home 580 /export/home ( 잘못된명령어수행 ) # ufsdump 0uf /dev/rmt/0 /export/home(0) # ufsdump 0uf /dev/rmt0 /export/home (X)
153 (3). quot CMD NAME quot - summarize file system ownership DESCRITPTION quot displays the number of blocks (1024 bytes) in the named filesystem (one or more) currently owned by each user. There is a limit of 2048 blocks. Files larger than this will be counted as a 2048 block file, but the total block count will be correct. OPTIONS -a Generate a report for all mounted file systems. -f Display three columns giving, for each user, the number of blocks owned, the count of number of files, and user name. This option is incompatible with the -c and -v options. ( 명령어형식 ) # quot -af # quot -f /dev/dsk/c0t0d0s7 # quot -f /export/home (/etc/vfstab 정의가되어있는경우 ) [EX] quot 명령어실습 (Solaris 10 x86 on VMWare) # quot -f /export/home (/dev/dsk/c0d0s7) 10 9 user01 /* 10 Blocks(1 Block=1024 Bytes), Files + Directory : 9 */ 9 2 root 7 8 user user user04 <Block> <Files> # du -sk /export/home/user01 11 /export/home/user01 # find /export/home -user user01 wc -l 9 # quot -af /dev/rdsk/c0d0s0 (/): root bin adm uucp lp 28 8 nobody 25 5 #1001 <----- # find / -nouser -exrc rm -r {} \; 5 5 daemon 2 2 smmsp 2 13 user01 /dev/rdsk/c0d0s4 (/data2): 1 1 root...( 중략 )
154 [EX] 파일시스템사용량점검시 l ( 가정 ) 사용자가많은서버에서파일시스템의사용량점검시가장많은용량 ( 많은파일 / 디렉토리 ) 을사용하고있는사용자점검시 l 타겟파티션 : /export/home l df CMD -> du CMD -> quot CMD -> find CMD # df -k # df -k /export/home # cd /export/home ; du -sk * sort -rn more # quot -f /export/home # find /export/home -size +<SIZE> -mtime -7 -user user01 -type f [EX] 파일시스템사용량점검데몬의구조특정슬라이스 (Partition, Slice) 의사용량의제한을두게되는데경계선값은거의대부분 80% 정도로정하고있다. 다시말해서특정슬라이스가 80% 이상넘지않도록유지하는것이다. 파일시스템은 80% 넘지않도록관리하는것이중요하다. 다음스크립트는파일시스템의사용량이 80% 을넘게되면경고를알려주는데몬의구조를갖는다. 실무에서는아래스크립트에내용을약간변경하여사용하면된다. (a). df 명령어사용예 # df -h /export/home tail -1 awk '{print $5}' >> /root/output.txt (b). 데몬의구조 (Daemon Structure) ===== Daemon Structure ====== LIMIT=80 while [ 1 ] do LIMIT <=====> USAGE > < sleep 10 done ===== Daemon Structure ====== (c). 데몬구현 # vi /root/shell/df_mon.sh #!/bin/ksh LIMIT=80 # LIMIT=80 (80%) while [ 1 ] do USAGE=`df -h /export/home/ tail -1 awk '{print $5}' awk -F% '{print $1}'` if [ $LIMIT -le $USAGE ] ; then /* -le : less equal ( 작거나같은경우 ) */ echo "`date` : Filesystem Warning" tee -a /var/adm/df_mon.log else echo "`date` : Filesystem Stable" fi sleep 3 done # chmod 700 /root/shell/df_mon.sh (rwx------) # nohup /root/shell/df_mon.sh & (# nohup CMD)
155 [EX] /root/shell/df_mon.sh 실습 :/root/shell/df_mon.sh 스크립트복사 # rcp :/root/shell/df_mon.sh /test # cat /test/df_mon.sh #!/bin/ksh LIMIT=40 # LIMIT=80 (80%) while [ 1 ] do USAGE=`df -h /export/home/ tail -1 awk '{print $5}' awk -F% '{print $1}'` if [ $LIMIT -le $USAGE ] ; then echo "`date` : Filesystem Warning" tee -a /var/adm/df_mon.log else echo "`date` : Filesystem Stable" fi sleep 3 done 2 /export/home 파일시스템모니터링 [TERM1] 모니터링윈도우 # chmod 700 /test/df_mon.sh # cd /test #./df_mon.sh 시간 : Filesystem Stable 시간 : Filesystem Stable 시간 : Filesystem Stable... ( 중략 )... 시간 : Filesystem Warning 시간 : Filesystem Warning 시간 : Filesystem Warning 3 작업윈도우에서큰파일생성 [TERM2] 작업윈도우 # df -h /export/home ( 사용량 : 1%) Filesystem size used avail capacity Mounted on /dev/dsk/c0d0s7 472M 1.1M 424M 1% /export/home # cd /export/home # mkfile 100m testfile1 # df -k /export/home ( 사용량 : 22%) # mkfile 100m testfile2 # df -k /export/home ( 사용량 : 44%) ( 원복 ) /export/home/testfile[1-2] 삭제테스트가끝난후파일 (testfile1/testfile2) 삭제 # rm /export/home/testfile*
156 ( 정리 ) newfs 명령어 1. Filesystem Type ( 썬에서지원하는파일시스템종류 ) Disk-Based Filesystem : UFS, ZFS, pcfs, hsfs, udfs Virtual Filesystem : swapfs, cachefs, tmpfs, mntfs, procfs,... Network Filesystem : NFS(NFSv4) 2. UFS Filesystem Struture VTOC > format, prtvtoc/fmthard -s bootblk > installboot superblock cylinder group - backup superblock - cyliner group block +----> newfs, fsck - inode table - datablock newfs CMD newfs /dev/rdsk/c0d1s0 newfs -m 3 /dev/rdsk/c0d1s0 newfs -N /dev/rdsk/c0d1s0 newfs -T /dev/md/rdsk/d50 4. minfree fstyp -v /dev/rdsk/c0d1s0 grep minfree tunefs -m 3 /dev/rdsk/c0d1s0 newfs -m 3 /dev/rdsk/c0d1s0 5. Checking the Filesystem by Using the fsck Command fsck /dev/rdsk/c0d1s0 fsck -o f,p /dev/rdsk/c0d1s0 fsck -o b=32 /dev/rdsk/c0d1s0 fsck / fsck -o f,p 6. Monitoring Filesystem Use df -k, du -sk /etc, quot -af
157 [ 참고 ] df 명령어 1. df 명령어 Example 1: Executing the df command The following example shows the df command and its output: example% /usr/bin/df / (/dev/dsk/c0t0d0s0 ): blocks files /system/contract (ctfs ): 0 blocks files /system/object (objfs ): 0 blocks files /usr (/dev/dsk/c0t0d0s6 ): blocks files /proc (/proc ): 0 blocks 878 files /dev/fd (fd ): 0 blocks 0 files /etc/mnttab (mnttab ): 0 blocks 0 files /var/run (swap ): blocks 9375 files /tmp (swap ): blocks 9375 files /opt (/dev/dsk/c0t0d0s5 ): blocks files /export/home (/dev/dsk/c0t0d0s7 ): blocks files < 마운트포인트 > < 마운트자원 > <Free Blocks> <Free Files> where the columns represent the mount point, device (or "filesystem", according to df -k), free blocks, and free files, respectively. For contract file systems, /system/contract is the mount point, ctfs is the contract file system (used by SMF) with 0 free blocks and (INTMAX-1) free files. For object file systems, /system/object is the mount point, objfs is the object file system (see objfs(7fs)) with 0 free blocks and free files. Example 2: Writing Portable Information About the /usr File System The following example writes portable information about the /usr file system: example% /usr/xpg4/bin/df -P /usr Example 3: Writing Portable Information About the /usr/src file System Assuming that /usr/src is part of the /usr file system, the following example writes portable information : example% /usr/xpg4/bin/df -P /usr/src Example 4: Using df to Display Inode Usage The following example displays inode usage on all ufs file systems: example% /usr/bin/df -F ufs -o i
158 [ 참고 ] df / du 명령어의출력결과불일치 du / df 다른결과를표시하는경우 이메일 : jang4sc@paran.com 작성일 : [ 공지사항 ] 다음사이트의게시판에서얻은자료입니다. - 출처 : ( 솔실대 ) - 출처 : 테스트는직접해보고일부내용을수정하였습니다. 되도록원본문서를수정하지않도록노력하였습니다. 다음세가지이유로 du 와 df 가서로다른대답을표시할수있습니다. 1. 파일시스템에필요한 fsck(1m) 가일정하지않음. 2. 파일시스템에없는파일을열어서처리. 3. 데이터가포함된디렉토리마운트포인트. 자세한설명 위의세가지가능성을세부적으로설명하기전에 du와 df가응답을받는방법을알아야합니다. l du는파일시스템에서각파일의크기를차례대로확인하고전체크기를기억합니다. l df는파일시스템에대한시스템호출을작성해서여러가지상세정보를요청하는데, 그중하나가현재사용된디스크공간입니다. 1. 파일시스템에필요한 fsck(1m) 가일정하지않음. 파일시스템이손상되거나일정하지않으면 du 와 df 가다를수밖에없습니다. 파일시스템을조사하는프로세스 ( 즉, du) 에의해확인되는결과는실제파일시스템 ( 즉, 쿼리프로세스 df 에반환되는 ) 과일치하지않습니다. 손상되거나일정하지않은파일시스템은 fsck(1m) 를사용해서고쳐야합니다. ( 예 ) 명령어잘못수행시 # ufsdump 0uf /dev/rmt/0 /export/home ( 정상수행 ) # ufsdump 0uf /dev/rmt0 /export/home ( 비정상수행 ) # df -k ( 파일시스템풀 ) # cd ; du -sk * ( 그렇게큰파일은보이지않음 )
159 2. 파일시스템에없는파일을열어서처리. 실제로파일과관련된디스크블록을삭제해도, 파일에대한마지막 " 참조 " 가제거될때다시사용할수있도록설정됩니다. Unix 프로세스가파일을열면해당파일에대한참조수가증가합니다. 나중에파일시스템에서파일을제거하면프로세스가파일을닫을때까지 (close(2)) 명령을사용하든지프로세스가종료되든지 ) 데이터블록은사용할수있는상태로유지됩니다. 이런상태에서는 du 프로세스가파일시스템에있는파일을확인할수없기때문에이파일의크기를계산하지않지만, df( 파일시스템에서응답을받는 ) 프로세스는파일시스템에아직이파일이있다는것을확인할수있습니다. 프로세스가파일을닫으면 ( 프로세스가중단되거나종료되거나시스템이다시부팅되는경우 ) 이디스크블록이빈공간목록에포함되므로 du 와 df 의결과가일치합니다. ( 예 ) 오라클데이터베이스에서관리자의 dbf 파일삭제시오라클에서 dbf 파일삭제시에운영체제의명령어 (rm 명령어 ) 를통해서삭제하게되면운영중에는 dbf 파일이존재하던파일시스템에대해서 df 명령어의출력결과는줄어들지않지만 du 명령어의출력결과는줄어드는현상이대표적인예입니다. # cd /data1 # rm table1.dbf # df -h /data1 ( 용량이줄어들지않음 ) # du -sh /data1 ( 용량이줄어듬 ) 3. 데이터가포함된디렉토리마운트포인트. 파일시스템은디렉토리맨위에마운트되기때문에, 디렉토리마운트포인트에데이터가있으면 du 프로세스는이데이터를확인할수없지만 ( 마운트된파일시스템만확인 ), 하부파일시스템에는이데이터에대한정보가계속유지됩니다. 따라서 df 는사용하고있는공간까지추가해서보고합니다. 파일시스템의마운트를해제하면이데이터를확인할수있지만, 실행중인프로세스가마운트된파일시스템을사용하고있으면마운트를해제할수없습니다. 마운트포인트디렉토리를확인하려면프로세스를찾아서서중지시키거나 (fuser(1m) 등 ) 다시부팅하십시오 ( 단일사용자모드에서 ). ( 예 ) 파일이존재하는디렉토리를마운트포인터로사용하는경우 # df -h # mkfile 100m /test/testfile1 # mount /dev/dsk/c0d1s0 /test # du -sk /test # df -h
160 Solaris 10 Admin I Guide 5. Mount & Umount l l l l l Mount Verification Mount CMD Umount CMD Troubleshooting Foppy & CD Mount 솔라리스시스템에서장치 (Device) 를사용하기위해서는반드시마운트과정을거쳐야사용이가능하다. 그리고다사용한자원은언마우트 (Umount) 하면된다. 마운트되어진장치를누군가사용한다면기본적으로언마운트되지않는다. 부팅시에마운트해야하는자원 ( 예 : 장치 ) 이존재한다면 /etc/vfstab 파일을사용하면된다. 마운트확인 (Mount Verification) (1). 마운트된장치확인 현재마운트되어진정보를확인하기위해서는 df 명령어에 -k 옵션을사용하거나, mount 명령어에아무런옵션없이사용하는방법을많이사용한다. df 명령어는주로ᄀ마운트된상황을보기위해서나ᄂ파일시스템의사용량을점검할때주로사용하고, mount 명령어에특별한옵션이없는경우에는주로ᄀ마운트옵션정보를확인하거나, ᄂ마운트된시간을확인할때사용한다. # df -k (# df -h) # mount (# mount -p) df -k : 마운트상황정보, 디스크사용량점검확인 mount : 마운트옵션정보확인, 마운트시간확인
161 장치마운트 현재자원 (Resource) 를마운트하기위해서는 mount 명령어를수행하고, 부팅시에마운트할자원이있다면 /etc/vfstab 파일에정의하여사용하면된다. mount 명령어에의해서수행되는자원마운트는현재쓰이기는하지만 mount 명령어를통해서만마운트가된경우, 부팅시에는마운트가되지않기때문에 /etc/vfstab 파일에도반드시정의하여야한다. 현재마운트할때사용하는명령어 : mount CMD 부팅시마운트할때사용하는파일 : /etc/vfstab ( 예 : Linux -> /etc/fstab) (1) 마운트에관련된파일들 솔라리스시스템에서 /etc/mnttab 파일은현재마운트되어져있는정보를담는다. /etc/mnttab 파일은마운드된자원이있다면 mntfs 에의해서자동으로정보가등록되고, 언마운트가되면자동으로정보가삭제된다. 따라서관리자가 /etc/mnttab 파일을관리할필요는없다. /etc/vfstab 파일은부팅시에마운트할만한자원 (Resource, 예 : 장치 ) 에대한정보를담는다. 이파일은관리자가직접편집을통해서관리해야한다. 새로이마운트할자원이있다면 /etc/vfstab 파일에정보를등록하면된다. /etc/mnttab : 현재마운트된정보를담는다.(mntfs) ( 예 : Linux -> /etc/mtab) /etc/vfstab : 부팅시에마운트할만한정보를담는다. ( 예 : Linux -> /etc/fstab) (1-1). /etc/mnttab 파일 The file /etc/mnttab is really a file system that provides read-only access to the table of mounted file systems for the current host. /etc/mnttab is read by programs using the routines described in getmntent(3c). Mounting a file system adds an entry to this table. Unmounting removes an entry from this table. Remounting a file system causes the information in the mounted file system table to be updated to reflect any changes caused by the remount. The list is maintained by the kernel in order of mount time. That is, the first mounted file system is first in the list and the most recently mounted file system is last. When mounted on a mount point the file system appears as a regular file containing the current mnttab information. Each entry is a line of fields separated by <TAB>s in the form: [special] [mount_point] [fstype] [options] [time] special The name of the resource that has been mounted. mount_point The pathname of the directory on which the filesystem is mounted. fstype The file system type of the mounted file system. options The mount options. See respective mount file system man page in the SEE ALSO section below. time The time at which the file system was mounted. Examples of entries for the special field include the pathname of a block-special device, the name of a remote file system in the form of host:pathname, or the name of a swap file, for example, a file made with mkfile(1m)
162 (/etc/mnttab 파일의해석 ) # cat /etc/mnttab grep export /dev/dsk/c0d0s7 /export/home ufs rw,intr,largefiles,logging,xattr,\ onerror=panic,dev= 필드설명 /dev/dsk/c0d0s7 마운트자원 /export/home 마운트포인터 ufs 마운트파일시스템 rw,intr,largefiles,logging,xattr,\ 마운트옵션 onerror=panic,suid,dev= 마운트시간 ( 기준 : ) (mount 명령어출력화면해석 ) # mount grep export /export/home on /dev/dsk/c0d0s7 read/write/setuid/devices/intr/largefiles/logging/xattr/\ onerror=panic/dev= on Mon Sep 29 10:33: 필드설명 /export/home 마운트포인터 on /dev/dsk/c0d0s7 마운트자원 read/write/setuid/intr/largefiles/\ 마운트옵션 logging/xattr/onerror=panic/dev= on 토 3월 8 14:34: 마운트시간 mount 명령어에아무런옵션이나인자 (Arguments) 없이사용하면현재마운트되어진자원들에대한정보를얻을수있다. mount 명령어는 /etc/mnttab 파일을정보를사용하여일정한형식 ( 출력형식 ) 으로보여준다. /etc/mnttab 파일은현재마운트된정보를담고있고 mntfs 가상파일시스템으로솔라리스에의해관리된다. 관리자가관리할필요가없는파일이다. [EX] /etc/mnttab 파일실습 # cat /etc/mnttab grep export -> /export/home 의정보가보임 # umount /export/home # cat /etc/mnttab grep export -> /export/home 의정보가보이지않음 # mount /export/home # cat /etc/mnttab grep export -> /export/home 의정보가보임
163 (1-2). /etc/vfstab 파일 The file /etc/vfstab describes defaults for each file system. The information is stored in a table with the following column headings: device device mount FS fsck mount mount to mount to fsck point type pass at boot options The fields in the table are space-separated and show the resource name (device to mount), the raw device to fsck (device to fsck), the default mount directory (mount point), the name of the file system type (FS type), the number used by fsck to decide whether to check the file system automatically (fsck pass), whether the file system should be mounted automatically by mountall (mount at boot), and the file system mount options (mount options). (See respective mount file system man page below in SEE ALSO for mount options.) A '-' is used to indicate no entry in a field. This may be used when a field does not apply to the resource being mounted. /etc/vfstab 파일은부팅시에마운트할만한정보를담고있다. 하지만 /etc/vfstab 파일 /, /usr, /var, /tmp, 가상파일시스템등은부팅시에마운트되지않는다고선언되어있다. 이것은이파일이읽혀지는런레벨 2 과정전에미리마운트가되기때문이다. 이런파일시스템은런레벨 S 에서마운트된다. ( 주의 ) /etc/vfstab 파일의 (a) 모든필드의구분은탭 1 칸으로정의되어야하며, 필드의정보가 (b) 정의되지않는경우비워놓지않고 -(Dash), 0(Zero) 로표시해야한다. 만약잘못정의한경우부팅하다멈추는경우가생길수있다. (/etc/vfatab 파일의해석 ) # cat /etc/vfstab (Solaris 10 (05/09) x86 on VMWare) #device device mount FS fsck mount mount #to mount to fsck point type pass at boot options # fd - /dev/fd fd - no - /proc - /proc proc - no - /dev/dsk/c0d0s1 - - swap - no - /dev/dsk/c0d0s0 /dev/rdsk/c0d0s0 / ufs 1 no - /dev/dsk/c0d0s3 /dev/rdsk/c0d0s3 /data1 ufs 2 yes - /dev/dsk/c0d0s4 /dev/rdsk/c0d0s4 /data2 ufs 2 yes - /dev/dsk/c0d0s5 /dev/rdsk/c0d0s5 /data3 ufs 2 yes - /dev/dsk/c0d0s6 /dev/rdsk/c0d0s6 /data4 ufs 2 yes - /dev/dsk/c0d0s7 /dev/rdsk/c0d0s7 /export/home ufs 2 yes - /* # mount -F ufs -o <Default Options> /dev/dsk/c0t0d0s7 /export/home */ /* # fsck /dev/rdsk/c0t0d0s7 */ /devices - /devices devfs - no - ctfs - /system/contract ctfs - no - objfs - /system/object objfs - no - swap - /tmp tmpfs - yes - ( 주의 ) /, /usr, 가상파일시스템 (fd, procfs, devfs, ctfs, objfs 등 ) 은싱글유저런레벨에서마운트가되기때문에 /etc/vfstab 파일에서는 Mount At Boot 필드에 no 로되어있다. 이것은 /etc/vfstab 파일이런레벨 2 에서읽혀지기때문에마운트되어져있는것을다시마운트되지못하도록설정한것이다
164 # cat /etc/vfstab grep export /dev/dsk/c0d0s7 /dev/rdsk/c0d0s7 /export/home ufs 2 yes - ( 출력결과해석 ) 필드 설명 /dev/dsk/c0t0d0s7 마운트자원 /dev/rdsk/c0t0d0s7 fsck 명령어수행자원 /export/home 마운트포인터 ufs 마운트파일시스템 2 fsck 수행할것인지결정 yes 부팅시에마운트결정 - 마운트옵션
165 mount CMD umount CMD mountall CMD umountall CMD 자원 (Resource) 을마운트할때사용하는명령어자원마운트를해제할때사용하는명령어마운트할만한정보를모두마운트하는명령어마운트되어있는자원을모두해제할때사용하는명령어 (2). mount 명령어 mount attaches a file system to the file system hierarchy at the mount_point, which is the pathname of a directory. If mount_point has any contents prior to the mount operation, these are hidden until the file syst em is unmounted. umount unmounts a currently mounted file system, which may be specified either as a mount_point or as special, the device on which the file system resides. The table of currently mounted file systems can be found by examining the mounted file system information file. This is provided by a file system that is usually mounted on /etc/mnttab. The mounted file system information is described in mnttab(4). Mounting a file system adds an entry to the mount table; a umount removes an entry from the table. 마운트는자원 ( 예 : 장치 ) 을마운트포인터에얻어져마운트포인터를사용하면, 자원을사용하도록하는방식이다. mount 명령어를사용하여디스크디바이스장치를마운트하는경우장치의이름은블럭디바이스 (Block Device Name) 이름을사용해야한다. ( 명령어형식 ) # mount [-F ufs] [-o option(s)] <resouce> <mount_pointer> # mount /dev/dsk/c0t0d0s7 /export/home # mount /export/home (/etc/vfstab 정의되어있다면 ) (2-1) 마운트명령어의기본옵션 마운트시기본옵션 (Defaut Options) 을사용한다. 하지만, 기본옵션은 mount 명령어수행시옵션을따로주지않으면기본옵션으로마운트하게된다. 기본옵션 : read/write, suid, initr, largefiles, logging, xattr, devices, onerror=panic # mount (# cat /etc/mnttab) ( 기본옵션 ) ( 다른옵션 ) rw <-> ro /* ro : 쓸수없다. */ suid <-> nosuid /* nosuid : SetUID 프로그램처럼동작하지않는다. */ intr <-> nointr /* nointr : 프로그램중간에인터럽트걸수없다. */ logging <-> nologging /* nologging : 저널링기능을사용하지않는다. */ largfiles <-> nolargfiles /* nolargefiles : 한번에 2G 보다큰파일을생성할수없다. */ xattr onerror=panic <-> lock, umount, panic /* 파일시스템에이상이발생했을때 (EX: System Crash) panic : I/O를발생시키지않고, reboot 시킨다. lock : I/O를발생시키지않는다. umount : umount 시킨다. */
166 (2-2) 마운트옵션예제 mount 명령어수행시 ro 옵션을사용하면, 여러가지기본옵션중 read/write 만 read only 옵션으로바뀌고나머지옵션 ( 지정되지않은옵션 ) 은그대로기본옵션을따른다. 여러가지옵션을지정하는경우컴마 (,) 로구분한다. # mount -o ro /dev/dsk/c0t0d0s6 /export/home # mount -o ro,nosuid /dev/dsk/c0t0d0s7 /export/home # mount -o noatime /dev/dsk/c0t0d0s3 /var # mount -o nolargefiles /dev/dsk/c0t0d0s7 /export/home # mount -o logging /dev/dsk/c0t0d0s7 /export/home # mount -o rw,remount / (remount : including solaris 9) # mount -o remount,logging /export/home (logging : Including Solaris 8) [EX] 각파티션별권장하는마운트옵션 (mount Options Reference) ro /usr/local, /export/pkg, /opt /* 추가적인패키지설치공간 */ nosuid /export/home, /user /* 사용자홈디렉토리 ( 파티션 ) */ noatime /var /* 가변적인데이터기록파티션 */ nolargefiles /export/home /* 사용자홈디렉토리 ( 파티션 ) */ logging /export/home, /database, /data1, (/, /usr) /* 데이타가저장되는파티션 */
167 ( 마운트옵션중쉬운종류 ) ro OPTIONS 파일시스템에쓰기방지 (EX: read only) 옵션 nolargefiles 한번에 2G 보다큰파일을생성못하도록설정하는옵션 [EX] rw/ro 옵션실습 # df h F ufs /data1 (c1t0d0s3) # umount /data1 # mount o ro /data1 # mount grep data1 # touch /data1/file1 touch: cannot create /data1/file1: Read-only file system # mount o remount /data1 # mount grep data1 [EX] largefiles/nolargefiles 옵션실습 # mkdir -p /p # mount o nolargefiles /dev/dsk/c1t1d0s7 /p # mount grep /p # mkfile 3g /p/testfile1 Could not set length of /p/testfile1: File too large # mkfile 3g /test/testfile2 # rm /test/testfile2 # umount /p ( 마운트옵션중어려운종류 ) noatime OPTION atime(access Time) 을기록으로남기지않는옵션 nosuid OPTIONS SetUID 프로그램이정상동작하지않도록만들어주는옵션 [EX] noatime 옵션실습 (Intel Platform on VMWare) noatime 옵션 : 파일의 atime(access Time) 를기록하지않는다. ( 알림 ) 스팍용에서실습할때는파티션이름을변경하여사용하면된다. ( 예 ) c0d0s6 -> c0t2d0s6 1 /data4(c0d0s6) 마운트옵션확인 # mount grep data4 (/dev/dsk/c0d0s6) /data4 on /dev/dsk/c0d0s6 read/write/setuid/devices/intr/largefiles/logging/xattr/\ onerror=panic/dev= on Fri Sep 26 15:26: > noatime : 보이는옵션 -> atime(access Time) : 안보이는옵션 2 마운트포인트변경및마운트옵션확인 (/data4 -> /noatime) 마운트할당시에특별하게옵션을주지않으면기본옵션 (Default Options) 으로마운트된다. # mkdir /noatime # umount /data4 # mount /dev/dsk/c0d0s6 /noatime ( 마운트옵션을주지않았다.( 기본옵션사용 )) # mount grep noatime /noatime on /dev/dsk/c0d0s6 read/write/setuid/devices/intr/largefiles/logging/xattr/\ onerror=panic/dev= on Fri Sep 26 21:28:
168 3 마운트시기본옵션 (noatime 아닌경우 ) 설정확인기본옵션을사용하게되면파일을접근 (Access) 할때마다 atime(access Time) 이변경된다. # cd /noatime # echo "hello" > testfile # ls -l testfile (-l : mtime 확인할때사용하는옵션 ) -rw-r--r-- 1 root root 15 Sep 26 21:29 testfile # ls -lu testfile (-u : atime 확인할때사용하는옵션 ) -rw-r--r-- 1 root root 15 Sep 26 21:29 testfile... <1 분정도후 > <----- date 명령어로확인... # cat testfile hello # ls -l testfile -rw-r--r-- 1 root root 15 Sep 26 21:29 testfile # ls -lu testfile -rw-r--r-- 1 root root 15 Sep 26 21:31 testfile 4 마운트옵션 noatime 으로설정 (noatime) # cd ; umount /noatime # mount -o noatime /dev/dsk/c0d0s6 /noatime /* 파일에 atime(access Time) 을기록하지않는다. */ # mount grep noatime /noatime on /dev/dsk/c0d0s6 read/write/setuid/devices/intr/largefiles/logging/xattr/\ noatime/onerror=panic/dev= on Fri Sep 26 21:32: 변경된마운트옵션 (noatime) 확인 # cd /noatime # cat testfile hello # ls -l testfile -rw-r--r-- 1 root root 15 Sep 26 21:29 testfile # ls -lu testfile -rw-r--r-- 1 root root 15 Sep 26 21:31 testfile... <1 분정도후 > <----- date 명령어로확인... # cat testfile hello # ls -l testfile -rw-r--r-- 1 root root 15 Sep 26 21:29 testfile # ls -lu testfile -rw-r--r-- 1 root root 15 Sep 26 21:31 testfile
169 [ 참고 ] noatime 를사용하는경우 /var 파일시스템 (EX: 로그, 스풀, 캐싱 ) 같이프로그램 ( 프로세스 ) 가실행될때파일들이생성되기도하고참조도많이되는파일시스템에 noatime 옵션을통해마운트를하면성능이좋아진다. [ 참고 ] ls 명령어의 -c / -l / -u 옵션 파일의속성정보중시간 l mtime(modify Time) # ls -l 파일이수정되거나생성된시간 l atime(access Time) # ls -lu 파일의접근시간 l ctime(changed Time) # ls -lc 파일의속성정보가변경된시간 # man ls OPTIONS -c Uses time of last modification of the i-node (file created, mode changed, and so forth) for sorting (-t) or printing (-l or -n). -l Lists in long format, giving mode, ACL indication, number of links, owner, group, size in bytes, and time of last modification for each file (see above). If the file is a special file, the size field instead contains the major and minor device numbers. If the time of last modification is greater than six months ago, it is shown in the format `month date year' for the POSIX locale. When the LC_TIME locale category is not set to the POSIX locale, a different format of the time field can be used. Files modified within six months show `month date time'. If the file is a symbolic link, the filename is printed followed by "->" and the path name of the referenced file. -u Uses time of last access instead of last modification for sorting (with the -t option) or printing (with the -l option)
170 [EX] nosuid 옵션실습 (Intel Platform on VMWare) nosuid : SetUID 프로그램은프로그램실행하는동안권한이높아진다. 하지만마운트할당시에 nosuid 옵션 ( 마운트옵션 ) 이붙으면, SetUID 프로그램을실행해도 SetUID 프로그램처럼동작하지않도록해주는옵션이다. 사용자그냥실행시킨것처럼된다. (X) # find /export/home -perm type f -exec rm -rf {} \; -> crontab 등록 (0) # mount -o nosuid /export/home 1 SetUID 프로그램생성 # cp /usr/bin/ksh /export/home/user01 # chmod 4755 /export/home/user01/ksh (4755 : rwxr-xr-x -> rwsr-xr-x root other) 2 SetUID 프로그램사용자로실행 # telnet localhost use01 사용자로로그인 $./ksh # id (# cat /etc/shadow) uid=1001(user01) gid=10(staff) euid=0(root) # exit $ exit 3 마운트옵션 nosuid 로설정 # cd ; umount /export/home # mount -o nosuid /dev/dsk/c0d0s7 /export/home # mount grep export /export/home on /dev/dsk/c1t0d0s7 read/write/nosetuid/nodevices/intr/largefiles/logging/ xattr/onerror=panic/dev= on Wed Aug 25 10:56: nosuid 옵션설정확인 # telnet localhost user01 사용자로로그인 $./ksh $ id uid=1001(user01) gid=10(staff) $ ps PID TTY TIME CMD 3092 pts/3 0:00 ksh 3085 pts/3 0:00 ksh $ ls -l ksh -rwsr-xr-x 1 root root Sep 26 14:31 ksh $ exit $ exit [ 참고 ] nosuid 옵션을사용하는경우 /export/home 파일시스템같이일반사용자가사용하고있는파일시스템에 nosuid 옵션을통해마운트를하면사용자들이 SetUID 프로그램을사용할수없도록원천봉쇄할수있다. 따라서서버의보안이강화된다
171 [ 참고 ] logging OPTIONS # man -s 1M mount_ufs OPTIONS logging nologging If logging is specified, then logging is enabled for the duration of the mounted file system. Logging is the process of storing transactions (changes that make up a complete UFS operation) in a log before the transactions are applied to the file system. Once a transaction is stored, the transaction can be applied to the file system later. This prevents file systems from becoming inconsistent, therefore eliminating the need to run fsck. And, because fsck can be bypassed, logging reduces the time required to reboot a system if it crashes, or after an unclean halt. 만약 logging 옵션이지정되면, 파일시스템마운트시에 logging 옵션이 enable 된다. logging 옵션은 UFS 트랜젝션과정을수행하기전에파일시스템에적용된로그로트랜젝션을저장하게된다. 하나의트랜젝션이저장되게되면, 트랜젝션은나중에파일시스템에적용된다. 이것은파일시스템이불일치하는경우을방지한다. 따라서 fsck 명령어를실행할필요가없게되는것이다. 그리고, fsck 명령어의실행은지나치게된다. logging은시스템비정상적으로리부팅될때에필요한시간을줄여주게된다. The default behavior is logging for all UFS file systems. 모든 UFS 파일시스템에서 logging 옵션은기본적인동작이다. The log is allocated from free blocks in the file system, and is sized approximately 1 Mbyte per 1 Gbyte of file system, up to a maximum of 64 Mbytes. 로그는파일시스템의남는블럭에할당이된다. 그리고, 파일시스템 1G 당 1M 로적당하게사이징된다. 최대는 64M 까지이다. Logging is enabled on any UFS file system, including root (/), except under the following conditions: o When logging is specifically disabled. o If there is insufficient file system space for the log. In this case, the following message is displayed and file system is still mounted: 파일시스템에충분한공간이없는경우에는마운트할때다음과같은메세지를받게된다. # mount /dev/dsk/c0t4d0s0 /mnt /mnt: No space left on device Could not enable logging for /mnt on/dev/dsk/c0t4d0s0. The log created by UFS logging is continually flushed as it fills up. The log is totally flushed when the file system is unmounted or as a result of the lockfs -f command. UFS logging 에의해서 Log 가생성되었을때 Log 가 Max 값에도달하면계속해서 flush 된다. 파일시스템이 umount 될때또는 lockfs -f 명령어수행시때는전체가 flush 된다
172 [ 참고 ] 솔라리스 8 버전에서 logging 옵션설정솔라리스 8 버전은기본적으로저널링기능 (logging 옵션 ) 사용하고있지않기때문에, 따로설저해주어야한다. # umount /data1 # mount o logging /data1 # mount grep data1 # vi /etc/vfstab [ 수정전 ] /dev/dsk/c1t0d0s3 /dev/rdsk/c1t0d0s3 /data1 ufs 2 yes - [ 수정후 ] /dev/dsk/c1t0d0s3 /dev/rdsk/c1t0d0s3 /data1 ufs 2 yes logging
173 bg fg 옵션파일시스템설명 hard soft intr nointr largefiles nolargefiles logging nologging NFS NFS NFS UFS UFS If the first mount attempt fails, retries another mount in the background (bg) or in the foreground (fg). This option is safe for non critical vfstab entries. The default is fg. Specifies the procedure if the server does not respond. The soft option indicates that an error is returned. The hard option indicates that the retry request is continued until the server responds. The default is hard. Specifies whether keyboard interrupts are delivered to a hung process while waiting for a response on a hard-mounted file system. The default is intr (interrupts allowed). Enables you to create files larger than 2 Gbytes. The largefiles option means that a file system mounted with this option might contain files larger than 2 Gbytes. If the nolargefiles option is specified, the file system cannot be mounted on a system that is running Solaris 2.6 or compatible versions. The default is largefiles. Enables or disables logging for the file system. UFS logging is the process of storing transactions (changes that comprise a complete UFS operation) into a log before the transactions are applied to the UFS file system. Logging helps prevent UFS file systems from becoming inconsistent, which means fsck can be bypassed. Bypassing fsck reduces the time to reboot a system if it crashes, or after a system is shut down uncleanly. except last file ro rw suid nosuid CacheFS, NFS, PCFS,UFS, HSFS CacheFS, HSFS, NFS, UFS The log is allocated from free blocks on the file system, and is sized at about 1 Mbyte per 1 Gbyte of file system, up to a maximum of 64 Mbytes. The default is logging. status change or the time of the last file modification. For more information, see stat(2). This option reduces disk activity on file systems where access times are unimportant (for example, a Usenet news spool). The default is normal access time (atime) recording. remount All Changes the mount options associated with an already-mounted file system. This option can generally be used with any option except ro.however, what can be changed with this option depends on the file system type. retry=n NFS Retries the mount operation when it fails. n is the number of times to retry. Specifies read/write (rw) or read-only (ro). If you do not specify this option, the default is rw. The default option for HSFS is ro. Allows or disallows setuid execution. The default is to allow setuid execution
174 (2-3). 마운트에관련한몇개의파일들 (Mounting Current Types of Filesystems) l /etc/default/fs : 로컬파일시스템 (Local Filesystem) 의기본파일시스템정의가되어있다. l /etc/dfs/fstypes : 원격파일시스템 (Remote Filesystem) 의기본파일시스템정의가되어있다. 마운트에관련된파일들 /etc/mnttab, /etc/vfstab /etc/default/fs, /etc/dfs/fstypes # cat /etc/default/fs LOCAL=ufs # cat /etc/dfs/fstypes nfs NFS Utilities autofs AUTOFS Utilities cachefs CACHEFS Utilities [ 참고 ] 로컬 & 원격파일시스템마운트시 (Local & NFS Mount) # mount -F ufs [-o options] /dev/dsk/c0t0d0s7 /export/home # mount /dev/dsk/c0t0d0s7 /export/home # mount -F nfs [-o options] :/root/shell /mnt/server # mount :/root/shell /mnt/server
175 (3). mountall / umountall CMD mountall 명령어는마운트할만한정보들을모두마운트한다. 마운트할만한정보들은 /etc/vfstab 파일에정의된필드중에서 mount at boot 부분에 yes 로설정된필드만을나타낸다. umountall 명령어는현재마운트되어있는모든파일시스템을언마운트한다. 현재마운트된정보는 /etc/mnttab 파일에존재한다. 하지만언마운트시킬수없는파일시스템이있다. 이것들은 /, /usr, /var, /tmp, 가상파일시스템등이다. ( 명령어형식 ) # mountall (/etc/vfstab, mount at boot) # umountall (/etc/mnttab, current mount except /, /usr, /var, /tmp, virtual filesystem) [EX] mountall/umountall 실습 1 umountall 명령어실습 # df -k (# df -h -F ufs) Filesystem size used avail capacity Mounted on /dev/dsk/c0d0s0 12G 6.4G 5.3G 55% / /devices 0K 0K 0K 0% /devices ctfs 0K 0K 0K 0% /system/contract proc 0K 0K 0K 0% /proc mnttab 0K 0K 0K 0% /etc/mnttab swap 1.7G 912K 1.7G 1% /etc/svc/volatile objfs 0K 0K 0K 0% /system/object /usr/lib/libc/libc_hwcap1.so.1 12G 6.4G 5.3G 55% /lib/libc.so.1 fd 0K 0K 0K 0% /dev/fd swap 1.7G 8K 1.7G 1% /tmp swap 1.7G 28K 1.7G 1% /var/run /dev/dsk/c0d0s3 472M 1.0M 433M 1% /data1 /dev/dsk/c0d0s4 472M 1.0M 424M 1% /data2 /dev/dsk/c0d0s5 472M 1.0M 424M 1% /data3 /dev/dsk/c0d0s6 472M 1.0M 424M 1% /data4 /dev/dsk/c0d0s7 472M 1.2M 466M 1% /export/home # umountall ( 출력되는에러메세지무시 ) # df -k (# df -h -F ufs) Filesystem size used avail capacity Mounted on /dev/dsk/c0d0s0 12G 6.4G 5.3G 55% / /devices 0K 0K 0K 0% /devices ctfs 0K 0K 0K 0% /system/contract proc 0K 0K 0K 0% /proc mnttab 0K 0K 0K 0% /etc/mnttab swap 1.7G 916K 1.7G 1% /etc/svc/volatile objfs 0K 0K 0K 0% /system/object fd 0K 0K 0K 0% /dev/fd swap 1.7G 8K 1.7G 1% /tmp swap 1.7G 28K 1.7G 1% /var/run -> /data1, /data2, /data3, /data4, /export/home 언마운트되어서보이지않는다
176 2 mountall 명령어실습 # vi /etc/vfstab #device device mount FS fsck mount mount #to mount to fsck point type pass at boot options #... ( 중략 )... # /dev/dsk/c0d0s3 /dev/rdsk/c0d0s3 /data1 ufs 2 yes > 주석처리 (#) # mountall # df -k Filesystem size used avail capacity Mounted on /dev/dsk/c0d0s0 12G 6.4G 5.3G 55% / /devices 0K 0K 0K 0% /devices ctfs 0K 0K 0K 0% /system/contract proc 0K 0K 0K 0% /proc mnttab 0K 0K 0K 0% /etc/mnttab swap 1.7G 916K 1.7G 1% /etc/svc/volatile objfs 0K 0K 0K 0% /system/object fd 0K 0K 0K 0% /dev/fd swap 1.7G 8K 1.7G 1% /tmp swap 1.7G 28K 1.7G 1% /var/run /dev/dsk/c0d0s4 472M 1.0M 424M 1% /data2 /dev/dsk/c0d0s5 472M 1.0M 424M 1% /data3 /dev/dsk/c0d0s6 472M 1.0M 424M 1% /data4 /dev/dsk/c0d0s7 472M 1.2M 466M 1% /export/home ( 복원 ) /etc/vfstab 파일복구 l /etc/vfstab 주석처리 (#) 제거 # vi /etc/vfstab l /data1 마운트 # mount /data
177 (4). umount CMD (4-1) 마운트해제 (Performing Unmounts) [ 참고 ] # mount /dev/dsk/c0t0d0s7 /export/home ( 명령어형식 ) # umount /export/home # umount /dev/dsk/c0t0d0s7 (4-2) 사용중인파일시스템마운트해제 (Unmounting a Busy Filesystem) 솔라리스시스템에서마운트된파일시스템을누군가사용하고있다면기본적으로관리자는파일시스템을언마운트할수없다. 관리자는이런경우라하더라도반드시언마운트해야한다면 umount 명령어에 -f 옵션을사용하여강제적으로파일시스템을언마운트할수있다. [EX] 사용중인파일시스템언마운트실습 [TERM1] 사용자윈도우 # telnet localhost user01 사용자로로그인 $ pwd /export/home/user01 -> /export/home/user01 사용자홈디렉토리사용 [TERM2] 관리자윈도우 # umount /export/home umount: /export/home busy <----- 메시지확인 /export/home: 사용중인파일시스템언마운트 (Unmounting a busy filesystem.) fuser 명령어사용하는방법 (0) 권장 umount 명령어 -f 옵션사용하는방법 (X) 권장하지않음 -> F/S 불일치발생시킴 [TERM2] 관리자윈도우 l 강제적으로파일시스템 umount 실습 # fuser -cu /export/home /* -c : PID, -u : username */ 847co(user01) 847co : PID user01: 사용자이름 # wall -a /root/warning.txt /* # wall -a /etc/hosts */ # fuser -ck /export/home /* -c : PID, -k : KILL Signal */ # umount /export/home or # umount -f /export/home
178 [ 참고 ] 공유되어있기때문에사용중으로표시하는경우 /export/home 파티션이공유되어져있다면, 이것은사용중으로보아야한다. 때문에관리자가 /export/home 파티션을 umount 할려고하지만 "Device Busy" 메세지를받고, 그파일시스템에사용하고있는사용자를점검했을때, 사용하는사람들이없다면, 이것은공유되어있을가능성이높기때문에확인해봐야한다. # vi /etc/dfs/dfstab share /export/home # svcadm disable network/nfs/server (# /etc/init.d/nfs.server stop) # svcadm enable network/nfs/server (# /etc/init.d/nfs.server start) # umount /export/home umount: /export/home busy # fuser -cu /export/home /export/home: -> 자원이공유되어있어서 umount가안되는지확인 (/etc/dfs/dfstab) [ 참고 ] /export/home 파티션에들어가서 /export/home 을언마운트하는경우 # mount /export/home # cd /export/home # umount /export/home # fuser -cu /export/home # cd # umount /export/home # mount /export/home
179 [EX] 파일시스템마운트의정확한의미 mount? 자원을쓸수있는상태로만드는작업자원 ( 예 :/dev/dsk/c0d1s0) 을마운트포인터 ( 예 :/data5) 에올린다. ( 예 ) # mount /dev/dsk/c0d1s0 /data5 # df -k /data4 /* 마운트되어있는지확인 */ # touch /data4/testfile1 /* 마운트되어있으면그안에파일을생성할수있는가? */ # ls -l /data4/testfile1 # cd # umount /data4 /* 언마운트 */ # ls -ld /data4 /* /data4 폴더가사라졌는가? */ # ls -l /data4 # touch /data4/testfile2 /* 그럼, /data4 안에파일을만들수있는가? */ # ls -l /data4/testfile2 # mount /data4 # ls -l /data4 (?) # umount /data4 # ls -l /data4 (?) (Check Point) -> 마운트포인터는 /(root) 파티션에존재한다. -> 마운트포인터는빈폴더를사용해야한다. 예 ) # mount /dev/dsk/c0d1s0 /etc -> /usr 파티션따로설정하지않았다. 그럼최상위 (/, root) 파티션에속한다. 예 ) /usr -> 패키지설치하는디렉토리예 ) 왜, /, swap 파일시스템만있어도되는가? ( 질문 ) 서버의파일시스템레이아웃설정 (Filesystem Layout)? DISK : 30G (/, swap, /usr, /export/home) (/, swap, /usr) (/, swap) ( 질문 ) 왜슬라이스를나누는가? (swap 설명제외 ) / /, /usr, /var, /tmp, /DATA(/was, /was/logs, /data) 관리상 : 데이터영역을보호하기위해서 (c:\ <--> c:\, d:\) 디스크풀 (Full) 보안상 ( 마운트시에옵션 ) [ 참고 ] 보안툴용파티션 (System Admin Tools for Security) 대표적인보안툴 l John the Ripper (Password Crack Tool) l Nessus (Exploit Check Tool) 보안툴을설치해서사용하는파티션 - 보안툴은따로파티션을나누어서사용한다.( 예 : /Tools) - 사용할때는 mount, 사용하지않을때는 umount - 보안툴파티션은 /etc/vfstab 파일에정의하지않는다
180 [ 요약 ] Disk Device Admin(Solaris 10 x86 on VMWare) 디스크추가 (1). Device Reconfiguration (2). Slice (format) (3). Filesystem (newfs) (4). Mount (mount CMD, /etc/vfstab) 1 디스크추가 2 장치재인식 (Device Reconfiguration) # devfsadm -v # devfsadm -c disk or # devfsadm -i [dad sd] 3 파티션작업 (Slice, Partition) # format 슬라이스마운트포인터 용량 s0 /oracle 200M ----> UFS s1 swap 200M ----> swapfs s2 overlap 1G s3 /disk1 200M ----> UFS s4 /disk2 200M ----> UFS s5 s6 s7 /logs * ----> UFS 파일시스템작업 (Filesystem) # newfs /dev/rdsk/c0d1s0 # newfs /dev/rdsk/c0d1s3 # newfs /dev/rdsk/c0d1s4 # newfs /dev/rdsk/c0d1s7 5 마운트작업 (Mount) # mkdir /oracle /disk1 /disk2 /logs # mount /dev/dsk/c0d1s0 /oracle # mount /dev/dsk/c0d1s3 /disk1 # mount /dev/dsk/c0d1s4 /disk2 # mount /dev/dsk/c0d1s7 /logs # vi /etc/vfstab... ( 중략 )... # # (1) Disk Configuration (EX: c0d1) # /dev/dsk/c0d1s0 /dev/rdsk/c0d1s0 /oracle ufs 2 yes - /dev/dsk/c0d1s3 /dev/rdsk/c0d1s3 /disk1 ufs 2 yes - /dev/dsk/c0d1s4 /dev/rdsk/c0d1s4 /disk2 ufs 2 yes - /dev/dsk/c0d1s7 /dev/rdsk/c0d1s7 /logs ufs 2 yes - 6 mount 테스트방법 # umount /oracle # umountall # umount /disk1 # umount /disk2 # umount /logs # mount /oracle (# fsck /oracle) # mountall # mount /disk1 (# fsck /disk1) # mount /disk2 (# fsck /disk2) # mount /logs (# fsck /logs)
181 트러블슈팅 (Troubleshooting) 솔라리스에서부팅중에멈추게되면파일시스템을점검할수없게된다. 따라서디스크로부팅할수없게됨으로써시스템을제어하거나문제를해결할수없게된다. 이런경우 1 of 2(1 번 CD) 를사용하여부팅해서솔라리스시스템 (OS) 을제어할수있다. 솔라리스 CD 안에있는운영체제가설치시에복사된것이기때문에, CD 안에도운영체제가존재하기때문이다. (1) 부팅실패시시스템파일복구 (Repairing Important Files if Boot Fails) CDROM 싱글유저부팅 (Single User Mode with CDROM) ok boot cdrom -s (or ok boot -F failsafe) 편리한기능설정 (ksh function setting) 마운트작업수행 (Working) 언마운트후재부팅 (umount & reboot) 다음은 root 사용자의암호를잃어버린경우복구하는예이다. # vi /etc/shadow # vi /etc/shadow root: 암호 :~~~~~~~~ -----> root::~~~~~~~~~~ [ 그림 ] root 암호 NULL 로변경 ( 디스크에존재하는운영체제쪽으로부팅한경우 ) Disk c0t0d0s > / ----> # vi /etc/shadow (CD에존재하는운영체제쪽으로부팅한경우 ) Disk CD c0t0d0s > /a ----> # vi /a/etc/shadow [ 그림 ] CD 로부팅시 root 암호 NULL 로변경 ( 시나리오 ) root 암호를잃어버려서시스템관리자 (root) 로솔라리스시스템에로그인할수없는상태라고가정한다. 이경우디스크의이미지를가지고싱글유저모드로들어가면 root 암호를입력해야만들어갈수있기때문에제어를위해서는반드시 CD(1 of 2) 를가지고부팅해야한다
182 (a) 1번 CD로부팅 Single User Mode with CD-ROM <STOP + A> ok boot cdrom -s (ok boot -F failsafe, ok boot disk2 -F failsafe) [ 참고 ] ok boot -s (ok boot disk2 -s) (b) 편리한기능설정 ksh function setting # ksh (sh -> ksh) # set -o vi (ksh function) # stty erase ^H (Delete -> Backspace) # TERM=sun (or TERM=vt100) # export TERM (c) c0t0d0s0 마운트수행 Basic Setting # fsck /dev/rdsk/c0t0d0s0 (c0t0d0s0 : /(root) 파티션 ) # mount /dev/dsk/c0t0d0s0 /a (d) 작업수행 Working # vi /a/etc/shadow [Before] root:dbijvbljfanlq:13411:::::: [After] root::13411:::::: <----- NULL password :wq! -> root 암호는 13문자로되어있다. (e) 언마운트 & 재부팅 umount & reboot # cd # umount /a # reboot (f) 부팅이된이후로그인창에서 root 사용자로로그인후 # passwd ( 새로운암호를입력 )
183 [EX] /etc/vfstab, /etc/system 파일의복구 l /etc/vfstab : 부팅시에마운트할정보를담는다. l /etc/system : 부팅시에 kernel이읽어들이는파일이다. (Linux : /etc/sysctl.conf) (1). CD-ROM 부팅 <STOP + A> ok boot cdrom -s (ok boot -F failsafe) (2). 편리한기능 # ksh # set -o vi # stty erase ^H # export TERM=vt100 (3). 마운트 & 작업 # fsck /dev/rdsk/c0d0s0 (# fsck -o f,p /dev/rdsk/c0t0d0s0) # mount /dev/dsk/c0d0s0 /a # vi /a/etc/vfstab 적정한편집 (4). 언마운트 & 리부팅 # cd ; umount /a # reboot
184 [EX] root 사용자암호복구방법 (root Password Recovery) (Solaris 10 (05/09) x86 on VMWare 6.5) 솔라리스 x86 에서부팅시에싱글유저 (Single User) 로부팅할수있는방법은다음과같다. ( 참고자료 ) -> " 솔라리스강좌 [ 관리자 ]" 게시판 -> 91, 92 번자료 (Intel Platform) (Sparc Platform) l Disk 운영체제이미지를가지고싱글유저부팅 -> ok boot disk2 -s l Grub로싱글유저부팅 ("Solaris failsafe") -> ok boot disk2 -F failsafe l 1번 CD를가지고설치중싱글유저작업 -> ok boot cdrom -s (1). DISK 운영체제이미지를가지고싱글유저부팅하는방법 1 서버시스템전원 Power Off # sync # poweroff 2 부팅시 "Solaris 10 5/08 s10x_u5wos_10 X86" 선택후 'e' 입력
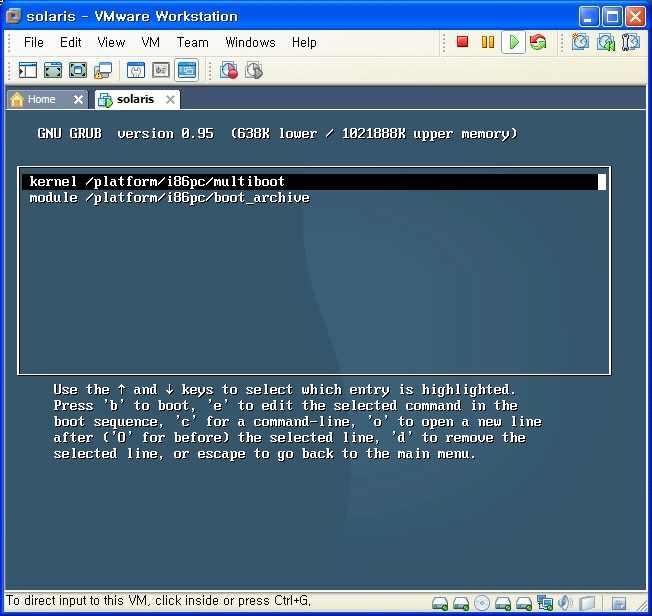
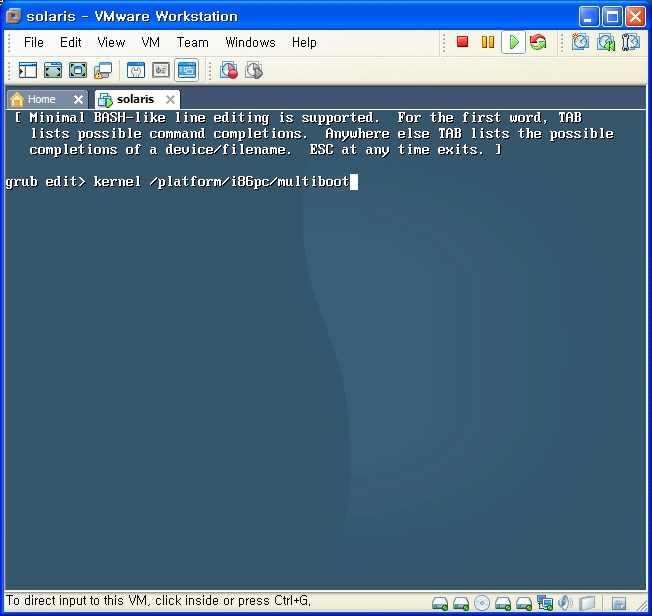
185 3 kernel /platform/i86pc/multiboot" 선택후 'e' 입력 4 grub edit 화면확인
186 5 싱글유저옵션 "-s" 입력후 <Enter> 6 "kernel /platform/i86pc/multiboot -s" 선택후 "b" 입력
187 7 싱글유저로부팅중관리자암호입력 ( 예 : root 사용자 ) 8 싱글유저부팅확인 # who -r # sync ; sync ; sync # init

188 (2). Grub 을가지고싱글유저부팅 1 부팅시 "Solaris failsafe" 선택후 <Enter> 2 부팅중메세지확인 l /dev/dsk/c0d0s0 파티션을 /a 에 read/write 형태로마운트할것인가? l 만약여러개의운영체제가있다면여러개의파티션에서운영체제선택하는메뉴가나온다. 그때선택하면된다
189 3 "y" 입력후 <Enter> 4 "Starting Shell" 확인
190 5 작업을위한편리한기능설정 l ksh ( 현재쉘변경, sh -> ksh) l set -o vi (ksh의이전명령어되살리기기능사용 ) l stty erase ^H ( 삭제키전환, Delete -> Backspace) l TERM=vt100 ; export TERM (TERM 변수선언 ) ( 참고 ) 현재상태확인 # who -r ----> 현재런레벨표시가없다. # pwd ----> /tmp/root # ls / # df h ----> /a # ls /a ----> c1t0d0s0 6 /a/etc/shadow 파일편집
191 7 shadow 파일의두번째필드의암호삭제 8 shadow 파일의두번째필드의암호삭제확인
192 9 변경된내용강제저장 10 서버시스템 reboot

193 11 부팅시 "Solaris 10 5/08 s10x_u5wos_10 X86" 선택후 <Enter> 12 로그인창확인

194 13 root 사용자로로그인 l root 사용자의암호가 NULL 패스워드가되었으므로관리자암호는없다. 14 로그인후 passwd 명령어를통해새로운암호입력
195 (3) 1 번 CD 를가지고설치중싱글유저부팅 1 번 CD(CD1 or DVD) 를넣은상태에서부팅을시키면설치모드로전환하게되는데, 설치화면중다음과같은화면이나오면 "6. Single user shell" 을선택하여시스템이상시트러블슈팅을할수도있다. ( 주의 ) 반드시 CD-ROM 먼저부팅할수있도록 BIOS 에서설정이되어있어야한다. 1 "Solaris" 을선택 2 "6. Single user shell" 을선택 3 작업과정은생략한다
196 [ 참고 ] /(root) 파티션이 Full 되는경우의처리 l l l 가끔실무에서는 / 파티션이풀차는경우가있다. 이런경우 /(root) 파티션의남은공간 ( 쓸수있는공간 ) 을늘리기위해서 ( ㄱ ) 불필요한파일을지우는경우 ( ㄴ ) /(root) 파티션의공간을증설하는경우 ( ㄷ ) /var( 일부파티션 ) 을마이그레이션하는경우등이있다. 다음시나리오는 /(root) 파티션이풀난경우이고, /var 디렉토리가 /(root) 파티션안에존재하는경우이다. /var 디렉토리는로그파일 (Log Files), 스풀 (Spool), 캐싱 (Caching) 공간으로사용되기때문에 /var 디렉토리는지속적으로관리가필요하다. ( 작업시나리오 ) /var 디렉토리의용량이너무커졌다. 이유는누적되는패치를계속받다보니 /var 디렉토리안에쌓이는정보들이늘어났다. 하지만이안에있는자료들이나파일들은지울수없는상태이다. 그리고 /var 파티션을따로정한것이아니라, 그냥 /(root) 파티션의일부디렉토리형태로쓰고있었다. 따라서관리자는 /var 디렉토리의내용을하나의파티션만들고싶어한다. /(root) 파티션의용량이부족하기때문에새로장착된디스크에적당한크기의파티션으로 /var 디렉토리의내용을넣는작업을한다. [ 참고 ] 작업문서 -> " 검색 " 창에서 -> "/var 디렉토리마이그레이션 " 으로검색하면많은문서를볼수있다. 그리고다음과같은몇가지규칙을지켜주는것이좋다. ( ㄱ ) 디렉토리마이그레이션시에는 cp 명령어로옮기면안된다.(EX: tar 명령어사용 ) ( ㄴ ) 새로운디스크를장착하고파티션을구분한후마운트를하고작업을수행한다. ( ㄷ ) /var 디렉토리에 "read/write" 가발생하지않도록싱글유저모드 (CD 부팅 ) 에서작업하는것이바람직하다. 이문서는꼭 /(root) 파티션의 /var 디렉토리를하나의파티션으로구성하는예만되는것은아니다. /(root) 파티션의 /usr 디렉토리를하나의파티션으로구성할때도사용할수있는문서이다
197 Solaris 10 Admin I Guide 5. Mount & Umount l l l l l l vold Daemon Admin CD-ROM Usage Floppy Usage If not run a vold Troubleshooting ISO Image Mount
198 볼륨관리개요 (Volume Management Overview) Volume Management(vold) 서비스는 /usr/sbin/vold 데몬에의해제어된다. vold 데몬은기본적으로시스템에설치되어있으면서비스가되고있다. vold 데몬이떠있으면, 일반사용자가 vold 데몬을통해 CD-ROM, Diskette 등을사용할수있게된다. Volume Management(vold) 는 CD-ROM 을삽입한경우자동으로인식한다. 하지만 Diskette 은그렇지않다. diskette 은삽입하고나면 volcheck 명령어를통해인식시킬수있다. 인식이되면적당한마운트포인터에자동마운트된다. Volume Management(vold) 는 ufs, pcfs, hsfs, udfs 파일시스템을마운트할수있다. 장치 (Device) 에대한사용권한은 root 사용자에게있다. 따라서일반사용자는기본적으로장치를사용할수없지만, 솔라리스에서는일반사용자가장치를다룰수있도록 vold 데몬을사용할수있다. vold 데몬은시스템시동시에자동으로동작하도록설정되어있다. 만약 vold 데몬이존재하지않는다면일반사용자는장치를사용할수없다. root 사용자만 mount 명령어를통해장치를다룰수있게된다. Removable Device Volume Management(CD & Floppy) <Device> CD-ROM ====> VM(Volume Manager) ====> End User Floppy vold Zip-Disk =============================> Root Jaz-Disk USB [ 그림 ] Removable Device Management CD-ROM 이나 Diskette 을가지고사용자가간단하게작업하는경우, vold 데몬이떠있는체계에서는각장치를쉽게마운트하여사용이가능하다. 만약 vold 데몬이마운트된디바이스의파일시스템을인식한다면, 장치는지정된디렉토리에마운트된다. ( 이경로를가지고접근이가능하다.) 만약 vold 데몬이파일시스템을이포함되지않은장치를인식한다면, 장치의 Raw Data Path 를가지고접근이가능하다. [ 참고 ] 마운트포인터와 raw Path Access File Systems With This Path Access Raw Data With This Path Diskette /floppy/floppy0 /vol/dev/aliases/floppy0 CD-ROM /cdrom/cdrom0 /vol/dev/aliases/cdrom0 Jaz Drive /ramdisk/jaz0 /vol/dev/aliases/jaz0 Zip Drive /ramdrive/zip0 /vol/dev/aliases/zip0 PCMCIA Card /pcmem/pcmem0 /vol/dev/aliases/pcmem0 USB Memory /rmdisk/rmdisk0 /vol/dev/aliases/rmdisk
199 vold 데몬관리 The Volume Management daemon, vold, creates and maintains a file system image rooted at root-dir that contains symbolic names for floppies, CD-ROMs and other removable devices. The default root-dir is set to /vol if no directory is specified by the -d option. 볼륨관리데몬 (vold) 은플로피, CD-ROM, 다른 removable device 들을위해파일시스템이미지들의심볼릭링크를 root-dir 에생성하고관리한다. 특별한지정이없다면기본 root-dir 은 /vol 디렉토리이다. vold reads the /etc/vold.conf configuration file upon startup. If the configuration file is modified later, vold must be told to reread the /etc/vold.conf file. vold 데몬은시작시에 /etc/vold.conf 파일을다시읽는다. 만약설정파일이수정된다면 vold 데몬으로하여금 /etc/vold.conf 파일을다시읽도록해야한다. vold is hotplug-aware for USB and 1394 mass storage devices, thus there is no need for stopping and restarting vold. It is recommended to eject(1) the "media" before hot-removing a device. The eject command unmounts any filesystems mounted from the media, making it safe to remove the device. (Note that all USB and 1394 devices, regardless of whether they contain removable media, are treated like removable media devices). vold 데몬은 USB 또는 1394 저장장치위해핫플러그인을지원한다. vold 데몬을 stop 하고다시 restart 할필요가없다. 미디어 ( 장치 ) 를핫리무브 (Hot-Removing) 하기위해서는미디어 eject 시킬것을권장한다. eject 명령어는마운트된미디어파일시스템을언마운트시킨다. 따라서안전하게장치를제거할수있도록해준다. vold 데몬을관리하기위해서는 svcadm 명령어를사용하고, refresh/disable/enable/restart 등의서브명령어를사용할수있다. # svcadm disable volfs 수행하는경우 vold 데몬이종료되고, 반대로 enable 시키는경우 vold 데몬이다시뜬다. vold 데몬은기본적으로떠있다. 솔라리스운영체제관리시에도 vold 데몬은떠있는상태로유지하는것이운영상에유리하다. 특이한경우를제외하고는 vold 데몬을종료하지말것을권장한다. ( 명령어형식 ) # svcadm refresh volfs (/etc/vold.conf 파일을다시읽어드림 ) # svcadm disable volfs (volfs 서비스 disable, /etc/init.d/volmgt stop) # svcadm enable volfs (volfs 서비스 enable,/etc/init.d/volmgt start) [ 참고 ] Solaris 8/9 버전에서 vold 데몬관리 # /etc/init.d/volmgt stop # /etc/init.d/volmgt start [EX] vold 데몬 Active/Inactive 실습 1 vold 데몬 /volfs 서비스확인 # pgrep -lf vold (# ps -ef grep vold) 584 /usr/sbin/vold -f /etc/vold.conf # svcs -a grep volfs online 0:16:16 svc:/system/filesystem/volfs:default l svcs:/system/filesystem/volfs:default 서비스가 online 상태이면, vold 데몬이떠있다
200 2 volfs 서비스 disable # svcadm disable volfs # pgrep -lf vold -> 데몬이떠있지않는다. # svcs -a grep volfs disabled 0:18:54 svc:/system/filesystem/volfs:default l svc:/system/filesystem/volfs:default 서비스가 disabled 상태이면, vold 데몬이종료되어있다 3 volfs 서비스 enable # svcadm enable volfs # pgrep -lf vold 951 /usr/sbin/vold -f /etc/vold.conf # svcs -a grep volfs online 0:19:21 svc:/system/filesystem/volfs:default
201 CD-ROM 사용 CD 를 CD-ROM 에넣게되면자동으로마운트된다. 자동으로마운트되기때문에사용자에게는마운트포인터가중요하게된다. CD-ROM 의마운트포인터는 /cdrom/cdrom0 이다. 그리고 CD-ROM 이하나더있고 CD 가들어있다면 /cdrom/cdrom1 이마운트포인터가된다. CD 를다사용하고나면, eject 시켜주면된다. ( 주의 ) 솔라리스시스템은 vold 데몬이떠있는상태에서 CD 가들어있는경우 eject 시키지않으면 CD 가배출되지않는다. # Auto Mount (CD-ROM 마운트 ) # cd /cdrom/cdrom0 (CD 사용 ) # cd ; eject cdrom (CD-ROM 언마운트 ) [EX] CD 사용실습 (Solaris 10 x86 on VMWare) (a). CD-ROM 사용 VMWare 하단 > CD-ROM 아이콘클릭 -> Physical Device 선택 -> "OK" 클릭 # svcadm disable volfs # svcadm enable volfs # pgrep lf vold Automount 확인 (CD-ROM 창확인 ) # cd /cdrom/cdrom0 ; ls # cd ; eject cdrom (CD 배출되는것확인 ) (b). ISO Image 사용 VMWare 하단 -> CD-ROM 아이콘클릭 -> ISO Image -> "2 of 2 CD" 장착 -> "OK" 클릭 # svcadm disable volfs # svcadm enable volfs Automount 확인 (CD-ROM 창확인 ) # cd /cdrom/cdrom0 # ls # cd ; eject cdrom ( 다시 remount 된다.) 플로피 (Floppy) 사용 Floppy 는서버시스템에서는거의존재하지않고 Desktop 용에서주로사용하고있다. vold 데몬이떠있는경우 volcheck 명령어를통해서 Floppy 를마운트할수있다. 마운트포인터는 /floppy/floppy0 이된다. 또한 Floopy 가하나더존재한다면 /floppy/floppy1 이마운트포인터가된다. 현재 Enterprise 이상장비에서는 Floppy 장치대신 Tape 장치가장착되어있다. # volcheck -v (Floopy 마운트 ) # cd /floppy/floppy0 (Floppy 사용 ) # cd # eject floppy (Floppy 언마운트 ) ( 알림 ) 엔터프라이즈서버에 floppy 가없기때문에실습은하지않는다
202 vold 데몬이떠있지않은경우 vold 데몬이떠있지않은경우에 root 사용자는 mount 명령어를통해서장치를직접마운트할수있다. 이경우 CD 파일시스템은솔라리스에서 hsfs 를사용하고 Floppy 는 pcfs 파일시스템을사용한다. # mount -F hsfs -o ro /dev/dsk/c0t6d0s0 /mnt/cdrom (CD-ROM mount) # mount -F pcfs /dev/diskette /mnt/floppy (Floppy mount) [EX] vold 데몬이떠있지않은경우의실습 (sparc Platform) l If not run a vold, CD-ROM Usage l ( 전제조건 ) Solaris 2 of 2 CD 장착 # svcadm disable volfs /* vold 데몬종료 */ # pgrep -lf vold /* vold 데몬떠있는지확인 */ # mkdir -p /mnt/cdrom /* 마운트포인터생성 */ # mount -F hsfs -o ro /dev/dsk/c0t1d0s0 /mnt/cdrom /* CD-ROM 마운트 */ /* 만약 Blade150 CD-ROM: /dev/dsk/c0t1d0s0 */ # cd /mnt/cdrom ; ls # cd ; umount /mnt/cdrom ( 알림 ) Sparc Platform IDE 방식의디스크사용 : ( 예 ) CD-ROM : c0t1d0s0 t0 t1 c t2 t [EX] vold 데몬이떠있지않은경우의실습 (Solaris 10 x86 on VMWare) l ( 전제조건 ) Solaris 2 of 2 CD 장착 ( 이미지형태 /CD-ROM) # svcadm disable volfs /* volfs 서비스 disable */ # svcs -a grep volfs /* vofs 서비스상태확인 */ # pgrep -lf vold /* vold 데몬떠있는지확인 */ # mkdir /mnt/cdrom /* 마운트포인터생성 */ # mount -F hsfs -o ro /dev/dsk/c1t0d0s0 /mnt/cdrom /* CD-ROM 직접마운트 */ (c1d0s0 -> c1t0d0s0) ( 알림 ) c1t0d0s0(ide 방식의 CD-ROM) d0 d1 c d0 d1 c # df -k -> 마운트된상황확인 # cd /mnt/cdrom ; ls # cd ; umount /mnt/cdrom
203 트러블슈팅 vold 데몬의이상으로인한트러블슈팅방법중가장좋은방법은 vold 데몬을 restart 하는방법이다. vold 데몬은 SMF 서비스체계로관리되므로아래와같이명령어를수행하여 vold 데몬을 restart 하면된다. ( 증상 ) vold 데몬이떠있는데, CD 를 CD-ROM 에집어넣으면, 자동마운트가안되는경우라면 ( 해결 ) vold 데몬을 restart 한다. l l svcadm disable volfs (# /etc/init.d/volmgt stop) svcadm enable volfs (# /etc/init.d/volmgt start) [ 참고 ] vold is Managed by the Service Management Facility(SMF) Solaris 10 1/06: The volume management daemon, vold, is now managed by the Service Management Facility (SMF). This means you can use the svcadm disable command to disable the following new volfs service, if appropriate: # svcadm disable volfs You can identify the status of the volfs service by using this command: $ svcs volfs STATE STIME FMRI online Sep_29 svc:/system/filesystem/volfs:default For more information, see smf(5). You can use the svccfg command to display and to set additional vold properties. For example, you could temporarily enable vold logging to help troubleshooting a problem. For example: # svccfg svc:> select system/filesystem/volfs svc:/system/filesystem/volfs> listprop vold application vold/config_file astring vold/log_debuglevel count 0 vold/log_file astring vold/log_nfs_trace boolean false vold/log_verbose boolean false vold/never_writeback_label boolean false vold/root_dir astring fs dependency fs/entities fmri svc:/system/filesystem/local fs/grouping astring require_all fs/restart_on astring none fs/type astring service smserver dependency smserver/entities fmri svc:/network/rpc/smserver smserver/grouping astring require_all smserver/restart_on astring none smserver/type astring service rpcbind dependency rpcbind/entities fmri svc:/network/rpc/bind rpcbind/grouping astring require_all rpcbind/restart_on astring restart rpcbind/type astring service general framework general/action_authorization astring solaris.smf.manage.volfs general/entity_stability astring Unstable general/single_instance boolean true general/value_authorization astring solaris.smf.modify.volfs start method start/exec astring "/lib/svc/method/svc-volfs start" start/timeout_seconds count
204 start/type astring method stop method stop/exec astring :kill stop/timeout_seconds count 30 stop/type astring method refresh method refresh/exec astring "/lib/svc/method/svc-volfs refresh" refresh/timeout_seconds count 30 refresh/type astring method tm_common_name template tm_common_name/c ustring "Volume Management filesystem" tm_man_volfs template tm_man_volfs/manpath astring /usr/man tm_man_volfs/section astring 7FS tm_man_volfs/title astring volfs svc:/system/filesystem/volfs> setprop vold/log_debuglevel=3 svc:/system/filesystem/volfs> exit # svcadm disable volfs /* 변경정보적용 */ # svcadm enable volfs You can also use the svccfg command to display a listing of settable vold properties. # svccfg svc:> select volfs svc:/system/filesystem/volfs> listprop vold/* vold/config_file astring vold/log_debuglevel count 3 vold/log_file astring vold/log_nfs_trace boolean false vold/log_verbose boolean false vold/root_dir astring vold/never_writeback_label boolean false svc:/system/filesystem/volfs> exit For a description of these properties, see the vold(1m)
205 ISO 이미지마운트 가상 CD 프로그램들 VirutalCD CDspace DaemonLite 솔라리스시스템안에서도 ISO 이미지파일들의사용이늘고있다. 프로그램 CD 로제작되어배포되는것보다 ISO 이미지형태로배포되는경우들이늘어나고있다. 솔라리스시스템안에서도가상 CD 프로그램들처럼 lofs(local File System) 을지원하고있다. 자신의자원을자신이마운트할수있도록하는것이다. 이것은일반적인개념이며, CD 마운트에국한되지않고여러곳에서응용하여사용되고있다. l ISO 이미지를만드는 mkisofs(8) 명령어는매뉴얼을참고하기바란다. l lofs(7fs), lofi(7d), lofiadm(1m) 자세한정보에대해서는매뉴얼페이지를참고하기바란다. [EX] ISO 이미지마운트과정 1 ISO Image 파일다운로드 ( 가정 ) /test/solaris_driver.iso 이미지가존재한다고가정한다. # rcp :/root/CD/solaris_driver.iso /test /dev/lofi/1 [ 참고 ] mkisofs(8) 명령어를 ISO 이미지파일을생성할수있다. (solaris_driver.iso 파일이만들어진방법 ) # mkisofs -o solaris_driver.iso /etc/default 2 solaris_driver.iso 파일을가상디바이스 (Virtual Device) 파일에맵핑및확인 # lofiadm -a /test/solaris_driver.iso # lofiadm Block Device File /dev/lofi/1 /test/solaris_driver.iso 3 가상디바이스 ( 맵핑된 ISO 파일 ) 마운트및확인 # mount -F hsfs -o ro /dev/lofi/1 /mnt/cdrom # df -k /mnt/cdrom Filesystem size used avail capacity Mounted on /dev/lofi/1 6.1M 6.1M 0K 100% /mnt/cdrom # ls /mnt/cdrom (# ls -R /mnt/cdrom) _nfs.swp* fs.* kbd.* mpathd.* power.* tar.* autofs.* ftp.* keyserv.* nfs.* rpc.nis* telnetd.* cron.* inetinit.* login.* nfslogd.* su.* utmpd.* devfsadm.* init.* lu.* nss.* sys_susp.* yppasswd.* dhcpagen.* ipsec.* metassis.xml* passwd.* syslogd.* 4 마운트해제 # cd ; umount /mnt/cdrom [ 참고 ] lofiadm 명령어로생성된가상디바이스삭제 lofiadm 명령어로만들었던가상이미지파일은리부팅이되면자동으로사라진다. 바로삭제하고싶다면 lofiadm 명령어의 -d 옵션을사용하면된다. # cd ; umount /mnt/cdrom # lofiadm -d /dev/lofi/
206 USB 사용 (Using USB Device) 최근솔라리스시스템에서도 USB 저장장치에대한사용이늘고있다. 솔라리스 10 버전에서 vold 데몬이떠있는겨우 USB 를꽂으면자동으로마운트되고, USB 를빼면자동으로언마운트된다. USB 를뺄때주의할사항은빼기전에 eject 시켜주는것을권장한다. 그래야만찌거기데이터가남지않게된다. USB 에대한자세한내용은다음을참고하기바란다. ( ㄱ ) > 일반자료실 > 81 번자료 ( ㄴ ) For recent information about USB devices, go to the following site: ( ㄷ ) For general information about USB devices, go to the following site: 1 USB 메모리를꽂는다. 2 마운트확인 ( 자동마운트된다.) # df -k Filesystem size used avail capacity Mounted on /dev/dsk/c0t0d0s0 15G 10G 4.8G 69% / /devices 0K 0K 0K 0% /devices ctfs 0K 0K 0K 0% /system/contract proc 0K 0K 0K 0% /proc mnttab 0K 0K 0K 0% /etc/mnttab swap 2.2G 1.7M 2.2G 1% /etc/svc/volatile objfs 0K 0K 0K 0% /system/object sharefs 0K 0K 0K 0% /etc/dfs/sharetab fd 0K 0K 0K 0% /dev/fd swap 2.2G 56K 2.2G 1% /tmp swap 2.2G 104K 2.2G 1% /var/run /dev/dsk/c0t0d0s4 470M 2.6M 421M 1% /data2 /dev/dsk/c0t0d0s5 941M 1.0M 883M 1% /data3 /dev/dsk/c0t0d0s7 470M 1.1M 422M 1% /export/home /vol/dev/dsk/c2t0d0/unnamed_rmdisk:c 3.7G 140K 3.7G 1% /rmdisk/unnamed_rmdisk -> /rmdisk/unnamed_rmdisk에마운트된것이보인다. 3 마운트포인터로이동및확인 # cd /rmdisk/unnamed_rmdisk # ls RECYCLER/ Recycled/ passwd* -> 내용확인 shadow* 4 USB 언마운트 # eject -n /* 기본장치별명보기 */ fd -> floppy0 fd0 -> floppy0 fd1 -> floppy1 diskette -> floppy0 diskette0 -> floppy0 diskette1 -> floppy1 rdiskette -> floppy0 rdiskette0 -> floppy0 rdiskette1 -> floppy1 cd -> cdrom0 cd0 -> cdrom0 cd1 -> cdrom1 sr -> cdrom0 sr0 -> cdrom0 /dev/sr0 -> cdrom0 /dev/rsr0 -> cdrom0 cdrom0 -> /vol/dev/rdsk/c0t1d0/nomedia rmdisk0 -> /vol/dev/rdsk/c2t0d0/unnamed_rmdisk floppy0 -> /vol/dev/rdiskette0/nomedia
207 # cd # eject rmdisk0 (USB 메모리카드빼낼때사용 ) # df -k Filesystem size used avail capacity Mounted on /dev/dsk/c0t0d0s0 15G 10G 4.8G 69% / /devices 0K 0K 0K 0% /devices ctfs 0K 0K 0K 0% /system/contract proc 0K 0K 0K 0% /proc mnttab 0K 0K 0K 0% /etc/mnttab swap 2.2G 1.6M 2.2G 1% /etc/svc/volatile objfs 0K 0K 0K 0% /system/object sharefs 0K 0K 0K 0% /etc/dfs/sharetab fd 0K 0K 0K 0% /dev/fd swap 2.2G 48K 2.2G 1% /tmp swap 2.2G 104K 2.2G 1% /var/run /dev/dsk/c0t0d0s4 470M 2.6M 421M 1% /data2 /dev/dsk/c0t0d0s5 941M 1.0M 883M 1% /data3 /dev/dsk/c0t0d0s7 470M 1.1M 422M 1% /export/home 5 USB 메모리를뺀다
208 1 외장하드디스크를꽂는다. 2 마운트확인 # df -h [ 참고 ] 외장디스크사용 (USB 방식 ) Filesystem size used avail capacity Mounted on /dev/dsk/c0t0d0s0 15G 10G 4.8G 69% / /devices 0K 0K 0K 0% /devices ctfs 0K 0K 0K 0% /system/contract proc 0K 0K 0K 0% /proc mnttab 0K 0K 0K 0% /etc/mnttab swap 2.2G 1.7M 2.2G 1% /etc/svc/volatile objfs 0K 0K 0K 0% /system/object sharefs 0K 0K 0K 0% /etc/dfs/sharetab fd 0K 0K 0K 0% /dev/fd swap 2.2G 56K 2.2G 1% /tmp swap 2.2G 104K 2.2G 1% /var/run /dev/dsk/c0t0d0s4 470M 2.6M 421M 1% /data2 /dev/dsk/c0t0d0s5 941M 1.0M 883M 1% /data3 /dev/dsk/c0t0d0s7 470M 1.1M 422M 1% /export/home /vol/dev/dsk/c2t0d0/unnamed_rmdisk:c 112G 102G 10G 92% /rmdisk/unnamed_rmdisk # cd /rmdisk/unnamed_rmdisk # ls ALToolBar/ ALZip/ Adobe/ Config.Msi/ IP.TXT* IPv6OverIPv4Tunnel.rtf* NICE.HWP* NPKI/ Noname1.txt* ORACLE/ RECYCLER/ RRDTOOL.TXT* System Volume Information/... ( 중략 )... 3 장치제거 # cd # eject -n fd -> floppy0 fd0 -> floppy0 fd1 -> floppy1 diskette -> floppy0 diskette0 -> floppy0 diskette1 -> floppy1 rdiskette -> floppy0 rdiskette0 -> floppy0 rdiskette1 -> floppy1 cd -> cdrom0 cd0 -> cdrom0 cd1 -> cdrom1 sr -> cdrom0 sr0 -> cdrom0 /dev/sr0 -> cdrom0 /dev/rsr0 -> cdrom0 rmdisk0 -> /vol/dev/rdsk/c2t0d0/unnamed_rmdisk cdrom0 -> /vol/dev/rdsk/c0t1d0/nomedia floppy0 -> /vol/dev/rdiskette0/nomedia # eject rmdisk0 # df -h -> 정보가사라졌다. ( 결론 ) 외장디스크에대해서도 USB 처럼사용이가능하다
209 RAM File System RAMDISK -> RAM File System - ( 전제조건 ) MEMORY(EX: RAM) 공간이충분한경우사용 /test 공간과같이임시용데이터를저장하는공간에대해서사용 -> reboot 되고나면 RAMDISK 내용은사라지기때문이다. 1 남는메모리확인 # top b grep Memory (# prtconf grep Memory) Memory: 2000M phys mem, 851M free mem, 1500M total swap, 1500M free swap 2 RAM DISK 생성및확인 # ramdiskadm a ramdisk1 10m /dev/ramdisk/ramdisk1 # ramdiskadm Block Device Size Removable /dev/ramdisk/ramdisk Yes 3 파일시스템생성 # newfs /dev/rramdisk/ramdisk1 newfs: construct a new file system /dev/rramdisk/ramdisk1: (y/n)? y /dev/rramdisk/ramdisk1: sectors in 34 cylinders of 1 tracks, 602 sectors 10.0MB in 3 cyl groups (16 c/g, 4.70MB/g, 2240 i/g) super-block backups (for fsck -F ufs -o b=#) at: 32, 9664, 19296, 4 마운트및확인 # mkdir /ramdisk1 # mount /dev/ramdisk/ramdisk1 /ramdisk1 # df h F ufs grep ramdisk /dev/ramdisk/ramdisk1 9.1M 1.0M 7.2M 13% /ramdisk1 5 RAM 파일시스템삭제 # cd ; umount /ramdisk1 # ramdiskadm d ramdisk1 [ 결론 ] RAM DISK 는 /test 디렉토리와같이임시적인파일이생성되는작업용디렉토리에대해서수행하면좋을수있다. 단 RAM DISK 안의내용은서버가재부팅이되면안의내용은삭제된다
210 [ 정리 ] mount(mount, /etc/vfstab) 1. Mount Verification # df -k 마운트된유 / 무확인, 디스크사용량점검 # mount 마운트옵션확인, 마운트된시간확인 2. Mount 관련된파일 - /etc/mnttab - /etc/vfstab 3. mount 명령어 # mount [-F ufs] -o OPTIONS /dev/dsk/c0d0s7 /export/home -F ufs : /etc/default/fs, /etc/dfs/fstypes -o OPTIONS : rw, intr, suid, largefiles, logging, xattr, onerror=panic # umount /export/home Busy Filesystem Umount fuser cu / -ck umount -f # mountall (/etc/vfstab) # umountall(/etc/mnttab) 4. Troubleshooting (a). CD-ROM(1 of 2) 부팅 (b). 편리한기능설정 (c). 작업 (mount) (d). umount & reboot 5. CD 마운트 # svcadm disable volfs # svcadm enable volfs (vold 데몬이떠있는경우 ) 자동마운트 # cd /cdrom/cdrom0 # cd ; eject cdrom (vold 데몬이떠있지않은경우 ) # mount -F hsfs -o ro /dev/dsk/c0t6d0s0 /mnt/cdrom # cd /mnt/cdrom # cd ; umount /mnt/cdrom
211 Solaris 10 Admin I Guide 6. Package Administration l l l l Solaris Program Installation Type l l Packages Source Solaris Packages Overivew l l Packages Files Software Group / Software Clusters / Software Packages Packages Management CMD(s) l pkgadd, pkgrm, pkginfo, pkgchk Packages Practise l l l Packages add/remove Packages Spool GNU Packages Installation 프로그램설치방법 솔라리스시스템에서프로그램을설치하는방법은 (a) 소스형태의파일을직접컴파일하여설치하는방법과 (b) 패키지를설치하는방식이있다. 이문서에서는후자의방식에관해서만다루고있다. 솔라리스프로그램설치방법 (Solaris Program Installation Type) - 소스형태의설치방식 (Source Installation (Complier: cc, gcc))./configure --prefix=/usr/local/apache make(makefile) make install - 패키지형태의설치방식 (Package Installation) pkgadd, pkgrm, pkginfo, pkgchk ( 예 : rpm CMD(Linux)) 패키지란프로그램을배포하기위한프로그램을구성하는파일과디렉토리를모아놓은그룹이다
212 패키지관련파일들 l l l l /var/sadm/install/contents /var/sadm/system/admin/clusters /var/sadm/system/.clustertoc /var/sadm/system/.platform (1). /var/sadm/install/contents 파일 Displaying Information about installed software packages. /var/sadm/install/contents 파일은프로그램이패키지형태로추가된모든파일의정보를담고있다. 하지만패키지형태로추가된것이아닌소소형태로프로그램이설치된경우는이파일에설치정보가들어가지않는다. ( 주의 ) 관리자가직접편집하는것을권장하지않는다. pkg CMD(EX: pkgadd,pkgrm) 가 contents 파일의정보를자동으로수정해준다. # more /var/sadm/install/contents /bin=./usr/bin s none SUNWcsr /dev d none 0755 root sys SUNWcsr SUNWcsd /dev/allkmem=../devices/pseudo/mm@0:allkmem s none SUNWcsd /dev/arp=../devices/pseudo/arp@0:arp s none SUNWcsd /dev/conslog=../devices/pseudo/log@0:conslog s none SUNWcsd /dev/console=../devices/pseudo/cn@0:console s none SUNWcs... ( 중략 )... /etc/apache d none 0755 root bin SUNWapchr SUNWtcatr SUNWipplr /etc/apache/readme.solaris f none 0644 root bin SUNWapchr /etc/apache/access.conf e renamenew 0644 root bin SUNWapchr /etc/apache/httpd-standalone-ipp.conf e preserve 0644 root bin SUNWipplr /etc/apache/httpd.conf-example f none 0644 root bin SUNWapchr... ( 중략 )... # ls /var/sadm/pkg /* 솔라리스에설치된패키지목록 */ # ls -altr /var/sadm/pkg # cat /var/sadm/install/contents /* 솔라리스에설치된패키지및파일목록 */ # grep showrev /var/sadm/install/contents /usr/bin/showrev f none 0755 root sys SUNWadmc /usr/share/man/man1m/showrev.1m f none 0644 root root SUNWman -> showrev 명령어가시스템에설치되어있는지확인 -> find / -name showrev -type f 2>/dev/null (2). /var/sadm/system/admin 디렉토리하위의파일들 # cat /var/sadm/system/admin/cluster CLUSTER=SUNWCXall (SUNWCall : 전체설치, SUNWCXall : 전체설치 + OEM) -> 솔라리스운영체제설치할당시에어떤소프트웨어그룹을선택하여설치했는지정보가들어있는파일이다. -> 솔라리스운영체제설치할당시에소프트웨어그룹을 " 전체설치 + OEM" 을선택하여설치했다. # cat /var/sadm/system/admin/.clustertoc grep METACLUSTER METACLUSTER=SUNWCXall /* 전체설치 + OEM */ METACLUSTER=SUNWCall /* 전체설치 */ METACLUSTER=SUNWCprog /* 개발자설치 */ METACLUSTER=SUNWCuser /* 사용자설치 */ METACLUSTER=SUNWCreq /* 최소설치 */ METACLUSTER=SUNWCrnet /* 제한된네트워크설정설치 */ METACLUSTER=SUNWCmreq -> 솔라리스운영체제설치할당시에설치된 METACLUSTER에대한정보가들어있는파일이다

213 # cat /var/sadm/system/admin/.platform PLATFORM_GROUP=sun4u INST_ARCH=sparc PLATFORM_NAME=SUNW,SPARCstation-fusion PLATFORM_ID=SUNW,SPARCstation-fusion IN_PLATFORM_GROUP=sun4u PLATFORM_NAME=FJSV,GP PLATFORM_ID=FJSV,GP IN_PLATFORM_GROUP=sun4u PLATFORM_NAME=FJSV,GPUU... ( 중략 )... # uname -m sun4u (3). 솔라리스소프트웨어구성 (Software Components of the Solaris OE) 솔라리스운영체제의소프트웨어는 3 가지로구분한다. Software Packages (EX: MS-Word) Software Clusters (EX: MS-Office) Software Groups [ 그림 ] Solaris OE Software Components 썬공인교재그림참조 software packages -> software clusters -> software groups CDE DEMOs -> JDE Develper -> Configuration for the CDE Develper Man Pages Software Cluster Developer Software Group CDE HELP Developer Env CDE Man Pages CDE Includes
 During the software installation process, software clusters group logical collections of software packages together.")
214 소프트웨어패키지 (Software Packages) A software package contains a group of software files and directories. The package also contains the related software installation scripts. 소프트웨어클러스터 (Software Clusters) During the software installation process, software clusters group logical collections of software packages together. Some software clusters contain only one software package. 소프트웨어그룹 (Software Groups) Reduced Networking Support Software Group Core System Support Software Group End User Solaris Software Group Developer Solaris Software Group Entire Solaris Software Group Entire Solaris Software Group plus Original Equipment Manufacturers(OEM) Support Possible Entries for the cluster keyword Interactive Installation Name Configuration Cluster Name Reduced Network SUNWrnet 제한된네트워크설치 Core SUNWCreq 최소설치 End User SUNWCuser 사용자설치 Developer SUNWCprog 개발자설치 Entire distribution SUNWCall 전체설치 Entire distribution plus OEM SUNWCXall 전체설치 + OEM [ 그림 ] Solaris OS Software Group 썬공인교재그림참조
215 Reduced Network Support Software Group (SUNWCrnet) This group contains the minimum software that is required to boot and run a Solaris system with limited network service support. The Reduced Networking software group provides a multiuser text-based console and system administration utilities. This software group also enables the system to recognize network interfaces, but does not activate network services. A system installed with the Reduced Networking software group could, for example, be used as a thin-client host in a network. 포함 0 : Limited Network Service Support 포함 X : Don't activate Network Service Core Software Group (SUNWCreq) The Core software group contains the minimum software required to boot and run the Solaris OE in a minimum configuration, without the support to run many server applications. The Core software group includes a minimum of networking software, including Telnet, File Transfer Protocol (FTP), Network File System (NFS), Network Information Service (NIS) clients, and Domain Name Service (DNS). This software group also includes the drivers required to run the Common Desktop Environment (CDE) but does not include the CDE software. The Core software group also does not include online manual pages. 포함 0 : Minimum Networking Software(telnet,ftp 등 ) 포함 X : CDE(Common Desktop Environment), Manual(man) End User System Support Software Group (SUNWCuser) The End User System Support software group contains the Core software group and also contains the recommended software for an end user plus the CDE. 포함 0 : SUNWCreq + CDE 포함 X : Manual(man) Developer System Support Software Group (SUNWCprog) The Developer System Support software group contains the End User System Support software group. It also contains the libraries, the include files, the online manual pages, and the programming tools for developing software. 포함 0 : SUNWCuser + libraries, Manual(man), Developing Software 포함 X : gcc Entire Distribution Software Group (SUNWCall) The Entire Distribution software group contains the Developer System Support software group. It also contains additional software needed for servers. The software that is in the Entire Distribution software group is the entire Solaris OE software release minus OEM support. 포함 0 : SUNWCprog + Server Packages 포함 X : OEM support Software Entire Distribution Plus OEM Support Software Group(SUNWCXall) The Entire Distribution Plus OEM Support software group contains the entire Solaris OE software release. It also contains additional hardware support for OEMs. This software group is recommended when you are installing the Solaris OE software on non-sun servers that use UltraSPARC processors. 포함 0 : SUNWCall + OEM support Software 포함 X : 없음
216 패키지관련명령어 솔라리스운영체제에서 2 가지형식의패키지형식을제공하고있다. l File system(or Directory) format ( 예 : Windows : 한글프로그램폴더 ) l Data stream format ( 예 : Linux : rpm Packages) Packages delivered in file system format consist of multiple files and directories. Packages delivered in data stream format consist of a single file only. # dfshares /* 서버의공유된자원확인 */ # mkdir -p /mnt/pkg /* 마운트포인터생성 */ # mount :/root/packages /mnt/pkg /* 서버의자원마운트 */ # cd /mnt/pkg/compare /* 마운트된자원확인 */ # ls SUNWman/ SUNWman.pkg (File System Format) The package consists of a directory that matches the package name, and other files and directories including the pkginfo and pkgmap files. # ls -ld SUNWman drwxr-xr-x 5 root root 7 Nov 25 13:43 SUNWman/ # ls -l SUNWman drwxr-xr-x 2 root root 3 Nov archive/ drwxr-xr-x 2 root root 5 Nov install/ -rw-r--r-- 1 root root 583 Nov pkginfo -rw-r--r-- 1 root root 1022K Nov pkgmap drwxr-xr-x 2 root root 2 Nov reloc/ (Data Stream Format) Packages downloaded from the Internet are most often in data stream format. # ls -l SUNWman.pkg -rw-r--r-- 1 root root 49K Nov 25 13:46 SUNWman.pkg # file SUNWman.pkg SUNWzip.pkg: package datastream # head SUNWman.pkg (# head -30 SUNWman.pkg) # PaCkAgE DaTaStReAm SUNWzip # end of header NAME=The Info-Zip (zip) compression utility ARCH=i386 VERSION= ,REV= SUNW_PRODNAME=SunOS SUNW_PRODVERS=5.10/SunOS Development SUNW_PKGTYPE=usr MAXINST=1000 -> head 명령어를통해서 10 ~ 50 라인정도확인해본다
217 패키지관련명령어 pkginfo 패키지정보확인명령어 pkgchk 패키지설치상태확인명령어 pkgadd 패키지설치명령어 pkgrm 패키지삭제명령어 (1). pkginfo CMD NAME pkginfo - display software package information DESCRIPTION pkginfo displays information about software packages that are installed on the system (with the first synopsis) or that reside on a particular device or directory (with the second synopsis). Without options, pkginfo lists the primary category, package instance, and the names of all completely installed and partially installed packages. It displays one line for each package selected. OPTIONS -d device Defines a device, device, on which the software resides. device can be an absolute directory pathname or the identifiers for tape, floppy disk, removable disk, and so forth. The special token spool may be used to indicate the default installation spool directory (/var/spool/pkg). -l Specify long format, which includes all available information about the designated package(s). -R root_path Defines the full path name of a directory to use as the root_path. All files, including package system information files, are relocated to a directory tree starting in the specified root_path. -v version Specify the version of the package as version. The version is defined with the VER- SION parameter in the pkginfo(4) file. All compatible versions can be requested by preceding the version name with a tilde (~). Multiple white spaces are replaced with a single white space during version comparison. ( 명령어형식 ) # pkginfo # pkginfo SUNWman (# pkginfo grep SUNWman) # pkginfo -l SUNWman (-l : long format) # pkginfo -d /cdrom/cdrom0/solaris_10/product (-d : directory) # pkginfo -d /cdrom/cdrom0/solaris_10/product SUNWman # pkginfo -d /cdrom/cdrom0/solaris_10/product -l SUNWman [ 참고 ] CD1 패키지설치 # cd /cdrom/cdrom0/solaris_10/product # pkginfo -d. -l SUNWman (-d. : 현재폴더 )
218 [ 참고 ] pkginfo 명령어의활용예 # pkginfo wc -l -> 패키지의설치된개수 # pkginfo grep Apache -> Apache 패키지가설치확인 # pkginfo grep bash -> bash 패키지가설치확인 # pkginfo grep SMC -> sufreeware.com 사이트에서다운로드하여설치한패키지목록 [EX] pkginfo 출력화면 # pkginfo... ( 중략 )... system SUNWfss Fair Share Scheduler system SUNWftdur ftsafe developer utilities package (Root) system SUNWftduu ftsafe developer utilities package (Usr) system SUNWftpr FTP Server, (Root) system SUNWftpu FTP Server, (Usr) system SUNWgcmn gcmn - Common GNU package... ( 중략 ) 필드설명 system 시스템카테고리 SUNWfss 패키지의이름 Fair Share Scheduler 패키지의설명 [EX] pkginfo -l SUNWman 출력화면 # pkginfo -l SUWNman PKGINST: SUNWman (Package Installation Name) NAME: On-Line Manual Pages (Package Description) CATEGORY: system (System Packages Category) ARCH: i386 (Package System Arch.) VERSION: 43.0,REV=75.0 (Package Version) BASEDIR: /usr (Package Installation Base Directory) VENDOR: Sun Microsystems, Inc. (Package Vendor) DESC: System Reference Manual Pages (Package Description) PSTAMP: (Package Product Date) INSTDATE: 9월 :47 (Package Installation Date) HOTLINE: Please contact your local service provider STATUS: completely installed FILES: installed pathnames 17 shared pathnames 195 directories blocks used (approx) (1 block = 512 bytes) -> pkginfo 명령어는시스템에설치된패키지의목록을자세하게출력해준다
219 (2). pkgchk CMD NAME pkgchk - check package installation accuracy DESCRIPTION pkgchk checks the accuracy of installed files or, by using the -l option, displays information about package files. pkgchk checks the integrity of directory structures and files. Discrepancies are written to standard error along with a detailed explanation of the problem. OPTIONS -l List information on the selected files that make up a package. This option is not compatible with the -a, -c, -f, -g, and -v options. -p path Only check the accuracy of the path name or path names listed. path can be one or more path names separated by commas (or by white space, if the list is quoted). -v Verbose mode. Files are listed as processed. ( 명령어형식 ) # pkgchk SUNWman (# pkginfo -i SUNWman) # pkgchk -p /etc/shadow (-p : path) # pkgchk -lp /etc/shadow (-l : list, -p : path) # pkgchk -v SUNWman (-v : verbose) [EX] pkgchk SUNWman 형식실습 # pkgchk SUNWman # -> 아무런메세지가나오지않으면정상적으로패키지가잘설치되어있음을나타낸다. # pkgchk SUNWmmann WARNING: no pathnames were associated with <SUNWmmann> <----- 메세지확인 [EX] pkgchk -p /etc/shadow 형식실습 # pkgchk p /usr/bin/ls # -> 아무런메세지가나오지않는다면설치되었을당시 ( 초기패키지가만들어진때 ) 와현재파일의변화가없는상태를나타낸다. # pkgchk -p /etc/shadow ERROR: /etc/shadow modtime <02/29/08 12:00:38 AM> expected <09/28/08 11:32:45 PM> actual file size <338> expected <417> actual file cksum <23267> expected <28829> actual -> 파일의 Modify Time이변경되었고, -> 파일크기도변경되었고, -> 따라서, 파일의체크섬값도변경되었다. [ 참고 ] 프로그램의무결성점검프로그램의변조유무확인 -> 간단한점검 (pkgchk -p) -> 다양한점검 (EX: Tripwire) # pkgchk -p /usr/bin/find /usr/bin/find 바이너리파일은운영체제설치때와현재가같아야한다
220 [EX] pkgchk -lp, pkgchk -v 형식실습 1 # pkgchk -lp /usr/bin/showrev # pkgchk -v SUNWman ============== SUNWman =============== /usr/share/man/sman3c/endgrent.3c /usr/share/man/sman3c/endnetgrent.3c /usr/share/man/sman3c/endpwent.3c /usr/share/man/sman3c/endspent.3c... ( 중략 )... ====================================== [ 그림 ] SUNWman 패키지 [EX] pkgchk -lp, -v 형식실습 2 1 /usr/bin/find 파일이포함된패키지확인 # which find /usr/bin/find (/bin/find) # pkgchk -lp /usr/bin/find Pathname: /usr/bin/find Type: regular file Expected mode: 0555 Expected owner: root Expected group: bin Expected file size (bytes): Expected sum(1) of contents: Expected last modification: Oct 15 08:31: Referenced by the following packages: SUNWcsu /* 솔라리스시스템 core 패키지 */ Current status: installed # pkgchk -v SUNWcsu (# pkgchk -v SUNWcsu > file.log 2>&1)... ( 중략 )... /usr/sbin/modload /usr/sbin/modunload /usr/sbin/mount /usr/sbin/mountall /usr/sbin/msgid /usr/sbin/mvdir /usr/sbin/named-bootconf /usr/sbin/ncheck /usr/sbin/ndc /usr/sbin/ndd /usr/sbin/newfs /usr/sbin/nlsadmin /usr/sbin/nscd /usr/sbin/nslookup /usr/sbin/nstest /usr/sbin/nsupdate... ( 중략 )
221 2 /etc/shadow 파일이포함된패키지확인 # ls -l /etc/shadow -r root sys 724 Jan 15 20:07 /etc/shadow # pkgchk -lp /etc/shadow Pathname: /etc/shadow Type: editted file Expected mode: 0400 Expected owner: root Expected group: sys Referenced by the following packages: SUNWcsr /* 솔라리스시스템 core 패키지 */ Current status: installed # pkgchk -v SUNWcsr (# pkgchk v SUNWcsr > file.log 2>&1)... ( 중략 )... /sbin/autopush /sbin/biosdev /sbin/bootadm /sbin/dhcpagent /sbin/dhcpinfo /sbin/dladm /sbin/fdisk /sbin/hostconfig /sbin/ifconfig /sbin/ifparse /sbin/in.mpathd /sbin/init /sbin/installgrub /sbin/jsh /sbin/mount /sbin/mountall... ( 중략 )... /sbin/route /sbin/routeadm /sbin/sh /sbin/soconfig /sbin/su /sbin/su.static /sbin/sulogin /sbin/swapadd /sbin/sync /sbin/uadmin /sbin/umount /sbin/umountall /sbin/uname /sbin/zonename... ( 중략 )
222 3 /usr/share/man/man1/zsh.1 파일이포함된패키지확인 # cd /usr/share/man/man1 ; ls... ( 중략 )... mt.1 mv.1 nawk.1 nca.1 zipsplit.1 zlogin.1 zonename.1 zsh.1 # pkgchk -lp /usr/share/man/man1/zsh.1 Pathname: /usr/share/man/man1/zsh.1 Type: regular file Expected mode: 0444 Expected owner: root Expected group: bin Expected file size (bytes): 765 Expected sum(1) of contents: Expected last modification: Jan 08 17:51: Referenced by the following packages: SUNWsfman Current status: installed # pkgchk -v SUNWsfman -> 출력내용생략 [ 실무예 ] 패키지설치경로확인관리자가패키지를추가하고, 일정한시간이흐른후에설치된패키지의파일과디렉토리목록을확인하고자할때사용될수있다. # pkgadd -d. SMCsudo /* 패키지설치 */... ( 중략 )... /usr/local/man/man1m/sudo.1m /* 패키지의파일과디렉토리설치위치출력 */ /usr/local/man/man1m/sudoedit.1m /usr/local/man/man1m/visudo.1m /usr/local/man/man4/sudoers.4 /usr/local/sbin/visudo... ( 중략 )... -> 일정한시간이흐른후 # pkginfo grep sudo # pkgchk -v SMCsudo [ 실무예 ] 언어패키지설치 (ko.utf-8) => 오라클설치시 # locale /* 현재사용하고있는언어 */ # locale -a /* 지원되는언어종류 */ CD 안에서 (ko.utf-8) 에관련된패키지를운영체제에설치 (EX: localeadm) => # vi /etc/default/init (LANG 변수 ) => # reboot
223 (3). pkgarm CMD NAME pkgrm - remove a package from the system DESCRIPTION pkgrm will remove a previously installed or partially installed package from the system. A check is made to determine if any other packages depend on the one being removed. If a dependency exists, the action taken is defined in the admin file. The default state for the command is in interactive mode, meaning that prompt messages are given during processing to allow the administrator to confirm the actions being taken. Non-interactive mode can be requested with the -n option. OPTIONS The following options are supported: -n Non-interactive mode. If there is a need for interaction, the command will exit. Use of this option requires that at least one package instance be named upon invocation of the command. Certain conditions must exist for a package to be removed noninteractively or a non-restrictive admin file needs to be used. -R root_path Defines the full path name of a directory to use as the root_path. All files, including package system information files, are relocated to a directory tree starting in the specified root_path. -s spool Remove the specified package(s) from the directory spool. The default directory for spooled packages is /var/sadm/pkg. -v Trace all of the scripts that get executed by pkgrm, located in the pkginst/install directory. This option is used for debugging the procedural and non-procedural scripts. ( 명령어형식 ) # pkgrm SUNWapchr # pkgrm -s spool SUNWapchr ( 주의 ) Do no use the rm command to remove software packages. Doing so will result in inaccuracies in the database that keeps track of all installed packages on the system
224 (4). pkgadd CMD NAME pkgadd - transfer software packages to the system DESCRIPTION pkgadd transfers the contents of a software package from the distribution medium or directory to install it onto the system. Used without the -d option, pkgadd looks in the default spool directory for the package (var/spool/pkg). Used with the -s option, it writes the package to a spool directory instead of installing it. The pkgadd utility requires an amount of temporary space the size of the package that is being installed. pkgadd determines which temporary directory to use by checking for the existance of the $TMPDIR environment variable. If $TMPDIR is not defined, pkgadd uses P_tmpdir from stdio.h. P_tmpdir has a default of /var/tmp/. OPTIONS -n Installation occurs in non-interactive mode. Suppress output of the list of installed files. The default mode is interactive. -R root_path Define the full path name of a directory to use as the root_path. All files, including package system information files, are relocated to a directory tree starting in the specified root_path. The root_path may be specified when installing to a client from a server (for example, /export/root/client1). -s spool Write the package into the directory spool instead of installing it. -v Trace all of the scripts that get executed by pkgadd, located in the pkginst/install directory. This option is used for debugging the procedural and non-procedural scripts. ( 명령어형식 ) # pkgadd -d /cdrom/cdrom0/solaris_10/product SUNWapchr or # cd /cdrom/cdrom0/solaris_10/product # pkgadd -d. SUNWapchr # pkgadd -s spool -d. SUNWapchr
225 ( 정리 ) 패키지관련명령어 pkginfo CMD # pkginfo # pkginfo SUNWman # pkginfo -l SUNWman (-l : long line format) # pkginfo -d. -l SUNWman (-d : directory) pkgchk CMD # pkgchk SUNWman # pkgchk -lp /usr/bin/ls (-p : path) # pkgchk -v SUNWcsu (-v : verbose) pkgrm CMD # pkgrm SUNWman # pkgrm -s spool SUNWman (-s : spool) pkgadd CMD # pkgadd -d. SUNWman (-d : directory) # pkgadd -d. -s spool SUNWman
226 패키지추가 / 삭제실습 [ 실습 1] -> packages 추가 / 삭제실습 (CD-ROM 사용 ) [ 실습 2] -> packages 스풀실습 [ 실습 3] -> packages 설치방법의종류실습 [ 실습 4] -> GNU packages 패키지설치실습 [ 실습 1] 패키지추가 / 삭제실습 (CD-ROM 사용 ) ***** Solaris CD5 ready? ***** ( :/export/install) (1). Installation a Packages OS (Apache Package) <=== CD-ROM (CD5) 삭제 (SUNWapchd) 추가 (SUNWapchd) [ 그림 ] 패키지삭제 / 추가 1 pkginfo 명령어를통해 Apache 패키지목록확인 l 삭제할패키지를전체목록에서확인하고자세한정보를확인한다. # pkginfo grep Apache (# pkginfo SUNWapchd, # pkginfo -i SUNWapchd) system SUNWaclg Apache Common Logging system SUNWapch2d Apache Web Server V2 Documentation system SUNWapch2r Apache Web Server V2 (root) system SUNWapch2u Apache Web Server V2 (usr) system SUNWapchd Apache Web Server Documentation system SUNWapchr Apache Web Server (root) system SUNWapchu Apache Web Server (usr) -> 삭제할패키지로 SUNWapchd 패키지를선택 ( 예 : SUNWapchd) # pkginfo -l SUNWapchd PKGINST: SUNWapchd NAME: Apache Web Server Documentation CATEGORY: system ARCH: i386 VERSION: ,REV= BASEDIR: / VENDOR: Sun Microsystems, Inc. DESC: The Apache HTTP server (1.3.x) (documentation) PSTAMP: sfw10-patch-x INSTDATE: 9월 :43 HOTLINE: Please contact your local service provider STATUS: completely installed FILES: 559 installed pathnames 2 shared pathnames 33 directories 350 executables blocks used (approx) -> 삭제할패키지의버전확인 ( )
227 2 pkgrm 명령어를통해 SUNWapachd 패키지삭제 # pkgrm SUNWapchd The following package is currently installed: SUNWapchd Apache Web Server Documentation (i386) ,REV= Do you want to remove this package? [y,n,?,q] y <----- 'y' 입력 ## Removing installed package instance <SUNWapchd> ## Verifying package dependencies.... ( 중략 )... /usr/apache/htdocs/manual/bind.html.fr /usr/apache/htdocs/manual/bind.html.en /usr/apache/htdocs/manual/license /usr/apache/htdocs/manual /usr/apache/htdocs /usr/apache <shared pathname not removed> /usr <shared pathname not removed> ## Updating system information. Removal of <SUNWapchd> was successful. <----- 메세지확인 # pkginfo grep Apache system SUNWaclg Apache Common Logging system SUNWapch2d Apache Web Server V2 Documentation system SUNWapch2r Apache Web Server V2 (root) system SUNWapch2u Apache Web Server V2 (usr) system SUNWapchr Apache Web Server (root) system SUNWapchu Apache Web Server (usr) -> SUNWapchd 패키지가지워졌기때문에패키지이름이없어졌다. 3 pkgadd 명령어를통해 SUNWapchd 패키지설치 # cd /cdrom/cdrom0/solaris_10/product # ls -ld SUNWapch* drwxr-xr-x 5 root staff 2.0K Mar SUNWapch2S/ drwxr-xr-x 5 root staff 2.0K Mar SUNWapch2d/ drwxr-xr-x 5 root staff 2.0K Mar SUNWapch2r/ drwxr-xr-x 5 root staff 2.0K Mar SUNWapch2u/ drwxr-xr-x 5 root staff 2.0K Mar SUNWapchS/ drwxr-xr-x 5 root staff 2.0K Mar SUNWapchd/ drwxr-xr-x 5 root staff 2.0K Mar SUNWapchr/ drwxr-xr-x 5 root staff 2.0K Mar SUNWapchu/ [ 참고 ] CD5 없는경우 # mount :/export/install /mnt/cdrom # cd /mnt/cdrom ; ls # cd Solaris_10/Product # ls -ld SUNWapch* # pkginfo -d. -l SUNWapchd PKGINST: SUNWapchd NAME: Apache Web Server Documentation CATEGORY: system ARCH: i386 VERSION: ,REV= BASEDIR: / VENDOR: Sun Microsystems, Inc. DESC: The Apache HTTP server (1.3.x) (documentation) PSTAMP: sfw10-patch-x HOTLINE: Please contact your local service provider STATUS: spooled... ( 중략 )... 4 package information files blocks used (approx) /* 1 block = 512 bytes */ -> 설치할패키지의버전정보확인 ( )
228 # pkgadd -d. SUNWapchd Processing package instance <SUNWapchd> from </cdrom/sol_10_508_x86_5/solaris_10/product> Apache Web Server Documentation(i386) ,REV= ==================================================================== Copyright (c) The Apache Group. All rights reserved. Redistribution and use in source and binary forms, with or without modification, are permitted provided that the following conditions are met:... ( 중략 )... Using </> as the package base directory. ## Processing package information. ## Processing system information. 2 package pathnames are already properly installed. ## Verifying package dependencies. ## Verifying disk space requirements. ## Checking for conflicts with packages already installed. ## Checking for setuid/setgid programs. This package contains scripts which will be executed with super-user permission during the process of installing this package. Do you want to continue with the installation of <SUNWapchd> [y,n,?] y <---- 'y' 입력 Installing Apache Web Server Documentation as <SUNWapchd> ## Installing part 1 of blocks Installation of <SUNWapchd> was successful. <----- 메세지확인 # pkginfo grep Apache system SUNWaclg Apache Common Logging system SUNWapch2d Apache Web Server V2 Documentation system SUNWapch2r Apache Web Server V2 (root) system SUNWapch2u Apache Web Server V2 (usr) system SUNWapchd Apache Web Server Documentation system SUNWapchr Apache Web Server (root) system SUNWapchu Apache Web Server (usr) -> SUNWapchd 패키지가잘설치가되어서정보가보인다. ( 패키지삭제 / 설치과정요약 ) l pkginfo grep Apache l pkginfo -l SUNWapchd l pkgrm SUNWapchd l pkginfo grep Apache l cd /cdrom/cdrom0/solaris_10/product l ls -ld SUNWapch* l pkginfo -d. -l SUNWapchd l pkgadd -d. SUNWapchd l pkginfo grep Apache
229 [ 실습 2] 패키지스풀 (Packages Spool) 추가 / 삭제실습 l Adding Packages by Using a Spool Directory # cd /cdrom/cdrom0/solaris_10/product # pkgadd -d. -s spool SUNWman (# cp -r SUNWman /var/spool/pkg) # pkgadd -d. -s /var/spool/pkg SUNWman # ls -al /var/spool/pkg # pkgrm -s spool SUNWman (# rm -r /var/spool/pkg/sunwman) # cd /cdrom/cdrom0/s0/solaris_9/product # pkgadd -d. -s /export/pkg SUNWman # pkgrm -s /export/pkg SUNWman 스풀추가스풀삭제 CD-ROM(SUNWman) ---> /var/spool/pkg ---> 삭제 /export/pkg [ 실습그림 ] 1 SUNWman 패키지확인 ( 전제조건 ) DVD 이미지 or CD5 이미지 (# mount :/export/install /mnt/cdrom) # cd /cdrom/cdrom0/solaris_10/product # ls -ld SUNWman drwxr-xr-x 5 root staff 2.0K Mar SUNWman/ 2 SUNWman 패키지스풀 (/var/spool/pkg) # pkgadd -d. -s spool SUNWman (-s spool <=> -s /var/spool/pkg) Transferring <SUNWman> package instance -> /var/spool/pkg/sunwman 생성된다. # ls -l /var/spool/pkg drwxr-xr-x 5 root root 512 Sep 29 02:38 SUNWman/ 3 SUNWman 패키지스풀 (/export/pkg) # mkdir -p /export/pkg # pkgadd -d. -s /export/pkg SUNWman Transferring <SUNWman> package instance # ls -l /export/pkg drwxr-xr-x 5 root root 512 Sep 29 02:39 SUNWman/ -> /export/pkg/sunwman 생성된다
230 4 스풀된패키지삭제 (/var/spool/pkg, /export/pkg) # pkgrm -s /var/spool/pkg SUNWman (# pkgrm -s spool SUNWman) The following package is currently spooled: SUNWman On-Line Manual Pages (i386) 43.0,REV=75.0 Do you want to remove this package? [y,n,?,q] y Removing spooled package instance <SUNWman> <----- 'y' 입력 # pkgrm -s /export/pkg SUNWman The following package is currently spooled: SUNWman On-Line Manual Pages (i386) 43.0,REV=75.0 Do you want to remove this package? [y,n,?,q] y Removing spooled package instance <SUNWman> <----- 'y' 입력 5 스풀된패키지삭제확인 # ls -l /export/pkg # ls -l /var/spool/pkg 1 cp -r 옵션으로옮긴패키지설치 # pkgrm SUNWapchd # cd /cdrom/cdrom0/solaris_10/product # cp -r SUNWapchd /export/pkg # cd /export/pkg # pkgadd -d. SUNWapchd -> 정상적으로잘설치된다. [ 참고 ] "cp r" & "pkgadd -s" 의비교 2 pkgadd 명령어에 -s /export/pkg 옵션으로옮긴패키지설치 # pkgrm SUNWapchd # cd /cdrom/cdrom0/solaris_10/product # pkgadd -d. -s /export/pkg SUNWapchd # cd /export/pkg # pkgadd -d. SUNWapchd -> 정상적으로잘설치된다. l 두방법모두정상적으로설치가된다. l ( 결론 ) 스풀은단순히디렉토리옮기는것과같다
231 [ 실습 2] 스풀디렉토리를사용한패키지추가 ( 실무예 ) 대 === NFS SERVER === ---> ClientA (/p) ---> ClientB (/p) # share /export/pkg > ClientC (/p) --->... =================== /result > /p1 [ 그림 ] 스풀디렉토리를사용한패키지배포서버 [EX] 패키지배포서버구축예제 (At Packages Deploy Server) (a). 공유 : /export/pkg, /result (b). 패키지스풀 : /export/pkg (pkgadd -d. -s /export/pkg SUNW*) (At Client) (a). 공유자원마운트 : /p(--> /export/pkg), /p1(--> /result) (b). 패키지설치스크립트 : /root/shell/pkgadd.sh # crontab -e 분시일월요일 CMD 0 6 * * * /root/shell/pkgadd.sh # cat pkgadd.sh #!/bin/ksh # (1). 설치할패키지가없으면종료 ls /p > /tmp/.file.txt if [! -s /tmp/.file.txt ] ; then /* -s : size 존재하면 */ exit 1 fi # (2). 패키지설치 cd /p /* 이기능은자세하게구현되어있지않다. */ pkgadd -n -d. SUNW* # (3). 패키지정상설치유무확인 if [ $? -eq 0 ] ; then /* -eq : equal */ echo "Packages Installation Process completed." else echo "warning : Package Not Installation." > /p1/`hostname`.txt fi rm /tmp/.file.txt
232 [ 실제클라이언트구축 ] # mkdir /p /p1 # dfshares RESOURCE SERVER ACCESS TRANSPORT... ( 중략 ) :/export/pkg :/result # mount :/export/pkg /p # mount :/result /p1 # df -h -F nfs -> 마운트정보확인 # rcp :/root/shell/pkgadd.sh /test # cd /test # cat pkgadd.sh #!/bin/ksh ls /p > /tmp/.file.txt if [! -s /tmp/.file.txt ] ; then exit 1 fi #cd /p # cd /p #pkgadd -d. SUNW* # pkgadd -n -d. SUNW* ls /nodir 2> /dev/null # EOF if [ $? -eq 0 ] ; then echo "Packages Installation Process completed." else echo "warning : Package Not Installation." > /p1/`hostname`.txt fi rm /tmp/.file.txt # chmod 755 pkgadd.sh #./pkgadd.sh # rsh ls /result
233 [ 실습 3] 패키지를설치할수있는방법의종류 GNU Package Installation ( 솔라리스서버에패키지를설치할수있는방법의종류 l sunfreeware 사이트를이용한 popt 패키지설치 l rcp 서버를이용한 top 패키지설치 l NFS 서버를이용한 gcc 패키지설치 l 웹서버를이용한 sudo 패키지설치 l FTP 서버 (ftp.sunfreeware.com) 를이용한 gftp 패키지설치 l prodreg 프로그램을이용한패키지설치
![[EX1] http://www.sunfreeware.com 사이트를이용한 popt 패키지설치 (Solaris 10 x86 on VMWare) l sunfreeware.com 사이트에서자신의서버에맞는패키지를선택하여, 솔라리스서버로패키지를다운로드하고, 패키지의압축을해제한후, 패키지를설치하면된다. 다음은 popt-1.](/docs-images/104/164712495/images/234-0.jpg "14 패키지를설치하는과정의그림이다. http://www.sunfreeware.com -> popt -> download -> Package Install libiconv gcc 1 http://www.sunfreeware.com 사이트에접속 -> 오른쪽상단의 \"x86/solaris 10\" 을선택 2 오른쪽하단화면변경확인 - 234 -")
234 [EX1] 사이트를이용한 popt 패키지설치 (Solaris 10 x86 on VMWare) l sunfreeware.com 사이트에서자신의서버에맞는패키지를선택하여, 솔라리스서버로패키지를다운로드하고, 패키지의압축을해제한후, 패키지를설치하면된다. 다음은 popt-1.14 패키지를설치하는과정의그림이다. -> popt -> download -> Package Install libiconv gcc 1 사이트에접속 -> 오른쪽상단의 "x86/solaris 10" 을선택 2 오른쪽하단화면변경확인

 [ 참고 ] wget 명령어를사용하는경우 ( 전제조건 ) 서버가인터넷에연결된경우 # wget ftp://ftp.")
235 3 오른쪽하단의 "popt-1.14" 선택 4 가운데페이지의 popt-1.14-sol10-intel-local.gz" 선택 The popt library is for parsing command line options - installs in /usr/local. Dependencies: libiconv and having libgcc_s.so.1 in /usr/local/lib is required. This can be done by installing libgcc or gcc or higher. -> popt-1.14 패키지는선수패키지가존재한다. (libiconv, gcc or libgcc) 5 윈도우서버로파일을다운로드 -> 적당한공간에받는다.( 예 : 바탕화면 ) 6 윈도우서버파일 -> 솔라리스서버로업로드 -> 알 FTP 실행 -> 파일 ( 예 : popt) 은솔라리스서버의 /test 디렉토리로전송한다. 7 솔라리스서버에서패키지설치 # cd /test ; ls # gzip -d popt* # pkgadd -d popt* -> 설치화면생략 # pkginfo grep popt (# pkginfo SMCpopt) [ 참고 ] wget 명령어를사용하는경우 ( 전제조건 ) 서버가인터넷에연결된경우 # wget ftp://ftp.sunfreeware.com/pub/freeware/intel/10/popt-1.14-sol10-x86-local.gz
236 [EX2] rcp 서버 ( ) 를사용한 top 패키지설치 (Solaris 10 SPARC on Blade2500) rcp 서버를통해 top 패키지를설치하는예이다. 선수적으로 rcp 서버에패키지가존재해야한다. 그래야만클라이언트에서패키지를다운로드받고설치할수있다. ( 시나리오 ) 여러대의유닉스서버를관리하는경우유닉스서버들이외부웹커낵션을이룰수없는경우가대부분이다. 따라서패키지파일을바로인터넷으로받아설치할수없다. 이런경우 SE 노트북에 VMWare 설치후솔라리스시스템을설치한후 rcp 서버인증파일을만들고, 각서버 ( 서비스서버 ) 에서파일또는패키지가필요한경우원격에서복사하여사용하면된다 rcp 서버 솔라리스서버 사무실노트북 # rcp S:/root/packages /test /root/packages (SE 노트북 ) 1 top 패키지 rcp 서버에서다운로드및설치 # rsh ls /root/packages/top # rcp :/root/packages/top/top sol10-sparc-local.gz /test # cd /test ; gzip -d top sol10-sparc-local.gz # pkgadd -d top sol10-sparc-local # pkginfo grep SMCtop (# pkginfo grep SMC) 2 top 명령어정상동작테스트 # top -> 출력결과생략 <Ctrl + C> # top -b # man top -b Use "batch" mode. In this mode, all input from the terminal is ignored. Interrupt characters (such as ^C and ^\) still have an effect. This is the default on a dumb terminal, or when the output is not a terminal. last pid: 819; load avg: 0.00, 0.01, 0.01; up 0+04:07:51 14:15:31 66 processes: 63 sleeping, 2 zombie, 1 on cpu CPU states: 99.5% idle, 0.0% user, 0.5% kernel, 0.0% iowait, 0.0% swap Memory: 400M phys mem, 307M free mem, 512M total swap, 512M free swap 97.5% PID USERNAME LWP PRI NICE SIZE RESSTATE TIME CPU COMMAND 495 root M 12M sleep 0: % Xsun 471 root K 1876K sleep 0: % mibiisa 536 root K 4548K sleep 0: % dtterm 819 root K 1088K cpu/0 0: % top 512 root K 4444K sleep 0: % dtgreet 453 root K 3948K sleep 0: % httpd 497 root K 2412K sleep 0: % dtlogin 613 root K 2336K sleep 0: % vold 475 root K 2264K sleep 0: % snmpxdmid 3 top -b 명령어활용 1 (CPU 사용량점검 ) # top -b grep 'CPU states' awk '{print $3}' /* CPU idle 퍼센트확인 */ 4 top -b 명령어활용 2 ( 좀비프로세스추적 ) # ps -elf awk '$2 == "Z" {print $0}' /* Zombie Process 검색 */ 8 Z root :00<defunct> 8 Z root :00<defunct> -> 424, 421 PID 번호를가진프로세스가좀비프로세스임을확인
237 # ptree /usr/lib/lpsched 372 /usr/lib/lpsched 379 /bin/sh -c /etc/lp/interfaces/printerc printerc-78 "/etc/hosts" 383 /bin/sh -c /etc/lp/interfaces/printerc printerc-78 "/etc/hosts" 418 /usr/spool/lp/bin/lp.tell -l printerc 419 /bin/sh -c /etc/lp/interfaces/printerc printerc-78 "/etc/hosts" 420 /usr/lib/lp/postscript/postio 424 <defunct> # lpstat -o printerc-78 root 월 16 15:39 on printerc
238 [EX3] NFS 을통한 gcc 패키지설치 (Solaris 10 SPARC on Blade2500) l rcp/scp/ftp 서버이용 : 패키지 / 파일을다운로드받는시간이걸린다. l NFS 서버이용 : 패키지 / 파일을다운로드할필요가없다 NFS 서버 솔라리스서버 사무실노트북 # mount S:/root/packages /test /root/packages (SE 노트북 ) # dfshares # mkdir -p /mnt/pkg # mount :/root/packages /mnt/pkg # df -k /mnt/pkg # cd /mnt/pkg ; ls # cd gcc # pkgadd -d gcc sol10-sparc-local :/root/pacages 디렉토리활용 -> 적당한패키지선택 # cp < 패키지이름 > /test # cd /test # pkgadd -d. < 패키지이름 > ( 만약압축되어있다면해제후실행 )
239 [EX4] 웹을통한 sudo 패키지설치 (Solaris 10 SPARC on Blade2500) l rcp/ftp/nfs 서버구성 : 서비스가차단되어있다면 l WEB 서버구성 : WEB 서비스포트 (EX: 80) 열려있는경우 ( 명령어형식 ) # pkgadd -d Web Server 서비스서버 httpd(apache2.x) /var/apache2/htdocs/pkg/test.pkg > # pkgadd -d # rsh ls /var/apache2/htdocs/pkg # pkgadd -d ## Downloading %...50%...75%...100% ## Download Complete The following packages are available: 1 SMCsudo sudo (SPARC) 1.6.8p12 Select package(s) you wish to process (or 'all' to process all packages). (default: all) [?,??,q]: all <----- 'all' 입력 Processing package instance <SMCsudo> from < sudo(sparc) Todd Miller et al Using </usr/local> as the package base directory. ## Processing package information. ## Processing system information. 6 package pathnames are already properly installed. ## Verifying disk space requirements. ## Checking for conflicts with packages already installed. ## Checking for setuid/setgid programs. The following files are being installed with setuid and/or setgid permissions: /usr/local/bin/sudo <setuid root> /usr/local/bin/sudoedit <setuid root> Do you want to install these as setuid/setgid files [y,n,?,q] y Installing sudo as <SMCsudo> ## Installing part 1 of 1. /usr/local/bin/sudo... ( 중략 )... /usr/local/doc/sudo/upgrade /usr/local/etc/sudoers /usr/local/libexec/sudo_noexec.la /usr/local/libexec/sudo_noexec.so /usr/local/man/man1m/sudo.1m /usr/local/man/man1m/sudoedit.1m /usr/local/man/man1m/visudo.1m /usr/local/man/man4/sudoers.4 /usr/local/sbin/visudo [ verifying class <none> ] Installation of <SMCsudo> was successful
240 [EX5] ftp 서버를이용한 gftp 패키지설치 (Solaris 10 x86 on VMWare) l 선수패키지확인 ( 에서선수패키지확인 ) # ftp ftp.sunfreeware.com (ftp://ftp.sunfreeware.com) Connected to sunfreeware.com. 220 ftp.sunfreeware.com FTP server ready. Name (sunfreeware.com:root): anonymous 331 Guest login ok, send your complete address as password. Password: id@paran.com ftp> dir ftp> cd pub /* pub */ ftp> dir ftp> cd freeware /* pub/freeware */ ftp> dir ftp> cd intel /* pub/freeware/intel */ ftp> dir ftp> cd 10 /* pub/freeware/intel/10 */ ftp> dir ftp> dir gftp* ftp> bin ftp> hash ftp> prompt ftp> lcd /test ftp> mget gftp* ftp>!ls ftp> quit 웹브라우저를사용하여 FTP 프로토콜을통해파일을다운받을수도있다. 웹브라우저에서 ftp://ftp.sunfreeware.com/pub/freeware/sparc/10 입력한다. [ 참고 ] # ftpconfig /export/ftp -> ftp:// / [EX6] prodreg Tools(GUI Tools) # prodreg & (prodreg : Product Registry) -> 툴사용에관해서는간단하기때문에따로설명하지않는다
241 [ 실습 4] 유용한 GNU 패키지설치및확인 다음과같은프로그램을설치하여보자 ( 참조 ) l [ ] pkg-get 패키지 패키지자동다운로드패키지 ( 예 : yum) l [0] top 패키지 서버상태모니터링패키지 l [V] gftp 패키지 FTP 패키지 l [0] vim 패키지 편집기패키지 l [0] gcc 패키지 컴파일러패키지 l [ ] ethereal 패키지 패킷캡쳐패키지 l [ ] nmap 패키지 네트워크스캐닝패키지 l [ ] VNC 패키지 VNC 서버 / 클라이언트패키지 (Solaris10 u5 버전이상에는기본설치 ) ( 주의 ) 선수패키지가있는경우먼저설치되어야한다. pkg-get 패키지설치 l > 오른쪽상단 > "pkg-get" 클릭 > 자세한설명참조 1 pkg-get 설치및확인 # pkgadd -d BOLTpget.pkg # pkginfo grep pkg-get [ 참고 ] pkg-get 명령어설정변경 # pkg-get compare -> sunfreeware.com 사이트와현재서버의 GNU 패키지를비교해준다. -> "pkg-get compare" 명령어가수행되면, /etc/pkg-get.conf 파일이생성된다. # vi /etc/pkg-get.conf # Configuration file for "pkg-get" # man pkg-get for details on the program #url=ftp://ftp.sunfreeware.com/pub/freeware <----- 주석처리 (#) url=ftp://ftp.kddilabs.jp/sun/sunfreeware <----- 새로운라인추가 url=ftp://ftp.riken.jp/sun/sunfreeware <----- 새로운라인추가 #North american mirror of of sunfreeware # See for other mirrors #url= # North american site for CompanionCD packages, instead of sunfreeware ones # see for other mirrors #url= # if you are behind a firewall, set these as appropriate #ftp_proxy= # or #http_proxy= #export http_proxy ftp_proxy # # If you also need to specify password, set in your own environment # export PROXYFLAGS="--proxy-user=xxxx --proxy-passwd=yyy" # It wouldnt be secure to specify it in the config file. # It isnt that secure in your environment EITHER, so beware. ( 명령어형식 ) # pkg-get compare # pkg-get install gcc # pkg-get upgrade gcc # pkg-get download gcc # pkg-get -s ftp://tmp.site/path/url -U (ftp://ftp.sunfreeware.com/pub/intel/10)
242 2 pkg-get 사용법 # pkg-get pkg-get SCCS pkg-get @(#) from pkg-get is used to install free software packages pkg-get Need one of 'install', 'upgrade', 'available','compare' '-i install' installs a package '-u upgrade' upgrades already installed packages if possible '-a available' lists the known available packages '-c compare' shows installed package versions vs available '-d download' just download the package, not install '-D describe' describe available packages '-f' dont ask any questions: force default behaviour Normally used with an override admin file See /var/pkg-get/admin-fullauto '-s ftp://site/dir' temporarily override site to get from (change /etc/pkg-get.conf for perm) '-U updatecatalog' updates download site inventory [EX] pkg-get 명령어사용 # pkg-get compare # (From site ftp.riken.jp )... ( 중략 )... software localrev remoterev automake [Not installed] 1.9 autossh [Not installed] 1.4a autossh [Not installed] 1.4b bash bash bash bash SAME bash ( 중략 )... # pkg-get install pstree Sorry, there are multiple versions possible Please specify one, in the following syntax pkg-get install pstree-2.27 pkg-get install pstree-2.32 # pkg-get install pstree-2.32 ERROR: information for "SMCpstre" was not found No existing install of SMCpstre found. Installing... trying ftp://ftp.riken.jp/sun/sunfreeware/i386/5.10/pstree-2.32-sol10-x86-local.gz --12:02:54-- ftp://ftp.riken.jp/sun/sunfreeware/i386/5.10/pstree-2.32-sol10-x86-local.gz => `/dev/fd/1' Resolving ftp.riken.jp Connecting to ftp.riken.jp :21... connected. Logging in as anonymous... Logged in! ==> SYST... done. ==> PWD... done. ==> TYPE I... done. ==> CWD /Sun/sunfreeware/i386/ done. ==> PASV... done. ==> RETR pstree-2.32-sol10-x86-local.gz... done. Length: 7,410 (7.2K) (unauthoritative) 100%[====================================>] 7, K/s 12:02:58 (27.23 KB/s) - `/dev/fd/1' saved [7410]... ( 중략 )... Installing pstree as <SMCpstre> ## Installing part 1 of 1. /usr/local/bin/pstree /usr/local/doc/pstree/readme [ verifying class <none> ] Installation of <SMCpstre> was successful. <----- 메세지확인
![# pkg-get install pstree-2.32 [ 참고 ] 설치시에러발생하는경우 ERROR: information for "SMCpstre" was not found No existing install of SMCpstre found. Installing... trying ftp://ftp.sunfreeware.](/docs-images/104/164712495/images/243-0.jpg "com/pub/freeware/i386/5.10/pstree-2.32-sol10-x86-local.gz /bin/pkg-get[18]: pstree-2.32-sol10-x86-local.gz.tmp: cannot create # pkg-get download pstree-2.")
243 # pkg-get install pstree-2.32 [ 참고 ] 설치시에러발생하는경우 ERROR: information for "SMCpstre" was not found No existing install of SMCpstre found. Installing... trying ftp://ftp.sunfreeware.com/pub/freeware/i386/5.10/pstree-2.32-sol10-x86-local.gz /bin/pkg-get[18]: pstree-2.32-sol10-x86-local.gz.tmp: cannot create # pkg-get download pstree-2.32 # gzip -d pstree* # pkgadd -d pstree* # pkginfo grep pstree application SMCpstre pstree # pstree... ( 중략 ) root gnome-volcheck -i 30 -z 3 -m cdrom,floppy,zip,jaz,dvdrom --sm- \ root gnome-volcheck -i 30 -z 3 -m cdrom,floppy,zip,jaz,dvdrom --s root nautilus --no-default-window --sm-client-id default root /usr/jdk/latest/bin/java -version:1.5+ -jar /usr/lib/patch/swu root /usr/lib/mapping-daemon root /usr/lib/gnome-netstatus-applet --oaf-activate-iid=oafiid:gnom root /usr/lib/gnome-vfs-daemon --oaf-activate-iid=oafiid:gnome_vfs_ root /usr/lib/clock-applet --oaf-activate-iid=oafiid:gnome_clockapp root /usr/lib/wnck-applet --oaf-activate-iid=oafiid:gnome_wncklet_f root /usr/lib/notification-area-applet --oaf-activate-iid=oafiid:gn \ root /bin/gnome-terminal root gnome-pty-helper \ root ksh \ root dtterm \ root /bin/ks gftp 패키지설치 l gtk l glib l openssl-0.9.7g l libiconv l readline l ncurses l libgcc-3.3 or gcc 이상버전 l gftp rc1-sol10-inetl-local.gz ( 주의 ) 선수패키지목록 (list) 는 sunfreeware.com 사이트에서확인한다. # gftp &
 # vi /usr/include/signal.h -> 칼라풀 (colorful) 하게보여야한다. gcc 패키지설치 l libiconv l gcc-3.3.2-sol10-intel-local.")
244 vim 패키지설치 l gtk l glib l ncurses l vim-7.2-sol10-x86-local.gz ( 주의 ) 선수패키지목록 (list) 는 sunfreeware.com 사이트에서확인한다. # vi /.vimrc /* vi 편집기의환경파일 */ syn on # alias vi='/usr/local/bin/vim' (--> ~/.kshrc 파일에정의한다.) # vi /usr/include/signal.h -> 칼라풀 (colorful) 하게보여야한다. gcc 패키지설치 l libiconv l gcc sol10-intel-local.gz ( 주의 ) 선수패키지목록 (list) 는 sunfreeware.com 사이트에서확인한다. # vi test.c main() { printf("hello"); } # gcc -o test test.c #./test -> 정상적으로 hello 메세지를받아야한다. ethereal 패키지설치 l gtk l libpcap l glib l pcre l zlib, l libgcc or gcc l ethereal sol10-intel-local.gz ( 주의 ) 선수패키지목록 (list) 는 sunfreeware.com 사이트에서확인한다. # cd /test # ethereal & # rcp :/packet/1/telnet.pkt /test -> ethereal 프로그램에서서버로부터받은 telnet.pkt 파일을열어본다
245 nmap 패키지설치 l openssl-0.9.8j l pygtk l pysqlite l libgcc or gcc l nmap-4.76-sol10-x86-local.gz ( 주의 ) 선수패키지목록 (list) 는 sunfreeware.com 사이트에서확인한다. # nmap -st (-s : SCAN, -T : TCP, -U : UDP) Starting Nmap 4.76 ( ) at :06 KST Interesting ports on solaris253 ( ): Not shown: 966 closed ports PORT STATE SERVICE 21/tcp open ftp 22/tcp open ssh 23/tcp open telnet 25/tcp open smtp 53/tcp open domain 79/tcp open finger 80/tcp open http 111/tcp open rpcbind 513/tcp open login 514/tcp open shell 515/tcp open printer 587/tcp open submission 631/tcp open ipp 898/tcp open sun-manageconsole 2049/tcp open nfs 4045/tcp open lockd 5987/tcp open unknown 6000/tcp open X /tcp open dtspc 7100/tcp open font-service 32771/tcp open sometimes-rpc /tcp open sometimes-rpc /tcp open sometimes-rpc /tcp open sometimes-rpc /tcp open sometimes-rpc /tcp open sometimes-rpc /tcp open sometimes-rpc /tcp open sometimes-rpc /tcp open sometimes-rpc /tcp open sometimes-rpc /tcp open unknown 32782/tcp open unknown 32783/tcp open unknown 32785/tcp open unknown Nmap done: 1 IP address (1 host up) scanned in seconds -> 서버에열려있는 TCP 포트번호를확인할수있다
246 VNC 패키지설치 l x11vnc-0.7-sol10-intel-local.gz l zlib l jpeg l libgcc-3.3 or gcc l tightvnc-1.3.9_javabin.zip ( (At VNC Server) # /usr/local/bin/x11vnc (At VNC Client) # cd classes # java VncViewer HOST < 서버 _IP> PORT 5900 # man x11vnc NAME x11vnc - allow VNC connections to real X11 displays version: 0.7pre, lastmod: DESCRIPTION Typical usage is: Run this command in a shell on the remote machine "far-host" with X session you wish to view: x11vnc -display :0 Then run this in another window on the machine you are sitting at: vncviewer far-host:0 Once x11vnc establishes connections with the X11 server and starts listening as a VNC server it will print out a string: PORT=XXXX where XXXX is typically 5900 (the default VNC server port). One would next run something like this on the local machine: "vncviewer hostname:n" where "hostname" is the name of the machine running x11vnc and N is XXXX , i.e. usually "vncviewer hostname:0". By default x11vnc will not allow the screen to be shared and it will exit as soon as a client disconnects. See -shared and -forever below to override these protections. See the FAQ on how to tunnel the VNC connection through an encrypted channel such as ssh(1). For additional info see: and Rudimentary config file support: if the file $HOME/.x11vncrc exists then each line in it is treated as a single command line option. Disable with -norc. For each option name, the leading character "-" is not required. E.g. a line that is either "nap" or "-nap" may be used and are equivalent. Likewise "wait 100" or "-wait 100" are acceptable and equivalent lines. The "#" character comments out to the end of the line in the usual way. Leading and trailing whitespace is trimmed off. Lines may be continued with a "\" as the last character of a line (it becomes a space character)
247 패키지포맷변경 (Packages Format Translation) 패키지유형 (Packages Format Types) l 파일시스템포맷 (File System Format) ( 예 : SUNWman/) l 데이터스트림포맷 (Data Stream Format) ( 예 : popt-1.7-sol10-intel-local) (1). 디렉토리구조 (File System Format) 인경우설치하기 # pkgadd -d. SUNWzsh ( 다른예 : # pkgadd -d /test SUNWzsh) (2). 데이터스트림구조 (Data Stream Format) 인경우설치하기 # pkgadd -d popt-1.7-sol10-intel-local -> sunfreeware.com 사이트의패키지는데이터스트림형식을갖는다. 패키지포맷변경 (Translating Package Format) Use the pkgtrans command to translate a package from file system format to data stream format, or from data stream format to file system format. The command syntax for the pkgtrans command is: ( 명령어형식 ) # pkgtrans <file_or_dir_path> <file_or_dir_path> [ package_name...] ( 예 ) pkgtrans /var/tmp /tmp/sunwrsc.pkg SUNWrsc 1 File System Format -> Data Stream Format # pkgtrans /export/pkg /test/sunwman.pkg SUNWman (F -> D) /export/pkg/sunwman/ -> /test/sunwman.pkg 2 Data Stream Format -> File System Format # pkgtrans /test/sunwman.pkg /test/pkg (D -> F) /test/sunwman.pkg -> /test/pkg/sunwman/ 3 여러개의디렉토리형태의패키지 (File System) 를파일형태패키지 (Data Stream) 로통합 # pkgtrans -s /pkg_dir /tmp/sunwall.pkg SUNWxxx1 SUNWxxx2 SUNWxxx3 (-s : 패키지가존재하고있는위치 ) /pkg_dir/sunwxxx1/ -> /tmp/sunwall.pkg SUNWxxx2/ SUNWxxx3/ [EX1] Filesystem Format -> Data Stream Format ( 전제조건 ) CD5 장착 (# mount :/export/install /mnt/cdrom) 1 CD 에존재하는 SUNWman 패키지를 /export/pkg 에스풀 # cd /cdrom/cdrom0/solaris_10/product # ls -ld SUNWman # pkgadd -d. -s /export/pkg SUNWman /* /export/pkg/sunwman 생성 */ 2 Filesystem Fomat 패키지를 Data Stream Format 패키지로변환 # pkgtrans /export/pkg /test/sunwman.pkg SUNWman
248 3 패키지변환확인및테스트 # cd /test ; ls # pkgadd -d SUNWman.pkg <Ctrl + C> <----- 설치되는화면만나오면바로 <Ctrl + C> 입력한다. [EX2] Date Stream Format -> Filesystem Format 1 Data Stream Format 패키지를 Filesystem Format 패키지로변환 # mkdir -p /test/pkg # pkgtrans /test/sunwman.pkg /test/pkg The following packages are available: 1 SUNWman On-Line Manual Pages (i386) 43.0,REV=75.0 Select package(s) you wish to process (or 'all' to process all packages). (default: all) [?,??,q]: <Enter> Transferring <SUNWman> package instance 2 패키지변환확인및테스트 # ls /test/pkg SUNWman/ # pkgadd -d /test/pkg SUNWman <Ctrl + C> <----- 설치되는화면만나오면바로 <Ctrl + C> 입력한다. [EX] 실무예 ( 패키지변환예 ) APM(Apache + PHP + MySQL) 설치 ( 소스형태의설치방식채택 ) -> 반복적인작업 -> 한번은컴파일 (configure;make;make install) ( ㄱ ) 아래문서 ( Packaging on Solaris 10 x86 ) 참조 ( ㄴ ) APM 컴파일 (configure ; make ; make install) APM 이연동할수있도록설정 # cd /usr/local ; ls apache/ php/ mysql/ ( ㄷ ) APM source( 컴파일되어있는상태 ) -> 솔라리스패키지로변환 - pkginfo 파일 - prototype 파일 - pkgmk 명령어 gftp 설치 -> 선수패키지 (libiconv, readline, ncurses,...) -> 반복적인작업 ( ㄱ ) sunfreeware.com 사이트에서패키지를다운로드 - gftp 패키지다운로드 - gftp 설치시필요한선수패키지다운로드 ( ㄴ ) Data Stream 패키지형식을 File System 패키지형식으로변환 - gftp.pkg -> SMCgftp/ - libiconv.pkg -> SMClibiconv/ - readline.pkg -> SMCreadline/ - ncurses.pkg -> SMCncurses/ # cd /test ; ls SMCgftp/ SMClibiconv/ SMCreadline/ SMCncurses/ ( ㄷ ) 패키지를통합 # pkgtrans -s /test /test/smcall.pkg SMCgftp SMClibiconv SMCreadline SMCncurses
249 [ 참고 ] Packaging on Solaris 10 x86 Packaging on Solaris 10 x86 작성일 : 이메일 : jang4sc@paran.com 플랫폼 : Solaris 10 x86(05/08) on VMWare gftp 프로그램을솔라리스패키지로만드는과정을기술하였다. 이문서를습득하시게되면다른프로그램에대해서도솔라리스패키지로변환하는과정을쉽게구현할수있을것이다. 문서는되도록간단하게만들었으며, 이글이많은분들에게도움이되었으면한다. 목차 테스트환경 1. gftp 소스다운로드 2. gftp 소스컴파일 2.1 gftp 소스파일압축해제 2.2 configure 실행 2.3 make 실행 2.4 make install 실행 3. gftp 패키징 3.1 pkginfo 파일생성 3.2 prototype 파일생성 3.3 pkgmk 명령어실행 3.4 패키지설치및확인 4. Filesystem 포맷을 Data Stream 포맷으로변경 5. 패키징스크립트 6. 참고 테스트환경테스트환경은다음과같습니다. l Windows XP (Basic OS) l VMWare (Virtualization Tools) l Solaris 10 05/08 (Guest OS) 1. gftp 소스다운로드 gftp 소스는 사이트에서다운로드받았다. l 다운로드파일 : gftp rc1.tar.gz l 다운로드디렉토리 : /test # pwd /test # ls -l -rw-r--r-- 1 root root 2.0M Nov 28 01:21 gftp rc1.tar.gz
250 2. gftp 소스컴파일 gftp 소스를받았다면 /test 디렉토리에서압축을해제한다. 그리고 gftp 컴파일과정 (configure, make, make install) 을수행하면된다. 2.1 gftp 소스파일압축해제 gftp 소스파일이 tar.gz 포맷을가지고있는파일이므로 gzcat 명령어에 tar 명령어를연결하여압축을해제하면된다. # gzcat gftp rc1.tar.gz tar xvf - x gftp rc1, 0 bytes, 0 tape blocks x gftp rc1/po, 0 bytes, 0 tape blocks x gftp rc1/po/zh_cn.po, bytes, 149 tape blocks x gftp rc1/po/en_ca.gmo, bytes, 105 tape blocks x gftp rc1/po/makevars, 1065 bytes, 3 tape blocks x gftp rc1/po/zh_tw.po, bytes, 150 tape blocks x gftp rc1/po/pt_br.gmo, bytes, 111 tape blocks x gftp rc1/po/sr@latn.gmo, bytes, 104 tape blocks x gftp rc1/po/en_gb.gmo, bytes, 104 tape blocks x gftp rc1/po/am.po, bytes, 112 tape blocks x gftp rc1/po/be.po, bytes, 127 tape blocks x gftp rc1/po/bg.po, bytes, 174 tape blocks x gftp rc1/po/ar.po, bytes, 163 tape blocks x gftp rc1/po/ca.po, bytes, 152 tape blocks... ( 중략 )... 현재디렉토리에 gftp rc1 디렉토리가생성되면, 그디렉토리안으로이동하여소스컴파일을진행한다. # ls gftp rc1/ gftp rc1.tar.gz # cd gftp rc1 # ls ABOUT-NLS Makefile.in aclocal.m4 debian/ lib/ AUTHORS NEWS config.guess* depcomp* missing* COPYING README config.h.in docs/ mkinstalldirs* ChangeLog README.html config.rpath* gftp.spec po/ ChangeLog-old THANKS config.sub* gftp.spec.in src/ INSTALL TODO configure* install-sh* Makefile.am acinclude.m4 configure.in intl/ 2.2 configure 실행 gftp rc1 디렉토리안에 INSTALL 파일을참고하여소스컴파일과정을진행한다. 소스컴파일된프로그램의위치는 /packages 디렉토리로정했다. configure 실행시 --prefix 옵션을통해서타켓디렉토리를 /packages 로정한다. # mkdir /packages #./configure --prefix=/packages checking for a BSD-compatible install..../install-sh -c checking whether build environment is sane... yes checking for gawk... no checking for mawk... no checking for nawk... nawk checking whether make sets $(MAKE)... yes checking build system type... i386-pc-solaris2.10 checking host system type... i386-pc-solaris2.10 checking for gcc... gcc checking for C compiler default output file name... a.out checking whether the C compiler works... yes checking whether we are cross compiling... no checking for suffix of executables... checking for suffix of object files... o
251 checking whether we are using the GNU C compiler... yes checking whether gcc accepts -g... yes checking for gcc option to accept ANSI C... none needed checking for style of include used by make... GNU checking dependency style of gcc... gcc3... ( 중략 )... configure: creating./config.status config.status: creating Makefile config.status: creating docs/makefile config.status: creating docs/sample.gftp/makefile config.status: creating lib/makefile config.status: creating src/gftp config.status: creating src/makefile config.status: creating src/uicommon/makefile config.status: creating src/gtk/makefile config.status: creating src/text/makefile config.status: creating gftp.spec config.status: creating intl/makefile config.status: creating po/makefile.in config.status: creating config.h config.status: executing depfiles commands config.status: executing default-1 commands config.status: creating po/potfiles config.status: creating po/makefile -> configure 과정이정상적으로실행되었는지확인한다. 2.3 make 실행 make 실행하고에러가없는지확인한다. # make make all-recursive Making all in intl sed -e 's,@''have_posix_printf''@,1,g' \ -e 's,@''have_asprintf''@,0,g' \ -e 's,@''have_snprintf''@,1,g' \ -e 's,@''have_wprintf''@,0,g' \ <./libgnuintl.h.in > libgnuintl.h gcc -c -DLOCALEDIR=\"/packages/share/locale\" -DLOCALE_ALIAS_PATH=\"/packages/share/locale\" -DLIBDIR=\"/packages/lib\" -DIN_LIBINTL -DENABLE_RELOCATABLE=1 -DIN_LIBRARY -DINSTALLDIR=\"/packages/lib\" -DNO_XMALLOC -Dset_relocation_prefix=libintl_set_relocation_prefix -Drelocate=libintl_relocate -DDEPENDS_ON_LIBICONV=1 -DHAVE_CONFIG_H -I. -I. -I.. -g -O2 bindtextdom.c gcc -c -DLOCALEDIR=\"/packages/share/locale\" -DLOCALE_ALIAS_PATH=\"/packages/share/locale\" -DLIBDIR=\"/packages/lib\" -DIN_LIBINTL -DENABLE_RELOCATABLE=1 -DIN_LIBRARY -DINSTALLDIR=\"/packages/lib\" -DNO_XMALLOC -Dset_relocation_prefix=libintl_set_relocation_prefix -Drelocate=libintl_relocate -DDEPENDS_ON_LIBICONV=1 -DHAVE_CONFIG_H -I. -I. -I.. -g -O2 dcgettext.c... ( 중략 )... if gcc -DHAVE_CONFIG_H -I. -I. -I../.. -I/usr/include/gtk-2.0 -I/usr/lib/gtk-2.0/include -I/usr/include/atk-1.0 -I/usr/include/pango-1.0 -I/usr/openwin/include -I/usr/sfw/include -I/usr/sfw/include/freetype2 -I/usr/include/glib-2.0 -I/usr/lib/glib-2.0/include -D_REENTRANT -I../../intl -g -O2 -MT view_dialog.o -MD -MP -MF ".deps/view_dialog.tpo" \ -c -o view_dialog.o `test -f 'view_dialog.c' echo './'`view_dialog.c; \ then mv -f ".deps/view_dialog.tpo" ".deps/view_dialog.po"; \ else rm -f ".deps/view_dialog.tpo"; exit 1; \ fi gcc -g -O2 -o gftp-gtk bookmarks.o chmod_dialog.o delete_dialog.o dnd.o gftp-gtk.o gtkui.o gtkui_transfer.o menu-items.o misc-gtk.o options_dialog.o transfer.o view_dialog.o../../lib/libgftp.a../uicommon/libgftpui.a -lgtk-x lgdk-x latk-1.0 -lgdk_pixbuf-2.0 -lm -lmlib -lpangoxft-1.0 -lpangox-1.0 -lpango-1.0 -lgobject-2.0 -lgmodule-2.0 -lglib-2.0 -lpthread -lsocket -lnsl -lm -lgthread-2.0 -lcrypto -lssl../../intl/libintl.a -liconv
252 2.4 make install 실행 make install 실행하고에러가없는지확인한다. 이전과정인 make 과정까지잘진행이되었다면 make install 과정은정상적으로진행이될것이다. # make install Making install in intl if { test "gftp" = "gettext-runtime" test "gftp" = "gettext-tools"; } \ && test 'yes' = yes; then \ /bin/sh.././mkinstalldirs /packages/lib /packages/include; \.././install-sh -c -m 644 libintl.h /packages/include/libintl.h; --mode=install \.././install-sh -c -m 644 libintl.a /packages/lib/libintl.a; \ if test "@RELOCATABLE@" = yes; then \ dependencies=`sed -n -e 's,^dependency_libs=\(.*\),\1,p' < /packages/lib/libintl.la sed -e "s,^',," -e "s,'\$,,"`; \ if test -n "$dependencies"; then \ rm -f /packages/lib/libintl.la; \ fi; \ fi; \ else \ : ; \ fi... ( 중략 )... Making install in src Making install in uicommon Making install in text /bin/bash../../mkinstalldirs /packages/bin mkdir -p -- /packages/bin../.././install-sh -c gftp-text /packages/bin/gftp-text Making install in gtk /bin/bash../../mkinstalldirs /packages/bin../.././install-sh -c gftp-gtk /packages/bin/gftp-gtk /bin/bash../mkinstalldirs /packages/bin.././install-sh -c gftp /packages/bin/gftp make install 실행을통해서 /packages 디렉토리로설치프로그램이동이되고, 구성되었는지확인한다. 만약정상적으로수행이되었다면아래와같은디렉토리구조를갖게될것이다. APM(Apache + PHP + MySQL) 처럼여러개의소스프로그램을컴파일할때의구조도같다고보면된다. 그때는 Apache, PHP, MySQL 이컴파일된최상위디렉토리에서작업하면된다. # cd /packages # ls bin/ lib/ man/ share/
253 3. gftp 패키징 (Packaging) /packages 디렉토리에서작업을해야하며, pkginfo 파일과 prototype 파일을생성하고, pkgmk 명령어수행하여야한다. 3.1 pkginfo 파일생성 pkginfo 파일을 /packages 디렉토리에생성한다. 이파일은패키지를만드는관리자에의해직접생성이되어야한다. # vi pkginfo PKG="BSCgftp" /* 패키지이름 */ NAME="gftp Packaging Test" /* 패키지에대한간단한설명 */ ARCH="i386" /* 패키지아키텍쳐 */ VERSION="1.0" /* 패키지버전 */ BASEDIR="/usr/local" /* 패키지설치기본디렉토리 */ CATEGORY="application" /* 패키지카테고리 */ VENDOR="BSC" /* 패키지제작벤더정보 */ CLASSES="none" /* 패키지클래스정보 */ HOTLINE="Your contact info" /* 패키지핫라인 */ 3.2 prototype 파일생성 아래예제와같이 prototype 파일을생성한다. # echo i pkginfo > prototype # pkgproto -c none.=. egrep -v "prototype=prototype pkginfo=pkginfo" >> prototype # cat prototype i pkginfo d none lib 0755 root root f none lib/charset.alias=lib/charset.alias 0644 root root d none share 0755 root root d none share/locale 0755 root root d none share/locale/am 0755 root root d none share/locale/am/lc_messages 0755 root root f none share/locale/am/lc_messages/gftp.mo=share/locale/am/lc_messages/gftp.mo 0644 root root d none share/locale/az 0755 root root d none share/locale/az/lc_messages 0755 root root f none share/locale/az/lc_messages/gftp.mo=share/locale/az/lc_messages/gftp.mo 0644 root root d none share/locale/ar 0755 root root... ( 중략 ) pkgmk 명령어실행 pkgmk 명령어를통해 Filesystem Format 형식의패키지를생성한다. # pkgmk -d. ## Building pkgmap from package prototype file. ## Processing pkginfo file. WARNING: parameter <PSTAMP> set to "solaris " ## Attempting to volumize 177 entries in pkgmap. part blocks, 650 entries ## Packaging one part. /packages/bscgftp/pkgmap /packages/bscgftp/pkginfo /packages/bscgftp/reloc/bin/gftp /packages/bscgftp/reloc/bin/gftp-gtk /packages/bscgftp/reloc/bin/gftp-text /packages/bscgftp/reloc/lib/charset.alias /packages/bscgftp/reloc/man/man1/gftp.1 /packages/bscgftp/reloc/share/applications/gftp.desktop /packages/bscgftp/reloc/share/gftp/copying
254 /packages/bscgftp/reloc/share/gftp/bookmarks /packages/bscgftp/reloc/share/gftp/connect.xpm /packages/bscgftp/reloc/share/gftp/deb.xpm /packages/bscgftp/reloc/share/gftp/diff.xpm... ( 중략 )... /packages/bscgftp/reloc/share/locale/uk/lc_messages/gftp.mo /packages/bscgftp/reloc/share/locale/zh_cn/lc_messages/gftp.mo /packages/bscgftp/reloc/share/locale/zh_tw/lc_messages/gftp.mo /packages/bscgftp/reloc/share/pixmaps/gftp.png ## Validating control scripts. ## Packaging complete. # ls BSCgftp/ bin/ lib/ man/ pkginfo prototype share/ # cd BSCgftp # ls pkginfo pkgmap reloc/ 3.4 패키지설치및확인 만들어진파일시스템포맷 (Filesystem Format) 의 gftp 패키지를설치하고확인한다. # ls BSCgftp/ bin/ lib/ man/ pkginfo prototype share/ # pkgadd -d. BSCgftp Processing package instance <BSCgftp> from </packages> gftp Packaging Test(i386) 1.0 BSC Using </usr/local> as the package base directory. ## Processing package information. ## Processing system information. 28 package pathnames are already properly installed. ## Verifying disk space requirements. ## Checking for conflicts with packages already installed. ## Checking for setuid/setgid programs. Installing gftp Packaging Test as <BSCgftp> ## Installing part 1 of 1. /usr/local/bin/gftp /usr/local/bin/gftp-gtk /usr/local/bin/gftp-text /usr/local/lib/charset.alias /usr/local/man/man1/gftp.1 /usr/local/share/applications/gftp.desktop /usr/local/share/gftp/copying /usr/local/share/gftp/bookmarks /usr/local/share/gftp/connect.xpm... ( 중략 )... /usr/local/share/locale/th/lc_messages/gftp.mo /usr/local/share/locale/tr/lc_messages/gftp.mo /usr/local/share/locale/uk/lc_messages/gftp.mo /usr/local/share/locale/zh_cn/lc_messages/gftp.mo /usr/local/share/locale/zh_tw/lc_messages/gftp.mo /usr/local/share/pixmaps/gftp.png [ verifying class <none> ] Installation of <BSCgftp> was successful. # pkginfo grep BSC application BSCgftp gftp Packaging Test
255 4. Filesystem 포맷을 Data Stream 포맷으로변경 썬에서제공하는패키지의형식은파일시스템포맷 (Filesystem Format) 과데이터스트림포맷 (Data Stream Format) 이존재한다. 필요에따라서서로변환이가능하다. -> 이부분에관해서는 " 백승찬님의 Solaris Admin Guide 1, 패키지관리 " 부분을참고하기바란다. 5. 패키징스크립트 위의과정을자동으로수행할수있는스크립트를참고로붙인다. # cat mkpkg.sh #******* mkpkg.sh ************* # mkpkg.sh - ksh script for # making simple packages #****************************** #!/bin/ksh pkg="`pwd sed '{ s/.*\/// s/-.*// }'`" echo Package [$pkg]:"\c" read s [ -n "$s" ] && pkg="$s" name="$pkg" echo Package name [$name]:"\c" read s [ -n "$s" ] && name="$s" arch="sparc" echo Architecture [$arch]:"\c" read s [ -n "$s" ] && arch="$s" version="`pwd sed '{ s/.*\/// s/.*-// }'`" echo Version [$version]:"\c" read s [ -n "$s" ] && version="$s" basedir="/usr/local" echo Base directory [$basedir]:"\c" read s [ -n "$s" ] && basedir="$s" category="application" echo Category [$category]:"\c" read s [ -n "$s" ] && category="$s" vendor="your company" echo Vendor [$vendor]:"\c" read s [ -n "$s" ] && vendor="$s" classes="none" echo Classes [$classes]:"\c" read s [ -n "$s" ] && classes="$s" hotline="your contact info" echo Hotline [$hotline]:"\c" read s [ -n "$s" ] && hotline="$s" ( echo PKG="${pkg}"
256 echo NAME="${name}" echo ARCH="${arch}" echo VERSION="${version}" echo BASEDIR="${basedir}" echo CATEGORY="${category}" echo VENDOR="${vendor}" echo CLASSES="${classes}" echo HOTLINE="${hotline}" ) > pkginfo ( ID=`/usr/bin/id awk -F\( '{print $2}' awk -F\) '{print $1}'` GID=`/usr/bin/id awk -F\( '{print $3}' awk -F\) '{print $1}'` echo i pkginfo pkgproto -c none.=. sed "{ s/$id/root/g s/$gid/other/g }" egrep -v "prototype=prototype pkginfo=pkginfo" ) > prototype pkgmk -d. 6. 참고 패키지에관련한명령어와파일에대해서는다음매뉴얼을참고한다. pkginfo 파일에대한매뉴얼 man -s 4 -M /usr/share/man pkginfo prototype 파일에대한매뉴얼 pkgproto 명령어에대한매뉴얼 pkgmk 명령어에대한매뉴얼 man -s 4 -M /usr/share/man prototype man -s 1 -M /usr/share/man pkgproto man -s 1 -M /usr/share/man pkgmk
257 Solaris 10 Admin I Guide 6. Patch Administration l l l l l Patch Overview l Patch Mean? Solaris OE Patches Type Patch Documents and Files Patch CMD(s) l showrev -p, patchadd -p l patchadd l patchrm Patch Installation l l Standard Patch Installation Recommended Patch Installation 패치개요 솔라리스시스템에패치를관리하는방법은여러가지가존재한다. (a)cli 기반의명령어를사용하는경우가있고 (b)gui 기반의명령어를사용하는경우도있다. 전자의경우는 pkgadd, pkgrm 명령어를사용하는방식을말한다. 후자의경우는 SMC 툴과같은 GUI 툴을사용하여관리하는방식을말한다. 솔라리스 10 버전부터는쉽게패치를설치할수있도록여러가지툴을제공하고있다.(Patch Manager). 썬의패치다운로드공식사이트는 ftp://sunsolve.sun.com 이다. ( 현재 -> Support -> Patch) (1). 패치란? === Apache Patch ===== ===== Apache Program ==== ==== BACKUP Area ===== httpd (80) /var/sadm/pkg/ httpd.conf SUNWxxx/patchid/save/undo.Z Manual(Docs) Library(Modules) ====================== ========================== ====================== [ 그림 ] 패치과정
258 솔라리스패치의종류 The Solaris OE patch types include: l Standard patches l Recommended patches l Patch clusters(standard+recommended+security) l Firmware and PROM patches 썬솔라리스의패치를다음과같이구분한다. - 개별패치 (Standard Patch) - 패치의모음 (Recommended Patch) [ 참고 ] 개별패치이름 (Standard Patch Naming Convention) zip / jar 필드설명 패치의종류 ( 자세한내용 : README, Patch Report) 01 릴리즈 (Release).zip ZIP 포맷파일 [ 참고 ] Solaris OE Patch Type l Standard patches? Patches that fix specific problems with the Solaris OE and other Sun hardware and software products. l l l Recommended patches? Solaris OS patches that fix problems that might occur on a large percentage of systems. These include recommended security patches. Patch clusters? A group of standard, recommended, security, or Y2K patches that have been bundled into a single archive for easy downloading and installation. Firmware and PROM patches 패치관련문서 / 파일 패치를받기전에패치에관련한문서를자세하게살펴봐야한다. l 각개별패치의 README File ( zip : README) l Solaris9.PatchReport File (10_Recommended.zip : Solaris10.PatchReport) l 9_Recommended.README File (10_Recommended.zip : 10_Recommended.README) [ 참고 ] Security T-Patch
259 패치관련명령어 패치관련명령어 showrev -p, patchadd -p patchadd CMD patchrm CMD 설치된패치정보확인패치설치하는명령어패치삭제하는명령어 (1). 패치확인 (Checking Patch Levels) showrev CMD NAME showrev - show machine, software revision, and patch revision information DESCRIPTION showrev displays revision information for the current hardware and software. With no arguments, showrev shows the system revision information including hostname, hostid, release, kernel architecture, application architecture, hardware provider, domain, and kernel version. If a command is supplied with the -c option, showrev shows the PATH and LD_LIBRARY_PATH and finds out all the directories within the PATH that contain it. For each file found, its file type, revision, permissions, library information, and checksum are printed as well. OPTIONS The following options are supported: -a Print all system revision information available. Window system and patch information are added. -p Print only the revision information about patches. ( 명령어형식 ) # showrev -p ( 솔라리스 7 이하버전 # patchadd -p ( 솔라리스 8 이상버전 ) 일반적으로스팍플랫폼패치번호다음번째번호가인텔플랫폼패치번호이다. (sparc)# patchadd -p grep (intel)# patchadd -p grep ( 출력내용해석 ) # patchadd -p more Patch: Obsoletes: Requires: Incompatibles: Packages: SUNWcsu SUNWcsl SUNWckr SUNWfmd SUNWhea SUNWarc... ( 중략 )... Patch: Obsoletes: Requires: Incompatibles: Packages: SUNWcsu SUNWcsr... ( 중략 ) 필드설명 Patch: 패치아이디 Obsoletes: 사용할수없는패치 Requires: 선수패치 Incompatibles: 같이설치할수없는패치 Packages: SUNWcsu 이런패키지의패치
260 [ 참고 ] 설치된패치를확인하는방법 patchadd -p & /var/sadm/patch l patchadd -p 솔라리스 10 버전출시후의누적패치를확인할수있다. l /var/sadm/patch 솔라리스 10 운영체제설치후에새로설치된패치를확인할수있다. [ 참고 ] Solaris 10 버전종류 ( 업데이트버전 ) => "# cat /etc/release" Solaris 10 08/11 (u10: Update 10 Version) Solaris 10 09/10 (u9 : Update 9 Version) Solaris 10 10/09 (u8 : Update 8 Version) Solaris 10 05/09 (u7 : Update 7 Version) Solaris 10 10/08 (u6 : Update 6 Version) Solaris 10 05/08 (u5 : Update 5 Version) Solaris 10 08/07 (u4 : Update 4 Version) Solaris 10 11/06 (u3 : Update 3 Version) Solaris 10 06/06 (u2 : Update 2 Version) Solaris 10 01/06 (u1 : Update 1 Version) Solaris 10 03/05 # patchadd -p grep Patch: Obsoletes: Requires: Incompatibles: Packages: SUNWpapi SUNWpcu SUNWppm SUNWpsu SUNWpsm-lpd -> 패치내용확인 ( 솔라리스 버전출시이후에누적패치확인 ) # ls /var/sadm/patch # -> 내용없음 ( 솔라리스 10 설치한이후에새로설치된패치는아직없음 )
261 (2). 패치설치및삭제 (Installing and Removing Patches) patchadd CMD patchrm CMD 패치추가명령어패치삭제명령어 (2.1) patchadd CMD NAME patchadd - apply a patch package to a system running the Solaris operating system DESCRIPTION patchadd applies a patch package to a system running the Solaris 2.x operating environment or later Solaris environments (such as Solaris 10) that are compatible with Solaris 2.x. This patch installation utility cannot be used to apply Solaris 1 patches. patchadd must be run as root. OPTIONS The following options are supported: -d Does not back up the files to be patched. The patch cannot be removed. -p In the second form, displays a list of the patches currently applied. ( 명령어형식 ) # patchadd ( 주의 ) patchadd -d 패치를설치할때패치의백업을받지않을수있다. 이경우에는패치설치로디스크공간이부족하게되면백업되는공간을줄이기위해서 -d 옵션을사용할수있다. 하지만 -d 옵션을사용하는것을권장하지않는다. 이경우나중에패치를삭제할수없기때문이다
262 [EX] patchadd 명령어실습 l Solaris 10 x86 (05/08) : zip 파일로실습 (xscreensaver 패치 ) l Solaris 10 x86 (10/08) : zip 파일로실습 (cron 패치 ) l Solaris 10 SPARC (05/09) : zip 파일로실습 (lp 패치 ) l Solaris 10 SPARC (10/09) : zip 파일로실습 (xcreensaver 패치 ) l Solaris 10 x86 (10/09) : zip 파일로실습 (patch behavior patch 패치 ) l Solaris 10 x86 (09/10) : zip 파일로실습 (sh patch 패치 ) 1 서버에서패치파일다운로드및확인 # rsh ls /root/patch/standard_patch # rcp :/root/patch/Standard_Patch/ zip /test # cd /test ; ls 2 패치압축해제 # unzip zip -> " " 디렉토리생성 3 패치설치및확인 # patchadd /* 설치되는데약 5 초 ~ 30 초정도걸린다. */ Validating patches... Loading patches installed on the system... Done! Loading patches requested to install. Done! Checking patches that you specified for installation. Done! Approved patches will be installed in this order: Checking installed patches... Verifying sufficient filesystem capacity (dry run method)... Installing patch packages... Patch has been successfully installed. <----- 메세지확인 See /var/sadm/patch/ /log for details Patch packages installed: SUNWippcore SUNWpapi SUNWpcu SUNWppm SUNWpsm-ipp SUNWpsm-lpd SUNWpsu -> 설치되는데약 5초 ~ 30초정도걸린다. # patchadd -p grep Patch: Obsoletes: Requires: Incompatibles: Packages: SUNWpapi SUNWpcu SUNWppm SUNWpsu SUNWpsm-lpd Patch: Obsoletes: Requires: Incompatibles: Packages: SUNWpapi SUNWippcore SUNWpcu SUNWppm SUNWpsu SUNWpsm-ipp SUNWpsm-lpd -> 새로설치된 패치에대한정보가보인다 : 미리설치되어져있던패치 : 새로설치된패치
263 # ls /var/sadm/patch / 운영체제설치이후에최초로설치된패치 ( 예 : ) 이다. 4 설치된패치를다시설치하는경우 # patchadd /* 설치된패치를다시설치하는경우 */ Validating patches... Loading patches installed on the system... Done! Loading patches requested to install. Done! The following requested patches are already installed on the system Requested patch is already installed on the system. <----- 메세지확인 No patches to dependency check. -> 설치된패치를또설치하게되면설치되지않는다
264 (2.2) patchrm CMD NAME patchrm - remove a Solaris patch package and restore previously saved files DESCRIPTION patchrm removes a patch package and restores previously saved files to a system running the Solaris 2.x operating environment or later Solaris environments (such as Solaris 8) that are compatible with Solaris 2.x. patchrm cannot be used with Solaris 1 patches. patchrm must be run as root. ( 명령어형식 ) # patchrm [EX] patchrm 명령어실습 l Solaris 10 x86 (05/08) : zip 파일로실습 (xscreensaver 패치 ) l Solaris 10 x86 (10/08) : zip 파일로실습 (cron 패치 ) l Solaris 10 SPARC (05/09) : zip 파일로실습 (lp 패치 ) l Solaris 10 SPARC (10/09) : zip 파일로실습 (xcreensaver 패치 ) l Solaris 10 x86 (10/09) : zip 파일로실습 (patch behavior patch 패치 ) l Solaris 10 x86 (09/10) : zip 파일로실습 (sh patch 패치 ) 1 설치된패치확인 # patchadd -p grep Patch: Obsoletes: Requires: Incompatibles: Packages: SUNWpapi SUNWpcu SUNWppm SUNWpsu SUNWpsm-lpd Patch: Obsoletes: Requires: Incompatibles: Packages: SUNWpapi SUNWippcore SUNWpcu SUNWppm SUNWpsu SUNWpsm-ipp SUNWpsm-lpd 2 패치삭제 # patchrm /* 삭제되는데약 5 초 ~ 30 초정도걸린다. */ Loading patches installed on the system... Done! Checking patches that you specified for removal. Done! Approved patches will be removed in this order: Checking installed patches... Backing out patch Patch has been backed out. -> "Backing out patch" : 패치설치전상태로돌림. # patchadd -p grep <----- 메세지확인 Patch: Obsoletes: Requires: Incompatibles: Packages: SUNWpapi SUNWpcu SUNWppm SUNWpsu SUNWpsm-lpd -> 패치가목록에서사라졌다. # ls /var/sadm/patch # -> 목록이없다
265 패치추가 / 삭제실습 패치추가 / 삭제실습 l Standard Patch Installation l Recommended Patch Installation (1). Standard Patch Installation 패치설치과정 l sunsolve 사이트 ( 에서 Patch Report에서적당한패치선택 => ( -> support -> patch => [ 참고 ] -> " 자유게시판 " -> 591번자료 l 솔라리스시스템에선택한패치가설치되어있는지확인 l 설치되어있지않다면, 패치다운로드 l 솔라리스시스템에패치설치 패치를받았다면다음과같이압축을해제하고설치가가능하다. # ls zip # unzip zip # ls # patchadd
![[ 참조 ] 패치설치문서참조 http://cafe.daum.](/docs-images/104/164712495/images/266-0.jpg "net/bscsolaris -> \" 솔라리스강좌 ( 관리자 )\" 게시판 -> 95, 96 번자료")
![http://sunsolve.sun.com => [ 참고 ] http://cafe.daum.](/docs-images/104/164712495/images/266-1.jpg "net/bscsolaris -> \" 자유게시판 \" -> 591 번자료 1 http://suns")
266 [ 참조 ] 패치설치문서참조 -> " 솔라리스강좌 ( 관리자 )" 게시판 -> 95, 96 번자료 => [ 참고 ] -> " 자유게시판 " -> 591 번자료 1 사이트에접속후 "Accept" 선택 2 sunsolve 페이지의오른쪽상단 "login" 선택


267 3 Resister Now" 선택 l sunsolve 사이트에서패치를받기위해서는 ID/PASS 가존재해야한다. l 한번은가입을해야한다. 이 ID/PASS 는 sun 의모든사이트에서사용이가능하다. l 만약, 이전에솔라리스를설치하기위해서 Solaris 10 CD 를받을당시의 ID/PASS 를만들었다면, 그 ID/PASS 를사용해도된다. 4 필요한정보를입력 l 빨강색의별표 (*) 로표신된정보는반드시입력해야하는것이다

268 5 "join" 선택후 submit" 선택 6 온라인사용자생성중 l 온라인사용자를생성하는데약간의시간이흐른다

269 7 로그인확인및 "Patch Finder" 선택 8 "10_x86_patch_report" 선책후 View Patch Report" 선택
 l ( 예 ) Solaris 10 x86 10/08 <Ctrl + F> -> cron -> 138224-03 복사 11 운영체제에패치설치된유무확인 운영체제에패치가설치되어있는지확인한다.")
270 9 Patch Report 확인 10 설치할패치검색 l Solaris 10 x86 (05/08) : zip 파일로실습 (xscreensaver 패치 ) l Solaris 10 x86 (10/08) : zip 파일로실습 (cron 패치 ) l ( 예 ) Solaris 10 x86 10/08 <Ctrl + F> -> cron -> 복사 11 운영체제에패치설치된유무확인 운영체제에패치가설치되어있는지확인한다. # patchadd -p grep

271 12 패치찾기 l Solaris 10 (05/08) => l Solaris 10 (10/08) => 패치정보확인 1 l Documentation ID: l Title: cron Patch l Update Date: 시간


272 14 패치확인정보 2 l Keywords l Summary l Solaris Release 15 패치정보확인 3 l Files included in this Patch


273 16 패치다운로드선택, HTTP 선택 17 패치파일다운로드유무선택 18 패치다운로드폴더선택
274 19 솔라리스서버에패치설치 패치를유닉스서버에올리고설치한다. Window Server -> Solaris Server(/test) (AlFTP Program) (At Solaris Server) # ls zip # unzip zip # patchadd # patchadd -p grep
275 (2). Recommended Patch Installation Installing Patch Clusters(Recommended Patch) The patch cluster provides a selected set of patches for a designated. Solaris OE level and is conveniently wrapped for one-step installation. Patch clusters are usually a set of recommended, security, or Y2K patches. You should not install cluster patches on systems with limited disk space. Sun does not recommend installing cluster patches on systems with less than 10 Mbytes of available space in the /(root), /usr, /var, or /opt partitions. By default, the cluster installation procedure saves the base objects being patched. Prior to installing the patches, the cluster installation script first determines if enough system disk space is available in the /var/sadm/pkg directory to save the base packages and terminates if not enough space is available. You can override the save feature by using the -nosave option when you are executing the cluster installation script. If you use the -nosave option, you will not be able to back out individual patches if the need arises. You can remove individual patches that were installed by the patch cluster by using the patchrm command. The README file is located in the specific patch directory under the /var/sadm/patch directory after the patch has been installed. Download File Name: 10_Recommeded.zip (10_x86Recommended.zip) # cd <patch_cluster_directory> #./install_cluster -> install_cluster 스크립트가알아서설치를해준다. -> "Error Return Code #" 표시가나오면아래표참고 Solaris Patch Error Codes(Solaris 10) 0 No error. 1 Usage error. 2 An attempt to apply a patch that has already been applied. 3 The effective user ID(EUID) is not root. 4 An attempt to save orignal files failed. 5 The pkgadd command failed. 6 The patch is obsolete. 7 An invalid package directory. 8 An attempt to patch a package that is not installed. 9 Cannot access /usr/sbin/pkgadd(client problem). 10 Package validation error. 11 An error occurred while adding a patch to the root template. 12 The patch script terminated due to a signal. 13 A symbolic link was included in the patch. 14 Not used. 15 The prepatch script had a return code other than The postpatch script had a return code other than A mismatch of the -d option occurred between a previous patch installation and the current one. 18 There is not enough space in the filesystems that are targets of the patch. 19 The $SOFTINFO/INST_RELEASE file was not found. 20 A direct instance patch was required but was not found. 21 The progressive patches have not been installed on the manager. 22 A progressive instance patch was required but was not found. 23 A restricted patch is already applied to the packages. 24 A incompatible patch was applied. 25 A required patch was not applied 26 The user-specified backout data cannot be found. 27 The relative directory supplied cannot be found. 28 A pkginfo file is corrupt or missing. 29 Bad patch ID format. 30 Dry run failures occurred. 31 The patch given for the -C option was invalid. 32 You must be running the Solaris 2.6 or greater. 33 Bad formatted patch file or patch file not found. 34 The apporopriate kernel jumbo patch needs to be installed
276 1 Recommended Patch 다운로드 # ls ( 주의 ) 용량 ( 다운로드파일용량, 압축해제된디렉토리용량, 설치될용량 ) # df -h F ufs /dev/dsk/c1t1d0s7 19G 20M 19G 1% /logs # cd /logs # ftp root 사용자로로그인 ftp> cd /root/patch ftp> dir ftp> cd Recommended_Patch ftp> dir ftp> cd 2011_0728 ftp> dir ftp> lcd /logs ftp> bin ftp> hash ftp> prompt ftp> mget * ftp>!ls l ftp> quit 10_x86_Recommended.zip 2 Recommended Patch 압축해제 # unzip 10_x86_Recommended.zip -> [ 실무예 ] # timex unzip q 10_x86_Recommended.zip -> [ 실무예 ] # nice -n 10 unizp -q 10_x86_Recommended.zip -> 압축이해제되고, 디렉토리가생성된다. -> 많은시간이걸린다. [ 참고 ] unzip 명령어의 -q 옵션 # man unzip -q perform operations quietly (-qq = even quieter). Ordinarily unzip prints the names of the files it's extracting or testing, the extraction methods, any file or zipfile comments that may be stored in the archive, and possibly a summary when finished with each archive. The -q[q] options suppress the printing of some or all of these messages
277 3 Recommended Patch 설치 # cd 10_x86_Recommended # ls 10_x86_Recommended.README Copyright installcluster@ patch_order patchset.conf 10_x86_Recommended.html LEGAL_LICENSE.TXT installpatchset* patches/ #./installcluster Correct passcode not confirmed. usage: installcluster [-d] [-h] [-R alt-root-path -B alt-boot-env] [--apply-prereq] --<passcode> [-d] [-h] [-B alt-boot-env] [-R alt-root-path] [--apply-prereq] --<passcode> - don't save undo packages - display this usage message - specify LU boot environment as target - specify alternate root as target - apply prerequisite patches only - passcode required for script execution This script will only execute when a specific passcode is provided as a command line option. For further instructions regarding installation of this patch set, please review the 10_x86_Recommended.README file. -> 사용방법확인, 자세한내용은 README 파일을참고한다. Setup. ( 주의 ) 만약 swap 공간이부족하면늘려야 installcluster 실행된다. # mkfile 2g /logs/swapfile # swap a /logs/swapfile # swap -l #./installpatchset --s10patchset (#./installcluster --s10patchset) Recommended OS Cluster Solaris 10 x86 ( ) The patch set will complete installation in this session. No intermediate reboots are required. Application of patches started : :33:55 Applying ( 1 of 212)... skipped Applying ( 2 of 212)... skipped Applying ( 3 of 212)... success Applying ( 4 of 212)... skipped Applying ( 5 of 212)... skipped Applying ( 6 of 212)... skipped Applying ( 7 of 212)... skipped Applying ( 8 of 212)... skipped... ( 중략 )... Applying (205 of 212)... success Applying (206 of 212)... success Applying (207 of 212)... success Applying (208 of 212)... success Applying (209 of 212)... success Applying (210 of 212)... success Applying (211 of 212)... success Applying (212 of 212)... success Application of patches finished : :02:51 Following patches were applied :
278 Following patches were skipped : Patches already applied ( 중략 ) Patches obsoleted by one or more patches already applied Patches not applicable to packages on the system Installation of patch set complete. PLEASE REBOOT THE SYSTEM. Install log files written : /var/sadm/install_data/s10x_rec_cluster_short_ _ log /var/sadm/install_data/s10x_rec_cluster_verbose_ _ log -> 설치되는데오랜시간이걸린다. 4 시스템 shutdown # init 6 -> ( 주의 ) Recommended Patch 가설치되면반드시재부팅한다. -> reboot 시킬때 init, shutdown 명령어를사용한다. 5 설치된패치확인 # ls /var/sadm/patch / / / / / / / / / / / / / / / / / / / / / / / / / / / / / / / / / / / / / / / / / / / / / / / -> 새로설치된패치목록을확인한다. # uname a (Recommended Patch 설치전 ) SunOS solarisxxx 5.10 Generic_ i86pc i386 i86pc (Recommended Patch 설치후 ) SunOS solarisxxx 5.10 Generic_ i86pc i386 i86pc
279 [ 참고 ] patchadd -p & showrev -p "showrev -p" 명령어보다 "patchadd -p" 명령어사용할것을권장한다. 이유는 "patchadd -p" 명령어가더자세하게정보를출력하기때문이다. (The patchadd command takes longer to display patch information.) [ 참고 ] /var/sadm/patch 디렉토리 Historical information about all pathes that are currently installed on a system and that can be uninstalled using the patchrm command is stored in the /var/sadm/patch directory. 솔라리스운영체제설치후에새로설치되는패치를확인할때사용하는디렉토리이다. -> 관리자가최근에설치한패치를확인하고싶다. # ls /var/sadm/patch # ls -altr /var/sadm/patch ( 서버설치후첫번째패치설치화면 ) # ls /var/sadm/patch / ( 서버가운영된후 6 개월이지난후패치설치화면 ) # ls /var/sadm/patch / / / / / / / / / / / / / / / / / / / / / / / / / / / / / / / / / / / / / / / / / /... ( 중략 ) / / / / / / / / / / / / / / / / / / / / / / / / / / / / / / / / / / / / / / / / / / / / /
280 [ 참고 ] /var filesystem space Be sure that the /var filesystem is at least 200MB in size start with. There must be sufficient space for the /var/sadm directory to grow as new software packages and patches are installed on the system. 98M 1.5G 3.5G 예전방식파티션정책 (Solaris 9 버전이하 ) OS (/, /usr, /var, /tmp) + DATA (/oracle, /data) 새로운방식파티션정책 (Solaris 10 버전이상 ) OS (/, /var) + DATA (/oracle, /data) ( 서버설치후, 첫번째패치설치후 /var 용량확인 ) # du -sh /var ( 서버가운영된후 6 개월이지난후, 누적패치설치후 /var 용량확인 ) # du -sh /var ( 서버가운영된후 1 년이지난후, 누적패치설치후 /var 용량확인 ) # du -sh /var
281 [ 참고 ] In case, patch download using the FTP 솔라리스패치 (Standard Patch, Recommended Patch) 를 FTP 로받을때는전송모드를 Binary Mode 로받아야한다. 전송모드 (Transfer Type) solaris 9 >= : binary solaris 8 <= : ASCII(American Standard Code for Information Interchange) [ 참고 ] uncompress & untar tar.Z /* tar.z 포맷 */ tar.gz /* tar.gz 포맷 */ zip /* zip 포맷 */ jar /* jar 포맷 */ ( 형식 ) jar # jar xvf jar ( 형식 ) zip # unzip zip ( 형식 ) tar.Z # zcat tar.Z tar xvf - ( 형식 ) tar.gz # gzcat tar.gz tar xvf
282 [ 참고 ] patch 에관련된파일들 ( 전제조건 ) 최소한한개의 patch 는설치되어야한다. /var/sadm--+-- pkg SUNWxxx pkginfo +-- save undo.z +-- patch README log /var/sadm/pkg/sunwxxx/pkginfo Updated by patch # cd /var/sadm/pkg/sunwxwsvr # cat pkginfo HOTLINE=Please contact your local service provider = MAXINST=1000 SUNW_PKGTYPE=ow SUNW_PKGVERS=1.0 PSTAMP=x10x ARCH=i386 SUNW_PATCHID= PKGINST=SUNWxwsvr PKGSAV=/var/sadm/pkg/SUNWxwsvr/save PATCHLIST= PATCH_INFO_ =Installed: Mon Mar 24 10:20:30 PDT 2008 From: mum Obsoletes: Requi res: Incompatibles: INSTDATE=Oct :59 UPDATE=yes PATCH_PROGRESSIVE=false PATCH_UNCONDITIONAL=false PATCH_NO_UNDO=false PATCH_BUILD_DIR=none PATCH_UNDO_ARCHIVE=none INTERRUPTION=no SQLDB=no PATCH_INFO_ =Installed: Wed Oct 1 01:59:25 KST 2008 From: solaris200 Obsole tes: Requires: Incompatibles: SCRIPTS_DIR=/test/ /SUNWxwsvr/install /var/sadm/pkg/sunwxxx/save/ /undo.z Achive of old files replaced by patch # cd /var/sadm/pkg/sunwxwsvr/save/ # ls undo.z # file undo.z undo.z: compressed data block compressed 16 bits
283 /var/sadm/patch/ /readme # cd /var/sadm/patch/ # ls README log # cat README Patch-ID# NOTE: *********************************************************************** READ THE TERMS OF THE AGREEMENT ("AGREEMENT") IN THE LEGAL_LICENSE.TXT FILE CAREFULLY BEFORE USING THIS SOFTWARE. BY USING THE SOFTWARE, YOU AGREE TO THE TERMS OF THIS AGREEMENT. IF YOU DO NOT AGREE TO ALL OF THE TERMS, PROMPTLY DESTROY THE UNUSED SOFTWARE. *********************************************************************** Keywords: security xscreensaver Synopsis: X _x86: xscreensaver patch Date: Jun/20/2008 Install Requirements: NA Solaris Release: 10_x86 SunOS Release: 5.10_x86 Unbundled Product: X11 Unbundled Release: 6.6.2_x86 Xref: This patch available for SPARC as Topic: Relevant Architectures: i386 BugId's fixed with this patch: Changes incorporated in this version: Patches accumulated and obsoleted by this patch: Patches which conflict with this patch: Patches required with this patch: Obsoleted by: Files included with this patch: /usr/openwin/bin/xscreensaver /usr/openwin/bin/xscreensaver-command /usr/openwin/bin/xscreensaver-demo /usr/openwin/lib/app-defaults/xscreensaver /usr/openwin/lib/xscreensaver/bin/xscreensaver-getimage /usr/openwin/lib/xscreensaver/bin/xscreensaver-lock /usr/openwin/lib/xscreensaver/config/xscreensaver-demo.glade2 Problem Description: JDS session is accessible for a while before xscreensaver lock is displayed on hotdesking (from )
284 TJDS screen is not locked and is waiting for the role password (from ) password dialog window remains on the screen even after screen is unlocked (from ) "Kill daemon" option of xscreensaver application should not work for normal user on TJDS DTU specific issue: [tjds] xscreensaver-demo should always be launched in global zone (from ) desktop sessions go blank within few seconds of logging xscreensaver does not invoke after IDLE time expires from a Sun Ray DTU (from ) On-Screen Keyboard application and desktop shown without unlocking xscreensaver lock screen on TJDS (from ) after applying patch (or greater), xscreensaver coredumps xscreensaver doesn't wake up with mouse movements on TJDS (from ) unable to type in Windows session with full screen mode when hotdesked into same DTU on TJDS (from ) double password request by xscreensaver under certain conditions (from ) [tjds] xscreensaver-demo should always be launched in global zone (from ) at-spi-registryd starts when screen is locked even when accessible device support is off GNOME screen lock does not prevent access to other applications via 'alt-tab' when AT support is enabled, input focus is located at password label hard-coded display number in screensaver with dual/multiple heads env (from ) xscreensaver needs to be modified for Trusted JDS need Trusted logo in xscreensaver lock program (from ) cannot unlock screen with smartcard after installing patch (from ) bugid : Screen Lock unlocks without authentication [Cinnabar Solaris] unable to unlock screen when running dual-head magnification xscreensaver-lock's password timer needs to to be reset for each key (rework) xscreensaver should not enable input method unable to enter passwd for GNOME 2.14 screen saver, "System Error" (from ) NSCM login takes username twice xscreensaver (JDS) hangs while using smartcard if it's idle overnight xscreensaver loops while trying to unlock session for user whose password was
285 expired xscreensaver doesn't audit [nv_12+jds3.1] xscreensaver: 'Can't run hacks if logged in as root!' unlocalized xscreensaver spews 'extension "GLX" missing on display' all over console xscreensaver fails with more than 4 Xinput devices (from ) xscreensaver should not enable input method (from ) Dialognostics should be Diagnostics in the Advanced tab of xscreensaver-demo mouse-over displays incorrect information JDS unlock dialog logo not in line with unified "coolstart" branding increase unlock dialog box timeout to 2 minutes xscreensaver preferences panel shouldn't say "passwdtimeout" (from ) xscreensaver lockscreen translation errors (from ) xscreensaver segfaults when XInputExtension is missing (from ) new image should be included in xscreensaver dialog (from ) LDAP and GNOME xscreensaver authentication failure Patch Installation Instructions: Refer to the man pages for instructions on using 'patchadd' and 'patchrm' scripts provided with Solaris. Any other special or non-generic installation instructions should be described below as special instructions. The following example installs a patch to a standalone machine: example# patchadd /var/spool/patch/ The following example removes a patch from a standalone system: example# patchrm For additional examples please see the appropriate man pages. Special Install Instructions: None. README -- Last modified date: Friday, June 20,
286 /var/sadm/patch/ /log # cd /var/sadm/patch/ # cat log This appears to be an attempt to install the same architecture and version of a package which is already installed. This installation will attempt to overwrite this package. Dryrun complete. No changes were made to the system. This appears to be an attempt to install the same architecture and version of a package which is already installed. This installation will attempt to overwrite this package. Installation of <SUNWxwsvr> was successful. # cd /test # patchrm > 출력내용생략 # patchadd Validating patches... Loading patches installed on the system... Done! Loading patches requested to install. Done! Checking patches that you specified for installation. Done! Approved patches will be installed in this order: Checking installed patches... Verifying sufficient filesystem capacity (dry run method)... Installing patch packages... Patch has been successfully installed. See /var/sadm/patch/ /log for details Patch packages installed: SUNWxwsvr
287 [ 참고 ] 자동패치관리체계 updatemanager 통한패치자동설치 (GUI) smpatch 통한패치자동설치 (CLI) 패치관리정책 > (GUI) # updatemanager & Sun Connection > (CLI) # smpatch [analyze update] (1). Sun Connection # sconadm register -c & -> 실행되는데시간이걸린다.(10 초 ~ 15 초 ) (2). updatemanager 통한패치자동설치 # updatemanager & -> 파워포인트자료참고 -> -> " 솔라리스강좌 ( 관리자 )" 게시판 -> 97 번 ~102 번자료 (3). smpatch 통한패치자동설치 ( 명령어형식 ) # smpatch analyze /* 시스템에설치가능한패치목록확인 */ # smpatch update -L /* 시스템에설치가능한모든패치설치 */ # smpatch update -i /* 몇개의패치를설치 */ # smpatch get -V /* 패치매니저버전확인 */ # smpatch messages -a /* 패치설치시에로그기록확인, 메세지확인 */ [ 실습 ] smpatch 명령어를통한현재서버에패치업데이트 솔라리스 8,9 버전 -> Sun Patch Manager 2.0 설치되어있어야한다. 솔라리스 10 버전 -> Developer Software Group 이상설치시자동설치된다. 현재서버의설치가능한패치확인 시스템에더설치될패치가존재하는지확인한다. Patch Manager(smpatch 버전 ) 의버전확인 # smpatch get -V > smpatch 버전확인 시스템에설치가능한패치목록확인 # smpatch analyze (Solaris 10 x86 10/08 on VMWare) SunOS 5.10_x86: patch behavior patch SunOS 5.10_x86: sharetab patch -> 출력결과를확인하는데시간이걸린다.(10초 ~ 30초 ) -> 2개 ( , ) 의설치될패치가존재한다
288 다른출력결과이다. # smpatch analyze (Solaris 10 SPARC 10/08 on Blade150, ) -> 여러개의패치가미리설치된상태에서추가적인설치패치목록을확인한경우의결과 SunOS 5.10: Adobe Acrobat Reader patch SunOS 5.10: bind patch SunOS 5.10: SunFreeware bzip2 patch SunOS 5.10: sockfs patch JDS 3: Macromedia Flash Player Plugin Patch SunOS 5.10: in.ftpd patch SunOS 5.10: e1000g patch SunOS 5.10: ipf ipftest patch SunOS : Live Upgrade Patch -> 여러개의설치될패치가존재한다. -> 위의패치중일부를선택하여설치할수도있고, 모두한꺼번에설치할수도있다. ( 일부를선택하여설치하는경우 ) # smpatch update -i i ( 모두한꺼번에설치하는경우 ) # smpatch update -L 다른출력결과이다.(Solaris 10 SPARC 05/09 on Blade 150, ) -> 패치를한번도받지않은상태에서출력결과 # smpatch analyze 새메시지가있습니다. 검색하려면다음명령을수행하십시오. smpatch messages [-a] 필요한패치입니다 SunOS 5.10: kernel patch GNOME 2.6.0: GNOME Desktop Patch GNOME 2.6.0: Gnome libtiff - library for reading and writing TIFF Patch SunOS 5.10: Adobe Acrobat Reader patch SunOS 5.10: Apache 1.3 Patch SunOS 5.10: Native LDAP, PAM, name-service-switch patch SunOS 5.10: rpc.nisd patch SunOS 5.10: bind patch SunOS 5.10: SunFreeware bzip2 patch SunOS 5.10: SMA patch SunOS Common Agent Container (cacao) runtime upgrade patch SunOS 5.10: pam_krb5.so.1 patch SunOS 5.10: Sun GigaSwift Ethernet 1.0 driver patch SunOS 5.10: c2audit and auditconfig patch SunOS 5.10: sockfs patch SunOS 5.10: sshd patch SunOS 5.10: sh patch SunOS 5.10: patchchk patch SunOS 5.10: patch behavior patch SunOS 5.10: w and whodo patch SunOS 5.10: ksh,sh,pfksh,rksh,xargs patch CDE 1.6: Runtime library patch for Solaris CDE 1.6: Dthelp patch SunOS 5.10: fasttrap patch SunOS 5.10: CDE Desktop changes - Solaris Trusted Extensions JDS 3: Macromedia Flash Player Plugin Patch GNOME 2.6.0: GNU Transport Layer Security Library Patch SunOS 5.10: SunFreeware gnu esp ghostscript patch SunOS 5.10: libgss.so.1 patch SunOS 5.10: gtar patch SunOS 5.10: Install and Patch Utilities Patch SunOS 5.10: e1000g patch SunOS 5.10: ipf ipftest patch SunOS 5.10: lp patch Message Queue 3.7 UR2 Patch 2 SunOS Core product SunOS 5.10: Sun iscsi Device Driver and Utilities Patch JavaSE 5.0: update 21 patch (equivalent to JDK 5.0u21) JavaSE 5.0: update 21 patch (equivalent to JDK 5.0u21), 64bit SunOS 5.10: Asian CCK locales patch SunOS 5.10: libsasl.so.1 patch SunOS : Live Upgrade Patch
289 SunOS 5.10: XML and XSLT libraries patch SunOS 5.10: Solaris Management Console Patch Sun Java Web Console Mozilla 1.7 patch SunOS 5.10: ntpq patch SunOS 5.10: Perl patch SunOS 5.10: libpng Patch SunOS 5.10: PostgresSQL patch SunOS 5.10: PostgreSQL 8.2 core patch SunOS 5.10: PostgreSQL 8.2 documentation patch SunOS 5.10: PostgreSQL 8.3 core patch SunOS 5.10: PostgreSQL 8.3 documentation patch SunOS 5.10: Sun Update Connection Proxy SunOS 5.10: SunFreeware ghostscript man pages patch SunOS 5.10: SunFreeware samba man pages patch SunOS 5.10: Samba patch StarSuite 8 (Solaris): Update SunOS 5.10: Service Tags patch X : Xorg server patch X : Xsun patch X : xscreensaver patch NSS_NSPR_JSS : NSPR / NSS / JSS 4.3 다른출력결과이다. # smpatch analyze (Solaris 10 10/09 x86 on VMWare, ) SunOS 5.10_x86: Update Connection System Client SunOS 5.10_x86: patch behavior patch SunOS 5.10_x86: ksh,sh,pfksh,rksh,xargs patch SunOS 5.10_x86: Install and Patch Utilities Patch StarSuite 8 (Solaris_x86): Update 16 현재서버에패치업데이트로컬시스템에패치를다운로드하고업데이트를수행한다. 시스템을분석하고적절한패치를다운로드하여업데이트를시작한다. # smpatch update -L has been validated. /* 패치설치가능유무확인 */ has been validated. /* 패치설치가능유무확인 */ Installing patches from /var/sadm/spool has been applied. /* 패치설치 */ has been applied. /* 패치설치 */ /var/sadm/spool/patchpro_dnld_ @24:45:22:kst.txt has been moved to \ /var/sadm/spool/patchprosequester/patchpro_dnld_ @24:45:22:kst.txt 다운로드받은패치의설치시점 ( 적용시점 ) ( ㄱ ) 다운로드받은패치가바로설치되고적용되는경우 ( ㄴ ) 다운로드받은패치가 reboot 시에설치되고적용되는경우 ( ㄷ ) 패치를다운로드만하는경우 ( 다운로드디렉토리 : /var/spool/patch) -> 이런경우는관리자가직접패치를설치해야한다. [ 참고문서 ] smpatch 명령어를통한자동패치설치과정분석 l -> 솔라리스10 게시판 -> 33번자료
290 다른출력결과이다. # smpatch update -L 새메시지가있습니다. 검색하려면다음명령을수행하십시오. smpatch messages [-a] ( 으 ) 로패치다운로드 /var/sadm/spool has been validated has been validated has been validated has been validated has been validated has been validated has been validated has been validated has been validated has been validated has been validated has been validated cannot be validated has been validated cannot be validated has been validated has been validated has been validated has been validated has been validated has been validated has been validated has been validated has been validated has been validated has been validated has been validated. Failure: ERROR: Failed to validate the digital signature(s). 에서패치설치 /var/sadm/spool 적용되었습니다 적용되었습니다 적용되었습니다. 알림 : 업데이트 은 ( 는 ) 설치정책에서허용하지않는 "reboot immediate"( 으 ) 로입력되었으므로현재적용할수없습니다. NOTICE: 패치 은 ( 는 ) 다음시스템종료때까지설치할수없습니다 적용되었습니다. 알림 : 업데이트 은 ( 는 ) 설치정책에서허용하지않는 "single user, reconfig immediate"( 으 ) 로입력되었으므로현재적용할수없습니다. NOTICE: 패치 은 ( 는 ) 다음시스템종료때까지설치할수없습니다. 알림 : 업데이트 은 ( 는 ) 설치정책에서허용하지않는 "single user, reboot immediate"( 으 ) 로입력되었으므로현재적용할수없습니다. NOTICE: 패치 은 ( 는 ) 다음시스템종료때까지설치할수없습니다 적용되었습니다 적용되었습니다 적용되었습니다 적용되었습니다 적용되었습니다 적용되었습니다. WARNING: 설치자가패치를찾을수없습니다 적용되었습니다 적용되었습니다 적용되었습니다 적용되었습니다 적용되었습니다 적용되었습니다 적용되었습니다 적용되었습니다 적용되었습니다 적용되었습니다 적용되었습니다 적용되었습니다. /var/sadm/spool/patchpro_dnld_ @17:44:10:kst.txt ( 으 ) 로이동되었습니다 /var/sadm/spool/patchprosequester/patchpro_dnld_ @17:44:10:kst.txt 설치정책이허용하지않는업데이트의 ID 가파일에기록되었습니다. /var/sadm/spool/disallowed_patch_list 설치한하나이상의업데이트를활성화하려면시스템을종료해야합니다. 시스템종료를시작하려면다음명령중하나를사용해야합니다. o 펌웨어프롬프트로이동 - init 0 또는 shutdown -i 0 o 시스템전원끄기 - init 5 또는 shutdown -i 5 o 시스템재시작 - init 6 또는 shutdown -i
291 설치될패치가없는경우 # smpatch update -L No patches required. 인증에실패한경우 # smpatch analyze Failure: Cannot connect to retrieve current2.zip: You are not authorized to access this service. 패치설치후시스템 shutdown( 필요한경우 ) reboot 명령어를수행하면안된다. 부팅시에설치되는패치가 reboot 명령어에는동작하지않는다. 패치의종류 - 패치를다운로드받고바로설치되고적용되는패치 - 패치를다운로드받고 reboot 이되면서설치되고적용되는패치 - 패치를다운로드만받아놓는패치 (EX: /var/sadm/spool) (X) # reboot (0) # shutdown -y -g 0 -i 6 (0) # init 6 (4). 패치관리정책 솔라리스시스템설치후 -> Recommended Patch 설치솔라리스시스템운영시 -> 자주패치를설치하지않는서버 -> patchadd,patchrm 명령어사용 ( 인터넷이되는않는경우의서버환경에서 ) 솔라리스시스템운영시 -> 정기적인패치설치을하는서버 -> updatemanager,smpatch ( 인터넷이되는서버환경에서 )
292 [ 참고 ] smpatch 명령어 The smpatch utility program allows you to download, apply, and remove patches on a single system or on multiple systems. The system on which you run Sun Patch Manager must be running at least Solaris 8 OS and have the Developer Software Support Group installed. If your system runs Solaris 8 OS or Solaris 9 OS, it must also have the Sun Patch Manager 2.0 software installed. If your system runs Solaris 10 OS and has the Developer Software Support Group installed, the Sun Patch Manager 2.0 software is included. The smpatch command can also be used to download the required patches for your systems from the Sun patch server URL at: The default location for downloaded patches is the /var/sadm/spool directory. The values used by the smpatch command can be displayed using the following command: # smpatch get -L patchpro.patch.source patchpro.download.directory /var/sadm/spool All smpatch commands must be issued on the command line. To obtain patches from the Sun patch server, your system must be configured to access the Internet. The smpatch command can analyze the patch requirements for a system and automatically patch that system with all appropriate patches. For further details, refer to man smpatch. # man smpatch NAME smpatch - download, apply, and remove updates DESCRIPTION The smpatch command manages the update process on a single system or on multiple systems. Use this command to download, apply, and remove updates. Also, use the smpatch command to configure the update management environment for your system. If you want to run the smpatch command in remote mode, your system must run at least the Developer Solaris Software Group of the Solaris 10 system. The smpatch analyze command determines the updates that are appropriate for the systems you want to update. The smpatch command can download and apply updates that you specify on the command line. Or, smpatch can download and apply updates based on an analysis of one or more systems. Use the -i option or the -x idlist= option to specify the particular updates. All of the systems on which you want to apply updates must be running the same version of the Solaris Operating System, have the same hardware architecture, and have the same updates applied. The list of updates that is generated by the analysis is based on all of the available updates from the Sun update server. No explicit information about your host system or its network configuration is transmitted to Sun. Only a request for the Sun update set is transmitted. The update set is scanned for updates that are appropriate for this host system, the results are displayed, and those updates are optionally downloaded. smpatch supports the Live Upgrade feature of the Solaris operating system (see live_upgrade(5)). Through the add, remove, and update subcommands, described below, smpatch
293 enables you to perform operations on a boot environment (BE). A BE is an operating system image, consisting of a particular set of operating system and application software packages. EXAMPLES Example 1 Analyzing Your System to Obtain the List of Appropriate Updates for the Local System # smpatch analyze Shows how to analyze your system to obtain the list of appropriate updates. After the analysis, you can download and apply the updates to your system. Example 2 Analyzing Your System to Obtain the List of Appropriate Updates for Another System # smpatch analyze -n lab1 Shows how to analyze a different system, lab1, to obtain the list of appropriate updates. After the analysis, you can download and apply the updates to that system. Example 3 Applying Updates to Multiple Systems # smpatch add -i i i \ -d fileserver:/files/updates/s10 -n lab1 -n lab2 Applies updates , , and to the systems lab1 and lab2. The updates are located in the /files/updates/s10 directory on the system named fileserver. Example 4 Applying Updates by Using an Update List File # smpatch add -x idlist=/tmp/update/update_file \ -d /net/fileserver/export/updatespool/solaris10 -n lab1 -n lab2 Applies the updates specified in the file /tmp/update/update_file to the systems lab1 and lab2. The updates are located in the NFS-mounted directory named /net/fileserver/export/updatespool/solaris10. Example 5 Applying Updates by Using an Update List File and a System List File # smpatch add -x idlist=/tmp/update/update_file \ -x mlist=/tmp/update/sys_file Applies the updates listed in the file /tmp/update/update_file to the systems listed in the file /tmp/update/sys_file. The updates are located in the default /var/sadm/spool directory on the local system. Example 6 Analyzing a System and Downloading Updates From the Sun Update Server # smpatch download -n lab1 Analyzes the lab1 system and downloads the appropriate updates from the Sun update server to the download directory. Example 7 Downloading Updates From the Sun Update Server The command below downloads the and updates from the Sun update server to the /files/updates/s10 directory. # smpatch download -i i d /files/updates/s
294 Example 8 Downloading Specific Update Revisions From the Sun Update Server The command below downloads the and updates from the Sun update server. The specific revisions are downloaded, not the highest available revision. # smpatch download -f -i i Example 9 Downloading the Highest Available Update Revisions From the Sun Update Server The command below downloads the and updates, which are the highest available revisions, from the Sun update server. # smpatch download -f -i i Example 10 Downloading Update README Files From the Sun Update Server The command below downloads the README files for updates and Because update was specifi ed without a revision number, the README file for the highest available update revision, , is downloaded from the Sun update server. # smpatch download -t -i i Example 11 Listing All Configuration Parameter Values # smpatch get -p password Loading Tool: com.sun.admin.patchmgr.cli.patchmgrcli from mars Login to mars as user root was successful. Download of com.sun.admin.patchmgr.cli.patchmgrcli from mars was successful. On machine mars: patchpro.backout.directory - "" patchpro.download.directory - /var/sadm/spool patchpro.install.types - rebootafter:reconfigafter:standard patchpro.patch.source - patchpro.patchset - current patchpro.proxy.host - "" patchpro.proxy.passwd **** **** patchpro.proxy.port patchpro.proxy.user - "" patchpro.sun.passwd **** **** patchpro.sun.user - "" Lists the configuration settings for the system. Example 12 Listing One or More Configuration Parameter Values # smpatch get -L patchpro.patch.source patchpro.download.directory <----- 패치사이트 <----- 패치사이트 /var/sadm/spool <----- 패치다운로드디렉토리 Uses smpatch in local mode to list the values of the patchpro.patch.source and the patchpro.download.directory parameters. Example 13 Reordering a List of Updates # smpatch order -x idlist=/tmp/plist Reorders the update list called /tmp/plist in an order that is suitable for applying the updates
295 Example 14 Removing an Update # smpatch remove -i Removes update Example 15 Specifying the Update Policy The following command specifies the update policy. # smpatch set \ patchpro.install.types=standard:singleuser:reconfigafter:rebootafter Specifies the update policy for your system. The following types of updates are allowed to be applied to your system: o o o o Standard updates Updates that must be applied in single-user mode Updates that require that the system undergo a reconfiguration reboot after they have been applied Updates that require that the system undergo a reboot after they have been applied Example 16 Changing the Download Directory Location # smpatch set patchpro.download.directory=/export/home/updates Example 17 Specifying a Local Web Proxy # smpatch set patchpro.proxy.host=webaccess.corp.net.com \ patchpro.proxy.port=8080 Specifies the host name, webaccess.corp.net.com, and port, 8080, of the local web proxy. Example 18 Resetting a Configuration Parameter Value # smpatch unset patchpro.patch.source Resets the value of the patchpro.patch.source parameter to its default value, which is the URL that points to the Sun update server. Example 19 Updating Your System # smpatch update -L Analyzes your local system, determines the appropriate updates, downloads those updates to the download directory, and applies those updates. Example 20 Adding an Update to a BE The following command adds a specific update to the BE altboot. # smpatch add -b altboot Following successful completion of this command, you can then boot from altboot. Example 21 Updating a BE The following command performs an update on the BE altboot. # smpatch update -b altboot This command performs all of the usual analysis and dependency checking that occurs with any update command. Follow
296 ing successful completion of this command, you can then boot from altboot. Example 22 Obtaining smpatch Version Number The following command returns the version number for an smpatch subcommand. # smpatch update -V # smpatch Usage: smpatch about smpatch add -i patch-id... -x idlist=patch-list-file -d patch-dir -b boot-env -n system-name... -x mlist=system-list-file -H host-name:port -u user-name -p user-password -r role-name -l role-password -R client-root-path -V smpatch add -L -i patch-id... -x idlist=patch-list-file -d patch-dir -b boot-env -R client-root-path -V smpatch analyze -i patch-id... -x idlist=patch-list-file -n system-name -H host-name:port -u user-name -p user-password -r role-name -l role-password -V smpatch analyze -L -i patch-id... -x idlist=patch-list-file -V smpatch download -i patch-id... -x idlist=patch-list-file -d patch-dir -n system-name -H host-name:port -u user-name -p user-password -r role-name -l role-password -f -t -V smpatch download -L -i patch-id... -x idlist=patch-list-file -d patch-dir -f -t -V smpatch get [opts] [parameter-name]
297 -n system-name -H host-name:port -u user-name -p user-password -r role-name -l role-password -V smpatch get -L [parameter-name]... -V smpatch getdocument [opts] document-class/name... Where document-class is ReadMe collection category xml EISManifest EISBundle TLPMetadata -n system-name -H host-name:port -u user-name -p user-password -r role-name -l role-password -V smpatch getdocument -L document-class/name... -V Where document-class is ReadMe collection category xml EISManifest EISBundle TLPMetadata smpatch messages -a display-all-messages -V smpatch order -i patch-id... -x idlist=patch-list-file -d patch-dir -n system-name -H host-name:port -u user-name -p user-password -r role-name -l role-password -V smpatch order -L -i patch-id... -x idlist=patch-list-file -d patch-dir -V smpatch remove -i patch-id -b boot-env -n system-name -H host-name:port -u user-name -p user-password -r role-name -l role-password -R client-root-path -V smpatch remove -L -i patch-id -b boot-env -R client-root-path -V smpatch set [opts] parameter-name=parameter-value... -n system-name -H host-name:port -u user-name -p user-password -r role-name -l role-password -V smpatch set -L parameter-name=parameter-value... -V smpatch unset [opts] parameter-name... -n system-name -H host-name:port -u user-name -p user-password -r role-name
298 -l role-password -V smpatch unset -L parameter-name... -V smpatch update -i patch-id... -x idlist=patch-list-file -d patch-dir -b boot-env -n system-name -H host-name:port -u user-name -p user-password -r role-name -l role-password -V smpatch update -L -i patch-id... -x idlist=patch-list-file -d patch-dir -b boot-env -V smpatch list -V
299 Solaris 10 Admin I Guide 7. Boot Sequence l l l l l Open Boot PROM Phase Boot Program Phase Kernel Phase Init Phase svc.start Phase 솔라리스 10 에서는부팅과정을다음과같은 5 단계로구분하고있다. 이전솔라리스버전 ( 예 : 솔라리스 9 버전까지 ) 까지는 svc.start Phase 가존재하지않았다. 부팅과정 (Boot Sequence) 1 단계 : Open Boot PROM Phase 2 단계 : Boot Program Phase 3 단계 : Kernel Phase 4 단계 : init Phase 5 단계 : svc.startd Phase 부팅과정설명 PowerON -> Open Boot PROM Phase -> Boot Program Phase -> Kernel Phase -> Init Phase POST VTOC kernel init boot-device bootblk moduels /etc/inittab auto-boot? ufsboot /etc/system svc.startd Phase <
300 [ 참고 ] IA(Intel Architecture) Boot Process BIOS PROM BIOS looks for mboot MBR(Master Boot Record) pboot is loaded from active partion bootblk is loaded by pboot If multiple bootable partions exist bootblk displays Primary Boot Subsystem Menu bootblk starts either boot.bin or ufsboot => this can be interrupted to run the Configuration Assistant command interpreter starts which processes /etc/bootrc script => this provides a menu of boot choices kernel initiailization using either boot.bin or ufsboot to read the files /sbin/init processes the inittab /sbin/rc* scripts are run
301 (1). 1 단계 : Open Boot PROM Phase 시스템에전원이들어오게되면펌웨어 (F/W) 에서는 POST(Power On Self Test) 과정에의해서시스템의기본적인하드웨어를인식한다. l 시스템하드웨어초기화 (Device Tree Build) 및테스트 (H/W Test) boot PROM 펌웨어에서 POST 과정을수행하고시스템하드웨어와메모리를확인한다. l banner 메세지를출력한다. 모델, 프로세스종류와스피드, 키보드상황, PROM 버전번호, RAM 크기, NVRAM 시리얼번호 (Serial Number), MAC 주소 (Ethernet Address), HostID등을출력한다. l boot-device, auto-boot? 설정을통해서기본적인부팅장치를선택해서부팅과정을진행한다. l VTOC(Disk Sector 0) 을읽어서 /(root) 파티션을찾고, 시스템주부팅프로그램 (Primary Boot Program) 인 bootblk(sector 1 ~ 15) 을읽는다. l boot 명령어는 bootblk 프로그램을메모리로로드한다. (2). Boot Program Phase 부팅프로그램이실행되면 (a) 디스크로부팅하는경우에는디스크의첫번째섹터인 VTOC (=Disk Label) 을읽어들이고그다음 15 개의섹터인 bootblk 프로그램이실행된다. (b) 네트워크로부팅한다면 inetboot 프로그램이실행된다. 만약 bootblk 프로그램이실행되면 ufsboot( 두분째부팅프로그램 ) 이실행된다. 그리고 ufsboot 프로그램은커널을메모리로로딩 (Load) 한다. (ufsboot -> disk, inetboot -> net) l bootblk 프로그램은 2 번째부트프로그램 (ufsboot) 을메모리로로드한다. l ufsboot 프로그램은적당한 2 개의커널을메모리로로딩한다. 커널은 2 개로이루어졌으며, genunix, unix 이다. genunix 는플랫폼에독립적인일반적인커널파일이고, unix 는플랫폼에종속적인커널파일이다. l ( 참고 ) 솔라리스 10 SPARC 플랫폼에서는 64 비트로만동작한다. (3). Kernel Phase 커널은 /etc/system 파일을읽어드리고, 커널모듈을메모리에로드한다. /etc/system 파일에존재하는 moddir, exclude, forceload 지시자 (Directive) 를통해부팅시에메모리로모듈을로딩하고 "set VARIABLE=value" 을통해커널패러미터를설정한다. 그리고 init 프로세스를실행한다. l 커널은설정파일인 /etc/system(linux: /etc/sysctl.conf) 파일을읽어드린다. l 커널이초기화되면커널모듈 (Kernel Modules) 을메모리로로딩한다. l 커널은 ufsboot 명령어를사용하여커널모듈을로드한다. 이때, /(root) 파일시스템을마운트하기위한여러가지모듈을로드하게된다. l 커널은 /etc/init(-> /sbin/init) 데몬을시작한다. (4). Init Phase /sbin/init 프로세스는 /etc/inittab 파일을읽고 /etc/inttab 파일설정에따라 svc.startd 데몬을실행한다. 기본적인기능초기화 ( 파일시스템모듈초기화, 소켓초기화, etc) (5). svc.startd Phase svc.startd 데몬은서비스저장소 (Service Repository Configuration) 를확인하고, 적당한서비스를실행메소드를실행하면서 start 하거나 stop 하게된다
302 Open Boot PROM Phase (1) 런레벨 (Runlevel, 동작수준 ) 런레벨은시스템이특정하게초기화된환경을뜻한다. 예를들어시스템이커져있는상태로초기화된것을런레벨 5 라한다. 런레벨 6 은시스템리부팅상태를나타낸다. (1-1). Runlevel 종류 Run Level Milestone Function PROM Mode(ok prompt) s/s single-user Single user mode with critical file systems mounted and accessible 1 Single User Mode with all available filesystems 2 multi-user Mutiuser Mode without NFS. Mutli users can access the system. All System daemons are running except for the NFS server and some other network resource server related daemons. 3 multi-user-server Mutiuser Mode with NFS(default), NFS and other network resource all servers available 4 This level is currently not implemented. 5 OS is shutdown and the system is powered off. 6 OS is shutdown and the system reboots to the default run level 런레벨 0 은 PROM 모드를나타내고, s,s,1 는싱글유저모드를나타낸다. 2,3 은멀티유저모드를나타낸다. 4 는아직까지정의되지않았고, 5 는셧다운상태, 6 은리부팅상태를나타낸다. (1-2). 현재 runlevel 확인 현재시스템이초기화된런레벨을확인하기위해서는 who 명령어에 -r 옵션을사용한다. # who -r (-r : runlevel). run-level 3 1 월 28 12: S ( 명령어출력해석 ) 필드설명 run-level 3 현재런레벨 1월 28 12:13 현재런레벨변경된시간 3 현재런레벨 0 리부팅이후에현재런레벨로몇번바뀌었는지 (count). S 이전런레벨 # man who -r Indicates the current run-level of the init process
303 (1-3). runlevel 조정명령어 Run levels are sometimes referred to as init states because the init command can be used to transition between run levels. The init command passes the required run level to svc.startd. You can use the init command to manually initiate run-level transitions. You can also change run levels with the shutdown, init, halt, reboot, and poweroff commands. In addition, the svcadm command, can be used to change the run level that a system will boot to, by selecting the milestone to achieve. [ 참고 ] 새로운 solaris10 에서의 init 데몬 솔라리스 10 이전버전에서 init 데몬은부팅시에시스템서비스 (System Service) 를 stop 하거나 start 시키는역할을가지고있었다. 하지만 Solaris 10 버전에서는 svc.startd 데몬이이런역할을갖는다. init 데몬은단순히스트림모듈 (Stream Modules) 을초기화하거나소켓전송제공 (Socket Transport Proviers) 자를설정하거나전원에러 (Power Fail) 시시스템을셧다운시키거나 svc.startd 데몬을실행시키는역할만가진다. init 데몬의역할은 /etc/inittab 파일에정의되어있다. 런레벨을조정하는명령어는 5 가지존재한다. 단일런레벨로조정하는명령어 : poweroff, halt, reboot 모든런레벨로조정하는명령어 : init, shutdown poweroff CMD (Runlevel 5) # poweroff /* 시스템전원 OFF */ halt CMD (Runlevel 0) # halt /* PROM Mode 로전환 */ reboot CMD (Runlevel 6) # reboot /* 시스템 reboot */ init CMD # init ( 0 S s ) # init 0 /* PROM Mode 로전환 */ # init 5 /* 시스템전원 OFF */ # init 6 /* 시스템 reboot */ shutdown CMD # shutdown (# shutdown -g 60 -i s) # shutdown -y -i 5 -g 120 "System Disk repair" # shutdown -y -i 5 -g 0 "System Halt" # man shutdown OPTIONS -y Pre-answer the confirmation question so the command can be run without user intervention. -g grace-period Allow the super user to change the number of seconds from the 60-second default. -i init-state If there are warnings, init-state specifies the state init is to be in. By default, system state `s' is used
![[EX1] 시스템전원을끄는명령어 # poweroff # init 5 # shutdown -i 5 -g 0 -y [EX2] PROM Mode 로전환하는방법 # halt # init 0 # shutdown -i 0 -g 0 -y [ 참고 ] 런레벨명령어비교 Runlevel CMD poweroff/halt/reboot - 운영체제데몬을종료시키지않고런레벨변경](/docs-images/104/164712495/images/304-0.jpg "init/shutdown - 운영체제데몬을종료시킨후에런레벨변경 [ 표 ] 런레벨조정명령어의기능비교 ================================================================================ grace-period messages kill-daemon all-runlevel")
304 [EX1] 시스템전원을끄는명령어 # poweroff # init 5 # shutdown -i 5 -g 0 -y [EX2] PROM Mode 로전환하는방법 # halt # init 0 # shutdown -i 0 -g 0 -y [ 참고 ] 런레벨명령어비교 Runlevel CMD poweroff/halt/reboot - 운영체제데몬을종료시키지않고런레벨변경 init/shutdown - 운영체제데몬을종료시킨후에런레벨변경 [ 표 ] 런레벨조정명령어의기능비교 ================================================================================ grace-period messages kill-daemon all-runlevel ================================================================================ poweroff X X X X halt X X X X reboot X X X X init X X O 0 shutdown O O O 0 ================================================================================ [ 그림 ] Runlevel 조정명령어의수행 ( 정리 ) Open Boot PROM Phase 선수지식 - Runlevel 의의미 / 종류? - Runlevel 확인? - Runlevel 조정명령어
305 (2) Open Boot PROM 구조 (2-1). OpenBoot 아키텍쳐표준 (IEEE) Goal of the OpenBoot Architecture Standard(IEEE #1275) Test and initialize system hardware. Determine the system's hardware configuration. Boot the operating environment. Provide an interactive interface for configuration, testing, and debugging. Enable the use of third-party devices. (2-2). Boot PROMs 버전 (boot PROMs Version) 1.x The first boot PROM used on SPARC systems. 2.x The first OpenBoot PROM. 3.x The OpenBoot PROM with a flash update feature. You can update the 3.x firmware without having to replace the boot PROM chip. This generation was introduced with the Sun UltrSPARC product line. 4.x The OpenBoot PROM that supports the 64-bit UltrSPARC III processor 5.x Available on the Sun Enterprise 3500, 4500, 5500 and 6500 servers. [ 참고 ] 현재 PROM 버전확인명령어 # prtconf -V /* 운영체제안에서확인 ( 예 : Blade150 -> OBP */ OBP /11/14 06:55 # prtconf -V /* 운영체제안에서확인 ( 예 : Blade2500 -> OBP */ OBP /05/14 19:11 ok banner /* PROM Mode 안에서확인 */ Sun Ultra 5/10 UPA/PCI (UltraSPARC-IIi 360MHz), Keyboard Present OpenBoot 3.31, 128 MB (50 ns) memory installed, Serial # Ethernet address 8:0:20:b5:66:8f, HostID:80b5668f. -> Solaris 9 SPARC on Ultra
306 (2-3). Boot PROM Each Sun SPARC system has a boot PROM chip. This 1-Mbyte chip is typically located on the same board as the central processing unit (CPU). Boot PROM chips are usually found in a pluggable socket on older systems. As of the 3.x PROM, they are permanently soldered to the main system board. The Ultra workstations use a reprogrammable boot PROM called a flash PROM (FPROM). The FPROM allows you to load new boot program data into the PROM by using software, instead of having to replace the chip. Desktop systems have a write-protect jumper that must be moved before you can write to the PROM. You have to move the jumper because the default position is write-protect. Refer to the Sun Flash PROM Guide for Workstations and Workgroup Servers - Standalone Version part number , for the jumper location on your system. The boot PROM firmware controls the operation of the system before the operating system has been booted and the kernel is available. The boot PROM also provides the user with a user interface and firmware utility commands, known as the FORTH command set. Commands include the boot commands, diagnostics commands, and commands to modify the default configuration. [ PROM ] [ NVRAM ] ============== ============== POST eeprom System Configuration Information ============== ============== Device Driver TOD +----> NVRAM chip(eeprom) ============== ============== User Interface MAC Addr +----> SEEPROM chip ============== ============== Default Value Host ID +----> SCC(System Configuration Card) ============== ============== +-- l- l--+ Binary Machine Intructions > (SPARC CPU) [ 그림 ] Open Boot PROM 구조 (Structure) [ 참고 ] PROM 모드용어 (Terms) - NVRAM(Nonvalatile RAM, 비휘발성메모리 ) - SEEPROM(Serial Electronically Erasable Programmable Read Only Memory) chip - SCC(System Configuration Card) - TOD(Time of Date, 시간 ) - POST(Power-On Self Test, 자기진단 ) - MAC(Media Access Control) Addr. = Physical Addr. = Ethernet Addr. EX) 8:0:20:f8:20:32 [ 참고 ] POST 과정이란? - Probes the memroy and then the CPU. - Probes bus devices, interprets their drivers, and builds a device tree. - Installs the console - After the boot PROM initializes the system, the banner displays on the console. [ 참고 ] HOST ID # hostid 80f
307 (2-3-1) NVRAM Chip Older systems contain a removable NVRAM chip, normally located on the main system board. In addition to the system configuration information, the NVRAM chip contains an integrated lithium battery which provides battery backup for the configuration information and also provides the system 's time-of-day (TOD) function. (2-3-2) SEEPROM Chip Most newer systems contain a non-removable SEEPROM chip, normally located on the main system board. SEEPROM chips do not require a battery to maintain the system configuration information. (2-3-3) SCC(System Configuration Card) Some newer systems contain a removable System Configuration Card which holds the system configuration information. It is inserted into the System Configuration Card Reader
308 (3) OBP(Open Boot PROM) Command OBP 명령어를사용하기위해서는런레벨 0 으로전환해야한다. 다음은 Runlevel3 에서 Runlevel 0 으로전환할수있는명령어에대한종류이다. Runlevel 3(Multi User Mode) -> Runlevel 0(PROM Mode) # sync ; sync ; sync ( ㄱ ) # halt ( ㄴ ) # init 0 ( ㄷ ) # shutdown -i 0 -g 0 -y [ 참고 ] Blade 2500 장비매뉴얼 /diagnostics,trubleshooting Guide (a). help 명령어 help 명령어는 OpenBoot 펌웨어 (Firmware) 안에주범주 (Main Categroy) 의정보를얻을수있다. help 명령어를통해 OpenBoot 펌웨어안에존재하는명령어들의세트 (set) 들을확인할수있다. ( 명령어형식 ) ok help ok help ( 명령어범주 명령어 ) ok help ok help boot ok help misc ok help power ok help nvramrc ok help line ok help diag [ 참고 ] sifting CMD 일부 ok sifting probe ok sifting test ok sifting show [ 참고 ] OBP 상태에서 poweroff ok power-off /* OBP Command Line에서전원을끄기위한방법 */ # poweroff /* 쉘프롬프트에서전원을끄기위한방법 */
309 [ 참고 ] help 명령어출력결과 Sun Blade 1500 (OpenBoot PROM version ) ok help Enter 'help command-name' or 'help category-name' for more help (Use ONLY the first word of a category description) Examples: help select -or- help line Main categories are: Breakpoints (debugging) Repeated loops Defining new commands Numeric output Radix (number base conversions) Arithmetic Memory access Line editor System and boot configuration parameters Select I/O devices eject devices Power on reset Diag (diagnostic routines) Resume execution File download and boot nvramrc (making new commands permanent) Sun Fire V120 ok help Enter 'help command-name' or 'help category-name' for more help (Use ONLY the first word of a category description) Examples: help select -or- help line Main categories are: Breakpoints (debugging) Repeated loops Defining new commands Numeric output Radix (number base conversions) Arithmetic Memory access Line editor System and boot configuration parameters Select I/O devices Floppy eject eject devices Power on reset Diag (diagnostic routines) Resume execution File download and boot nvramrc (making new commands permanent) ok help boot boot <specifier> ( -- ) Examples: boot boot net boot cdrom boot disk1:h boot tape boot disk myunix as dload <filename> ( addr -- ) Examples: 4000 dload /export/root/foo/test?go boot kernel ( default ) or other file - boot kernel form default device. Factory default is to boot from DISK if present, otherwise from NET. - boot kernel from network - boot kernel from CD-ROM - boot from disk1 partition h - boot default file from tape - boot myunix from disk with flafgs "-as" debug load of file over network at address - if executable program, execute it or if Forth program, compile it
310 (b). banner 명령어 banner 명령어는시스템에관련한유용한정보들을출력해준다. 시스템모델이름 (System Model) boot PROM 버전 (Firmware Version) 메모리정보 (Installed Memory) 시리얼번호 (Serial Number) 이더넷주소 (Ethernet Address) 호스트아이디 (Host ID) ( 명령어형식 ) ok banner [ 참고 ] OBP 버전확인 ok banner /* 운영체제다운상태 */ # prtconf -V /* 운영체제운영중확인 */ # /usr/paltform/`uname -m`/sbin/prtdiag -v /* 운영체제운영중확인 */ [ 참고 ] banner 명령어출력결과 Sun Ultra 10 ok banner Sun Ultra 5/10 UPA/PCI (UltraSPARC-IIi 360MHz), Keyboard Present OpenBoot 3.31, 128 MB (50 ns) memory installed, Serial # Ethernet address 8:0:20:b5:66:8f, Host ID:80b5668f. Sun Fire V120 ok banner Sun Fire V120 (UltraSPARC-IIe 648MHz), No Keyboard OpenBoot 4.0, 2048 MB memory installed, Serial # Ethernet address 0:3:ba:68:44:39, Host ID: e9. Sun Blade 1500 ok banner Sun Blade 1500 (Silver), Keyboard Present Copyright Sun Microsystems, Inc. All rights reserved. OpenBoot , 1024 MB memory installed, Serial # Ethernet address 0:3:ba:d8:63:df, Host ID: 83d863df. Sun Blade 2500 ok banner Sun Blade 2500, Keyboard Present Copyright Sun Microsystems, Inc. All rights reserved. OpenBoot 4.9.5, 2048 MB memory installed, Serial # Ethernet address 0:3:ba:44:d7:55, Host ID: 8344d
311 (c). boot 명령어 boot 명령어는몇가지옵션을가지고있다. 특별한옵션없이 boot 명령어를실행한다면런레벨 3 으로부팅을하게된다. disk, cdrom, net, floppy 등을통해서특정한부팅디바이스로부팅할수도있다. boot 명령어에 -r 옵션은장치를달고인식시키기위해서사용한다. -s 옵션은싱글유저모드로부팅할려고할때사용한다. -v 옵션은부팅시에콘솔에서자세한디바이스정보를확인할수있다. 보통트러블슈팅을위해서사용한다. ( 명령어형식 ) ok boot /* 기본디바이스쪽으로부팅하는경우 */ ok boot cdrom /* CD-ROM 으로부팅해서설치하는경우 */ ok boot disk /* 선택된 DISK 운영체제로부팅하는경우 */ ok boot net /* 네트워크부팅하는경우 */ ok boot floppy ok boot tape ok boot -a /* 대화형모드형태로부팅할때사용 */ ok boot -r /* 장치재인식하며부팅할려고할때사용 */ ok boot -s (ok boot disk -s) /* 디스크운영체제이미지를가지고싱글유저부팅할때 */ ok boot -v (ok boot disk -v) /* 부팅과정을자세하고보고싶을때 */ ok boot -rv ok boot -sv ok boot disk -s ok boot cdrom -s /* CD1 로부팅하면서트러블슈팅을하기위해서 */ a ok boot -r b # reboot -- -r c # touch /reconfigure ; init 5 d # devfsadm -c disk e # drvconfig -c disk ; disks [ 참고 ] ok boot -r ( 장치재인식 ) a CD1 부팅 <STOP + A> ok boot cdrom -s [ 참고 ] boot cdrom -s (root 암호복구 ) (ok boot -F failsafe) b 편리한기능설정 # ksh /* sh -> ksh */ # set -o vi /* 기본편집기선언 */ # stty erase ^H /* delete key 정의 */ # TERM=sun /* TERM 변수설정 */ # export TERM /* 변수 export */ c root 사용자암호삭제작업 # fsck /dev/rdsk/c0t0d0s0 # mount /dev/dsk/c0t0d0s0 /a # vi /a/etc/shadow -> root 사용자의두번째필드의암호삭제 # reboot d root 사용자암호복구 root Login (Null Password) # passwd
312 [ 참고 ] boot -a ( 대화형부팅 ) ( 시나리오 ) 솔라리스운영체제에오라클 DB 을설치하는경우 /etc/system 파일에공유메모리, 세마포어설정등을해주어야한다. 이것은오라클이메모리를많이사용하는프로그램에한가지이기때문이다. 하지만 /etc/system 파일을편집하기전에는반드시백업을받아둬야한다. /etc/system 파일은커널이읽어들이는파일이기때문이다. 이파일에정의하는것이잘못된다면부팅하다멈추게된다. 다음은오라클설치시문제가발생하는과정을나타낸다. ( ㄱ ) /etc/system 커널패러미터수정 # cp /etc/system /etc/system.orig # vi /etc/system... set maxusers=40 ; kernel parameter <----- 잘못된편집... # reboot -- -r ( ㄴ ) 시스템리부팅부팅시에러메시지출력... Boot Fail... ( ㄷ ) 대화형부팅 <STOP + A> ok boot -a Enter filename [kernel/sparcv9/unix]: <Enter> Enter default directory for modules [/platform/sunw,ultra-5_10/kernel /platform/sun4u/kernel /kernel /usr/kernel]: <Enter> Name of system file [etc/system]: /etc/system.orig root file system type [ufs]: <Enter> Enter physical name of root device: <Enter> or Name of system file [etc/system]: /etc/system.orig root file system type [ufs]: <Enter> Enter physical name of root device: <Enter> ( ㄹ ) 만약 /etc/system 파일을백업을받지않았다면대화형부팅과정은의미가없게된다. 이경우에는 CD-ROM, 싱글유저로부팅하여 /etc/system 파일을원상복귀하여야할것이다
313 (d). printenv/setenv 명령어 printenv 명령어를사용하여 NVRAM 패러미터값을확인할수있다. 출력내용은현재설정값과기본값이출력된다. 현재설정값은 eeprom 에기본설정값은 PROM 에설정되어있다. setenv 명령어를사용하여 NVRAM 패러미터값을변경할수있다. ( 명령어형식 ) ok printenv Variable Name Value Default Value... auto-boot? false true... boot-device disk2 disk net disk net... local-mac-address? false false... security-mode none... diag-switch? false false... -> Value : 현재설정값 (eeprom 안에들어있는값 ) -> Default Value : 기본값 (PROM 안에들어있는값 ) ok printenv /* 전체 NVRAM 패러미터값확인 */ ok printenv boot-device /* boot-device NVRAM 패러미터값확인 */ ok printenv auto-boot? /* auto-boot? NVRAM 패러미터값확인 */ ok setenv auto-boot? false /* auto-boot NVRAM 패러미터값변경 */ ok setenv boot-device disk /* boot-device NVRAM 패러미터값변경 */ ok reset /* 바로이전에설정한패러미터값을적용한상태로부팅 */ ok reset-all /* 이전에설정한모든값을적용한상태로부팅 */ [ 참고 ] reset-all 명령어 The reset-all command halts the system, clears all buffers and registers, and performs a software simulated power-off/power-on of the system. The reset-all command clears system registers, which is required on a system with a PROM 3.x or higher before you can use the probe command or perform other tests. [EX] printenv / setenv 실습 ok printenv boot-device disk2 disk net ok setenv boot-device disk2 ok printenv boot-device disk2 ok printenv auto-boot? false ok setenv auto-boot? true ok printenv auto-boot? true ok reset-all
314 [ 참고 ] printenv 명령어출력결과 ok printenv Variable Name Value Default Value asr-policy normal normal test-args diag-passes 1 1 local-mac-address? true true fcode-debug? false false scsi-initiator-id 7 7 oem-logo No default oem-logo? false false oem-banner No default oem-banner? false false ansi-terminal? true true screen-#columns screen-#rows ttyb-rts-dtr-off false false ttyb-ignore-cd true true ttya-rts-dtr-off false false ttya-ignore-cd true true ttyb-mode 9600,8,n,1,- 9600,8,n,1,- ttya-mode 9600,8,n,1,- 9600,8,n,1,- output-device ttya screen input-device ttya keyboard auto-booton-error? false false error-reset-recovery sync sync load-base auto-boot? true true boot-command boot boot diag-file diag-device net net boot-file boot-device disk net disk net use-nvramrc? false false nvramrc security-mode none No default security-password No default security-#badlogins 0 No default verbosity min min diag-trigger none none service-mode? false false diag-script normal normal diag-level max max diag-switch? false false
315 (e). set-default/set-defaults 명령어 set-defaults 명령어는모든 NVRAM 패러미터값을기본값으로설정한다. set-default 명령어는하나의패러미터값만을기본값으로설정한다. ( 명령어형식 ) ok set-default boot-device ok set-defaults ok reset-all (ok setenv boot-device disk net) [ 참고 ] stop Key Function <STOP> - POST Skip <STOP + A> - PROM Mode <STOP + D> - digonastic Mode <STOP + N> - Default Value Recovery [ 참고 ] System Hang - Recovery(Freeze) <STOP + A> 사용하는경우 ( ㄱ ) 솔라리스운영체제설치시에 <STOP + A> ok boot cdrom ( ㄴ ) root 암호를복구하는경우 (root 암호분실시 ) <STOP + A> ok boot cdrom -s ( ㄷ ) System Hang 상태의경우 (System Freeze) System Hang <STOP + A> ok sync sync 명령어 This command causes the syncing of file systems, a crash dump of memory, and then a reboot of the system. [ 참고 ] STOP + A Key 동작하지않도록설정하기 1 <STOP + A> 키가서버운용중에시스템을중지할수없도록설정하는방법 1 On many systems, the default effect of the keyboard abort sequence is to suspend the operating system and enter the debugger or the monitor. Some systems feature key switches with a secure position. On these systems, setting the key switch to the secure position overrides any software default set with this command. To permanently change the software default effect of the keyboard abort sequence, first add or change the value of the KEYBOARD_ABORT variable in the /etc/default/kbd file to: KEYBOARD_ABORT=disable Next, run the command kbd -i to change the setting. Valid settings are enable, disable, and alternate; all other values are ignored. If the variable is not specified in the default file, the setting is unchanged. -a enable disable alternate Enables, disables, or alternates the keyboard abort sequence effect. By default, a keyboard abort sequence (typically Stop-A or L1-A on the keyboard and BREAK on the serial console device) suspends the operating system
316 on most systems. The default keyboard behavior can be changed using this option. The -a option can only be used by a super-user. disable Disables the default/alternate effect and ignores keyboard abort sequences. # vi /etc/default/kbd KEYBOARD_ABORT=disable # kbd -i /* 설정적용 */ or # kbd -a disable 2 <STOP + A> 키가서버운용중에시스템을중지할수없도록설정하는방법 2 # vi /etc/system set abort_enable=0 # reboot [EX] set-default 실습 ok printenv Variable Name Value Default Value... auto-boot? false true... boot-device disk2 disk net... local-mac-address? false false... security-mode none... diag-switch? false false... ok set-default boot-device (ok set-default boot-device disk net) ok printenv boot-device disk net ok reset-all
317 (f). probe-scsi/probe-ide 명령어 probe-scsi 명령어는보드의 SCSI 컨트롤러에연결된주변장치 (Peripheral Device) 의정보를출력해준다. probe-scsi-all 명령어는보드의 SCSI 컨트롤러연결된모든주변장치와 SBus/PCI SCSI 컨트롤러에붙은모든주변장치정보를출력해준다. probe-ide 명령어는보드의 IDE 컨트롤러에붙은 CD-ROM/Disk 에대한정보를출력한다. 내부디바이스의디바이스번호를출력한다. probe-fcal-all 명령어는 FC-AL GBICs 에포함된모든주변장치정보를출력한다. (Fibre Channel-Arbitrated Loop Gigabit Interface Converters) ( 명령어형식 ) ok probe-scsi /* SCSI DISK 확인할때 */ ok probe-scsi-all /* SCSI 방식의모든장치확인할때 */ ok probe-ide /* IDE DISK 확인할때 */ ok probe-fcal-all /* FC-AL DISK 확인할때 */ [ 참고 ] probe-ide/probe-scsi/probe-scsi-all 명령어출력결과 ok probe-scsi (Sun Fire V120) Targert 0 Unit 0 Disk FUJITSU MAP3367N SUN36G 0401 Target 1 Unit 0 Disk FUJITSU MAP3367N SUN36G > 2장의 Internal Disk 존재하는상태 ok probe-scsi probe-scsi? -> SCSI 디스크가없는경우 ok probe-scsi-all (Sun Fire V120) /pci@1f,0/pci@1/scsi@8,1 Targert 0 Unit 0 Disk SEAGATE ST373307LSUN72G 0507 Target 1 Unit 0 Disk SEAGATE ST373307LSUN72G 0507 Target 2 Unit 0 Disk SEAGATE ST373307LSUN72G 0507 /pci@1f,0/pci@1/scsi@8 Targert 0 Unit 0 Disk FUJITSU MAP3367N SUN36G 0401 Target 1 Unit 0 Disk FUJITSU MAP3367N SUN36G > 3장의디스크 (External SCSI initiator(/pci@1f,0/pci@1/scsi@8,1)) -> 2장의디스크 (Internal SCSI initiator(/pci@1f,0/pci@1/scsi@8)) ok probe-ide Device 0 ( Primary Master ) ATA Model: ST A Device 1 ( Primary Slave ) ATA Model: ST A Device 2 ( Secondary Master ) Removable ATAPI Model: TOSHIBA ODD-DVD SD-R1512 Device 3 ( Secondary Slave ) Not Present
318 (g). devalias/nvalias/nvunalias 명령어 devalias 명령어는시스템디바이스별칭 (Device Alias) 을출력한다. nvalias 명령어는디바이스에별칭을정의할때사용한다. nvunalias 명령어는디바이스에별칭을삭제할때사용한다. ( 명령어형식 ) ok devalias (ok devalias disk) ok nvalias mydisk /pci@1f,0/pci@1,1/ide@3/disk@1,0 ok nvunalias mydisk (ok nvalias mydisk ^Y) [ 참고 ] show-cmd ok show-devs ok show-ttys ok show-displays ok show-nets ok show-disks ok show-tapes [ 참고 ] 새로운 Disk로부팅 ( 예 : RAID 1 - Mirroring) DISK0 (OS) <---- 기존의디스크 A OS RAID 1 (Mirroring) V DISK1 (OS) <----- 새로장착한디스크 ok probe-ide (ok probe-scsi) /* 붙어있는 DISK 장치확인 */ ok show-devs /* 인식된전체디바이스확인 */ ok devalias /* 각디바이스의 alias 이름확인 */ ok show-disks a) /pci@1f,0/pci@1/scsi@1,1/disk b) /pci@1f,0/pci@1/scsi@1/disk c) /pci@1f,0/pci@1,1/ide@3/cdrom d) /pci@1f,0/pci@1,1/ide@3/disk e) /pci@1f,0/pci@1,1/ebus@1/fdthree@14,3023f0 q) NO SELECTION Enter Selection, q to quit: d <----- 'd' 입력 /pci@1f,0/pci@1,1/ide@3/disk has been selected. Type ^Y (Control-Y) to insert it in the command line. e.g. ok nvalias mydev ^Y for creating devalias mydev for /pci@1f,0/pci@1,1/ide@3/disk ok nvalias mydisk <Ctrl + Y> ok devalias ok boot mydisk... 부팅이후에 ok 로전환... ok setenv boot-device disk mydisk net ok setenv auto-boot? true
319 [ 참고 ] The sample disk device path Disk Device Path - Ultra Workstation With a PCI-SCSI Bus /pci@1f,0/pci@1/pci@1/sunw,isptwo@4/sd@3,0 (c#t3d0s#) ^^ ^^^^^^^ ^^^^^ ^^^^^ ^^^^^^^^^^^^^ ^^ ^ ^ A A A A A A A A (1) (2) (2) (2) (2) (3,4,5) - (1) Root Device Node - (2) Bus Device and Controllers - (3) Device Type(SCSI Type) - (4) SCSI Target address - (5) Disk Number(Logical Unit Number or LUN) Disk Device Path - Ultra Workstation With a PCI-IDE Bus /pci@1f,0/pci@1,1/ide@3/dad@0,0 (c#t0d0s#) ^^ ^^^^^^^ ^^^^^^^ ^^^^^ ^^^ ^ ^ A A A A A A A (1) (2) (2) (2) (3,4,5) - (1) Root Device Node - (2) Bus Device and Controllers - (3) Device Type(IDE Disk) - (4) IDE Target address - (5) Disk Number(Logical Unit Number or LUN)
320 [ 참고 ] show-devs 명령어출력결과 Ultra 5 or Ultra 10 system ok show-devs /SUN,UltraSPARC-IIi@0,0 /pci@1f,0 /virtual-memory /memory@0, /pci@1f,0/pci@1 /pci@1f,0/pci@1,1 /pci@1f,0/pci@1,1/ide@3 /pci@1f,0/pci@1,1/sunw,m64b@2 /pci@1f,0/pci@1,1/network@1,1 /pci@1f,0/pci@1,1/ebus@1 /pci@1f,0/pci@1,1/ide@3/cdrom /pci@1f,0/pci@1,1/ide@3/disk /pci@1f,0/pci@1,1/ebus@1/sunw,cs4241@14, /pci@1f,0/pci@1,1/ebus@1/flashprom@10,0 /pci@1f,0/pci@1,1/ebus@1/eeprom@14,0 /pci@1f,0/pci@1/pci@1 /pci@1f,0/pci@1/pci@1/sunw,isptwo@4... ( 중략 )... Sun Blade 1500 ok show-devs /i2c@1f, /pci@1f, /ppm@1e,0 /pci@1e, /memory-controller@0,0 /SUNW,UltraSPARC-IIIi@0,0 /virtual-memory /memory@m/0,0 /aliases /options /openprom /chosen /packages /i2c@1f,464000/idprom@0,ae /i2c@1f,464000/nvram@0,ae /pci@1f,700000/sunw,xvr-100@3 /pci@1f,700000/network@2 /pci@1e,600000/pci@3 /pci@1e,600000/pci@2 /pci@1e,600000/ide@d /pci@1e,600000/usb@b /pci@1e,600000/usb@a /pci@1e,600000/sound@8 /pci@1e,600000/pmu@6 /pci@1e,600000/isa@7 /pci@1e,600000/pci@3/sunw,isptwo@4 /pci@1e,600000/pci@3/sunw,hme@0,1 /pci@1e,600000/pci@3/pci108e,1000@0 /pci@1e,600000/pci@3/sunw,isptwo@4/st /pci@1e,600000/pci@3/sunw,isptwo@4/sd... ( 중략 )
321 Ultra 5 or Ultra 10 system ok devalias screen net cdrom disk disk3 disk2 disk1 disk0 ide floppy ttyb ttya keyboard! keyboard mouse name [ 참고 ] devalias 명령어출력결과 /pci@1f,0/pci@1,1/sunw,m64b@2 /pci@1f,0/pci@1,1/network@1,1 /pci@1f,0/pci@1,1/ide@3/cdrom@2,0:f /pci@1f,0/pci@1,1/ide@3/disk@0,0 /pci@1f,0/pci@1,1/ide@3/disk@3,0 /pci@1f,0/pci@1,1/ide@3/disk@2,0 /pci@1f,0/pci@1,1/ide@3/disk@1,0 /pci@1f,0/pci@1,1/ide@3/disk@0,0 /pci@1f,0/pci@1,1/ide@3 /pci@1f,0/pci@1,1/ebus@1/fdthree /pci@1f,0/pci@1,1/ebus@1/se:b /pci@1f,0/pci@1,1/ebus@1/se:a /pci@1f,0/pci@1,1/ebus@1/su@14,3083f8:forcemode /pci@1f,0/pci@1,1/ebus@1/su@14,3083f8 /pci@1f,0/pci@1,1/ebus@1/su@14,3083f8 aliases Sun Blade 1500 ok devalias screen mouse keyboard net disk cdrom ide ttyb ttya name /pci@1f,700000/sunw,xvr-100@3 /pci@1e,600000/usb@b/mouse@2 /pci@1e,600000/usb@b/keyboard@1 /pci@1f,700000/network@2 /pci@1e,600000/ide@d/disk@0,0 /pci@1e,600000/ide@d/cdrom@2,0:f /pci@1e,600000/ide@d /pci@1e,600000/isa@7/serial@0,2e8 /pci@1e,600000/isa@7/serial@0,3f8 aliases
322 (h). eeprom 명령어 솔라리스운영체제에서 eeprom 명령어를사용해서 NVRAM 패러미터값들을변경할수있다. # eeprom ok printenv # eeprom auto-boot? ok printenv auto-boot? # eeprom boot-device ok printenv boot-device # eeprom auto-boot?="true" ok setenv auto-boot? true # eeprom boot-device="disk net" ok setenv boot-device disk net [EX] eeprom 명령어실습 # eeprom # eeprom auto-boot? (# eeprom grep auto) # eeprom auto-boot?=false # eeprom boot-device (# eeprom grep boot) # eeprom boot-device="disk2 disk net" # halt ok nvunalias mydisk ok devalias ok reset-all 1c1 < auto-boot?=false --- > auto-boot?=true [ 참고 ] PROM 변수설정백업 (Variable Configuration Backup) 기본값으로복원하는역할 (NVRAM 패러미터값 ) (a). ok set-defaults (b). <STOP + N> => 백업이안받아져있는상태에서는위험할수있다. # mkdir -p /EEPROM # eeprom > /EEPROM/eeprom (2008 년 04 월 04 일 ) ( 운영체제부팅후 ) # eeprom > /EEPROM/eeprom.txt # cd /EEPROM # diff eeprom eeprom.txt [ 참고문서 ] Flash PROM Upgrade l -> 솔라리스강좌 [ 관리자 ] 게시판 -> 194번자료
323 [ 참고 ] eeprom 명령어의출력결과 1 Sun Fire V120 PROM eeprom 명령어출력 ( 기본설정확인 ) # eeprom ras-shutdown-enabled?=false shutdown-temp=75 warning-temp=70 env-monitor=disabled diag-passes=1 diag-continue?=0 diag-targets=0 diag-verbosity=0 keyboard-click?=false keymap: data not available. scsi-initiator-id=7 #power-cycles=0 system-board-serial#: data not available. system-board-date: data not available. ttyb-rts-dtr-off=false ttyb-ignore-cd=true ttya-rts-dtr-off=false ttya-ignore-cd=true ttyb-mode=9600,8,n,1,- ttya-mode=9600,8,n,1,- pcia-probe-list=8,5,6,7 pcib-probe-list=7,c,3,d,5 mfg-mode=off diag-level=max fcode-debug?=false output-device=screen:r1280x1024x60 input-device=keyboard load-base=16384 auto-boot-retry?=false boot-command=boot auto-boot?=true watchdog-reboot?=false diag-file: data not available. diag-device=net boot-file: data not available. boot-device=disk:a disk1:a disk net local-mac-address?=false net-timeout=0 ansi-terminal?=true screen-#columns=80 screen-#rows=34 silent-mode?=false use-nvramrc?=false nvramrc: data not available. security-mode=none security-password: data not available. security-#badlogins=0 oem-logo: data not available. oem-logo?=false oem-banner: data not available. oem-banner?=false hardware-revision: data not available. last-hardware-update: data not available. diag-switch?=false
324 [ 참고 ] eeprom 명령어의출력결과 2 Sun Blade 150 PROM eeprom 명령어출력 ( 기본설정확인 ) # eeprom test-args: data not available. diag-passes=1 pci-probe-list=7,c,3,8,d,5,13 local-mac-address?=false fcode-debug?=false ttyb-rts-dtr-off=false ttyb-ignore-cd=true ttya-rts-dtr-off=false ttya-ignore-cd=true silent-mode?=false scsi-initiator-id=7 oem-logo: data not available. oem-logo?=false oem-banner=ncia oem-banner?=false ansi-terminal?=true screen-#columns=80 screen-#rows=34 ttyb-mode=9600,8,n,1,- ttya-mode=9600,8,n,1,- output-device=screen input-device=keyboard load-base=16384 auto-boot?=true boot-command=boot diag-file: data not available. diag-device=net boot-file: data not available. boot-device=disk net use-nvramrc?=true nvramrc: data not available. security-mode=none security-password: data not available. security-#badlogins=0 diag-script=none diag-level=max diag-switch?=false error-reset-recovery=boot
325 Boot Program Phase bootblk 프로그램이두번째부팅프로그램 (ufsboot) 을메모리로로드 (Load) 한다. ufsboot 프로그램은적당한커널 (32bit/64bit 커널 ) 을메모리에로드 (Load) 한다. bootblk (1st boot program) ufsboot (2nd boot program), inetboot (1) installboot 명령어 The path to ufsboot is recorded in the bootblk program, which is installed by the Solaris OE utility installboot. NAME installboot - install bootblocks in a disk partition SYNOPSIS installboot [-F zfs ufs hsfs] bootblk raw-disk-device DESCRIPTION The boot(1m) program, ufsboot, is loaded from disk by the bootblock program which resides in the boot area of a disk partition. This program is filesystem-specific, and must match the type of filesystem on the disk to be booted. (Installing UFS Boot Block) # cd /usr/platform/`uname -i`/lib/fs/ufs # installboot bootblk /dev/rdsk/c0t0d0s0 /* c0t0d0s0 : /(root) 파일시스템의이름 */ (Installing ZFS Boot Block) # cd /usr/platform/`uname -i`/lib/fs/zfs # installboot -F zfs bootblk /dev/rdsk/c0t0d0s0 /* c0t0d0s0 : /(root) 파일시스템의이름 */ (2) installgrub [ 참고 ] Intel Platform (GRUB-based) NAME installgrub - install GRUB in a disk partition or a floppy SYNOPSIS /sbin/installgrub [-fm] stage1 stage2 raw-device DESCRIPTION The installgrub command is an x86-only program. GRUB stands for GRand Unified Bootloader. installgrub installs GRUB stage 1 and stage 2 files on the boot area of a disk partition. If you specify the -m option, installgrub installs the stage 1 file on the master boot sector of the disk. (Installing GRUB on a Hard Disk Slice) # cd /boot/grub # installgrub stage1 stage2 /dev/rdsk/c0d0s0 /* c0d0s0 : /(root) 파일시스템의이름 */ [ 참고 ] installboot 명령어를사용하는경우 - 백업본을가지고 OS 디스크를복구할때 (OS 디스크를다른디스크로복사할때 ) - bootblk 가깨진경우
326 Kernel Phase (1) 커널 (Kernel) / 커널모듈 (Kernel Modues) 커널 (Kernel) /etc/system 파일 커널모듈 (Kernel Modules) (EX: Device Driver) (1-1). 커널 (Kernel) The core of the kernel is two pieces of static code called genunix and unix, where genunix is the platform-independent generic kernel file and unix is the platform-specific kernel file. When ufsboot loads these two files into memory, they are combined to form the running kernel. 커널의핵심은 2 개의 (genunix, unix) 정적코드로되어져있다. genunix 는플랫폼에독립적인일반적인커널파일이고, unix 는플랫폼에의존적인커널파일이다. ufsboot 프로그램이 2 개의파일을커널로로딩할때, 동작중인커널을형성하기위해서조합하게된다. [ 참고 ] --- Hardware OS Application CPU (32bits / 64bits) -> kernel (32bits / 64bits) -> Application (32bits / 64bits) On a system running in 32-bit mode, the two-part kernel is located in the directory - /platform/ uname -m /kernel. On a system running in 64-bit mode, the two-part kernel is located in the directory - /platform/ uname -m /kernel/sparcv9. 시스템이 32bit 모드로동작시, 2 개의커널의위치는 /platform/ uname -m /kernel 시스템이 64bit 모드로동작시, 2 개의커널의위치는 /platform/ uname -m /kernel/sparcv9 [Kernel] 32bit Kernel > unix > genunix 64bit Kernel > unix > genunix [ 참고 ] 현재 Sparc Platform - 64 bit 커널사용 (Solaris 10 for SPARC only runs 64-bit systems) Intel Platform - 32/64 bit 커널사용
327 (Solaris 10 05/09 on Blade 150) [/platform/sun4u/kernel]# ls -l unix lrwxrwxrwx 1 root root 12 Apr 9 16:58 unix -> sparcv9/unix* -> 32bits 커널 (genunix, unix) [/platform/sun4u/kernel/sparcv9]# ls -l unix genunix -rwxr-xr-x 1 root sys 3.8M Jul 18 01:21 genunix* -rwxr-xr-x 1 root sys 1.4M Jul 18 01:21 unix* -> 64bits 커널 (genunix, unix) (Solaris 10 05/09 on Blade 2500) [solaris211@/platform/sun4u/kernel]# ls -l unix lrwxrwxrwx 1 root root 12 Aug 31 11:02 unix -> sparcv9/unix* -> 64bits 커널 [solaris211@/platform/sun4u/kernel/sparcv9]# ls -l -rwxr-xr-x 1 root sys 3.8M Mar genunix* -rwxr-xr-x 1 root sys 1.4M Mar unix* -> 64bits 커널 (genunix, unix) (Solaris 10 05/09 on V240-R) [solaris249@/platform/sun4u/kernel]# ls -l unix lrwxrwxrwx 1 root root 12 Nov 1 18:28 unix -> sparcv9/unix* [solaris249@/platform/sun4u/kernel]# ls -l sparcv9/unix -rwxr-xr-x 1 root sys 1.4M Mar sparcv9/unix* (Solaris 10 10/09 on VMWare 7.0.1) [solaris254@/platform/i86pc/kernel]# ls -l unix -rwxr-xr-x 1 root sys 928K Sep unix* [solaris254@/platform/i86pc/kernel]# find /platform -name unix -type f./amd64/unix /* 64 bit 커널 */./unix /* 32 bit 커널 */./kmdb/amd64/unix./kmdb/unix
328 (1-2). 커널모듈 (Kernel Modules) The SunOS kernel is a small static core, consisting of genunix and unix and many dynamically loadable kernel modules. Modules can consist of device drivers, binary files to support file systems, and streams, as well as other module types used for specific tasks within the system. SunOS 커널은작은정적핵심 (small static core) 이다. genunix, unix, 많은동적커널모듈들로구성된다. 모듈은디바이스드라이버, 파일시스템을지원하기위한실행파일, 스트림뿐만아니라시스템의특수한일을하기위한모듈들로구성된다. The modules that make up the kernel typically reside in the directories /kernel and /usr/kernel. Platform-dependent modules reside in the /platform/ uname -m /kernel and /platform/ uname -i /kernel directories. 모듈은 /kernel, /usr/kernel 디렉토리에전형적인커널모듈이있고, /platform/`uname -m`/kernel, /platform/`uname -i`/kernel 디렉토리에는플랫폼에의존적인커널모듈이존재한다. /kernel, /usr/kernel : 플랫폼과상관없는커널모듈 /platrom/`uname -i`, /platform/`uname -m` : 플랫폼과상관있는커널모듈 /kernel : 부팅시에필요한커널모듈 /usr/kernel : 부팅이후에필요한커널모듈 [Module] Utra 10 E /kernel /kernel /kernel - /usr/kernel /usr/kernel /usr/kernel - /platform/`uname -i` /platform/sunw,ultra-5_10 /platform/sunw,enterprise - /platform/`uname -m` /platform/sun4u /platform/sun4u Blade /kernel /kernel - /usr/kernel /usr/kernel - /platform/`uname -i` /platform/sunw,sun-blade /platform/`uname -m` /platform/sun4u 커널모듈디렉토리 (Module Direcoty) - drv Device drviers - exec Executable file formats - fs Filesystem types, for example, ufs, nfs, and proc - misc Miscellaneous modules( 예 : Virtual swap) - sched Scheduling classes(process execution scheduling) - strmod Streams modules(generalized connection between users and device drivers) - sys System calls(defined interfaces for applications to use)
329 [EX1] Module 목록확인 Device ---- Device Driver ----(Device Files)Kernel Kernel Module (Kernel Modules Directory) - /kernel, /usr/kernel, /platform /kernel drv /usr/kernel exec fs (a) 현재메모리상의커널모듈확인 [ 참고 ] modinfo, modload, modunload 명령어 # modinfo more Id Loadaddr Size Info Rev Module Name c - 0 unix () 1 10a ed58-0 genunix () c platmod () e410-0 SUNW,UltraSPARC-IIe () b specfs (filesystem for specfs) b0 3 1 fifofs (filesystem for fifo) 7 7b20a dtrace (Dynamic Tracing) 8 127a000 40f devfs (devices filesystem 1.15) f528 39f8 1 1 TS (time sharing sched class) dc - 1 TS_DPTBL (Time sharing dispatch table) d0 37c ufs (filesystem for ufs) 14 12b7b90 21c - 1 fssnap_if (File System Snapshot Interface) 15 12b7d08 1d rootnex (sun4 root nexus 1.15) 16 12b9578 1bc 57 1 options (options driver) 17 12b a sad (STREAMS Administrative Driver ') 18 12ba980 a pseudo (nexus driver for 'pseudo' 1.28) 19 12bb clone (Clone Pseudodriver 'clone') 20 12bb scsi_vhci (SCSI VHCI Driver 1.55) 21 12cf a0-1 scsi (SCSI Bus Utility Routines) 22 12d6d grppm (platform pm driver v1.10) 23 12d7ff pmubus (pmubus nexus driver) 24 12d8e30 11e pcipsy (PCI Bus nexus driver 1.236) 25 12e9b78 6e dad (DAD Disk Driver 1.90) 26 12f dada ( ATA Bus Utility Routines) 27 12f15c cmlb (Common Labeling module 1.5) 28 12f5de8 d uata (ATA controller Driver 1.111) d todmostek (tod module for Mostek M48T59 1.) d88 2f ctfs (contract filesystem) c procfs (filesystem for proc) f9e8 21f mntfs (mount information file system) a tmpfs (filesystem for tmpfs) b objfs (kernel object filesystem) f58 1dc sharefs (sharetab filesystem) f58 1dc sharefs (sharefs syscall) f58 1dc sharefs (sharefs syscall (32-bit)) a730 2e md (Solaris Volume Manager base mod)... ( 중략 )
330 # modinfo grep hme (Solaris 10 05/09 on Blade150) a e hme (10/100Mb Ethernet Driver v1.160) # modinfo grep eri (Solaris 10 05/09 on Blade150) 152 7b6f4000 f6d8 8 1 eri (10/100 Mb Ethernet Driver v1.40) # modinfo grep bge (Solaris 10 05/09 on Blade2500) 155 7b6f be bge (BCM579x driver v0.58) # modinfo grep pcn (Solaris 9 x86 on VMWare) 92 feacc49c pcn (PC-Net (Generic) 1.39) # modinfo grep e1000g (Solaris 10 x86 on VMWare) -> 모듈목록확인 (b) 디스크에존재하는커널모듈확인 (SPARC Platform) NIC (hme) 모듈의위치 (Solaris 10 05/09 on Blade 150) # cd /kernel -> (a) 플랫폼과는상관없는, (b)booting 시에로딩되는 # cd drv/sparcv9 -> (c) Device Driver Directory # ls hme* hme NIC (eri) 모듈의위치 (Solaris 10 05/09 on Blade 150) # cd /kernel -> (a) 플랫폼과는상관없는, (b)booting 시에로딩되는 # cd drv/sparcv9 -> (c) Device Driver Directory # ls eri* eri NIC (bge) 모듈의위치 (Solaris 10 05/09 on Blade2500) # find / -name bge -type f /platform/sun4u/kernel/drv/sparcv9/bge # cd /platform/sun4u/kernel/drv/sparcv9 # ls -l *bge* -rwxr-xr-x 1 root sys 212K Dec bge* (c) 디스크에존재하는커널모듈 (INTEL Platform) NIC (pcn0, pcn1) 모듈의위치 # cd /kernel (Solaris 10 on VMWare 6.0.0) # cd drv # ls pcn* pcn* pcn.conf # cd /kernel (Solaris 10 10/09 on VMWare 7.0.1) # cd drv # ls *e1000g* e1000g* e1000g.conf
331 The /kernel/drv directory contains all of the device drivers that are used for system boot. The /usr/kernel/drv directory is used for all other device drivers. /kernel/drv 디렉토리에는시스템부팅시에사용되는모든디바이스드라이버가위치한다. /usr/kernel/drv 디렉토리에는다른종류의모든디바이스드라이버가존재한다. Modules are loaded automatically as needed either at boot time or on demand, if requested by an application. When a module is no longer in use, it might be unloaded on the basis that the memory it uses is needed for another task. 모듈은부팅시에또는프로그램의요청이있을때필요에따라서자동으로로딩된다. 모듈이더이상사용되지않을때언로드 (unload) 되어진다. 이메모리영역은다른일을위해재사용된다. After the boot process is complete, device drivers are loaded when devices, such as tape devices, are accessed. This process is called autoconfiguration because some kernel driver modules are loaded automatically when needed. 부팅과정후에사용되는테잎디바이스같은드라이버는로딩된다. 이러한과정을자동설정이라고한다. 이것은필요에따라서커널드라이버모듈이자동으로로딩되는것을의미한다. <Memroy> [Kernel] +=====================+ * 32-bit Kernel Static Core /platform/`uname -m`/kernel/unix - unix /platform/`uname -m`/kernel/genunix - genunix +=====================+ * 64-bit Kernel Device Driver Modules /platform/`uname -m`/kernel/sparcv9/unix Streams Modules /platform/`uname -m`/kernel/sparcv9/genunix fs Moduels sched Modules [Module] +=====================+ * /kernel * /usr/kernel * /platform/`uname -m`/kernel * /platform/`uname -i`/kernel
332 (2) /etc/system 파일 Boot Device 설정 (rootfs, rootdev) Kernel Module 설정 (moddir, exclude, forceload) Kernel Parameter 설정 (set maxusers=40) Solaris 8 버전이후에나온운영체제커널들은운영체제만을운용하는데최적화되어출시되었다. 하지만운영체제에는많은응용프로그램들이설치될수있고, 이런프로그램들이설치해서사용한다면적당한커널튜닝이필요하다. 서비스에게운영체제의많은자원을쓸수있도록설정해줘야하는것이다. 솔라리스운영체제 ( 커널 ) 튜닝은 /etc/system 파일의설정을적당하게편집하여사용하면된다. # cat /etc/system /* Linux: /etc/sysctl.conf */... (a) moddir /* Default Module Directory 선언시사용 */ * Example: * moddir: /kernel /usr/kernel /other/modules moddir: /kernel /usr/kenerl /platform/sun4u/kernel \ /platform/sunw,ultra-5_10/kernel /other/modules... (b). rootfs, rootdev /* Root F/S, Root Devices 정의시사용 */ * Example: * rootfs:ufs * rootdev:/sbus@1,f /esp@0,800000/sd@3,0:a... (c). exclude /* 제외시킬커널모듈선언시사용 */ * Examples: * exclude: win * exclude: sys/shmsys... (e). forceload /* 강제적으로로딩시킬커널모듈선언시사용 */ * Example: * forceload: drv/foo * forceload: drv/vx... (f). set /* 기본커널패러미터값변경시사용 */ * Examples: * * To set variables in 'unix': * * set nautopush=32 * set maxusers=40 * * To set a variable named 'debug' in the module named 'test_module' * * set test_module:debug = 0x13 *... * Examples: * set noexec_user_stack=1 * Stack Usage Limitation * set noexec_user_stack_log=1 * Stack Usage Limitation Log * set rstchown=0 * chown CMD * set abort_enable=0 * STOP + A * set pt_cnt=100 * pts terminal * set npty=100 * pts terminal * set maxuprc=100 * User process Max Limit -> /etc/system 파일내에서 "*" 표시는주석처리이다. -> /etc/system 파일내에서한개의라인은 80문자를넘으면안된다
333 [ 참고 ] set maxuprc=100 사용자프로세스의최대 100 개의프로세스이상띄울수없도록설정한다. => DoS(Denial Of Service) 공격을방어할수있다. fork bomb 공격에대비할수있다. [ 참고 ] 솔라리스에서커널패러미터설정값확인 (Solaris 9 버전 ) -> " 모든 Solaris 버전 " -> "Solaris 9 운영체제 " -> System Administrator Collection -> Solaris Tunable Parameter Reference Manual (Solaris 10 버전 ) -> " 모든 Solaris 버전 " -> Solaris 10 운영체제 -> System Administrator Collection -> Solaris Tunable Parameter Reference Manual ( => ( 변경 )
334 Init Phase init process (Parent Process, PID=1) /etc/inittab (4.1) /etc/inittab 파일 솔라리스 10 버전에서는이전버전 ( 예 : 솔라리스 9 버전 ) 처럼 /etc/inittab 파일이복잡하게만들어지지않고, 간단해졌다. 솔라리스 10 버전에서 /etc/inittab 파일은운영체제의기본적인초기화에관련한부분과 svc.startd 데몬을띄우도록설정이되어있다. # cat /etc/inittab # Copyright 2004 Sun Microsystems, Inc. All rights reserved. # Use is subject to license terms. # # The /etc/inittab file controls the configuration of init(1m); for more # information refer to init(1m) and inittab(4). It is no longer # necessary to edit inittab(4) directly; administrators should use the # Solaris Service Management Facility (SMF) to define services instead. # Refer to smf(5) and the System Administration Guide for more # information on SMF. # # For modifying parameters passed to ttymon, use svccfg(1m) to modify # the SMF repository. For example: # # # svccfg # svc:> select system/console-login # svc:/system/console-login> setprop ttymon/terminal_type = "xterm" # svc:/system/console-login> exit # #ident "@(#)inittab /12/14 SMI" ap::sysinit:/sbin/autopush -f /etc/iu.ap /* 스트림모듈초기화 */ sp::sysinit:/sbin/soconfig -f /etc/sock2path /* 소켓초기화 */ smf::sysinit:/lib/svc/bin/svc.startd >/dev/msglog 2<>/dev/msglog </dev/console /* svc.startd 데몬실행 */ p3:s1234:powerfail:/usr/sbin/shutdown -y -i5 -g0 >/dev/msglog 2<>/dev/msglog /* 전원이부족하면 shutdown */ pt:s1234:powerfail:/usr/lib/svc/method/installupdates lock /* 부팅시패치설치 Lock */ ID:runlevel:action:command ID : identifier rulevel: if empty if not empty action : initdefault sysinit powerfail - All Runlevel(0,s/S,1,2,3,4,5,6) - Corresponde Runlevel - 시스템기본런레벨정의 (System Default Runlevel) - Boot시만약 initdefault entry가 missing인경우어떤 runlevel이요구되는지를물어보는안전장치. - power fail signal을수신하는경우의기재사항과관계되는프로세스를실행. command: excution command
335 /dev/msglog [ 참고 ] /dev/msglog & /usr/lib/saf/sac & /usr/lib/saf/ttymon 대해서 Message output from rc scripts is directed to the /dev/msglog file. Prior to the Solaris 8 OE, all of these messages were written to the /dev/console file. The /dev/msglog file is used for message output collection from system startup or background applications. # man msglog NAME msglog - message output collection from system startup or background applications SYNOPSIS /dev/msglog DESCRIPTION Output from system startup ("rc") scripts is directed to /dev/msglog, which dispatches it appropriately. NOTES In the current version of Solaris, /dev/msglog is an alias for /dev/sysmsg. In future versions of Solaris, writes to /dev/msglog may be directed into a more general logging mechanism such as syslogd(1m). syslog(3c) provides a more general logging mechanism than /dev/msglog and should be used in preference to /dev/msglog whenever possible. [ 참고 ] Solaris 9 버전에서의 /etc/inittab 파일 l Solaris 9 버전에서의 /etc/inittab 파일은복잡한내용이들어있었다. # cat /etc/inittab ap::sysinit:/sbin/autopush -f /etc/iu.ap ap::sysinit:/sbin/soconfig -f /etc/sock2path fs::sysinit:/sbin/rcs sysinit >/dev/msglog 2<>/dev/msglog </dev/console is:3:initdefault: p3:s1234:powerfail:/usr/sbin/shutdown -y -i5 -g0 >/dev/msglog 2<>/dev/msglog ss:s:wait:/sbin/rcs >/dev/msglog 2<>/dev/msglog </dev/console s0:0:wait:/sbin/rc0 >/dev/msglog 2<>/dev/msglog </dev/console s1:1:respawn:/sbin/rc1 >/dev/msglog 2<>/dev/msglog </dev/console s2:23:wait:/sbin/rc2 >/dev/msglog 2<>/dev/msglog </dev/console s3:3:wait:/sbin/rc3 >/dev/msglog 2<>/dev/msglog </dev/console s5:5:wait:/sbin/rc5 >/dev/msglog 2<>/dev/msglog </dev/console s6:6:wait:/sbin/rc6 >/dev/msglog 2<>/dev/msglog </dev/console fw:0:wait:/sbin/uadmin 2 0 >/dev/msglog 2<>/dev/msglog </dev/console of:5:wait:/sbin/uadmin 2 6 >/dev/msglog 2<>/dev/msglog </dev/console rb:6:wait:/sbin/uadmin 2 1 >/dev/msglog 2<>/dev/msglog </dev/console sc:234:respawn:/usr/lib/saf/sac -t 300 co:234:respawn:/usr/lib/saf/ttymon -g -h -p "`uname -n` console login: " -T sun-color \ -d /dev/console -l console -m ldterm,ttcompat
336 svc.startd Phase svc.start Phase 에대한자세한내용은백승찬님의 SMF 서비스관리 부분을참고한다
![[Q & A] Throubleshooting A ------------------------ VTOC format,](/docs-images/104/164712495/images/337-0.jpg "prtvtoc/fmthard ------------------------ bootblk installboot")


337 [Q & A] Throubleshooting A VTOC format, prtvtoc/fmthard bootblk installboot super block newfs, fsck -o b= cylinder group fsck / fsck -o f,p - backup super block - cylinder group block - inode table - data block [Q & A] Throubleshooting B [Boot Sequence] Boot PROM Phase => Boot Program Phase => Kernel Phase => Init Phase => svc.startd
338 Solaris 10 Admin I Guide 8. User/Group Administration l l l l l l User Information Files Group Information Files User Admin CMD(s) Group Admin CMD(s) /etc/skel Directory User/Group Extension Admin CMD(s) 사용자 / 그룹정보관련파일 (User/Group Database Files) l /etc/passwd 사용자의정보파일 l /etc/shadow 사용자의암호파일 l /etc/group 그룹의정보파일 솔라리스시스템에는사용자의정보를담고있는 /etc/passwd, /etc/shadow 파일이있고, 그룹에대한정보가있는 /etc/group 파일이존재한다. 이파일들을텍스트파일로되어있으며, 안에있는내용을 cat, vi 명령어들을통해확인할수있다. 하지만직접편집하는것을권장하지않는다. 이런파일들은명령어 (useradd, usermod, userdel, groupadd, groupmod, groupdel 등 ) 를통해자동으로편집되고, 관리되는것을권장한다
339 사용자정보파일 l /etc/passwd 사용자의정보 ( 사용자이름,UID/GID, 홈디렉토리, 로그인쉘등 ) l /etc/shadow 사용자의암호 ( 사용자암호, 암호정책설정 ) 사용자의기본정보를담고있는파일은 /etc/passwd, /etc/shadow 파일이다. /etc/passwd 파일은사용자정보파일로서시스템에존재하는모든사용자에대한정보가등록되어있다. 정보로는사용자이름 (Username), 예전에암호가설정되어있던필드 (Placeholer), 사용자아이디 (UID), 주그룹아이디 (GID), 주석, 홈디렉토리, 로그인쉘등에대한정보가존재한다. /etc/shadow 파일에는시스템에존재하는사용자들의암호가암호화되어저장되어있다. 이파일은 root 사용자만읽을수있다. (1). /etc/passwd 파일 NAME passwd - password file DESCRIPTION The file /etc/passwd is a local source of information about users' accounts. The password file can be used in conjunction with other naming sources, such as the NIS maps passwd.byname and passwd.bygid, data from the NIS+ passwd table, or password data stored on an LDAP server. Programs use the getpwnam(3c) routines to access this information. Each passwd entry is a single line of the form: username:password:uid:gid:gcos-field:home-dir:login-shell where username password uid gid gcos-field is the user's login name. The login (login) and role (role) fields accept a string of no more than eight bytes consisting of characters from the set of alphabetic characters, numeric characters, period (.), underscore (_), and hyphen (-). The first character should be alphabetic and the field should contain at least one lower case alphabetic character. A warning message is displayed if these restrictions are not met. The login and role fields must contain at least one character and must not contain a colon (:) or a newline (\n). is an empty field. The encrypted password for the user is in the corresponding entry in the /etc/shadow file. pwconv(1m) relies on a special value of 'x' in the password field of /etc/passwd. If this value of 'x' exists in the password field of /etc/passwd, this indicates that the password for the user is already in /etc/shadow and should not be modified. is the user's unique numerical ID for the system. is the unique numerical ID of the group that the user belongs to. is the user's real name, along with information to pass along in a mail-message heading. (It is called the gcos-field for historical reasons.) An ``&'' (ampersand) in this field stands for the login name (in cases where the login name appears in a user's real name)
340 home-dir login-shell is the pathname to the directory in which the user is initially positioned upon logging in. is the user's initial shell program. If this field is empty, the default shell is /usr/bin/sh. /etc/passwd 파일의사용자의기본적인정보를담고있는파일이다. 다음은 /etc/passwd 파일의내용이다. # cat /etc/passwd root:x:0:0:super-user:/:/bin/ksh daemon:x:1:1::/: bin:x:2:2::/usr/bin: sys:x:3:3::/: adm:x:4:4:admin:/var/adm: lp:x:71:8:line Printer Admin:/usr/spool/lp: uucp:x:5:5:uucp Admin:/usr/lib/uucp: nuucp:x:9:9:uucp Admin:/var/spool/uucppublic:/usr/lib/uucp/uucico smmsp:x:25:25:sendmail Message Submission Program:/: listen:x:37:4:network Admin:/usr/net/nls: gdm:x:50:50:gdm Reserved UID:/: webservd:x:80:80:webserver Reserved UID:/: postgres:x:90:90:postgresql Reserved UID:/:/usr/bin/pfksh svctag:x:95:12:service Tag UID:/: nobody:x:60001:60001:nfs Anonymous Access User:/: noaccess:x:60002:60002:no Access User:/: nobody4:x:65534:65534:sunos 4.x NFS Anonymous Access User:/: user01:x:100:1::/export/home/user01:/bin/ksh user02:x:101:1::/export/home/user02:/bin/ksh # grep user01 /etc/passwd user01:x:100:1:user Account:/export/home/user01:/bin/ksh ( 출력결과해석 ) Username : user01 x : placeholder 1000 : UID 10 : GID User Account : Comment /export/home/user01 : Home Directory /bin/ksh : Login Shell
341 다음은 /etc/passwd 파일의사용자정보라인에대한각필드의자세한설명이다. 첫번째필드 : 사용자이름규칙 l 사용자이름은 2-8 글자의문자또는숫자가능 (Character + Number) ( 예 ) user01(6 글자 ) l 사용자이름의첫번째글자는반드시문자 ( 예 ) 01user(X). l 사용자의이름에는최소한한개의소문자포함 ( 하지만보통사용자이름은소문자만사용 ) l 사용자의이름에 Blank(" "), Period(.), Underscore(_), Hyphen(-) 은쓰지않는다. ( 일부프로그램에서문제를일으킬수있다.) ( 예 ) user 01(X), user_01(x), user-01(x), user.01(x) l 중첩된사용자이름을사용할수없다. ( 기본사용자 ) User UID Description root 0 Superuser account, The root account that has access to the entire system. It has almost no restrictions and overrides all other logins, protections, and permissions. daemon 1 Umbrella system daemon associated with routine system tasks. bin 2 Administrative daemon associated with running system binaries to perform some routine system task. sys 3 Administrative daemon associated with system logging or updating files in temporary directories. adm 4 Administrative daemon associated with system logging. lp 71 Line printer(lp) daemon account. uucp 5 Daemon associated with uucp(unix-to-unix Copy) functions. nuucp 6 Another daemon associated with uucp functions. The account that is used remote systems to log in to the host and start file transfers using uucp. smmsp 25 Sendmail message submission program daemon. webservd 80 Account reserved for WebServer access. gdm 50 GNOME Display Manager daemon. listen 37 Network listener daemon. nobody Account reserved for anonymous NFS access. noaccess Assigned to a user or a process that needs access to a system through some application but without actually logging in. nobody SunOS 4.0 or 4.1 version of the nobody user account 두번째필드 : Placeholder l 예전버전 ( 예 : SunOS 4.X, Solaris 1.X) 에서암호저장되던필드 l 보안상 'x' 로만표시되고, /etc/shadow 파일의 2번째필드에암호저장 세번째필드 : 사용자아이디 (UID) UID_Number User/Login Account Description root, daemon, bin, sys, etc. System accounts Regular users General purpose accounts and nobody and nobody4 Anonymous users noaccess Non-trusted users UID Number( ) System Account > UID:0 (root) (0-99) +-> 1-99 (Other System Account) End User > : Regular Users( 예 : user01, user02,...) ( ) +-> * : Special Users( 예 : nobody, nobody4, noaccess)
342 [ 참고 ] Reserved UID Numbers 이전버전과의호환을위해서일반사용자를위한 UID 범위는 까지이다. 네번째필드 : 그룹아이디 (GID) l 사용자의주그룹 (Primary Group) 정의 다섯번째필드 : Comment l 사용자의기본정보입력 ( 많은사용자관리시권장, 예 : Mail Server, Printer Server) -> 회사명, 직위, 영문이름, 전화번호, 이메일등입력 여섯번째필드 : Home Directory l 일반사용자의디렉토리는 /export/home 사용하도록한다. -> /export/home -> /home -> /users 일곱번째필드 : Login Shell l 기본쉘 (Basic Shell) - /usr/bin/sh (/sbin/sh : Default Shell) - /usr/bin/ksh - /usr/bin/csh l 확장쉘 (Extention Shell) - /usr/bin/tcsh - /usr/bin/zsh - /usr/bin/bash
343 (2). /etc/shadow 파일 NAME shadow - shadow password file DESCRIPTION /etc/shadow is an access-restricted ASCII system file that stores users' encrypted passwords and related information. The shadow file can be used in conjunction with other shadow sources, including the NIS maps passwd.byname and passwd.byuid and the NIS+ table passwd. Programs use the getspnam(3c) routines to access this information. The fields for each user entry are separated by colons. Each user is separated from the next by a newline. Unlike the /etc/passwd file, /etc/shadow does not have general read permission. Each entry in the shadow file has the form: username:password:lastchg:min:max:warn:inactive:expire:flag The fields are defined as follows: username password The user's login name (UID). An encrypted password for the user generated by crypt(3c), a lock string to indicate that the login is not accessible, or no string, which shows that there is no password for the login. The lock string is defined as *LK* in the first four characters of the password field. lastchg The number of days between January 1, 1970, and the date that the password was last modified. The lastchg value is a decimal number, as interpreted by atol(3c). min max warn inactive expire flag The minimum number of days required between password changes. This field must be set to 0 or above to enable password aging. The maximum number of days the password is valid. The number of days before password expires that the user is warned. The number of days of inactivity allowed for that user. This is counted on a per-machine basis; the information about the last login is taken from the machine's lastlog file. An absolute date expressed as the number of days since the Unix Epoch (January 1, 1970). When this number is reached the login can no longer be used. For example, an expire value of specifies a login expiration of January 1, Failed login count in low order four bits; remainder reserved for future use, set to zero. The encrypted password consists of at most CRYPT_MAXCIPHERTEXTLEN characters chosen from a 64-character alphabet (., /, 0-9, A-Z, a-z). Two additional special characters, "$" and ",", can also be used and are defined in crypt(3c). To update this file, use the passwd(1), useradd(1m), usermod(1m), or userdel(1m) commands. In order to make system administration manageable, /etc/shadow entries should appear in exactly the same order as /etc/passwd entries; this includes ``+'' and ``-'' entries if the compat source is being used (see nsswitch.conf(4)). Values for the various time-related fields are interpreted as Greenwich Mean Time
344 /etc/shadow 파일은사용자의암호가저장되거나, 패스워드에이징 (Password Aging) 설정할때사용하는파일이다. 패스워드에이징은패스워드의쓸수있는기간등을줌으로서사용자의로그인제한및사용자의암호를사용할수있는기간등을설정하는부분을나타낸다. 다음은 /etc/shadow 파일의내용이다. # cat /etc/shadow root:ko.l4080teha2:14150:::::: daemon:np:6445:::::: bin:np:6445:::::: sys:np:6445:::::: adm:np:6445:::::: lp:np:6445:::::: uucp:np:6445:::::: nuucp:np:6445:::::: smmsp:np:6445:::::: listen:*lk*::::::: gdm:*lk*::::::: webservd:*lk*::::::: postgres:np::::::: svctag:*lk*:6445:::::: nobody:*lk*:6445:::::: noaccess:*lk*:6445:::::: nobody4:*lk*:6445:::::: user01:.e1gmp1zeegji:14131:::::: user02:a4fg9ayxepruo:14133:::::: # grep user01 /etc/shadow user01:abcdefghijklm:1994:30:90:5:30:2100: Username : 사용자이름 (/etc/passwd 존재 ) abcdefghijklm : 암호 : 13 문자 (DES) 암호필드의형식 ( ㄱ ) user01:abcdefghijklm:1994::::::: => Password exist ( ㄴ ) user01:*lk*:1994::::::: => Password lock ( ㄷ ) user01:np:1994::::::: => No password setuid only ( ㄹ ) user01::1994::::::: => Null password 1994 : 을기준으로하는암호변경날짜 (Last Change) (Password Aging) MIN Change : 암호를변경할수없는최소날짜 Max Change : 암호를사용할수있는최대날짜 Warning Date : 암호변경을위한남은날짜를알려주는기간 Inactive : 로그인하지않으면비활성화상태로놓는시간 Expire Date : 암호의최대사용기간 Blank : 아직기능이없음
345 다음은패스워드에이징 (Password Aging) 에대한설명그림이다. 현재 ( 암호가변경된날짜 ) 30(MIN) 90(MAX) (ExpireDate) (WARN) 30(Inactive) [ 그림 ] Password Aging [EX]. 패스워드사용정책 (Passowrd Aging Policy) MAX, WARN 설정값설정테스트 Expire Date 설정값테스트 ( 선수지식 ) # man passwd -n : min -x : max -w : Warn -f : Inactive -e : (X) -> passwd -e ( 로그인쉘변경 ) # man useradd -e : Expire( 예 : usermod -e 01/20/2009 user01) ( 주의 ) 솔라리스에서 passwd 명령어의 -e 옵션은사용자의로그인쉘을변경할때사용한다
346 [EX1] MAX Change, Warning Date 설정실습 사용자의패스워드변경날짜기간정책관리자의패스워드정책 -> 사용자는반드시 30 일에한번씩암호를변경하여야한다.( 예 : paran.com, daum.net) -> 일반사용자가암호를변경하는경우에는패스워드변경규칙을적용받는다. -> 따라서, 서버보안이강화된다. 1 user01 사용자의암호변경 # passwd user01 New Password: <----- 새로운암호입력 ( 암호 : user01) Re-enter new Password: <----- 암호재입력 passwd: password successfully changed for user01 -> 오늘이 user01 사용자의암호가변경된날짜가된다. # grep user01 /etc/shadow user01:wyof5gb2kpnzc:14274:::::: /* 1970 년 1 월 1 일을기준으로암호가변경된날짜가 일지남 */ +---> 오늘 ( 암호를변경한날, 기준시간 ) 2 user01 사용자에대해서 MAX Change, WARN Date 값을설정 # passwd -x 30 -w 7 user01 /* -x : max, -w : Warn */ passwd: password information changed for user01 # grep user01 /etc/shadow user01:wyof5gb2kpnzc:14274:0:30:7::: -> passwd 명령어를통해 MAX Change 값이설정이되면, MIN Change 값은자동으로 0이된다. 암호가변경된날자현재 : 1 월 30 일 2 월 30 일 30(MAX) (WARN) (a) (b) A A 2월25일 3월5일 3 현재시간설정변경 (1 월 30 일 10 시 -> 2 월 25 일 10 시 ) # date Fri Jan 30 10:42:46 KST 2009 (1 월 30 일 ) # date (2 월 25 일 10 시정각 ) Wed Feb 25 10:00:00 KST user01 사용자로그인테스트 # telnet localhost Trying Connected to.. Escape character is '^]'. login: user01 <-----user01사용자로로그인 Password: <----- user01 사용자의암호입력 Your password will expire in 4 days. <----- 메세지확인 Last login: Mon Jan 19 15:19:14 from Sun Microsystems Inc. SunOS 5.9 Generic January
347 $ id uid=4002(user01) gid=1(other) $ exit 5 현재시간설정변경 (2 월 25 일 10 시 -> 3 월 5 일 10 시 ) # date (3 월 5 일 17 시정각 ) Thu Mar 5 10:00:00 KST user01 사용자로그인테스트 # telnet localhost Trying Connected to localhost. Escape character is '^]'. login: user01 <----- user01사용자로로그인 Password: <----- 기존의암호입력 ( 암호 : user01) Choose a new password. New Password: <----- 새로운암호입력 ( 암호 : 123user) Re-enter new Password: <----- 암호한번더입력 ( 암호 : 123user) telnet: password successfully changed for user01 Last login: Wed Feb 25 10:00:30 from localhost Sun Microsystems Inc. SunOS 5.9 Generic January 2003 $ id uid=4002(user01) gid=1(other) $ exit [ 원복 ] rdate 명령어를통해시간동기화 # rdate
348 [EX2] Expire Date 설정하는방법 프로젝트사용자들의관리정책 Server ( 프로젝트개발서버 ) 회사개발자그룹 - user01, user02, user03... 외부회사개발자그룹 새로운개발자추가 - test01, test02, test03... <----- new01(30일 ), new02(40일 ), new03(25일 ) /etc/shadow <---- script(7 일 ) user02:ndezxa6s4y0o.:13887:::::14244: 사용자계정신청서 - 사용자이름 (ID)/ 암호 (PASS) - 사용기간 - 회사정보 / 부서 / 직책 - 연락처... 1 원격서버 ( ) 와시간동기화 # rdate user02 사용자의패스워드에대한 Expire Date 설정 # usermod -e 12/31/2009 user02 (Expire Date : 2009 년 12 월 31 일 ) # grep user02 /etc/shadow user02:pvl7cb6kaj19e:14253:::::14609: 3 현재시간변경 (2009 년 1 월 30 일 10 시 -> 2010 년 1 월 10 일 18 시 ) # date -u (2010 년 1 월 10 일 10 시정각 ) Sun Jan 10 10:00:00 GMT user02 사용자로그인테스트 # telnet localhost Trying Connected to localhost. Escape character is '^]'. login: user02 <-----user02사용자로로그인 Password: <----- 암호입력 ( 암호 : user02) Login incorrect <----- 메세지확인 Connection to localhost closed by foreign host. -> user02 사용자는로그인할수없다. -> 이유는 expire date(2009년 12월31일 ) 가지났기때문이다. -> 사용자정보확인 # grep user02 /etc/passwd 5 원격서버와시간동기화 # rdate Fri Jan 30 11:01: # rdate time.bora.net # ntpdate time.kirss.re.kr
349 그룹정보파일 /etc/group 파일은그룹의정보를저장하는파일이다. /etc/group 파일에는그룹의이름, 그룹패스워드, 그룹아이디, 그룹에속한사용자의목록이들어갈수있다. 솔라리스시스템에서한명의사용자는반드시한개이상의그룹에속해있어야한다. 반드시속해있어야하는그룹을주그룹 (Primary Group) 이라고하고더속할수있는그룹을부그룹 (Secondary Group) 이라고한다. 솔라리스에서는한명의사용자가한개의주그룹에속하고 15 개의부그룹에더속할수있다. /etc/group 파일에는시스템의모든그룹정의가선언되어있다. (1). /etc/group 파일 NAME group - group file DESCRIPTION The group file is a local source of group information. The group file can be used in conjunction with other group sources, including the NIS maps group.byname and group.bygid, the NIS+ table group, or group information stored on an LDAP server. Programs use the getgrnam(3c) routines to access this information. The group file contains a one-line entry for each group recognized by the system, of the form: groupname:password: gid:user-list where groupname gid user-list The name of the group. A string consisting of lower case alphabetic characters and numeric characters. Neither a colon (:) nor a NEWLINE can be part of a groupname. The string must be less than MAXGLEN-1, usually 8, characters long. The group's unique numerical ID (GID) within the system. A comma-separated list of users allowed in the group. The maximum value of the gid field is To maximize interoperability and compatibility, administrators are recommended to assign groups using the range of GIDs below where possible. If the password field is empty, no password is demanded. During user identification and authentication, the supplementary group access list is initialized sequentially from information in this file. If a user is in more groups than the system is configured for, {NGROUPS_MAX}, a warning will be given and subsequent group specifications will be ignored. Malformed entries cause routines that read this file to halt, in which case group assignments specified further along are never made. To prevent this from happening, use grpck(1b) to check the /etc/group database from time to time
350 /etc/group 파일은그룹의정보를저장하는파일이다. 다음은 /etc/group 파일의내용이다. # cat /etc/group root::0: other::1:root bin::2:root,daemon sys::3:root,bin,adm adm::4:root,daemon uucp::5:root mail::6:root tty::7:root,adm lp::8:root,adm nuucp::9:root staff::10: daemon::12:root sysadmin::14: smmsp::25: gdm::50: webservd::80: postgres::90: nobody::60001: noaccess::60002: nogroup::65534: # grep staff /etc/group staff::10:user01,user Group Name : staff Group Password : ( 그룹암호를줄수있는명령어가존재하지않는다.) GID : 10 User List : user01, user02는 Secondary Group으로 staff 그룹에속한다
351 다음은 /etc/group 파일에서그룹정보라인에대한자세한각필드설명이다. 첫번째필드 : 그룹이름 (Group Name) l " 사용자이름 " 정의규칙과같다. ( 기본그룹 ) Group GID Description root 0 Superuser group other 1 Optional group bin 2 Administrative group associated with running system binaries sys 3 Administrative group associated with system logging or temporary directories adm 4 Administrative group associated with system logging uucp 5 Group associated with uucp functions mail 6 Electronic mail group tty 7 Group associated with tty devices lp 8 Line printer group nuucp 9 Group associated with uucp functions staff 10 General administrative group. daemon 12 Group associated with routine system tasks sysadmin 14 Administrative group associated with legacy Admintool and Solstice Admin Suite tools smmsp 25 Daemon for Sendmail message submission program webservd 80 Group reserved for Web Server access gdm 50 Group reserved for the GNOME Display Manager daemon nobody Group assigned for anonymous NFS access noaccess Group assigned to a user or a process that needs access to a system through some application but without actually logging in nogroup Group assigned to a user who is not a member of a known group nogroup Group assigned to a user who is not a member of a known group 두번째필드 : 그룹암호 (Group Password) 현재그룹암호를줄수있는명령어는존재하지않는다. 그룹암호를사용해야한다면 /etc/shadow 파일의두번째필드의사용자암호를복사해서사용하면된다. 자세한내용은 newgrp(1) 명령어의매뉴얼을참조한다. 그룹암호를아는사용자는 newgrp 명령어를통해주그룹 (Primary Group) 을변경할수있다. 세번째필드 : 그룹아이디 (GID, Group ID) GID 번호체계는 "UID 번호체계 " 와흡사하다. 네번째필드 : 사용자목록 (User List) 부그룹 (Secondary Group) 에속해있는사용자의목록 사용자그룹 (Group) - 주그룹 (Primary Group) (1 개 ) /etc/passwd -> GID 필드 - 부그룹 (Secondary Group) (15 개 ) /etc/group -> User List 필드
352 [EX] root 사용자 / 그룹정보확인 ( 명령어를통해사용자의 Group 정보확인 ) # id uid=0(root) gid=0(root) -> "gid=0(root)" : root 사용의 Primary Group # id -a uid=0(root) gid=0(root) groups=0(root),1(other),2(bin),3(sys),4(adm),5(uucp),6(mail), 7(tty),8(lp),9(nuucp),12(daemon) -> gid=0(root) groups=0(root) -> 1(other),2(bin),3(sys),4(adm),5(uucp),6(mail),7(tty),8(lp),9(nuucp),12(daemon) # groups root other bin sys adm uucp mail tty lp nuucp daemon -> Primary Group : root -> Secondary Group: other bin sys adm uucp mail tty lp nuucp daemon ( 파일을통해그룹의정보확인 ) # grep root /etc/passwd root:x:0:0:super-user:/:/bin/ksh # grep root /etc/group root::0: other::1:root bin::2:root,daemon sys::3:root,bin,adm adm::4:root,daemon uucp::5:root mail::6:root tty::7:root,adm lp::8:root,adm nuucp::9:root daemon::12:root # id -a [ 참고 ] Primary Group / Secondary Group 의쓰임 uid=0(root) gid=0(root) groups=0(root),1(other),2(bin),3(sys),4(adm),5(uucp),6(mail),\ 7(tty),8(lp),9(nuucp),12(daemon) # touch file1 (-rw-r--r-- 1 root root size mtime file1) # cat file1 ( 접근시에사용 ) (-rw-r--r-- 1 root root size mtime file1) A A V UID V GID(Primary GID, Secondary GID) l 주그룹 (Primary Group) 쓰임 : 파일 / 디렉토리생성시및권한점검시 l 부그룹 (Secondary Group) 쓰임 : 파일 / 디렉토리권한점검시
353 사용자관리 (User Administration) 사용자를추가할때사용하는방법은여러가지가있다. asmc 툴을통해추가하는방법, bsmuser 명령어를사용하는방법, cuseradd 명령어를통해추가하는방법, d 직접파일 (/etc/passwd, /etc/shadow) 에추가하는방법등이다. 일반적으로가장많이사용하는방법은 useradd 명령어를통해추가하는방법을가장많이사용하고있다. (1). 사용자관리명령어 (User Admin Command) useradd 사용자정보추가명령어 usermod 사용자정보수정명령어 userdel 사용자정보삭제명령어 [ 참고 ] 사용자추가방법 - SMC(GUI, Solaris Management Console) - smuser(cli) - useradd(cli) - 직접추가 (/etc/passwd, /etc/shadow, /export/home) -> 권장하지않음 [ 참고 ] /root/shell/useradd.sh ( 선수작업 ) 새로추가된모든일반사용자삭제 # grep user /etc/passwd # userdel -r < 사용자이름 > ( 예 : # userdel -r user01) -> user01, user02, user03, user04 사용자삭제 (1.1) useradd 명령어 NAME useradd - administer a new user login on the system DESCRIPTION useradd adds a new user to the /etc/passwd and /etc/shadow and /etc/user_attr files. The -A and -P options respectively assign authorizations and profiles to the user. The -R option assigns roles to a user. The -p option associates a project with a user. The -K option adds a key=value pair to /etc/user_attr for the user. Multiple key=value pairs may be added with multiple -K options. OPTIONS useradd also creates supplementary group memberships for the user (-G option) and creates the home directory (-m option) for the user if requested. The new login remains locked until the passwd(1) command is executed. Specifying useradd -D with the -g, -b, -f, -e, -A, -P, -p, -R, or -K option (or any combination of these options) sets the default values for the respective fields. See the -D option, below. Subsequent useradd commands without the -D option use these arguments. The system file entries created with this command have a limit of 2048 characters per line. Specifying long arguments to several options can exceed this limit. useradd requires that usernames be in the format described in passwd(4). A warning message is displayed if these restrictions are not met. See passwd(4) for the requirements for usernames
354 -c comment Any text string. It is generally a short description of the login, and is currently used as the field for the user's full name. This information is stored in the user's /etc/passwd entry. -d dir The home directory of the new user. It defaults to base_dir/account_name, where base_dir is the base directory for new login home directories and account_name is the new login name. -g group An existing group's integer ID or character-string name. Without the -D option, it defines the new user's primary group membership and defaults to the default group. You can reset this default value by invoking useradd -D -g group. GIDs 0-99 are reserved for allocation by the Solaris Operating System. -G group An existing group's integer ID or character-string name. It defines the new user's supplementary group membership. Duplicates between group with the -g and -G options are ignored. No more than NGROUPS_MAX groups can be specified. GIDs 0-99 are reserved for allocation by the Solaris Operating System. -m Create the new user's home directory if it does not already exist. If the directory already exists, it must have read, write, and execute permissions by group, where group is the user's primary group. -o This option allows a UID to be duplicated (non-unique). -s shell Full pathname of the program used as the user's shell on login. It defaults to an empty field causing the system to use /bin/sh as the default. The value of shell must be a valid executable file. -u uid The UID of the new user. This UID must be a non-negative decimal integer below MAXUID as defined in <sys/param.h>. The UID defaults to the next available (unique) number above the highest number currently assigned. For example, if UIDs 100, 105, and 200 are assigned, the next default UID number will be 201. UIDs 0-99 are reserved for allocation by the Solaris Operating System
355 # grep user01 /etc/passwd user01:x:100:1:end User:/export/home/user01:/bin/ksh ( 명령어형식 ) # useradd -u 100 -g 1 -c "End User" -m -d /export/home/user01 -s /bin/ksh user01 # passwd user01 # useradd -m -d /export/home/user01 -s /bin/ksh user01 # passwd user01 [ 참고 ] useradd 기본옵션사용 ( 옵션없이사용하는경우 ) -u 1000 기존의사용자다음번호 (UID) 자동할당.( 초기시작 100번 ) -g 10 Other(1) 그룹자동할당. -c "End User" 정보는없음. -m 홈디렉토리생성되지않음. -d /export/home/user01 /home/< 사용자이름 > 디렉토리사용.( 예 : /home/user01) -s /bin/ksh 기본쉘 (/bin/sh) 자동등록. [ 참고 ] useradd 명령어수행시에러메세지 The following indicates that login specified is already in use: UX: useradd: ERROR: login is already in use. Choose another. The following indicates that the uid specified with the -u option is not unique: UX: useradd: ERROR: uid uid is already in use. Choose another. The following indicates that the group specified with the -g option is already in use: UX: useradd: ERROR: group group does not exist. Choose another. The following indicates that the uid specified with the -u option is in the range of reserved UIDs (from 0-99): UX: useradd: WARNING: uid uid is reserved. The following indicates that the uid specified with the -u option exceeds MAXUID as defined in <sys/param.h>: UX: useradd: ERROR: uid uid is too big. Choose another. The following indicates that the /etc/passwd or /etc/shadow files do not exist: UX: useradd: ERROR: Cannot update system files - login cannot be created
356 (1.2) usermod 명령어 NAME usermod - modify a user's login information on the system DESCRIPTION The usermod utility modifies a user's login definition on the system. It changes the definition of the specified login and makes the appropriate login-related system file and file system changes. The system file entries created with this command have a limit of 512 characters per line. Specifying long arguments to several options might exceed this limit. OPTIONS -l new_logname Specify the new login name for the user. See passwd(4) for the requirements for usernames. -m Move the user's home directory to the new directory specified with the -d option. If the directory already exists, it must have permissions read/write/execute by group, where group is the user's primary group. # grep user01 /etc/passwd user01:x:1000:10:user :/export/home/user01:/bin/ksh -l -u -g -c -m -d -s ( 명령어형식 ) # usermod -u 1002 user01 # usermod -g 1 -c "Test User" user01 # usermod -c "" user01 # usermod -s /bin/bash user01 # usermod -m -d /export/home/user02 -l user02 user01 (-l : Login name) [ 참고 ] useradd 명령어에비해서 usermod 명령어는 -l 옵션이더있다. 이것은사용자의이름까지변경할수있어야하기때문이다. (1.3) userdel 명령어 NAME userdel - delete a user's login from the system DESCRIPTION The userdel utility deletes a user account from the system and makes the appropriate account-related changes to the system file and file system. OPTIONS -r Remove the user's home directory from the system. This directory must exist. The files and directories under the home directory will no longer be accessible following successful execution of the command. ( 명령어형식 ) # userdel -r user02 (-r : Remove Directory) -> 홈디렉토리존재하는경우 : 정상적으로명령어수행 -> 홈디렉토리존재하지않는경우 : 비정상적으로명령어수행, 명령어실행에러 # userdel user
357 [ 참고 ] 사용자삭제시여러가지메세지 1 user01 사용자의홈디렉토리가존재하지않는경우 # userdel -r user01 UX: userdel: ERROR: Unable to find status about home directory: No such file or directory. -> 사용자홈디렉토리가없는데 -r 옵션을사용하여삭제할려고하는경우에러메세지 ( 해결 ) # userdel user01 2 홈디렉토리의소유자가잘못된경우 # userdel -r user01 UX: userdel: WARNING: user01 has no permissions to use /export/home/user01. -> 사용자홈디렉토리의 UID 번호가정보와일치하지않아서생기는에러메세지 # ls -ld /export/home/user01 drwxr-xr-x other 512 4월 1 15:56/export/home/user01 ( 해결 ) # userdel user01 # rm -r /export/home/user01 or # chown -R user01 /export/home/user01 # userdel -r user01 3 /etc/passwd 파일에사용자정보가없는경우 # userdel -r user100 UX: userdel: ERROR: user100 does not exist. -> 사용자가없는데사용자를삭제할려고한경우의에러메세지
358 [ 참고 ] 실무예 (useradd -m, userdel -r 옵션이없는경우 ) l 타켓시스템 : Tru64 (Compaq) -> HP inlucde < 오라클관리자의잘못된설정예 > Oracle 9i -> Oracle 10g (oracle 사용자 ) /ora92 -> /oracle10g # vi /etc/passwd [ 수정전 ] oracle:x:1000:100:oracle Admin:/ora92:/bin/bash [ 수정후 ] 홈디렉토리직접수정 oracle:x:1000:100:oracle Admin:/oracle10g:/bin/bash <----- 홈디렉토리변경 (/ora92->/oracle10g) # mv /ora92 /oracle10g # telnet localhost oracle 사용자로로그인 < 시스템엔지니어의정상설정예 > # userdel oracle -> /etc/passwd, /etc/shadow 정보만삭제 # useradd -u g 100 -d /oracle10g -s /bin/bash oracle -> -m 옵션이없다. ( 주의 ) UID/GID 번호체크 [ 참고 ] 로그인못하도록사용자설정 Expire Date 활용하는방법 # usermod -e 01/20/07 user01 사용자암호을 Lock 거는방법 # passwd -l user01 (-l : lock, -u : unlock) 로그인쉘로 /bin/false 사용하는방법 # usermod -s /bin/false user01 로그인쉘을할당하지않는방법 # vi /etc/passwd lp:x:71:8:line Printer Admin:/usr/spool/lp:
359 (1.4) useradd -D 명령어사용 SYNOPSIS useradd [-c comment] [-d dir] [-e expire] [-f inactive] [-g group] [-G group [, group...]] [-m [-k skel_dir]] [-u uid [-o]] [-s shell] [-A authorization [,authorization...]] [-P profile [,profile...]] [-R role [,role...]] [-p projname] [-K key=value] login useradd -D [-b base_dir] [-e expire] [-f inactive] [-g group] [-A authorization [,authorization...]] [-P profile [,profile...]] [-R role [,role...]] [-p projname] [-K key=value] OPTIONS -D Display the default values for group, base_dir, skel_dir, shell, inactive, expire, proj, projname and key=value pairs. When used with the -g, -b, -f, -e, -A, -P, -p, -R, or -K options, the -D option sets the default values for the specified fields. l useradd 명령어의 -D 옵션은 useradd 명령어수행할때특별한옵션이없을때의기본값지정 # useradd -D (-D : Default) group=other,1 project=default,3 basedir=/home skel=/etc/skel shell=/bin/sh inactive=0 expire= auths= profiles= roles= limitpriv= defaultpriv= lock_after_retries= -> 그룹지정이없으면기본적으로 other(1) 그룹이다. -> 홈디렉토리지정이없으면기본적으로 /home 이다. -> 로그인쉘지정이없으면기본적으로 /bin/sh 이다. # useradd -D -g staff (0) # useradd -D -b /export/home (0) # useradd -D -s /bin/ksh (X) # useradd -m -d /export/home/user04 -s /bin/ksh user04 or # useradd -m -s /bin/ksh user04 ( 주의 ) 기본쉘을변경할수있는옵션이없다.( 예 : useradd -D -s /bin/ksh (X)) [EX] useradd -D 명령어실습 1 user03 사용자추가및정보확인특별한옵션이나인자없이 useradd 명령어를통해 user03 사용자추가 # useradd user03 # passwd user03 -> 사용자암호입력 # grep user03 /etc/passwd user03:x:1016:1::/home/user03:/bin/sh <----- 사용자의홈디렉토리 '/home/user03' # grep user03 /etc/shadow user03:nu0k5kavafte.:13926:::::: # ls -l /home -> 홈디렉토리없음 (useradd 명령어에 -m 옵션을주지않고사용자를추가했기때문에 )
360 2 user03 사용자삭제 # userdel -r user03 UX: userdel: ERROR: Unable to find status about home directory: No such file or directory. -> 홈디렉토리가없는데 useradd 명령어의 -r 옵션을사용했기때문이다. # userdel user03 # grep user03 /etc/passwd -> 사용자가삭제되어서정보가존재하지않는다. 3 useradd/usermod 명령어의기본옵션변경및확인 # useradd -D -b /export/home group=other,1 project=default,3 basedir=/export/home skel=/etc/skel shell=/bin/sh inactive=0 expire= auths= profiles= roles= limitpriv= defaultpriv= lock_after_retries= # useradd -D group=other,1 project=default,3 basedir=/export/home skel=/etc/skel shell=/bin/sh inactive=0 expire= auths= profiles= roles= limitpriv= defaultpriv= lock_after_retries= 4 user04 사용자추가및정보확인 # useradd -m user04 # passwd user04 -> 사용자암호를입력한다. # grep user04 /etc/passwd user04:x:1017:1::/export/home/user04:/bin/sh # grep user04 /etc/shdadow user04:3.mta/vsj1tya:13926:::::: # ls -ld /export/home/user04 drwxr-xr-x 2 user04 other 월 17 13:46 /export/home/user04/ 5 user04 사용자삭제및확인 # userdel -r user04 # grep user04 /etc/passwd # -> 정보가없어야한다. ( 복원 ) 사용자정보복원 ( ㄱ ) Base Directory 복원 # useradd -D -b /home ( ㄴ ) 사용자 (user01/user02) 복원 # useradd -m -d /export/home/user01 -s /bin/ksh user01 # passwd user01 # useradd -m -d /export/home/user02 -s /bin/ksh user02 # passwd user
361 [ 실무예 ] oracle 사용자추가 # groupadd dba /* DBA 그룹생성 */ # groupadd oinstall /* oinstall 그룹생성 */ # cat /etc/group /* 그룹추가확인 */ # useradd -g oinstall -G dba -m -d /oracle10g -s /bin/bash oracle /* -g : Primary Group, -G : Secondary Group */ # passwd oracle /* oracle 사용자암호입력 */ # cat /etc/passwd /* 사용자추가확인 */ # su - oracle /* oracle 사용자로전환 */ $ id -a /* oracle 사용자의정보확인 */ $ pwd $ exit # userdel -r oracle # groupdel dba # groupdel oinstall
362 그룹관리 (1). 그룹관리명령어 (Group Admin Command) groupadd 그룹정보추가 groupmod 그룹정보수정 groupdel 그룹정보삭제 (1.1) groupadd 명령어 NAME groupadd - add (create) a new group definition on the system DESCRIPTION The groupadd command creates a new group definition on the system by adding the appropriate entry to the /etc/group file. OPTIONS -g gid Assigns the group id gid for the new group. This group id must be a non-negative decimal integer below MAXUID as defined in /usr/include/sys/param.h. The group ID defaults to the next available (unique) number above the highest number currently assigned. For example, if groups 100, 105, and 200 are assigned as groups, the next default group number will be 201. (Group IDs from 0-99 are reserved by SunOS for future applications.) -o Allows the gid to be duplicated (non-unique). # grep class1 /etc/group class1::100: ( 명령어형식 ) # groupadd -g 100 class1 or # groupadd class1 groupadd 명령어수행시 -g 옵션을통해 GID 번호가지정이되지않으면, 기존에존재하는그룹의다음번째 GID 번호가자동으로할당된다. (UID 번호의초기값은 100 번부터시작된다.) (1.2) groupmod 명령어 NAME groupmod - modify a group definition on the system DESCRIPTION The groupmod command modifies the definition of the specified group by modifying the appropriate entry in the /etc/group file. OPTIONS -n name Specify the new name for the group. The name argument is a string of no more than eight bytes consisting of characters from the set of lower case alphabetic characters and numeric characters. A warning message will be written if these restrictions are not met. A future Solaris release may refuse to accept group fields that do not meet these requirements. The name argument must contain at least one character and must not include a colon (:) or NEWLINE (\n)
363 # grep class1 /etc/group class1::100: -n -g ( 명령어형식 ) # groupmod -g 101 class1 # groupmod -n class2 class1 (-n : groupname) l usermod 명령어는 useradd 명령어에비해서 -l 옵션 (-l: LoginName) 이더있다. l groupmod 명령어는 groupadd 명령어에비해서 -n 옵션 (-n: GroupName) 이더있다. (1.3) groupdel 명령어 NAME groupdel - delete a group definition from the system DESCRIPTION The groupdel utility deletes a group definition from the system. It deletes the appropriate entry from the /etc/group file. ( 명령어형식 ) # groupdel class2 [ 참고 ] -o 옵션 l l UID, GID을중첩 (duplicate) 시킬수있는옵션사용가능명령어 : useradd, usermod, groupadd, groupmod # grep user /etc/passwd user01:x:4006:1::/export/home/user01:/bin/ksh user02:x:4007:1::/export/home/user02:/bin/ksh # usermod -u 4006 user02 <----- 명령어에러 UX: usermod: ERROR: uid 4006 is already in use. Choose another. # usermod -u o user02 <----- UID 중첩은권장사항아님. ( 결론 ) 솔라리스운영체제안에서 UID/GID 번호는곧운영체제안에서의권한을나타낸다. 따라서서로다른사용자가 UID/GID 번호가중첩이되면안된다
364 [ 참고 ] useradd -G / usermod -G 옵션 l 사용자의부그룹 (Secondary Group) 선언시사용한다. useradd/usermod -g : 주그룹 (Primary Group) useradd/usermod -G : 부그룹 (Secondary Group) 1 class1, class2, class3 그룹추가및확인 # groupadd class1 # groupadd class2 # groupadd class3 # grep class /etc/group class1::100: class2::101: class3::102: 2 user03 사용자새로추가및정보확인 user03 사용자추가시에 Primary Group (-g): staff(gid=10) Secondary Group(-G): class1, class2 # useradd -g staff -G class1,class2 -m -d /export/home/user03 -s /bin/ksh user03 # passwd user03 -> 암호입력 # grep user03 /etc/passwd <----- Primary Group 확인 (GID 10 = staff) user03:x:4009:10::/export/home/user03:/bin/ksh # grep user03 /etc/group <----- Secondary Group 확인 class1::100:user03 class2::101:user03 # id user03 # id -a user03 (# groups user03) 3 user02 사용자의정보변경 # usermod -G class2,class3 user02 # grep user02 /etc/passwd <----- Primary Group 확인 user02:x:4010:1::/export/home/user02:/bin/ksh # grep class /etc/group <----- Secondary Group 확인 class1::100:user03 class2::101:user03,user02 class3::102:user02 4 user02 사용자의 Secondary Group 정보변경 # usermod -G class2 user02 # grep class /etc/group class1::100:user03 class2::101:user03,user02 class3::102: 5 user02 사용자의 Secondary Group 정보삭제 # usermod -G "" user02 # grep class /etc/group class1::100:user03 class2::101:user03 class3::102:
365 [ 참고 ] pwconv/pwunconv(password Conversion) 명령어 SunOS 4.x(Solaris 1.x) - /etc/passwd (user01: abcd:1000:10:comment:/user/user01:/bin/ksh) - ls -l /etc/passwd(rw-r--r-- root other) knit ----> DES > Pd9cO6oUtWnho a ----> DES >? # ls -l /etc/passwd (rw-r--r--) # ls -l /etc/shadow (r ) (a). pwconv 명령어의첫번째기능 Password Policy Conversion /etc/passwd > /etc/passwd, /etc/shadow pwconv(0) /etc/passwd < /etc/passwd, /etc/shadow pwunconv(x) (b). pwconv 명령어의두번째기능 pwconv other function - /etc/passwd < > /etc/shadow sync ========================================= /etc/passwd user01(0) user01(x) /etc/shadow user01(x) user01(0) ========================================= Create Delete EX) pwconv 실습 # useradd -m -d /export/home/user03 -s /bin/ksh user03 # passwd user03 # grep user03 /etc/passwd # grep user03 /etc/shadow # cat /etc/passwd... user03:x:1003:10::/export/home/user03:/bin/ksh... # vi /etc/shadow user03:xxxxxxxxxxxx::::::: -> Line Delete # grep user03 /etc/passwd # grep user03 /etc/shadow # pwconv # grep user03 /etc/passwd # grep user03 /etc/shadow # passwd user03 # vi /etc/passwd... user03:x:1003:10::/export/home/user03:/bin/ksh -> Line Delete... # pwconv # grep user03 /etc/passwd # grep user03 /etc/shadow
366 [ 참고 ] Password Cracking Tools( 약한암호를쓰고있는사용자확인 ) - John The Ripper ( - Crack 1 서버 ( ) 의패키지디렉토리마운트 # mkdir p /mnt/server # mount :/root/packages /mnt/server 2 john The Ripper 패키지설치 # cd /mnt/server/john ; ls # pkgadd -d john sol10-x86-local # pkginfo grep john # cd /usr/local/run ; ls 3 John The Repper 프로그램이읽어들이는 passwd.test 파일생성 # vi /etc/passwd... user01:x:101:1::/export/home/user01:/bin/ksh user02:x:102:1::/export/home/user02:/bin/ksh -----> 라인복사 -----> 라인복사 # vi passwd.test user01:x:101:1::/export/home/user01:/bin/ksh user02:x:102:1::/export/home/user02:/bin/ksh # vi /etc/shadow... user01:bem6oxtewmo5o:14178:::::: user02:wymbthtpzgwmw:14178:::::: -----> 붙여넣기 -----> 붙여넣기 -----> 암호부분복사 -----> 암호부분복사 # vi passwd.test user01:bem6oxtewmo5o:101:1::/export/home/user01:/bin/ksh user02:wymbthtpzgwmw:102:1::/export/home/user02:/bin/ksh -----> 붙여넣기 -----> 붙여넣기 #./john passwd.test Loaded 2 password hashes with 2 different salts (Traditional DES [24/32 4K]) user02 (user02) user01 (user01) guesses: 2 time: 0:00:00:00 100% (1) c/s: 1066 trying: user01 - user02 유닉스의암호가쉽게 Crack 되는이유? -> 유닉스시스템의사용자이름의길이가 2-8 글자사이 -> 유닉스시스템의사용자암호의길이가 6-8 글자사이
367 /etc/skel(skelton) 디렉토리 사용자추가될때사용자의환경을초기화하기위한파일들이존재하는디렉토리이다. (EX) 사용자기본환경파일생성 # useradd -m -d /export/home/user04 -s /bin/ksh user04 # passwd user04 # ls -al /export/home/user04 # ls -al /etc/skel [ 참고 ] 관리자의일반사용자환경을미리초기화시켜주기위한방법 ( 주 ) /etc/profile (.exrc : X) => 새로사용자가로그인할때 ( 부 ) /etc/skel/.profile (.exrc : 0) => 새로사용자가추가될때 [ 참고 ] Login Problems at the Command Line "Login incorrect" - 암호입력실수 "Permission denied" - 로그인, 암호, NIS+ 보안문제 "No shell" - /etc/passwd의로그인쉘문제 "No directory! logging - 홈디렉토리없음. in with home=/" "Choose a new password" - 암호가없음 "Couldn't fork a process" - 사용자프로세스제한에걸림 [EX1] "Login incorrect" 메세지실습 # telnet localhost Trying Connected to localhost. Escape character is '^]'. login: user01 Password: <----- 잘못된암호입력 ( 암호 : u) Login incorrect <----- 메세지확인 ( 원인 ) 암호입력실패 [EX2] "No shell" 메세지실습 # vi /etc/passwd [ 수정전 ] user01:x:100:1::/export/home/user01:/bin/ksh [ 수정후 ] user01:x:100:1::/export/home/user01:/bin/kkh <----- 잘못된쉘입력 (/bin/ksh -> /bin/kkh) -> passwd 명령어의 -e 옵션을통해서잘못된쉘을줄수는없다. # telnet localhost Trying Connected to localhost. Escape character is '^]'. login: user01 Password: <----- 암호입력 (user01) No shell <----- 메세지확인 Connection to localhost closed by foreign host. ( 원인 ) 잘못된로그인쉘지정
368 [EX3] "No directory! logging in with home=/" 메세지실습 ( 전제조건 ) user03 존재한다고가정한다. # grep user03 /etc/passwd # useradd -m -d /export/home/user03 -s /bin/ksh user03 # passwd user03 # mv /export/home/user03 /export/home/user03.old # telnet localhost Trying Connected to localhost. Escape character is '^]'. login: user03 Password: <----- 사용자암호입력 No directory! Logging in with home=/ <----- 메세지확인 Sun Microsystems Inc. SunOS 5.9 Generic January 2003 ( 원인 ) 사용자홈디렉토리없음 # id -> 일반사용자 : user03 # pwd -> /(root) 파티션에존재한다. # exit [EX4] "Choose a new password" 메세지실습 # vi /etc/shadow [ 수정전 ] user02:wpckphdhcrrhs:13908:::::: [ 수정후 ] user02::13908:::::: # telnet localhost < 번째필드의암호삭제 Trying Connected to localhost. Escape character is '^]'. login: user02 Choose a new password. <----- 메세지확인 New Password: <----- 새로운암호입력 ( 암호 : 123user) Re-enter new Password: <----- 암호재입력 ( 암호 : 123user) telnet: password successfully changed for user02 Sun Microsystems Inc. SunOS 5.9 Generic January 2003 ( 원인 ) 일반사용자의암호가없는경우 ( 일반사용자암호가 NULL 패스워드인경우 ) ( 복원 ) 사용자정보복원 l user01 사용자로그인쉘변경 (EX: /bin/kkh -> /bin/ksh) # vi /etc/passwd l user02 암호변경 (EX: 123user -> user02) # passwd user02 l user03 사용자홈디렉토리로변경 (EX: /export/home/user03.old -> /export/home/user03) # mv /export/home/user03.old /export/home/user
369 사용자 / 그룹관리명령어 (smuser, smgroup) SMC(Solaris Management Console) smuser 명령어 smgroup 명령어 (1). [Solaris 8 <=] User Admin CMD useradd 명령어 usermod 명령어 userdel 명령어 groupadd 명령어 groupmod 명령어 groupdel 명령어 (2). [Solaris 9 >=] User Admin CMD smuser 명령어 add modify delete list smgroup 명령어 add modify delete list (3). User Administration with smuser (3-1). 사용자추가 ( 명령어형식 ) smuser add [auth_args] -- [subcommand_args] # /usr/sadm/bin/smuser add -- -n user01 -u 500 -g staff -d /export/home/user01 \ -c "Regular User" -s /bin/ksh -x autohome=n # passwd user01 [ 참고 ] autohome=n Options smuser adds the user without automounting the user's home directory. (3-2). 사용자정보수정 # /usr/sadm/bin/smuser modify -- -n user01 -N user02 -d /export/home/user02 (3-3). 사용자삭제 # /usr/sadm/bin/smuser delete -- -n user
370 (4). 그룹관리 (Group Administration with smgroup) (4-1). 그룹추가 ( 명령어형식 ) smgroup [ -g gid [-o] ] [ -n name ] groupname # /usr/sadm/bin/smgroup add -- -n class1 -g 500 -m user01 (4-2). 그룹변경 # /usr/sadm/bin/smgroup modify -- -n class1 -N class2 (4-3). 그룹삭제 # /usr/sadm/bin/smgroup delete -- -n class2 (5) User Administration with SMC # smc &
371 [ 참고 ] 궈터 (Quota) 설정 Managing Quotas 수정일 : 이메일 : jang4sc@paran.com 플랫폼 : Solaris 9 x86(09/04) on VMWare [ 참고 ] Solaris 9 9/04 System Administrator Collection -> System Administration Guide(Advanced Administration) l Quota 왜필요한가? l Limit(MAX Value) 왜정하는것인가? l 해커에의한시스템 Disk 사용량고갈 [TERM1] Hacker Window # telnet localhost hacker/hacker $ vi disk_exhaust.c (# rcp :/root/C/disk_exhaust.c /test) #include<fcntl.h> #include<sys/types.h> #include<sys/stat.h> main() { int fd; char buf[10000]; fd=open("tempfile", O_WRONLY O_CREAT, 0777); unlink("./tempfile"); while(1) write(fd, buf, sizeof(buf)); } [TERM2] Admin Window # while [ 1 ] > do > echo " " > df -k > sleep 2 > done [TERM1] Hacker Window $ gcc -o disk_exhaust disk_exhaust.c $./disk_exhaust l 해커에의한 Memory 고갈 [TERM1] Hacker Window # telnet localhost hacker/hacker
372 $ vi mem_exhaust.c (# rcp :/root/C/mem_exhaust.c /test) #include<stdlib.h> main() { char *m; while (1) m=malloc(1); } [TERM2] Admin Window # sdtperfmeter & Performance Meter -> View Click -> "Cpu, Load, Disk, Page, Cntx, Swap" Select [TERM1] Hacker Window $ gcc -o mem_exhaust mem_exhaust.c $./mem-exhaust l 해커에의한프로세스개수고갈 [TERM1] Hacker Window # telnet localhost hacker/hacker $ vi proc_exhaust.c (# rcp :/root/C/proc_exhaust.c) #include<unistd.h> #include<sys/types.h> main() { while(1) fork(); return(0); } [TERM2] Admin Window # while [ 1 ] > do > echo " " > ps -ef wc -l > sleep 2 > done [TERM1] Hacker Window $ gcc -o proc_exhaust proc_exhaust.c $./proc_exhaust Setting Soft Limits and Hard Limits for Quotas Limits Data Limit Soft Limit Hard Limit Inodes Limit Soft Limit Hard Limit Once the user exceeds the soft limit, a timer begins. While the timer is ticking, the user is allowed to operate above the soft limit but cannot exceed the hard limit
373 Once the user goes below the soft limit, the timer is reset. However, if the user's usage remains above the soft limit when the timer expires, the soft limit is enforced as a hard limit. By default, the soft limit timer is set to seven days. Soft Limits - The soft limit which the user can temporarily exceed - The soft limit must be less than the hard limit. Hard Limits - The system will not allow a user to exceed his or her hard limit Setting up Quotas (1). Configure a filesystem for quotas (2). Set up quotas for a user (3). (Optional) Set up quotas for multiple users (4). Check for consistency (5). Trun on quotas (6). Check for Exceeded Quotas (7). Checking Quotas on a Filesystem (8). Change the Soft Time Limit Default (9). Turn Off Quotas (1). Configure a filesystem for quotas /etc/vfstab(mount options, rq) quotas file create # vi /etc/vfstab #device device mount FS fsck mount mount #to mount to fsck point type pass at boot options #... /dev/dsk/c1t0d0s7 /dev/rdsk/c1t0d0s7 /export/home ufs 2 yes rq # umount /export/home # mount -o rq /export/home # mount grep export /export/home on /dev/dsk/c1t0d0s7 read/write/setuid/devices/intr/ largefiles/logging/xattr/onerror=panic/dev= on Fri Nov 25 21:20: [ 참고 ] Qutoa 파일을만들지않은상태에서 edquota 명령수행시다음과같은메세지받음. # edquota user01 /etc/mnttab: no UFS filesystems with quotas file # cd /export/home # touch quotas # chmod 600 quotas [Ref.] quotas File l 600 퍼미션이없어도기본적인퍼미션 (644) 를갖기때문에 edquota 명령수행시에러가나지는않지만보안상 600(rw ) 퍼미션을갖도록조정한다. l quotas 파일은 Text 파일이아니므로 cat 명령어로정상적인내용을확인할수는없다. (2). Set up Quotas for a User # edquota user01 fs /export/home blocks (soft = 50, hard = 100) inodes (soft = 10, hard = 15) Soft Limit : disk blocks(0 -> 50), number of inodes(0 -> 10) Hard Limit : disk blocks(0 -> 100), number of inodes(0 -> 15)
374 (1-Kbytes disk blocks) # quota -v user01 Disk quotas for user01 (uid 100): Filesystem usage quota limit timeleft files quota limit timeleft /export/home v Displays the user's quota information on all mounted file systems where quotas exist (3). Setting Up Prototype Quotas for Multiple Users # edquota -p user01 user02 user03 # edquota -p user01 `awk -F: '$3 > 99 && $3 < {print $1}' /etc/passwd` (4). Check Quota Consistency The quotacheck command is run automatically when a system is rebooted. You generally do not have to run the quotacheck command on an empty filesystem with quotas. However, if you are setting up quotas on an file system with existing files, you need to run the quotacheck command to synchronize the quota database with the files or inodes that already exist in the file system. Also keep in mind that running the quotacheck command on large file systems can be time-consuming. To ensure accurate disk data, the file systems being checked should be quiescent when you run the quotacheck command manually. # quotacheck -av -v (Optional) Identifies the disk quotas for each user on a particular file system -a Checks all file systems with an rq entry in the /etc/vfstab file. (5). Turning On Qutas # quotaon -v /dev/dsk/c0t0d0s7 /dev/dsk/c0t0d0s4 # quotaon -av [ 참고 ] Startup Script - ufs_quota 스크립트를통해 quotacheck 명령어와 quotaon 명령어를한번에수행할수도있다. # /etc/init.d/ufs_quota start... 'start') /usr/sbin/quotacheck -a /usr/sbin/quotaon -a ;;... (6). Check for Exceeded Quotas # quota -v user01 # quota -v 301 (301 is UID) -v Displays one or more users' quotas on all mounted file systems that have quotas. (7) Checking Quotas on a Filesystem. # repquota av /dev/dsk/c1t0d0s7 (/export/home): Block limits File limits User used soft hard timeleft used soft hard timeleft user user # repquota -v /dev/dsk/c0t0d0s7 -v Reports on quotas for all users, even those users who do not consume resources. -a Reports on all file systems. (8). Change the Soft Time Limit Default
375 # edquota -t (9). Turn Off Quotas # quotaoff -v /export/home (/etc/vfstab) # quotaoff -av -v Displays a message from each file system when quotas are turned off. -a Turns off quotas for all file systems. [Ref.] Startup Script # /etc/init.d/ufs_quot stop [Summary] Set up Quota /etc/vfstab /export/home/quotas edquota quotacheck quotaon Target Filesystem : /export/home(/dev/dsk/c0t0d0s7) # vi /etc/vfstab /dev/dsk/c0d0s7 /dev/rdsk/c0d0s7 /export/home ufs 2 yes rq # cd /export/home # touch quotas # chmod 600 quotas # edquota user01 fs /export/home blocks (soft = 100, hard = 200) inodes (soft = 10, hard = 20) # edquota -p user01 user02 # quotacheck -v /export/home *** Checking quotas for /dev/rdsk/c0d0s7 (/export/home) user01 fixed: files 0 -> 6 blocks 0 -> 12 user02 fixed: files 0 -> 5 blocks 0 -> 10 # quotaon -v /export/home [TERM1] Block Limit (Soft Hard) Test # telnet localhost user01 사용자로로그인 $ export PATH=$PATH:/usr/sbin $ stty erase ^H $ quota -v user01 Disk quotas for user01 (uid 100): Filesystem usage quota limit timeleft files quota limit timeleft /export/home $ mkfile 90k file1 $ ls -l file1 -rw user01 other Dec 27 02:37 file1 $ quota -v user01 Disk quotas for user01 (uid 100): Filesystem usage quota limit timeleft files quota limit timeleft /export/home $ mkfile 50k file2 quota_ufs: Warning: over disk limit (pid 566, uid 100, inum 17, fs /export/home)
376 $ ls -l file* -rw user01 other Dec 27 02:37 file1 -rw user01 other Dec 27 02:39 file2 $ quota -v user01 Disk quotas for user01 (uid 100): Filesystem usage quota limit timeleft files quota limit timeleft /export/home days $ mkfile 200k file3 quota_ufs: over hard disk limit (pid 581, uid 100, inum 18, fs /export/home) file3: initialized of bytes: Disc quota exceeded $ ls -l file* -rw user01 other Dec 27 02:37 file1 -rw user01 other Dec 27 02:39 file2 -rw user01 other Dec 27 02:43 file3 (file3 이정상적으로생성된것처럼보이지만실제로는 Bytes 만큼만초기화되었다.) $ quota -v user01 Disk quotas for user01 (uid 100): Filesystem usage quota limit timeleft files quota limit timeleft /export/home days $ mkfile 300k file4 quota_ufs: Warning: too many files (pid 587, uid 100, fs /export/home) Could not set length of file4: Disc quota exceeded $ quota -v user01 Disk quotas for user01 (uid 100): Filesystem usage quota limit timeleft files quota limit timeleft /export/home days days $ ls -l file* -rw user01 other Dec 27 02:37 file1 -rw user01 other Dec 27 02:39 file2 -rw user01 other Dec 27 02:43 file3 -rw user01 other 0 Dec 27 02:49 file4 ( 파일은생성되었으나용량은 0 인파일이만들어졌다.) [TEST2] Inode Limit (Soft Hard) Test $ rm file* $ quota -v user01 Disk quotas for user01 (uid 100): Filesystem usage quota limit timeleft files quota limit timeleft /export/home $ touch file1 file2 file3 $ ls -l file* -rw-r--r-- 1 user01 other 0 Dec 27 02:52 file1 -rw-r--r-- 1 user01 other 0 Dec 27 02:52 file2 -rw-r--r-- 1 user01 other 0 Dec 27 02:52 file3 $ quota -v user01 Disk quotas for user01 (uid 100): Filesystem usage quota limit timeleft files quota limit timeleft /export/home $ touch file4 file5 file6 quota_ufs: Warning: too many files (pid 597, uid 100, fs /export/home) $ ls -l file* -rw-r--r-- 1 user01 other 0 Dec 27 02:52 file1 -rw-r--r-- 1 user01 other 0 Dec 27 02:52 file
377 -rw-r--r-- 1 user01 other 0 Dec 27 02:52 file3 -rw-r--r-- 1 user01 other 0 Dec 27 02:53 file4 -rw-r--r-- 1 user01 other 0 Dec 27 02:53 file5 -rw-r--r-- 1 user01 other 0 Dec 27 02:53 file6 $ quota -v user01 Disk quotas for user01 (uid 100): Filesystem usage quota limit timeleft files quota limit timeleft /export/home days $ touch file7 file8 file9 file10 file11 file12 file13 file14 file15 file16 quota_ufs: over file hard limit (pid 600, uid 100, fs /export/home) touch: file14 cannot create touch: file15 cannot create touch: file16 cannot create $ ls -l file* -rw-r--r-- 1 user01 other 0 Dec 27 02:52 file1 -rw-r--r-- 1 user01 other 0 Dec 27 02:54 file10 -rw-r--r-- 1 user01 other 0 Dec 27 02:54 file11 -rw-r--r-- 1 user01 other 0 Dec 27 02:54 file12 -rw-r--r-- 1 user01 other 0 Dec 27 02:54 file13 -rw-r--r-- 1 user01 other 0 Dec 27 02:52 file2 -rw-r--r-- 1 user01 other 0 Dec 27 02:52 file3 -rw-r--r-- 1 user01 other 0 Dec 27 02:53 file4 -rw-r--r-- 1 user01 other 0 Dec 27 02:53 file5 -rw-r--r-- 1 user01 other 0 Dec 27 02:53 file6 -rw-r--r-- 1 user01 other 0 Dec 27 02:54 file7 -rw-r--r-- 1 user01 other 0 Dec 27 02:54 file8 -rw-r--r-- 1 user01 other 0 Dec 27 02:54 file9 $ quota -v user01 Disk quotas for user01 (uid 100): Filesystem usage quota limit timeleft files quota limit timeleft /export/home days [TEST3] Timestamp (Soft Hard) Test $ rm file10 file11 file12 file13 $ quota -v user01 Disk quotas for user01 (uid 100): Filesystem usage quota limit timeleft files quota limit timeleft /export/home days $ su - ( 운영체제시간을변경시킬수있는사용자는 root 사용자뿐이다.) [/]# date Wed Dec 27 03:02:01 KST 2006 (12 월 27 일 -2006) [/]# date Sat Jan 27 03:02:00 KST 2007 (01 월 27 일 -2007) [/]# quota -v user01 Disk quotas for user01 (uid 100): Filesystem usage quota limit timeleft files quota limit timeleft /export/home EXPIRED [/]# su - Over file quota on /export/home, time limit has expired, remove 6 files Sun Microsystems Inc. SunOS 5.9 Generic January 2003 $ touch file10 quota_ufs: over file and time limit (pid 657, uid 100, fs /export/home) touch: file10 cannot create $ ls -l file* -rw-r--r-- 1 user01 other 0 Dec 27 02:52 file1 -rw-r--r-- 1 user01 other 0 Dec 27 02:52 file2... ( 중략 )... -rw-r--r-- 1 user01 other 0 Dec 27 02:54 file8 -rw-r--r-- 1 user01 other 0 Dec 27 02:54 file9 ( 시간이 지나서파일이생성되지않는다.)
378 ( 실무예 ) 사용자제어 (User Control) l 사용자추가 / 확인 / 변경 / 삭제 l 사용자환경관리 - /etc/profile(/etc/skel) l Quota 설정 - /export/home l 마운트옵션 - nosuid, nolargefiles(/export/home) l 약한암호를사용하는있는사용자점검 - John The Ripper(john sunfreeware.com) l 사용자암호변경정책 - Password Aging(WARN, MAX Change) l 사용량제한 - process 개수제한, memory 사용량제한, cpu 사용량제한
379 Solaris 10 Admin I Guide 9. Files About Security l l l l /etc/default/login l l CONSOLE Variable PASSREQ /etc/default/passwd l PASSLENGTH /etc/default/su l SULOG /var/adm/loginlog /etc/default/login 파일 (1). /etc/default 디렉토리의의미 솔라리스시스템에서 /etc/default 디렉토리에명령어의이름 ( 예 : login) 이나데몬의이름 ( 예 : inetd) 과같은파일이존재한다면매칭되는명령어나데몬이동작할때 /etc/default 디렉토리안에자신의이름과같은파일안의설정을기본설정 (Default Parameter) 로설정하게된다. login 프로그램의동작 login 프로그램은사용자의아이디와암호를입력받아인증에사용하고, 사용자로그인시에사용자환경변수 ($LOGNAME, $HOME, $SHELL 등 ) 를설정한다. - /etc/passwd - /etc/shadow - 환경변수설정 $LOGNAME $HOME $SHELL A A A user01:x:1000:10:end User:/export/home/user01:/bin/ksh - $LOGNAME (# echo $LOGNAME) - $HOME (# echo $HOME) - $SHELL (# echo $SHELL)
380 EX) login 프로그램의동작테스트 # login login: user01 Password: <----- 사용자의암호입력 $ $ telnet localhost... ( 중략 )... login: user01 Password: <----- 사용자의암호입력 (2). /etc/default/login 파일 /etc/default/login : login 프로그램이실행될때기본설정 (Default Parameter) 값이존재하는파일 CONSOLE 변수 : root 사용자만로그인할때사용할수있는장치 (Device) 을선언할때사용 PASSREQ 변수 : 일반사용자의 NULL 패스워드를인정할것인지를나타내는변수 (2.1) CONSOLE 변수 (Variable) l CONSOLE 변수는 root 사용자로만로그인할수있는장치 (Device) 을선언할때사용한다. # cat /etc/default/login #ident "@(#)login.dfl /10/19SMI" # # Copyright (c) by Sun Microsystems, Inc. # All rights reserved. # Set the TZ environment variable of the shell. # #TIMEZONE=EST5EDT # ULIMIT sets the file size limit for the login. Units are disk blocks. # The default of zero means no limit. # #ULIMIT=0 # If CONSOLE is set, root can only login on that device. # Comment this line out to allow remote login by root. # CONSOLE=/dev/console # PASSREQ determines if login requires a password. # PASSREQ=YES # ALTSHELL determines if the SHELL environment variable should be set # ALTSHELL=YES # PATH sets the initial shell PATH variable # #PATH=/usr/bin: # SUPATH sets the initial shell PATH variable for root # #SUPATH=/usr/sbin:/usr/bin # TIMEOUT sets the number of seconds (between 0 and 900) to wait before # abandoning a login session. # #TIMEOUT=300 # UMASK sets the initial shell file creation mode mask. See umask(1)
381 # #UMASK=022 # SYSLOG determines whether the syslog(3) LOG_AUTH facility should be used # to log all root logins at level LOG_NOTICE and multiple failed login # attempts at LOG_CRIT. # SYSLOG=YES # SLEEPTIME controls the number of seconds that the command should # wait before printing the "login incorrect" message when a # bad password is provided. The range is limited from # 0 to 5 seconds. # #SLEEPTIME=4 # DISABLETIME If present, and greater than zero, the number of seconds # login will wait after RETRIES failed attempts or the PAM framework returns # PAM_ABORT. Default is 20. Minimum is 0. No maximum is imposed. # #DISABLETIME=20 # RETRIES determines the number of failed logins that will be # allowed before login exits. # #RETRIES=5 # # The SYSLOG_FAILED_LOGINS variable is used to determine how many failed # login attempts will be allowed by the system before a failed login # message is logged, using the syslog(3) LOG_NOTICE facility. For example, # if the variable is set to 0, login will log -all- failed login attempts. # #SYSLOG_FAILED_LOGINS=5 (2.1.1). 기본설정해석 # cat /etc/default/login... ( 중략 )... # If CONSOLE is set, root can only login on that device. # Comment this line out to allow remote login by root. # CONSOLE=/dev/console... ( 중략 )... CONSOLE=/dev/console - root 사용자원격로그인불가 ( 예 : # telnet ) - 일반사용자원격로그인가능 (CONSOLE 변수는 root 사용자만상관이있다.) - CONSOLE 변수는 Linux 시스템에서 /etc/securetty
382 (2.1.2). CONSOLE 변수가선언될수있는형태 (a) CONSOLE=/dev/console ( 기본값 ) -> ( 권장 ) remote=no, Local=Yes, su=yes (b) #CONSOLE=/dev/console remote=yes, Local=Yes, su=yes (c) CONSOLE= remote=no, Local=No, su=yes [ 참고 ] CONSOLE 변수다른정의 CONSOLE=/dev/term/b [EX] CONSOLE 변수설정실습 1 CONSOLE 변수선언및확인 # vi /etc/default/login [ 수정전 ] #CONSOLE=/dev/console [ 수정후 ] CONSOLE=/dev/console # telnet localhost <----- 주석 ('#') 제거 Trying Connected to localhost. Escape character is '^]'. login: root <----- root 사용자 ( 관리자 ) 로로그인 Password: <----- 관리자암호입력 Not on system console <----- 메세지확인 Connection to localhost closed by foreign host. 2 CONSOLE 변수삭제 # vi /etc/default/login [ 수정전 ] CONSOLE=/dev/console [ 수정후 ] #CONSOLE=/dev/console <----- '#' pound 표시 # telnet localhost Trying Connected to localhost. Escape character is '^]'. login: root Password: <----- 관리자암호입력 Last login: Thu Jan 31 11:20:16from:0 Sun Microsystems Inc. SunOS 5.9 Generic January
383 (2.2) PASSREQ 변수 (Variable) - PASSREQ 변수는일반사용자에대한 NULL Password 을인정할것인지를설정할때사용 # cat /etc/default/login... ( 중략 )... # PASSREQ determines if login requires a password. # PASSREQ=YES... ( 중략 )... ( 기본설정 ) 일반사용자 : NULL Password (X) root 사용자 : NULL Password (O) [EX] PASSREQ 변수실습 1 PASSREQ 변수의기본설정확인 # grep PASSREQ /etc/default/login PASSREQ=YES # vi /etc/shadow [ 수정전 ] user01:/cl.fvimvk.ow:13909:::::: [ 수정후 ] user01::13909:::::: # telnet localhost Trying Connected to localhost. Escape character is '^]'. login: user01 Choose a new password. <----- 메세지확인 New Password: <----- 새로운암호입력 ( 암호 : 123user) Re-enter new Password: <----- 암호재입력 ( 암호 : 123user) telnet: password successfully changed for user01 Last login: Wed Jan 30 15:54:38fromlocalhost Sun Microsystems Inc. SunOS 5.9 Generic January 2003 $ exit 2 PASSREQ 변수설정변경및확인 # vi /etc/default/login [ 수정전 ] PASSREQ=YES [ 수정후 ] PASSREQ=NO # vi /etc/shadow [ 수정전 ] user01:/cl.fvimvk.ow:13909:::::: [ 수정후 ] user01::13909::::::
384 # telnet localhost Trying Connected to localhost. Escape character is '^]'. login: user01 <----- 사용자아이디만입력해도로그인가능확인 Last login: Thu Jan 31 11:55:50fromlocalhost Sun Microsystems Inc. SunOS 5.9 Generic January 2003 $ ( 복원 ) /etc/default/login 파일복원 l PASSREQ 변수 (PASSREQ=YES) # vi /etc/default/login l user01 암호복원 # passwd user
385 /etc/default/passwd 파일 /etc/default/passwd : passwd 명령어가읽어들이는기본패러미터값이정의된파일이다. PASSLENGTH 변수 : 패스워드의최소길이를제한하는변수 (1). /etc/default/passwd 파일 - 사용자의최소패스워드길이제한. - Password Aging 정책설정 - Password History 정책설정 # cat /etc/default/passwd #ident "@(#)passwd.dfl /04/22 SMI" # # Copyright 2004 Sun Microsystems, Inc. All rights reserved. # Use is subject to license terms. # MAXWEEKS= /* MAXWEEKS=4 (4 X 7 = 28) */ MINWEEKS= /* MINWEEKS=1 (1 X 7 = 7) */ WARNWEEKS= /* WARNWEEKS=1(1 X 7 = 7) */ PASSLENGTH=6 # NAMECHECK enables/disables login name checking. # The default is to do login name checking. # Specifying a value of "NO" will disable login name checking. # #NAMECHECK=NO # HISTORY sets the number of prior password changes to keep and # check for a user when changing passwords. Setting the HISTORY # value to zero (0), or removing/commenting out the flag will # cause all users' prior password history to be discarded at the # next password change by any user. No password history will # be checked if the flag is not present or has zero value. # The maximum value of HISTORY is 26. # # This flag is only enforced for user accounts defined in the # local passwd(4)/shadow(4) files. # #HISTORY=0 # # Password complexity tunables. The values listed are the defaults # which are compatible with previous releases of passwd. # See passwd(1) and pam_authtok_check(5) for use warnings and # discussion of the use of these options. # #MINDIFF=3 #MINALPHA=2 #MINNONALPHA=1 #MINUPPER=0 #MINLOWER=0 #MAXREPEATS=0 #MINSPECIAL=0 #MINDIGIT=0 #WHITESPACE=YES # # # passwd performs dictionary lookups if DICTIONLIST or DICTIONDBDIR # is defined. If the password database does not yet exist, it is # created by passwd. See passwd(1), pam_authtok_check(5) and # mkdict(1) for more information. # #DICTIONLIST= #DICTIONDBDIR=/var/passwd
386 # cat /etc/default/passwd... ( 중략 )... PASSLENGTH=6... ( 중략 )... - Define Value : 6,7,8 - Unix Password Length : 6-8 l PASSLENGTH 는일반사용자만반영이된다. l 일반사용자의새로입력되는암호가 6 글자보다작으면입력할수없다. l 일반사용자의새로입력되는암호가 8 글자보다크면큰글자는무시된다. [EX] PASSLENGTH 변수실습 1 관리자가 user01 사용자의암호변경및확인 # passwd user01 New Password: <----- 새로운암호입력 ( 암호 : solarisknit) Re-enter new Password: <----- 암호재입력 passwd: password successfully changed for user01 # telnet localhost Trying Connected to localhost. Escape character is '^]'. login: user01 Password: <----- 사용자암호입력 ( 암호 : solarisk) Last login: Thu Jan 31 12:00:29fromlocalhost Sun Microsystems Inc. SunOS 5.9 Generic January 2003 $ id uid=4024(user01) gid=1(other) 2 일반사용자 (user01 사용자 ) 가자신의암호변경 $ passwd ( 이전암호 : solarisk -> 새로운암호 : 123us) passwd: Changing password for user01 Enter existing login password: <----- 기존의암호입력 ( 암호 : solarisk) New Password: <----- 새로운암호입력 ( 암호 : 123us) passwd: Password too short - must be at least 6 characters. <----- 메세지확인 Please try again New Password: <----- 새로운암호입력 ( 암호 : 123user) Re-enter new Password: <----- 암호재입력 passwd: password successfully changed for user01 -> 일반사용자가암호를변경할때는암호변경규칙을적용받는다. -> 암호변경규칙에대한자세한내용은아래와같이매뉴얼을확인한다. # man -M /usr/share/man -s 1 passwd $ exit
387 /etc/default/su 파일 /etc/default/su : su 명령어가읽어들이는기본패러미터값이정의된파일 SULOG 변수 : su 명령어의성공 / 실패기록을남기는로그파일지정할때사용하는변수 su 명령어수행에대한성공 / 실패로그기록을남기는로그파일을지정할때사용하는변수 # cat /etc/default/su #ident "@(#)su.dfl /08/14SMI" /* SVr */ # SULOG determines the location of the file used to log all su attempts # SULOG=/var/adm/sulog # CONSOLE determines whether attempts to su to root should be logged # to the named device # #CONSOLE=/dev/console # PATH sets the initial shell PATH variable # #PATH=/usr/bin: # SUPATH sets the initial shell PATH variable for root # #SUPATH=/usr/sbin:/usr/bin # SYSLOG determines whether the syslog(3) LOG_AUTH facility should be used # to log all su attempts. LOG_NOTICE messages are generated for su's to # root, LOG_INFO messages are generated for su's to other users, and LOG_CRIT # messages are generated for failed su attempts. # SYSLOG=YES # cat /etc/default/su... ( 중략 )... # SULOG determines the location of the file used to log all su attempts # SULOG=/var/adm/sulog... ( 중략 )... [EX] SULOG 변수실습 1 관리자용윈도우에서 /var/adm/sulog 파일모니터링 [TERM1] 관리자윈도우 # tail -f /var/adm/sulog 2 사용자용윈도우에서 user02 사용자로로그인하여작업 [TERM2] 사용자윈도우 # telnet localhost user02 사용자로로그인 $ su - user01 Password: <----- 잘못된암호입력 ( 암호 : 123) su: Sorry $ su - user01 Password: <----- 정상적인암호입력 ( 암호 : 123user) Sun Microsystems Inc. SunOS 5.9 Generic January
388 $ id uid=100(user01) gid=1(other) $ tty /dev/pts/7 3 관리자윈도우의 /var/adm/loginlog 파일해석 (/var/adm/sulog 파일해석 ) SU 02/17 15:47 - pts/7 user02-user01 SU 02/17 15:47 + pts/7 user02-user 필드설명 SU su 명령어에대한로그기록 02/17 15:47 su 명령어실행시간 -, + -: 실패, +: 성공 pts/7 제어터미널 user02-user01 사용자스위칭정보 [ 참고 ] 관리대상이되는사용자선정 l su 명령어수행시실패를많이하는사용자검색 SU 02/17 15:47 - pts/7 user02-user01 SU 02/17 15:47 + pts/7 user02-user01 # cat /var/adm/sulog -> 출력결과생략 # cat /var/adm/sulog awk '$4 == "-" {print $0}' SU 04/19 19:04 - pts/3 root-user01 SU 04/19 19:05 - pts/3 root-user01 SU 04/19 19:05 - pts/3 root-user01 SU 04/19 19:05 - pts/3 root-user01 SU 04/19 19:05 - pts/3 root-user01 SU 06/20 11:06 - pts/6 user1-root SU 07/25 12:24 - pts/4 root-role1 SU 07/25 14:37 - pts/4 root-dateuser # cat /var/adm/sulog awk '$4 == "-" {print $0}' grep '\-root' (=> fgrep '-root') SU 06/20 11:06 - pts/6 user1-root # cat /var/adm/sulog awk '$4 == "-" {print $0}' grep '\-root' grep '06/20'
389 /var/adm/loginlog 파일 - 사용자가로그인시 5 번인증실패에대한로그기록을한다. - 기본적으로파일 (/var/adm/loginlog) 이존재하지않으므로생성하여야한다. - 만약로그파일 (/var/adm/loginlog) 이생성되지않으면로그기록은남지않는다. # cat /etc/default/login... ( 중략 )... # RETRIES determines the number of failed logins that will be # allowed before login exits. # #RETRIES=5 /* 5 번인증에실패하면 Connection 끊김 */ # # The SYSLOG_FAILED_LOGINS variable is used to determine how many failed # login attempts will be allowed by the system before a failed login # message is logged, using the syslog(3) LOG_NOTICE facility. For example, # if the variable is set to 0, login will log -all- failed login attempts. # #SYSLOG_FAILED_LOGINS=5 /* 5 번인증에실패하면로그기록으로남김 */ (1). /var/adm/loginlog 파일생성 /var/adm/loginlog 파일이없으면로그인시 5 번인증에실패해도기록으로남겨지지않기때문에로그파일 (/var/adm/loginlog) 파일을생성해야한다. 이파일을생성하는것을권장한다. # touch /var/adm/loginlog # chown root:sys /var/adm/loginlog # chmod 644 /var/adm/loginlog ( 보안상 : 640, 600) [EX] /var/adm/loginlog 파일실습 1 관리자윈도우에서 /var/adm/loginlog 파일모니터링 [TERM1] 관리자윈도우 # tail -f /var/adm/loginlog -> /var/adm/loginlog 파일은새로생성된파일이기때문에안에내용은초기에없다. 2 사용자윈도우에서 root 사용자로로그인하면서 5 번인증실패 [TERM2] 사용자윈도우 # telnet localhost root/1 -> 잘못된암호입력 ( 암호 : 1) root/2 -> 잘못된암호입력 ( 암호 : 2) root/3 -> 잘못된암호입력 ( 암호 : 3) root/4 -> 잘못된암호입력 ( 암호 : 4) root/5 -> 잘못된암호입력 ( 암호 : 5)
390 3 /var/adm/loginlog 파일해석 (/var/adm/loginlog 파일출력결과해석 ) root:/dev/pts/7:sun Feb 17 15:54: root:/dev/pts/7:sun Feb 17 15:54: root:/dev/pts/7:sun Feb 17 15:54: root:/dev/pts/7:sun Feb 17 15:54: root:/dev/pts/7:sun Feb 17 15:54: 필드설명 root 로그인시도사용자이름 /dev/pts/7 로그인시도제어터미널 Sun Feb 17 15:54: 로그인시도시간 관리자정책 l /var/adm/loginlog 파일생성 l 반복적인로그기록이남겨져있는지정기적으로점검 l 필요하다면, /etc/default/login(retries=3, SYSLOG_FAILED_LOGINS=3) [ 참고 ] /var/adm/loginlog 파일은다른로그파일과같이분석하기에좋은파일이다. - /var/adm/messages 일반적인 ( 시스템전반적인로그기록 ) 로그파일 - /var/adm/loginlog 로그인실패기록 [TERM1] # tail -f /var/adm/loginlog [TERM2] # tail -f /var/adm/messages [TERM3] # telnet localhost user01/1 user01/2 user01/3 user01/4 user01/
391 ( 정리 ) 보안에관련한파일 1. /etc/default/login 파일 CONSOLE=/dev/console ( 기본값 -> 권장 ) PASSREQ=YES ( 기본값 -> 권장 ) 2. /etc/default/passwd 파일 PASSLENGTH=6 ( 패스워드길이정책변경 -> 권장 ) HISTORY=0 /etc/security/policy.conf(/etc/security/crypt.conf) 3. /etc/default/su 파일 SULOG=/var/adm/sulog ( 기본값 -> 권장 ) 4. /var/adm/loginlog 파일 ( 파일생성 -> 권장 )
392 [ 참고 ] /etc/default/login, /etc/default/passwd 파일분석 /etc/default/login, /etc/default/passwd 파일분석 작성일 : 플랫폼 : Solaris 10 x86(05/08) on VMWare l l /etc/default/login 파일 /etc/default/passwd 파일 (1). /etc/default/login #ident "@(#)login.dfl /06/25 SMI" # # Copyright 2004 Sun Microsystems, Inc. All rights reserved. # Use is subject to license terms. # Set the TZ environment variable of the shell. # #TIMEZONE=EST5EDT # /***** TIMEZONE 설정 *****/ l TIMEZONE 변수를통해서 time zone을설정할수있다. l /usr/share/lib/zoneinfo 디렉토리안에운영체제에서지원되는 time zone의내용이있다. # echo $TZ 현재 TIMEZONE 설정 ( 예 : 아시아 > 동부 > 대한민국 ) ROK # cd /usr/share/lib/zoneinfo 지원되는 TIMEZONE 종류확인 Africa/ Canada/ Factory Iceland MST7MDT Portugal Zulu America/ Chile/ GB Indian/ Mexico/ ROK posixrules@ Antarctica/ Cuba GB-Eire Iran Mideast/ Singapore src/ Arctic/ EET GMT Israel NZ Turkey tab/ Asia/ EST GMT+0 Jamaica NZ-CHAT UCT Atlantic/ EST5EDT GMT-0 Japan Navajo US/ Australia/ Egypt GMT0 Kwajalein PRC UTC Brazil/ Eire Greenwich Libya PST8PDT Universal CET Etc/ HST MET Pacific/ W-SU CST6CDT Europe/ Hongkong MST Poland WET # ULIMIT sets the file size limit for the login. Units are disk blocks. # The default of zero means no limit. # #ULIMIT=0 # /***** 사용자사용블럭제한 *****/ l 사용자가사용할수있는블럭수를지정한다. l 만약 ULIMIT가 10블럭 (1 Block = 512 Bytes) 으로지정이되면사용자는 5K 밖에는사용할수없게된다. $ ulimit -a time(seconds) unlimited file(blocks) unlimited data(kbytes) unlimited stack(kbytes) coredump(blocks) unlimited nofiles(descriptors) 256 vmemory(kbytes) unlimited # vi /etc/default/login ULIMIT=10 # telnet localhost user01 로그인 $ ulimit -a time(seconds) unlimited file(blocks) 10 data(kbytes) unlimited
393 stack(kbytes) coredump(blocks) unlimited nofiles(descriptors) 256 vmemory(kbytes) unlimited $ /usr/sbin/mkfile 20k file1 File Size Limit Exceeded(coredump) $ ls core # If CONSOLE is set, root can only login on that device. # Comment this line out to allow remote login by root. # #CONSOLE=/dev/console # /***** Root 사용자로그인제한 *****/ 본문내용참고 # PASSREQ determines if login requires a password. # PASSREQ=YES # /***** 사용자의 Null 패스워드유 / 무설정 *****/ 본문내용참고 # ALTSHELL determines if the SHELL environment variable should be set # ALTSHELL=YES # /***** 사용자의 SHELL 변수변경가능여부설정 *****/ l ALTSHELL 변수가 NO 로지정이되면모든사용자의 SHELL 변수는기본적으로 /bin/sh 가된다. # vi /etc/default/login ALTSHELL=NO # telnet localhost user01 로그인 # echo $SHELL /bin/sh # grep user01 /etc/passwd user01:x:102:1::/export/home/user01:/bin/ksh # PATH sets the initial shell PATH variable # #PATH=/usr/bin: # /***** 사용자의 PATH 변수설정 *****/ l 사용자의 PATH 변수를설정하여줄수있다. 하지만, /etc/profile 사용하는것을권장한다. # SUPATH sets the initial shell PATH variable for root # #SUPATH=/usr/sbin:/usr/bin # /***** Root 사용자를위한 PATH 변수설정 *****/ l 사용자의 SUPATH 변수를설정하여줄수있다. 하지만, /etc/profile 사용하는것을권장한다. # TIMEOUT sets the number of seconds (between 0 and 900) to wait before # abandoning a login session. # #TIMEOUT=300 # /***** 사용자의 idle 시간설정 *****/ # telnet localhost user01 사용자로그인 $ export TIMEOUT=60 -> 60 초기다림 ( 명령어를입력하지않고 60 초동안기다림 ) -> 자동로그아웃 # UMASK sets the initial shell file creation mode mask. See umask(1). # #UMASK=022 # /***** 사용자의 umask 값설정 *****/ l csh 쉘에관련해서만적용된다. 그이유는 sh 계열 (ksh, zsh, bash 포함 ) 은 /etc/profile이읽혀지면서 /etc/profile에존재하는 umask 값이덮어쓰기형태로적용되기때문이다. # SYSLOG determines whether the syslog(3) LOG_AUTH facility should be used # to log all root logins at level LOG_NOTICE and multiple failed login # attempts at LOG_CRIT. # SYSLOG=YES
394 # /***** root 사용자로그인실패시로그기록유 / 무설정 *****/ l root 사용자의로그인기록과 (LOG_NOTICE), 로그인시암호를잘못입력하여 5번실패하게되면, 기록으로남길것인지를설정한다.(/var/adm/loginlog) # SLEEPTIME controls the number of seconds that the command should # wait before printing the "login incorrect" message when a # bad password is provided. The range is limited from # 0 to 5 seconds. # #SLEEPTIME=4 # /***** 로그인암호실패시 sleep time 지정 *****/ l 로그인시암호입력을실패하면다음암호입력할때까지의시간을정의한다. l 0 초부터 5 초사이의값을입력이가능하고, 기본값은 4 초이다. # DISABLETIME If present, and greater than zero, the number of seconds # login will wait after RETRIES failed attempts or the PAM framework returns # PAM_ABORT. Default is 20. Minimum is 0. No maximum is imposed. # #DISABLETIME=20 # /***** RETRIES(5 번인증실패 ) 번수만큼의인증실패후커낵션을끊는 disable time 지정 *****/ # telnet localhost l 사용자인증실패 5 번실패하고난후에 20 초가지나면쉘프롬프트가뜨게된다. # RETRIES determines the number of failed logins that will be # allowed before login exits. Default is 5 and maximum is 15. # If account locking is configured (user_attr(4)/policy.conf(4)) # for a local user's account (passwd(4)/shadow(4)), that account # will be locked if failed logins equals or exceeds RETRIES. # #RETRIES=5 # /***** 사용자로그인암호입력실패번수지정 *****/ l 로그인시암호를잘못입력하게되면몇번까지재입력이가능한지설정하는값이다. l 지정된번수보다높아지면로그인커넥션은끊어진다. l 기본값은 5 번이다. # The SYSLOG_FAILED_LOGINS variable is used to determine how many failed # login attempts will be allowed by the system before a failed login # message is logged, using the syslog(3) LOG_NOTICE facility. For example, # if the variable is set to 0, login will log -all- failed login attempts. # #SYSLOG_FAILED_LOGINS=5 # /* 사용자로그인실패시기록으로남길번수지정 *****/ l 사용자가로그인시암호를잘못입력하게되면변수에지정된번수이후에실패는기록으로남겨진다.(/var/adm/loginlog) l 기본값은 5 번이다 (2). /etc/default/passwd #ident "@(#)passwd.dfl /04/22 SMI" # # Copyright 2004 Sun Microsystems, Inc. All rights reserved. # Use is subject to license terms. # MAXWEEKS= MINWEEKS= PASSLENGTH=6 # /* 패스워드에이징 (Password Aging) */ 패스워드에이징 MAXWEEKS=4 (4 * 7일 = 28일 ) MINWEEKS= WARNWEEKS=1 (1 * 7일 = 7일 ) l 위의설정은한달에한번씩반드시암호를변경해서써야하고암호 MAX 값일주일전에사용자가로그인하면암호 MAX 값에대한경고메세지를준다. # /* 패스워드길이 */ 본문참조 # NAMECHECK enables/disables login name checking. # The default is to do login name checking
395 # Specifying a value of "NO" will disable login name checking. # #NAMECHECK=NO # /* 로그인이름점검활성화 / 비활성화지정 */ l 기본값은로그인이름을점검하는것이다. 만약 NAMECHECK=NO로설정이되면로그인이름을점검하지않는다. # HISTORY sets the number of prior password changes to keep and # check for a user when changing passwords. Setting the HISTORY # value to zero (0), or removing/commenting out the flag will # cause all users' prior password history to be discarded at the # next password change by any user. No password history will # be checked if the flag is not present or has zero value. # The maximum value of HISTORY is 26. # # This flag is only enforced for user accounts defined in the # local passwd(4)/shadow(4) files. # #HISTORY=0 # /* 사용자암호히스토리지정 */ l 사용자의암호히스토리를지정하여사용자이전암호들을남겨놓았다가, 이전에지정된암호 l 를재사용할려고할때막아주는기능을설정할수있다. 이기능이설정되면 ( 예 : HISTORY=3) 최근변경된 3개의암호를 /etc/security/passhistory 파일에저장하였다가사용자가새로운암호로변경하는경우이암호들과비교하게된다. l 최대값은 26 개까지가능하다. l 만약기능이설정되어있지않다면 0 로가기본값이다. # # Password complexity tunables. The values listed are the defaults # which are compatible with previous releases of passwd. # See passwd(1) and pam_authtok_check(5) for use warnings and # discussion of the use of these options. # #MINDIFF=3 새로운암호는이전암호와 3글자는틀려야한다. #MINALPHA=2 새로운암호는 2개의문자가포함되어야한다. #MINNONALPHA=1 새로운암호는 1개의문자가아닌것이포함되어야한다. #MINUPPER=0 새로운암호는대문자가반드시필요하지는않는다.( 대소문자구별 NO) #MINLOWER=0 새로운암호는소문자가반드시필요하지는않는다.( 대소문자구별 NO) #MAXREPEATS=0 새로우암호에반복되는글자의수의지정은없다. #MINSPECIAL=0 새로운암호의특수문자의지정은없다. #MINDIGIT=0 새로운암호의숫자지정은없다. #WHITESPACE=YES 새로운암호에공백문자가필요하다. # # # passwd performs dictionary lookups if DICTIONLIST or DICTIONDBDIR # is defined. If the password database does not yet exist, it is # created by passwd. See passwd(1), pam_authtok_check(5) and # mkdict(1) for more information. # #DICTIONLIST= #DICTIONDBDIR=/var/passwd # /* 사용자암호비교사전파일및디렉토리지정 */ l 사용자가암호를변경할때 (passwd 명령어사용시 ) DICTIONDIR 디렉토리및 DICTIONLIST 파일에지정된파일들에있는암호는사용할수없도록막아준다
396 패스워드점검에대한솔라리스 10 버전의새로운기능 패스워드점검에대한솔라리스 10 버전의새로운기능 패스워드히스토리기능 (Password History Checking) 패스워드최대길이변경 (Password Length Policy) 사용자잠금 (Acount Locking) (1). Password Checking Two updates have been made to how Solaris 10 OS checks password. The first is to support prior password history checking. The Second is to change the maximum number of characters in a password from eight to a possible 256(8 -> 256). (a). Featuers The updated password checking features have the following new featuers: Password History - Accounts defined in name services which support password history checking (presently files only), have a password hhistory maintained of up to 26 prior changed passwords. Each user's 26 prior passwords are kept so that an administrator may increase the number to check at any time up to 26, and have the new policy immediately enforced. The default is zero. Setting the HISTORY value to zero causes all user's password history to be discarded at the next password change by any user. If HISTORY is non-zero in the /etc/default/passwd file /etc/security/passhistory is created to record the user's previous 26 encrypted passwords, regardless of the value of HISTORY. Should HISTORY be set to zero in /etc/default/passwd this file is removed. The prior passwords retained are the crypt(3c) form as they would be in the /etc/shadow file. The pam_authtok_check(5) command has been modified to check the user's password history for a reuse of prior password. Root is still exempt from password quality checks. The update is synchronized by the existing global locking done during every local account password update. Maximum Number of Characters Allowed - The need to have greater password flexibility has led to the changing of th PASS_MAX variable from eight to 256. This variable change takes place in the limits.h header file. The getconf and getpass commands have been updated to interact with this change
397 (2). 패스워드히스토리점검 (Password History Checking) The following is a list of files that have changed for password history: /etc/default/passwd 패스워드히스토리기능설정파일 /etc/security/passhistory 패스워드히스토리 ( 이전암호 ) 가남겨지는파일 pam_authtok_check PAM 모듈 The /etc/default/passwd file has been updated to allow name checking and history. The updates to the file follow: # vi /etc/default/passwd... ( 중략 )... # NAMECHECK enables/disables login name checking. # The default is to do login name checking. # Specifying a value of "NO" will disable login name checking. # #NAMECHECK=NO # HISTORY sets the number of prior password changes to keep and # check for a user when changing passwords. Setting the HISTORY # value to zero (0), or removing/commenting out the flag will # cause all users' prior password history to be discarded at the # next password change by any user. No password history will # be checked if the flag is not present or has zero value. # The maximum value of HISTORY is 26. # # This flag is only enforced for user accounts defined in the # local passwd(4)/shadow(4) files. # #HISTORY=0... ( 중략 )... The /etc/security/passhistory is an auto-generated, colon-delimited file. It has the following syntax: user:cryptedpw1:cryptedpw2:... The getconf command has been updated to remain consistent with XPG. The following has been added to the command: - /usr/xpg4/bin/getconf [ -v specification ] system_var - /usr/xpg4/bin/getconf [ -v specification ] path_var - /usr/xpg4/bin/getconf -a The limits.h header file has been updated to reflect a maximum number of characters and now has this updated line: PASS_MAX 256 /* max # of characters in a pass-word */
398 [EX1] 암호히스토리기록실습 1 /etc/default/passwd 설정 # vi /etc/default/passwd [ 수정전 ] #HISTORY=0 [ 수정후 ] HISTORY=3 <----- 주석 (#) 을제거하고, 값을 3 으로설정 2 사용자윈도우에서 user01 사용자의패스워드변경 (user01 -> 123user) [TERM1] 사용자용윈도우 # telnet localhost user01 사용자로로그인 $ passwd passwd: Changing password for user01 Enter existing login password: (user01) New Password: (123user) Re-enter new Password: (123user) passwd: password successfully changed for user01 3 관리자윈도우에서 /etc/security/passhistory 파일점검 [TERM2] 관리자용윈도우관리자 (root 사용자 ) 확인 # cat /etc/security/passhistory user01:b3akyp0wcp0oe: -> 123user 4 사용자윈도우에서 user01 사용자의암호변경 (123user -> verify2) $ passwd passwd: Changing password for user01 Enter existing login password: (123user) New Password: (verify2) Re-enter new Password: (verify2) passwd: password successfully changed for user01 5 관리자윈도우에서 /etc/security/passhistory 파일점검 [TERM2] 관리자용윈도우관리자 (root 사용자 ) 확인 # cat /etc/security/passhistory user01:5zfcuqtxw1cn.:b3akyp0wcp0oe: -> verify2:123user 6 사용자윈도우에서 user01 사용자의암호변경 (verify2 -> 3verify) $ passwd passwd: Changing password for user01 Enter existing login password: (verify2) New Password: (3verify) Re-enter new Password: (3verify) passwd: password successfully changed for user01 7 관리자윈도우에서 /etc/security/passhistory 파일점검 [TERM2] 관리자용윈도우관리자 (root 사용자 ) 확인 # cat /etc/security/passhistory user01:pddblzw0.ryam:5zfcuqtxw1cn.:b3akyp0wcp0oe: -> 3verify:verify2:123user
399 8 사용자윈도우에서 user01 사용자의암호변경 (3verify -> 123user) $ passwd passwd: Changing password for user01 Enter existing login password: (3verify) New Password: (123user) passwd: Password in history list. Please try again New Password: ( 히스토리에없는암호입력 : ( 예 ) abc123!) [TERM2] 관리자용윈도우관리자 (root 사용자 ) 확인 # cat /etc/security/passhistory user01:pddblzw0.ryam:5zfcuqtxw1cn.:b3akyp0wcp0oe: A A A 3verify verify2 123user
400 [EX2] 암호최대길이변경실습 (Password Max Length) /etc/security/policy.conf /etc/security/crypt.conf 암호의길이를변경하기위한설정을하는파일암호화알고리즘을선택할수있는파일 1 /etc/security/policy.conf 파일설정 # vi /etc/security/policy.conf... ( 중략 )... # crypt(3c) Algorithms Configuration # # CRYPT_ALGORITHMS_ALLOW specifies the algorithms that are allowed to # be used for new passwords. This is enforced only in crypt_gensalt(3c). # CRYPT_ALGORITHMS_ALLOW=1,2a,md5,5,6 # The Solaris default is the traditional UNIX algorithm. This is not # listed in crypt.conf(4) since it is internal to libc. The reserved # name unix is used to refer to it. # [ 수정전 ] CRYPT_DEFAULT= unix [ 수정후 ] CRYPT_DEFAULT=1 /* 1 => bsdmd5, /etc/security/crypt.conf 참조 */ # cat /etc/security/crypt.conf # # Copyright 2008 Sun Microsystems, Inc. All rights reserved. # Use is subject to license terms. # #ident "@(#)crypt.conf /05/14 SMI" # # The algorithm name unix is reserved. 1 crypt_bsdmd5.so.1 2a crypt_bsdbf.so.1 md5 crypt_sunmd5.so.1 5 crypt_sha256.so.1 6 crypt_sha512.so.1 2 user01 사용자로로그인하여암호변경 # telnet localhost user01 사용자로로그인 $ passwd passwd: Changing password for user01 Enter existing login password: (user01 사용자암호입력 : abc123!) New Password: (solarisknit1) Re-enter new Password: (solarisknit1) passwd: password successfully changed for user01 3 암호길이정책변경확인 $ exit # grep user /etc/shadow user01:$1$ouhuhmti$4ntlwx1jhhfn5zqn9rdk91:14178:::::: user02:pvl7cb6kaj19e:14178:::::: -> /etc/security/policy.conf 파일의내용을변경하여 ( 예 : CRYPT_DEFAULT=1) 적용되는시점은 passwd 명령어가수행될때적용이된다. -> 따라서, user02 사용자는암호가길어진것은아니다. user02 사용자도 passwd 명령어를통해자신의암호를길게사용할수있도록하게되면암호가변경된다. -> ( 관리자 ) 가암호의최대길이를 255글자까지늘려쓰는방식으로전환한경우에는 MAX Change 값을 30일정도로설정 ( 예 : /etc/default/passwd) 해주어서한달안에는사용자가암호를반드시변경하도록하는것이좋다
401 # telnet localhost user01 사용자로로그인 ( 암호 : solarisknit1) -> 암호입력 : solarisk (X) 로그인이가능하지않는다. -> 압호입력 : solarisknit1 (0) 로그인이가능하다. $ id $ exit ( 복원 ) 다음과같은파일을복원한다. /etc/default/passwd (#HISTORY=0) # vi /etc/default/passwd /etc/security/policy.conf (CRYPT_DEFAULT= unix ) # vi /etc/security/policy.conf user01 사용자의암호 # passwd user
402 [EX3] 사용자자동잠금기능 (Account Locking) Solaris 10 버전에서로그인시여러번암호를잘못입력하는사용자들에대해서자동으로 Lock 을걸어줄수있는기능이있다. 이기능은기본기능은아니므로관리자의설정이필요하다. 만약이런기능이없다면관리자가 /var/adm/loginlog 파일에반복적으로로그인실패한사용자들에정보를보고 passwd 명령어의 -l 옵션을사용하여직접 Lock 을걸어주는것과같다. 1 /etc/security/policy.conf 파일설정 # vi /etc/security/policy.conf [ 수정전 ] # LOCK_AFTER_RETRIES=NO [ 수정후 ] LOCK_AFTER_RETRIES=YES 2 /etc/default/login 파일설정 # vi /etc/default/login [ 수정전 ] # RETRIES=5 [ 수정후 ] RETRIES=3 /* 최대 15 까지설정가능하다. */ 3 user01 사용자로로그인시잘못된암호입력 (3 번 ) # telnet localhost user01/k [TERM2] # grep user01 /etc/shadow # telnet localhost user01/k [TERM2] # grep user01 /etc/shadow # telnet localhost user01/k [TERM2] # grep user01 /etc/shadow user01:*lk*mfabn4juntkfc:14277::::::3 4 /var/adm/messages 파일확인 # tail -f /var/adm/messages Feb 2 16:37:28 solaris254 login: [ID auth.crit] REPEATED LOGIN FAILURES ON /dev/pts/5 FROM localhost, user01 5 user01 사용자암호 unlock # passwd -u user01 /* 사용자 unlock */ passwd: password information changed for user01 # grep user01 /etc/shadow user01:mfabn4juntkfc:14277::::::
403 Solaris 10 Admin I Guide 9. Jobs Scheduling l l at CMD l at 13:00 l at -l, at -q l atrm <job-id>, at -r <job-id> crontab CMD l crontab -e l crontab -l l crontab -r l crontab Files 정기적인작업수행 (Job Scheduling) 솔라리스에서정기적인작업을수행하기위해서사용하는데몬은 cron 이다. cron 데몬을사용하는명령어는 at, crontab 이다. at 명령어는특정한날짜 / 시간에한번작업을수행할때사용하고 crontab 명령어는반복적인작업을수행할때사용한다. 그래서 at 명령어의작업내용은큐 (Queue) 에저장되고 crontab 명령어의작업내용은파일 (File) 에저장된다. job Scheduling -----> cron -----> at CMD ( 반복적인작업 ) crontab CMD at CMD : 특정한시간에한번작업수행 => Queue 저장 (/var/spool/cron/atjobs) crontab CMD : 반복적인작업수행 => File 저장 (/var/spool/cron/crontabs) cron 데몬은솔라리스 10 버전에서 SMF(Service Management Facility) 로통합이되었다. 따라서 svcs 명령어나 svcadm 명령어를통해서서비스데몬을시작하고, 종료하고, 확인할수있다. ( 서비스데몬제어 ) # svcs -a grep cron (# svcs -p cron) online # svcadm disable cron # svcadm enable cron 10:04:02 svc:/system/cron:default
404 at 명령어 NAME at, batch - execute commands at a later time DESCRIPTION at The at utility reads commands from standard input and groups them together as an at-job, to be executed at a later time. The at-job is executed in a separate invocation of the shell, running in a separate process group with no controlling terminal, except that the environment variables, current working directory, file creation mask (see umask(1)), and system resource limits (for sh and ksh only, see ulimit(1)) in effect when the at utility is executed is retained and used when the at-job is executed. OPTIONS -l (The letter ell.) Reports all jobs scheduled for the invoking user if no at_job_id operands are specified. If at_job_ids are specified, reports only information for these jobs. -r at_job_id Removes the jobs with the specified at_job_id operands that were previously scheduled by the at utility. 명령어형식지정시 at 명령어다음에시간을쓰면 at 명령어선언하는방식이된다. 작업내용을확인할때는 at 명령어의 -l 옵션이나 atq 명령어를사용하면된다. at 작업삭제시에는 atrm 명령어다음에요청잡아이디 (Job-ID) 를입력하거나, at 명령어의 -r 옵션다음에요청잡아이디를입력하면삭제가가능하다. ( 명령어형식 ) ( 선언 ) # at 1300 /* 13:00 에수행 */ # at now /* 지금바로수행 */ # at +3 /* 3 분뒤에수행 */ ( 확인 ) # at -l # atq ( 삭제 ) # atrm xxxxx.a # at -r xxxxx.a (1) at 명령어작업선언 l at 명령어의하위프롬프트 (Sub prompt) 에서작업내용을다입력하고나면 <Ctrl + D> 입력한다. l 아래출력결과에서보여지는 a 를잡아이디 (Job-ID) 라고한다. 이것으로작업을구별하게된다. # date 현재시간 : 1 월 31 일 19:37 # at 1940 /* 오후 7 시 40 분 */ at> banner "EXCUTE" > /dev/pts/5 at> <Ctrl + D> commands will be executed using /usr/bin/ksh job a at Thu Jan 31 19:40:
405 (2) at 명령어작업확인 at 명령어에 -l 옵션을사용하면다음과같은내용을확인할수있다. l 작업요청자 l 현재대기중인요청작업아이디 l 작업수행시간 # at -l (/var/spool/cron/atjobs/*) user = root a Sat Feb 9 13:00: atq 명령어를사용하면다음과같은내용확인이가능하다. l 작업요청순서 l 작업실행시간 l 작업요청자 l 요청작업아이디 l 작업이름 # atq Rank Execution Date Owner Job Queue Job Name 1st Jan 31, :40 root a a stdin at 명령어수행시일반사용자는 at 명령어의 -l 옵션을사용하여자신의작업내용만확인이가능하지만, root 사용자는모든사용자의작업내용확인이가능하다. # at -l user = root a Tue Oct 7 13:00: user = user a Tue Oct 7 13:00: # atq Rank Execution Date Owner Job Queue Job Name 1st Oct 7, :00 root a a stdin 2nd Oct 7, :00 user a a stdin at 명령어의실제수행내용은 /var/spool/cron/atjobs 디렉토리에잡아이디 (Job-ID) 파일로저장이된다. 다음은작업내용을확인한예이다. 이파일안에는각작업이수행될때사용되는환경변수에대한내용도출력이된다. # cat /var/spool/cron/atjobs/ a : at job : jobname: stdin : notify by mail: no : project: 1 export _; _='/bin/at' export LANG; LANG='C' export HZ; HZ='100' export PATH='/bin:/sbin:/usr/bin:/usr/sbin:/usr/dt/bin:/usr/ccs/bin:/usr/openwin/bin:\ /usr/sadm/admin/bin:/usr/local/bin' export WINDOWID; WINDOWID=' ' export EDITOR; EDITOR='/usr/bin/vi' export LOGNAME; LOGNAME='root' export MAIL; MAIL='/var/mail/root' export PS1; PS1='[$PWD]# ' export TERMINAL_EMULATOR; TERMINAL_EMULATOR='dtterm' export DISPLAY; DISPLAY=' :0.0' export SHELL; SHELL='/bin/ksh' export HOME; HOME='/' export TERM; TERM='dtterm' export PWD; PWD='/' export TZ; TZ='ROK' PATH;
406 $SHELL << '...the rest of this file is shell input' #ident /05/01 SMI" /* SVr */ cd / umask 22 ulimit unlimited /root/shell/cpuhog.sh (3). at 명령어작업삭제 atrm 명령어나, at 명령어의 -r 옵션을통해서 at 요청작업을삭제할수있다. # atrm a or a: removed # at -r a a: removed (4). at 명령어작업사용자제어 at 명령어를사용할수있는사용자를지정할때사용하는파일이 at.allow 와, at.deny 파일이다. 하지만실무에서 at 명령어가잘사용은되지않으므로자세하게다루지는않는다. /etc/cron.d/at.deny /etc/cron.d/at.allow [ 참고 ] at CMD usage: at [-c -k -s] [-m] [-f file] [-p project] [-q queuename] -t time at [-c -k -s] [-m] [-f file] [-p project] [-q queuename] timespec at -l [-p project] [-q queuename] [at_job_id...] at -r at_job_id... ( 시나리오 ) 서버작업후시스템을종료하도록설정서버작업 - 서버에특정한프로그램설치작업설치작업이오래걸리는프로그램 ( 패치 ) 현재프로그램 ( 패치 ) 설치중... # at +30 (# echo reboot at now +30 min) at> reboot at> <CTRL + D> # at -l [ 참고 ] at 명령어사용방법 # cat script.sh date > /dev/pts/5 banner hello > /dev/pts/5 date > /dev/pts/5 # at now +3 min < script.sh
407 crontab 명령어 NAME crontab - user crontab file DESCRIPTION The crontab utility manages a user's access with cron (see cron(1m)) by copying, creating, listing, and removing crontab files. If invoked without options, crontab copies the specified file, or the standard input if no file is specified, into a directory that holds all users' crontabs. OPTIONS The following options are supported: -e Edits a copy of the current user's crontab file, or creates an empty file to edit if crontab does not exist. When editing is complete, the file is installed as the user's crontab file. The environment variable EDITOR determines which editor is invoked with the -e option. All crontab jobs should be submitted using crontab. Do not add jobs by just editing the crontab file, because cron is not aware of changes made this way. If all lines in the crontab file are deleted, the old crontab file is restored. The correct way to delete all lines is to remove the crontab file using the -r option. If username is specified, the specified user's crontab file is edited, rather than the current user's crontab file. This can only be done by root or by a user with the solaris.jobs.admin authorization. -l Lists the crontab file for the invoking user. Only root or a user with the solaris.jobs.admin authorization can specify a username following the -l option to list the crontab file of the specified user. -r Removes a user's crontab from the crontab directory. Only root or a user with the solaris.jobs.admin authorization can specify a username following the -r option to remove the crontab file of the specified user. 실무에서는 crontab 명령어를많이사용하고있다. crontab 명령어에 -e 옵션을사용하게되면, 사용자의 crontab 파일을열어서편집이가능하고, -l 옵션을사용하면 crontab 파일의내용을확인할수있다. -r 옵션을사용하면 crontab 파일을삭제한다. 하지만 -r 옵션은실무에서는잘사용하고있지않다. 이유는 -r 옵션을사용하는것은 crontab 파일자체를삭제하게한다. crontab 파일은한개의라인이한개의스케줄링규칙이되기때문에, 거의대부분의경우는선언된규칙을삭제하는경우가대부분이기때문이다. 파일자체를삭제하는것은맞지않다
408 (1). crontab 명령어를사용하기위한환경설정 crontab 명령어에 -e 옵션을사용하게되면 /var/spool/cron/crontab 디렉토리에존재하는사용자이름파일을 EDITOR 나 VISUAL 변수에선언된기본편집기을통해서열개된다. 따라서 EDITOR 또는 VISUAL 변수에기본편집기를정의해야한다. 만약기본편집기가선언이되어있지않으면 (EDITOR 또는 VISUAL 변수가선언되지않으면 ) crontab 명령어에 -e 옵션을통해서사용자 crontab 파일을열수는없다. l l crontab -e (-e: edit) 수행 -> 편집기사용 -> EDITOR/VISUAL 변수선언 crontab 명령어를사용하기위한환경변수선언 EDITOR or VISUAL EDITOR=/usr/bin/vi ; export EDITOR or VISUAL=/usr/bin/vi ; export VISUAL (EDITOR=/usr/local/bin/vim ; export EDITOR) (VISUAL=/usr/local/bin/vim ; export VISUAL) [EX] /etc/profile 에 EDITOR 변수선언 crontab 명령어를수행하는모든사용자를위해서 /etc/profile 에적당한라인에 EDITOR 변수를아래와같이선언한다. # vi /etc/profile... ( 중략 )... # # Sfecific Configuration # EDITOR=/usr/bin/vi ; export EDITOR <----- umask 바로위에선언 [ 참고 ] EDITOR 변수선언이되지않은경우 crontab -e 명령어를정상적으로사용하기위해서는 EDITOR 또는 VISUAL 변수가선언되어야한다. 다음은 EDITOR, VISUAL 변수가선언되지않은경우의예이다. # unset EDITOR # crontab -e 726 <----- 메세지확인 ( 파일의사이즈 ) <Ctrl + D> # ls -l /var/spool/cron/crontabs/root -r root other 726 Feb 3 02:24 /var/spool/cron/crontabs/root # EDITOR=/usr/bin/vi ; export EDITOR
409 (2). crontab 명령어 crontab 명령어를통해서사용자의정기적인스케줄링작업을수행할수있다. 정기적이고, 반복적인작업을수행하기위해서 cronab 명령어의 -e 옵션을통해서작업정의가가능하다. crontab 명령어의 -l 옵션을통해서사용자의작업내용을확인해볼수있다. crontab 명령어의 -r 옵션을통해서사용자의작업파일을 (crontab 파일 ) 삭제할수있다. ( 명령어형식 ) # crontab -e [ 사용자 ] /* -e : edit, # vi /var/spool/cron/crontabs/< 사용자이름 > */ # crontab -l [ 사용자 ] /* -l : list, # cat /var/spool/cron/crontabs/< 사용자이름 > */ # crontab -r [ 사용자 ] ( 주의 ) /* -r : remove, # rm /var/spool/cron/crontabs/< 사용자이름 > */ (2.1) root 사용자의 crontab 파일 root 사용자의 crontab 파일은다음과같다. # crontab -l /* # cat /var/spool/cron/crontabs/root */ #ident "@(#)root /03/23 SMI" # # The root crontab should be used to perform accounting data collection. # # 10 3 * * * /usr/sbin/logadm 15 3 * * 0 /usr/lib/fs/nfs/nfsfind 30 3 * * * [ -x /usr/lib/gss/gsscred_clean ] && /usr/lib/gss/gsscred_clean # # The rtc command is run to adjust the real time clock if and when # daylight savings time changes. # 1 2 * * * [ -x /usr/sbin/rtc ] && /usr/sbin/rtc -c > /dev/null 2>&1 #10 3 * * * /usr/lib/krb5/kprop_script slave_kdcs 03 3 * * * /usr/lib/patch/swupauto > /dev/null 2>&1 (2.2) root 사용자의기본 crontab 파일해석 root 사용자의기본 crontab 파일의해석은다음과같다. /usr/sbin/logadm 로그기록을관리해주는명령어이다. /etc/logadm.conf 파일이주설정파일이며로그파일들의정기적으로 rotation 시켜주는역할을가지고있다. 기본적으로다음과같은로그기록들을관리한다. l /var/log/syslog l /var/adm/messages l /var/cron/log l /var/lp/logs/lpsched l /var/fm/fmd/errlog l /var/fm/fmd/fltlog l /var/svc/log/*.log /usr/lib/fs/nfs/nfsfind 공유된 NFS 파일시스템에서.nfs 로시작하는오래된파일들 ( 한주이상오래된파일들 ) 을점검하는본쉘스크립트파일이다. 이스크립트는 /etc/dfs/sharetab 파일을점검한다
410 /usr/lib/gss/gsscred_clean gssd 데몬은사용자모드의데몬으로서 Kernel RPC 와 GSS-API(Generic Security Service Application Program Interface) 사이에서동작하고, 사용가능한 GSS-API Security Tokens 를생성한다. /usr/lib/gss/gsscred_clean 는콘쉘스크립트로 /etc/gss/gsscred_db 데이터베이스파일에서중복되는정보를삭제해준다. 관련된정보는 /usr/lib/gss/gssd 데몬의매뉴얼을확인해보면자세한내용을확인할수있다. /usr/sbin/rtc 모든 RTC(Real-Time Clock) 와 GMT-lag 을관리한다. 관련파일은 /etc/rtc_config 이다. 기본설정은 zone_info 는 ROK 이고 zone_lag 은 9 시간이다. (GMT + 9) /usr/lib/krb5/kprop_script kpro 프로그램은명령어라인유틸러티러서, Kerbose Database 를 Master KDC 로부터 Slave KDC 로배포 (Propagation) 하는역할을가진다. kprop_script 는 kdb5_util, slave_datatrans 을사용해서 KDC Slave 로정기적으로 Database 를넘기는역할을가진다. /usr/lib/patch/swupauto Update Manager 실행시설치할패치를점검하는본쉘스크립트이다
411 [EX1] crontab 명령어사용예제 ( 시나리오 ) 백업을정기적으로수행할수있도록선언하는하도록할려고한다. 백업스크립트는다음과같다. - backup scripts : /root/bin/backup.sh 정기적인백업작업을매일같이 7 시정각에수행되도록선언하여보자. # crontab -e 분 시 일 월 요일명령어 0 7 * * * /root/bin/backup.sh (0: 일요일,1: 월요일 ) > (a) > (a) 0 (b) 10,11,12 (b) 10,20,30 (c) (c) (d) * (0-23) (d) * (0-59) crontab 파일의규칙 l /var/spool/cron/crontabs/< 사용자이름 > 파일에저장된다. l 한개의라인이한개의규칙 (Rule) 이다. l 필드와필드구분은공백문자 (White Space) 로한다. l 한개의라인의 5개의시간필드와 1개의 CMD 필드로구성된다. l 시간필드는 < 분 >,< 시 >,< 일 >,< 월 >,< 요일 > 로구성이되고 l CMD 필드는실행할명령어또는스크립트를정의한다. l crontab 파일에는공백라인이존재하면안된다. l 주석 (#) 은사용이가능하다. [EX2] 특별한날짜에만수행하는백업스케줄링방법 분시 일월요일 명령어 0 5 * * * /root/bin/backup.sh ( 하루에한번씩수행 ) 0 1,13 * * * /root/bin/backup.sh ( 하루에두번씩수행 ) * * /root/bin/backup.sh ( 한달에한번씩수행 ) 0 5 * * 0 /root/bin/backup.sh ( 일주일에한번씩수행 ) 0 5 * * 1,3 /root/bin/backup.sh ( 일주일에두번씩수행 ) ,6,9,12 * /root/bin/backup.sh ( 분기별에한번씩수행 ) * 0 /root/bin/backup.sh ( 매월 1일 5시정각 + 매주일요일날도 ) 0 5 * * 0 /root/bin/backup.sh ( 매월첫번째주일요일날 ) => /root/bin/backup.sh (DAY=`date +%d` 직접선언 ) DAY=`date +%d` if [ $DAY -le 7 ] ; then /root/bin/backup.sh else echo "END" fi
412 [EX3] crontab 명령어의간단한실습 [TERM1] 관리자윈도우 # date 현재시간 : 1 월 31 일 20:12 # crontab -e... ( 중략 )... # # Sfecific Configuration # * * * banner "hello" > /dev/pts/5 <----- 새로운라인추가 :wq # crontab -l -> 선언된 crontab 정의확인 # date -> 시간정보확인 [EX4] 휴식시간표시 (Coffee Time) # banner COFFEE > /etc/coffeetime.txt # crontab -e... 분시일월요일 CMD ( 쉬는시간알림 ) 50 19,20,21 * * * wall -a /etc/coffeetime.txt [EX5] crontab 설정의다른예 # crontab -e... 분시일월요일 CMD ( 한달에한번수행 ) * * find /Log_Dir -name "*.log" -type f -mtime +30 -exec rm {} \; -> 오래된로그파일 (30일이상되는파일 ) 정기적으로삭제 # crontab -e... 분시일월요일 CMD ( 하루에두번수행 ) 10 0,12 * * * find /export/home -name ".rhosts" -type f -exec rm {} \; -> ( 권장 ).rhosts 파일을사용자홈디렉토리에못만들도록하는방법 # crontab -e... 분시일월요일 CMD ( 하루에한번수행 ) 0 5 * * * /root/shell/auto_ftp.sh [EX6] 서버의상태아침마다관리자에게메일로발송 # crontab -e ( 각서버에서 )... 분시일월요일 CMD ( 하루에한번수행 ) 40 8 * * 1-5 mailx -s "solaris254 : OK" root@paran.com < report.txt
413 [EX7] 서버에서백업자동화 / 오래된백업파일삭제 # vi /root/bin/backup.sh (# chmod 755 /root/bin/backup.sh)... ( 중략 )... cd /var/apache2/htdocs /usr/sfw/bin/gtar cvzf /backup/apache.`date +%m%d`.tar.gz.... ( 중략 )... # crontab -e... ( 중략 )... # # Backup Configuration # 0 6 * * 1-5 /root/bin/backup.sh /backup/apache.0320.tar.gz apache.0321.tar.gz apache.0322.tar.gz apache.0323.tar.gz... # crontab -e... ( 중략 )... # # Backup Remove Configuration # 0 6 1,15 * * find /backup -name "apache.*" -type f -mtime +30 -exec rm -f {} \;
414 ( 주의 ) crontab 명령어수행시간 l crontab 명령어의수행최소단위 : 1분 # vi script.sh #!/bin/ksh while true do CMD sleep 10 done # chmod 700 script.sh # nohup script.sh & l crontab 정의시시간은 0시 0분은사용하면안된다. # rdate time.bora.net -> # crontab -e 1 0 * * * rdate time.bora.net l find 명령어를수행하는스크립트인경우서버의부하량이없는새벽시간을사용한다. l crontab 명령어를통해스케줄링할때는명령어의절대경로사용을권장한다. 이것은스크립트에명령어들을선언할때도해당이된다. (a) 스크립트내에 PATH 변수선언 (b) 절대경로를포함한명령어선언 # vi /root/bin/script.sh gtar cvzf /backup/backup.`date +%m%d`.tar.gz (X)... /usr/sfw/bin/gtar cvzf /backup/backup.`date +%m%d`.tar.gz (0) l 백업스크립트 (EX: /root/bin/backup.sh) 을 crontab 등록해서실행할때는 nice 명령어를같이사용해주는것을권장한다. # crontab e * * * nice -n 10 /root/bin/backup.sh l crontab 등록을안전 (safer method) 하게하는방법 ( 권장하지않는방법 ) # crontab e ( 권장하는작업방법 ) # crontab -l > cron00 # vi cron00 # crontab cron
415 (3). crontab 명령어접근제어 (Access Control) /etc/cron.d 디렉토리에는 crontab 명령어의수행할수있는사용자를정의하는파일이존재할수있다. (cron.deny, cron.allow 파일이존재할수있다.) cron.deny 파일은 crontab 명령어를수행할수없는사용자를정의할때사용하고, cron.allow 파일은 crontab 명령어를수행할수있는유일한사용자를등록할때사용한다. - /etc/cron.d/cron.deny - /etc/cron.d/cron.allow /etc/cron.d 디렉토로에는기본적으로 cron.deny, at.deny 파일만존재한다. cron.deny 파일안에는 crontab 명령어를사용할수없는사용자를등록하고, 한개의라인에한명의사용자만등록이가능하다. ( 기본설정확인 ) # cd /etc/cron.d ; ls at.deny (0) at 명령어를거부할사용자등록 at.allow (X) at 명령어를사용할수있는유일한사용자등록 cron.deny (0) crontab 명령어를거부할사용자등록 cron.allow (X) crontab 명령어를사용할수있는유일한사용자등록 at 명령어제어관련파일 : /etc/cron.d/(at.deny at.allow) crontab 명령어제어관련파일 : /etc/cron.d/(cron.deny cron.allow) # cat /etc/cron.d/cron.deny daemon bin nuucp listen nobody noaccess ( 기본설정내용해석 ) l 등록된사용자는 crontab 명령어를수행할수없다.( 예 : System Account) l 등록이되지않은사용자는 crontab 명령어를수행할수있다.( 예 : 일반사용자 + root) cron.allow, cron.deny 파일에대한규칙 l /etc/cron.d/cron.deny(0) 파일이존재하고 /etc/cron.d/cron.allow(x) 파일이존재하지않는경우에는 cron.deny 파일안에사용자이름이있으면이사용자는수행할수없고, 파일안에사용자이름이없으면이사용자는 crontab 명령어를수행할수있다. l /etc/cron.d/cron.allow(0) 파일이존재하면, 이안에등록자만 crontab 명령어를사용할수있다. 등록되지않은사용자는 crontab 명령어를수행할수없다. cron.allow 파일안에 root 사용자가없으면, root 사용자도 crontab 명령어를수행할수없다. l /etc/cron.d/cron.allow(x), /etc/cron.d/cron.deny(x) 두개의파일이존재하지않으면, root 사용만 crontab 명령어를수행할수있다
416 [EX] 작업사용자제어실습 <============== TEST ============== ============================================================ EX3 EX2 EX1 ============================================================ cron.allow 0(user01) X X cron.deny 0(user01) 0(user01) 0(user01 not exist) ============================================================ 0 : file exist X : file not exist [ 그림 ] crontab 사용자제어실습계획 [EX1] cron.allow(x), cron.deny(0) cron.allow 파일이존재하지않고 cron.deny 파일이존재하는경우, user01 사용자가 cron.deny 파일에존재하지않는다. 따라서 user01 사용자는 crontab 명령어를사용할수있다. cron.deny 파일에등록되지않은모든사용자는 crontab 명령어를수행할수있는것이다. ( 기본상태 ) - /etc/cron.d/cron.deny 존재 0 - /etc/cron.d/cron.allow 존재 X 1 /etc/profile 에 EDITOR 변수설정 # vi /etc/profile... EDITOR=/usr/bin/vi ; export EDTIOR... <----- 적당한라인에등록 2 user01 사용자로로그인하여 crontab 명령어수행및확인 # telnet localhost user01 사용자로로그인 $ date 현재시간 : :00 $ crontab -e (/var/spool/cron/crontabs/user01) * * * echo "Crontab TEST" > /export/home/user01/cron.output ( 새로운라인추가 ) :wq -> user01 사용자의파일이처음만들어진것이다. -> 따라서, user01 사용자의 crontab 파일에는초기내용이없다. $ crontab -l * * * echo "Crontab TEST" > /export/home/user01/cron.output $ exit
417 [EX2] cron.allow(x), cron.deny(0) cron.allow 파일이존재하지않고 cron.deny 파일이존재하는경우, user01 사용자가 cron.deny 파일에존재한다. user01 사용자는 crontab 명령어를사용할수없다. 하지만 cron.deny 파일에등록되지않은모든사용자는 crontab 명령어를사용할수있다. daemon bin nuucp listen nobody noaccess user01 ( 기본상태 ) - /etc/cron.d/cron.deny 존재 0 <---- user01 등록 - /etc/cron.d/cron.allow 존재 X 1 /etc/cron.d/cron.deny 파일설정 # vi /etc/cron.d/cron.deny <----- 라인추가 2 user01 사용자의 crontab 명령어수행 # telnet localhost user01 사용자로로그인 $ crontab -e crontab: you are not authorized to use cron. Sorry. <----- 메세지확인 3 user02 사용자의 crontab 명령어수행 $ telnet localhost user02 사용자로로그인 $ crontab -e -> crontab 정의가가능하다. $ exit $ exit
418 [EX3] cron.allow(0), cron.deny(0) cron.allow, cron.deny 파일모두존재하고모두 user01 사용자가등록된경우이다. user01 사용자는 crontab 명령어를사용할수있다. 따라서 user01 사용자외에다른모든사용자는 crontab 명령어를수행할수없다.( 따라서, root 사용자도 crontab 명령어를수행할수없다. 단, root 사용자는다시설정할수있는권한 (cron.deny, cron.allow 파일편집권한 ) 을가지고는있다. user01 ( 기본상태 ) - /etc/cron.d/cron.deny 존재 0 <---- user01 등록 - /etc/cron.d/cron.allow 존재 0 <---- user01 등록 1 /etc/cron.d/cron.allow 파일설정 # vi /etc/cron.d/cron.allow (# echo "user01" > /etc/cron.d/cron.allow) 2 user01 사용자 crontab 명령어수행및확인 # telnet localhost user01 사용자로로그인 $ crontab -e -> 출력내용확인, 이전에정의한내용확인 3 user02 사용자 crontab 명령어수행및확인 $ telnet localhost user02 사용자로로그인 $ crontab -e crontab: you are not authorized to use cron. Sorry. $ su - root root 사용자암호입력 # crontab -e crontab: you are not authorized to use cron. Sorry. # exit ; exit ; exit [ 참고 ] 모든사용자는 crontab 명령어를사용할수없다.( 단, user01 제외 ) l 실무서버에서모든사용자가 crontab 명령어를수행할필요는없다. l 따라서, 필요한사용자만 crontab 명령어를수행할수있도록하고싶다. l 이런경우, /etc/cron.allow 파일을생성해서그안에 crontab 명령어를수행할수있는사용자 ( 예 : user01, root) 를정의하면된다. (a). /etc/cron.d/cron.allow <----- user01 등록 (b). /etc/cron.d/cron.deny <----- 모든사용자등록 (user01 제외 ) # awk -F: '{print $1}' /etc/passwd > /etc/cron.d/cron.deny -> user01 사용자라인삭제 (c). oracle, wasuser 사용자만 crontab 명령어를수행할수있도록설정한다. # ls /var/spool/cron/crontabs/ adm lp root sys uucp # vi /etc/cron.d/cron.allow adm lp root sys uucp oracle wasuser
419 Crontab 관련파일들 crontab 관련파일들 /etc/cron.d /etc/cron.d/cron.allow /etc/cron.d/cron.deny /etc/default/cron /var/cron/log /var/spool/cron/crontabs - cron 디렉토리 (main cron directory) - crontab 명령어허락사용자정의파일 - crontab 명령어거부사용자정의파일 - cron 데몬의기본설정파일 - cron 데몬의스케줄링성공, 실패기록파일 - crontab 명령어스풀 (spool) 디렉토리 ( 복원 ) crontab 설정복원 ( ㄱ ) crontab 명령어사용자제어파일복원 # vi /etc/cron.d/cron.deny -----> user01 라인삭제 # rm /etc/cron.d/cron.allow ( ㄴ ) root 사용자의 crontab 파일내용복원 # crontab -e -----> 추가로등록한테스트라인삭제 ( ㄷ ) user01 사용자의 crontab 파일초기화 # crontab -r user01 (# crontab -l user01) [ 참고문서 ] crontab 활용한 CPU 측정및그래프로그리기 l -> " 솔라리스성능모니터링 " 게시판 -> 35 번자료
420 System Administration Commands [ 참고 ] crontab 매뉴얼 cron(1m) NAME cron - clock daemon SYNOPSIS /usr/sbin/cron DESCRIPTION cron starts a process that executes commands at specified dates and times. You can specify regularly scheduled commands to cron according to instructions found in crontab files in the directory /var/spool/cron/crontabs. Users can submit their own crontab file using the crontab(1) command. Commands which are to be executed only once can be submitted using the at(1) command. cron only examines crontab or at command files during its own process initialization phase and when the crontab or at command is run. This reduces the overhead of checking for new or changed files at regularly scheduled intervals. As cron never exits, it should be executed only once. This is done routinely by way of the svc:/system/cron:default service. The file /etc/cron.d/fifo file is used as a lock file to prevent the execution of more than one instance of cron. cron captures the output of the job's stdout and stderr streams, and, if it is not empty, mails the output to the user. If the job does not produce output, no mail is sent to the user. An exception is if the job is an at(1) job and the -m option was specified when the job was submitted. cron and at jobs are not executed if your account is locked. Jobs and processses execute. The shadow(4) file defines which accounts are not locked and will have their jobs and processes executed. Setting cron Jobs Across Timezones The timezone of the cron daemon sets the system-wide timezone for cron entries. This, in turn, is by set by default system-wide using /etc/default/init. If some form of daylight savings or summer/winter time is in effect, then jobs scheduled during the switchover period could be executed once, twice, or not at all. Setting cron Defaults To keep a log of all actions taken by cron, you must specify CRONLOG=YES in the /etc/default/cron file. If you specify CRONLOG=NO, no logging is done. Keeping the log is a user configurable option since cron usually creates huge log files. You can specify the PATH for user cron jobs by using PATH= in /etc/default/cron. You can set the PATH for root cron jobs using SUPATH= in /etc/default/cron. Carefully consider the security implications of setting PATH and SUPATH. Example /etc/default/cron file: CRONLOG=YES PATH=/usr/bin:/usr/ucb: This example enables logging and sets the default PATH used by non-root jobs to /usr/bin:/usr/ucb:. Root jobs continue to use /usr/sbin:/usr/bin
421 The cron log file is periodically rotated by logadm(1m). FILES /etc/cron.d /etc/cron.d/fifo /etc/default/cron /var/cron/log /var/spool/cron /etc/cron.d/queuedefs Main cron directory Lock file cron default settings file cron history information Spool area Queue description file for at, batch, and cron /etc/logadm.conf Configuration file for logadm ATTRIBUTES See attributes(5) for descriptions of the following attributes: ATTRIBUTE TYPE ATTRIBUTE VALUE Availability SUNWcsu SEE ALSO svcs(1), at(1), crontab(1), sh(1), logadm(1m), svcadm(1m), queuedefs(4), shadow(4), attributes(5), rbac(5), smf(5), smf_security(5) NOTES The cron service is managed by the service management facility, smf(5), under the service identifier: svc:/system/cron:default Administrative actions on this service, such as enabling, disabling, or requesting restart, can be performed using svcadm(1m). The service's status can be queried using the svcs(1) command. Most administrative actions may be delegated to users with the solaris.smf.manage.cron authorization (see rbac(5) and smf_security(5)). DIAGNOSTICS A history of all actions taken by cron is stored in /var/cron/log and possibly in /var/cron/olog
422 Solaris 10 Admin I Guide 11. Backup & Recovery l l l l l l Backup / Restore CMD(s) Backup Media mt CMD(s) Backup Policy Backup & Restore Practise On-Line Backup(Shapshot Backup) 백업개요 백업의목적 (Backup Purpose) 불의의사고로인한파일삭제에대한대비 하드웨어 ( 예 : 디스크 ) 이상으로시스템클래쉬대비 시스템의장애처리를위한파일시스템의백업 시스템의설치, 업그레이드에의한데이터이동 시스템보안성을유지하기위한데이터의복사본유지 천재지변에대한대비 ( 주의 ) 백업시간 + 복구시간 = 작업시간백업작업을수행하는시간도중요하지만실제적으로백업은복구를위해존재하기때문에백업정책을세울때빠른복구, 정확한복구를위한방법을우선적으로고려해야한다. 백업방법의종류 Online Backup 서비스중에백업을받는방식 (EX: Hot Backup) Offline Backup 서비스를중지시킨상태에서백업을받는방식 * 이문서에서는주로 Offline Backup에관해서다룬다
423 백업과복구명령어종류 백업과복구관련명령어들 (Backup / Restore CMDs) tar(achive) + Compress CMD cpio + Compress CMD dd ufsdump, ufsrestore (UNIX: dump, restore) [EX] 백업예제 # tar cvf /dev/rmt/0 /export/home # dd if=/dev/rdsk/c0t0d0s2 of=/dev/rdsk/c0t1d0s2 cp & tar/cpio (/disk1 -> /disk2) [ 참고 ] 백업하는명령어를통한디렉토리마이그레이션 디렉토리마이그레이션작업을수행하는경우, 백업하는명령어를통해수행해야한다. 디렉토리안에는많은파일 / 디렉토리가존재하기때문에어떤종류의파일이있는지모르기때문이다. 단순하게 cp 명령어를수행한다면, 옮겨지지않거나혹은정보가변경될수있기때문에백업하는명령어종류를사용해야한다. 파일한두개정도를옮길때 : # cp /disk1/* /disk2 많은파일들을옮길때 : # cd /disk1 # tar cvf -. (cd /disk2 ; tar xvpf -) # ufsdump 0uf - /disk1 (cd /disk2 ; ufsrestore rvf -) [ 참고 ] tar/cpio,dd, ufsdump/ufsrestore 사용상차이점 tar/cpio,dd, ufsdump/ufsrestore 사용상차이점 tar/cpio, dd, ufsdump/ufsrestore 명령어는사용상의약간의차이가있다. tar/cpio 명령어는파일시스템이마운트되어있는상태에서많은파일이나디렉토리내용을백업할때사용한다. dd 명령어는 raw 복사이기때문에복사하는시간이많이걸린다.( 보통 1.5 배에서 2 배정도 ) 따라서보통실무에서는디스크를복사하는용도로많이사용된다. 특히나운영체제디스크를다른쪽에복사할때는복사이외의부가적인필요하지않으므로많이사용된다. ufsdump/ufsrestore 명령어는마운트가되어있지않아도수행이가능하며, 파일시스템단위로덤프 ( 복사 ) 가가능하다. tar/cpio 디렉토리백업을위해사용한다.( 마운트된상태에서만사용가능 ) dd 디스크마이그레이션작업할때사용한다.( 마운트되어있지않아도사용가능 ) ufsdump 파일시스템백업을위해사용한다.( 마운트되어있지않아도사용가능 )
424 백업매체 (Backup Media) 참고사이트 : 최신의정보에대해서는 kus21 사이트에서확인하시기바랍니다. 참고사이트는광고용으로사용한것이아님을알립니다. 참고사이트 : Tape Drive : Tape Library : => => 백업장치선택할때고려사항 가격 ( 가격대성능비가뛰어난제품을선택한다.) 신뢰성 ( 안정성이뛰어난제품을선택해야한다.) 속도및백업밀도 ( 속도나밀도, 저장용량에대해서도잘구별해야한다.) 지원운영체제 ( 모든운영체제를지원하는것이아니다.) 백업매체의종류주요 Backup Media DAT DLT/SDLT AIT LTO 다음예제의그림들은하나의예이므로참고로만생각한다. 실무에서는많은종류가존재한다. (1). DVD-RAM & MO RAM 드라이브 ( 예 : SSD) 3.5 인치광디스크 ( 예 : 노트북 ) 5.25 인치광디스크 ( 예 : 일반 PC) DVD-ROM (2). 테이프백업장치 4mm DDS1 4GB 4mm DDS2 8GB 4mm DDS3 24GB 4mm DDS4 40GB 4mm DDS5 72GB 4mm DAT(Digital Audio Tape) DDS(Digital Data Storage) DAT (Digital Audio Tape) 기술을기반으로개발된 DDS (Digital Data Storage) 는저렴한가격과편리성으로가장널리사용되는데이터저장기술이다. 4mm 데이터카트리지는여러종류의제품이있으며일반적으로그테이프길이로구분이된다.(4mm 90M,120M,125M,150M,170M 등 ) 같은 Tape 이라도사용하는 Drive 의종류에따라서저장용량이달라진다

 LTO")

.")
425 4mm DAT DDS 설명 (3). LTO Ultrium 카테고리 LTO1 100/200GB LTO2 200/400GB LTO3 400/800GB LT04 800GB/1,6TB LTO(Linear Tape Open) LTO 란테이프포맷제품들에새로운접근방법은테이프백업시장에서자동화와신뢰도, 확장성의새로운단계와공개표준을적용하기위해설계되었다. LTO 는세계스토리지시장을리드하는 IBM, HP, Seagate 3 사에의해공동으로개발되었다. LTO 설명 (4). DLT & SDLT & VS1 카테고리 SDLT1 SDLT2 DLT VS160 DLT4 & VS80 DLT3XT 15/30GB DLT3 10/20GB


 과 SDX2-36C (36GB), AIT-1 포맷용 SDX1-35C(35GB) 와")
426 DLT (Digital Linear Tape) Quantum 이개발한 DLT Drive 의 Format 방식으로대용량, 빠른전송속도, 빠른 File Access 를제공합니다. 특히개선된바인더시스템은 Tape 와 Head 의마멸도를최소화시켜주어 100,000 회이상사용후에도신뢰도를보장해주며 Tape 뒷면만가이드롤러에닿게해주어낮고부드럽게접촉시키는 Tape 의경로는 Media 의생명을길게해줍니다. DLT 설명 (5). AIT & 8mm DAT 현재 6 가지의 AIT 테이프가있다. AIT-3 포맷용 SDX3-100C (100GB), AIT-2 포맷용 SDX2-50C (50GB) 과 SDX2-36C (36GB), AIT-1 포맷용 SDX1-35C(35GB) 와 SCX1-25C(25GB), AIT WORM SDX2-50W(50GB) AIT 설명
 는저렴한가격과편리성으로가장널리사용되는데이터저장기술이다.")
 같은 Drive 이라도사용하는 Tape")
427 DAT (Digital Audio Tape) 기술을기반으로개발된 DDS (Digital Data Storage) 는저렴한가격과편리성으로가장널리사용되는데이터저장기술이다. 8mm 데이터카트리지는여러종류의제품이있으며일반적으로그테이프길이로구분이된다.(8mm 112M,160M,170M,225M 등 ) 같은 Drive 이라도사용하는 Tape 의종류에따라서저장용량이달라진다. 8mm DAT DDS 설명
428 백업매체사용 (1). mt(magnetic Tape Control) 명령어 NAME mt - magnetic tape control DESCRIPTION The mt utility sends commands to a magnetic tape drive. If -f tapename is not specified, the environment variable TAPE is used. If TAPE does not exist, mt uses the device /dev/rmt/0n. OPTIONS The following option is supported: -f tapename Specifies the raw tape device. OPERANDS The following operands are supported: count command eof fsf The number of times that the requested operation is to be performed. By default, mt performs command once. Multiple operations of command may be performed by specifying count. Writes count EOF marks at the current position on the tape. Forward spaces over count EOF marks. The tape is positioned on the first block of the file. fsr Forward spaces count records. bsf bsr Back spaces over count EOF marks. The tape is positioned on the beginning-oftape side of the EOF mark. Back spaces count records. eom Spaces to the end of recorded media on the tape. This is useful for appending files onto previously written tapes. rewind offline Rewinds the tape. Rewinds the tape and, if appropriate, takes the drive unit off-line by unloading the tape. status Prints status information about the tape unit. erase Erases the entire tape. Caution: Some tape drives have option settings where only portions of the tape may be erased. Be sure to select the correct setting to erase the whole tape. Erasing a tape may take a long time depending on the device and/or tape. Refer to the device specific manual for time details
429 ( 명령어형식 ) # mt [-f tape-device-name] command [count] Command 종류 =================================================================== Option(s) Description(s) =================================================================== status 테이프드라이버에대한정보를나타낸다. rewind 테이프드라이버에되감기를수행한다. erase 테이프드라이버의전체내용을지운다. offine 테이프드라이버를장치로부터분리시킨다. fsf 지정한 count 만큼뒤로스킵 (skip) 을진행한다. nbsf count+1 만큼앞으로이동한다. bsf 지정한 count 만큼앞으로스킵 (skip) 을진행한다. nbsf count+1 만큼뒤로이동한다. eom 마지막 record media까지스킵을진행한다. =================================================================== (2). mt 명령어사용법 tape 감기 # mt -f /dev/rmt/0 rewind (# mt rewind) tape 내용지우기 # mt -f /dev/rmt/0 erase (# mt erase) tape 꺼내기 # mt -f /dev/rmt/0 offline (# mt offline) tape 상태표시 # mt -f /dev/rmt/0 status (# mt status) tape 의맨끝으로의이동 (eom: End Of Magnetic Tape) # mt -f /dev/rmt/0 eom (# mt eom) count 만큼파일뒤로건너뛰기 (fsf: Forward space) # mt -f /dev/rmt/0 fsf [count] (# mt fsf 1) count 만큼파일앞으로건너뛰기 (bsf: Backward space) # mt -f /dev/rmt/0 bsf [count] (# mt bsf 2) ================================ ================================ ^ ^ ^ [ 그림 ] 테이프장치 백업파티션 : /export/home ( 하루에한번씩백업 ) 1 테잎 (Tape) Insert 2 # umount /export/home /* 백업받기위해서 umount */ 3 # ufsdump 0uf /dev/rmt/0 /export/home /* 백업받기 (Full Backup) */ 4 # mount /export/home /* 파일시스템정상적으로마운트후서비스 */... 하루지난이후에... 5 # mt -f /dev/rmt/0n fsf 1 /* 테잎포인터를다음번째파일로이동 */ 6 # umount /export/home /* 백업받기위해서 umount */ 7 # ufsdump 1uf /dev/rmt/0 /export/home /* 백업받기 (Incremental Bakcup) */ 8 # mt offline /* 테잎배출 */
430 [ 참고 ] Logical Tape Devices Names(EX: /dev/rmt/#) Logical tape device files are found in the /dev/rmt/* directory as symbolic links from the /devices directory. l 모든 tape device 는종류에관계없이다음형태의 logical device name 을사용한다. 테이프드라이브타겟넘버는반드시 4, 5 번이어야한다. t0 t1 t2 t3 t4 t5 t6... [ SCSI Interface ] /dev/rmt/#hn ( 예 : /dev/rmt/0n) 예 ) /dev/rmt/0 /dev/rmt/0n 옵션 # h n 설명 Drive Number(0-n). Logical Tape Number (EX: Target 4 => /dev/rmt/0, Target 5 => /dev/rmt/1) Tape density u(ultra compressed) c(compressed) h(high) m(medium) l(low) Optional no-rewind n no-rewind omit for re-wind. no-rewind 디바이스이름끝에 "n" 이설정되면, tape 동작이끝나도 rewind 하지않는다. 작업이끝난위치에 head 위치가연속적인테이프의백업이가능하다. If you don't specify the density, a tape drive typically writes at its preferred density. The preferred density usually means the highest density the tape drive supports.most SCSI drives can automatically detect the density or format on the tape and read it accordingly. To determine the different densities that are supported for a drive, look at the /dev/rmt subdirectory. This subdirectory includes the set of tape device files that support different output densities for each tape. Also, a SCSI controller can have a maximum of seven SCSI tape drives. Specifying the Rewind Option for a Tape Drive Normally, you specify a tape drive by its logical unit number, which can run from 0 to n. The following table describes how to specify tape device names with a rewind or a no-rewind option. Specifying Different Densities for a Tape Drive By default, the drive writes at its preferred density, which is usually the highest density the tape drive supports. If you do not specify a tape device, the command writes to drive number 0 at the default density the device supports. To transport a tape to a system whose tape drive supports only a certain density, specify a device name that writes at the desired density. The following table describes how to specify different densities for a tape drive
431 백업하지말야야하는디렉토리 내용이실시간적으로가변적인폴더들 EX) - /proc - /mnt - /var/spool/squid - /tmp( 별도 ) - /dev( 별도 ) - etc(ex: /cdrom,...) [ 참고 ] Proxy(Squid) : Function (Caching) DAUM > Proxy clineta clientb clientc... [ 그림 ] Proxy 서버의동작원리 백업을받아야하는디렉토리 백업을받아야하는우선순위 1 첫번째 : 데이터 (Database) --> ( 권장 ) 스토리지를사용 (EX: RAID 구현 ) 2 두번째 : 서버 / 시스템설정 (System Configuration Files) 3 세번째 : 추가했던설치했던프로그램 / 패키지 (System Program) 4 기타 (etc) EX) 백업파일시스템예제 - /database - /oracle - /etc - /home(or /export/home) - /usr/local - /var/spool/mail(/var/mail) - etc
432 백업정책 (1). 백업의종류및분류 서비스중에백업받는유무로분류 - Online Backup - Offline Backup 백업방법에따른분류 - 전체백업 (Full Backup) - 증분백업 (Incremental Backup) - 단순백업 ( 전체백업 + 증분백업 + 증분백업 +...) - 다단계백업 ( 전체백업 + 증분백업 + 전체백업 + 증분백업 +...) 백업주기에따른분류 - 연간백업 - 반기별백업 - 분기별백업 - 월간백업 - 주간백업 - 일간백업 (2). 백업정책문서화 - 백업수준문서 (Backup Level Sheet) - 백업데이터작업문서 (Backup Data Work Sheet) (2-1). 수준별백업 (Backup Level Sheet) =================================================================== Weeks Sun Mon Tus Wed Thu Fri Sat =================================================================== Day 1 일 2 일 3 일 4 일 5 일 6 일 7 일 Backup Level =================================================================== (2-2). 데이터워크시트 (Backup Data Work Sheet) 을이용한백업 ================================================================ Data Type Size Backup Level Work Using CMD Media Times ================================================================ OS(/) 000MB DLT 00수준 2시간 cpio Database(/home) 000MB DLT 00수준 4시간 ufsdump File(maillog) 000MB DAT 00수준 30분 tar ================================================================
 백업을매일받는방식이다. 하지만이경우풀백업의백업본을 2 개정도유지하는것을권장한다.")
433 (3). 백업스케줄링이론 l ( 전제조건 ) 매일매일증가하는데이터가큰경우 (Data Big!!!!) l 실무에서가장많이사용되는방식은풀 (Full) 백업이다. l 매일증가되는데이터가큰경우에는매일같이풀백업을받는방식은적당하지않다. l 따라서, 이경우에는중간중간에적당한부분에증분백업을적절히섞어야한다. l 백업시간은 30 분 ~ 3 시간이내인경우로맞추어주어야한다. l 백업시간이 3 시간보다많이걸리게되면, 좋은백업방법이아니며, l 백업방식의변화를주어야하는시점이된다. [ 참고 ] Full Backup 현재현장에서가장많이사용하는백업정책은풀 (Full) 백업을매일받는방식이다. 하지만이경우풀백업의백업본을 2 개정도유지하는것을권장한다. Tape1 Tape2 Tape 다음은실무에바로적용할수있는예제는아니다. 적절한응용이필요한다. (3-1) Incremental Backup(Comulative Backup) l 증분백업중누적하여백업받는방식 다음은각라인이일주일간의백업방식만을나타낸것이다. ================================================================ Weeks Sun Mon Tus Wed Thu Fri Sat ================================================================ Backup Level ================================================================ EX) 백업예제 # ufsdump 0uf /dev/rmt/0n /export/home 0 : Full Backup 1-9: Incremental Backup

434 (3-2) Incremental Backup(Discrete Backup) l 증분백업중선형적으로백업받는방식 다음은각라인이일주일간의백업방식만을나타낸것이다. ================================================================ Weeks Sun Mon Tus Wed Thu Fri Sat ================================================================ Backup Level ================================================================
435 (4). 백업스케줄링예제 (4-1) Daily Comulative and Weekly Comulative Backup ( 전제 ) : 데이터증가량이많은경우중에서그중에서좀적은경우 ================================================================ Weeks Sun Mon Tus Wed Thu Fri Sat ================================================================ Backup Level ================================================================ # crontab -e Min Hour Day Month Week CMD * * ufsdump 0uf /dev/rmt/0n /export/home 0 5 * * 1 ufsdump 9uf /dev/rmt/0n /export/home 0 5 * * 2 ufsdump 9uf /dev/rmt/0n /export/home 0 5 * * 3 ufsdump 9uf /dev/rmt/0n /export/home 0 5 * * 4 ufsdump 9uf /dev/rmt/0n /export/home 0 5 * * 5 ufsdump 5uf /dev/rmt/0n /export/home or * * ufsdump 0uf /dev/rmt/0n /export/home 0 5 * * 1,2,3,4 ufsdump 9uf /dev/rmt/0n /export/home 0 5 * * 5 ufsdump 5uf /dev/rmt/0n /export/home
 Daily")
436 (4-2) Daily Comulative and Weekly Incremental Backup 전제 : 데이터증가량이많은경우 ================================================================ Weeks Sun Mon Tus Wed Thu Fri Sat ================================================================ Backup Level ================================================================ (4-3) Daily Incremental and Weekly Comulative Backup ================================================================ Weeks Sun Mon Tus Wed Thu Fri Sat ================================================================ Backup Level ================================================================ * 위의예제는적당한실무예가없기때문에특별히다루지않는다
437 [ 참고 ] 백업레벨 (Backup Level) 이란? DATE Backup Level [ 참고 ] 백업에대한정책수립 ( 시나리오 ) 관리자의백업정책 - ( 조건 1) 전체백업 (Full Backup) 은 1 주 /2 주에한번씩토요일날수행한다. - ( 조건 2) 평일 ( 주간, 월 - 금 ) 에는증가분을누적해서백업을받는다. - ( 조건 3) 정기적으로 (6 개월, 1 년 ) 백업본을가지고복구작업수행한다
438 백업과복구관련명령어 백업과복구관련명령어 ufsdump 파티션 ( 슬라이스 ) 백업할때사용하는명령어 ufsrestore 백업매체 ( 파일 / 테입 ) 에존재하는백업본을복구할때사용하는명령어 (1). ufsdump 명령어 NAME ufsdump - incremental file system dump DESCRIPTION ufsdump backs up all files specified by files_to_dump (usually either a whole file system or files within a file sytem changed after a certain date) to magnetic tape, diskette, or disk file. The ufsdump command can only be used on unmounted file systems, or those mounted read-only. Attempting to dump a mounted, read-write file system might result in a system disruption or the inability to restore files from the dump. Consider using the fssnap(1m) command to create a file system snapshot if you need a point-in-time image of a file system that is mounted. If a filesystem was mounted with the logging option, it is strongly recommended that you run ufsdump as the root user. Running the command as a non-root user might result in the creation of an inconsistent dump. options is a single string of one-letter ufsdump options. arguments may be multiple strings whose association with the options is determined by order. That is, the first argument goes with the first option that takes an argument; the second argument goes with the second option that takes an argument, and so on. files_to_dump is required and must be the last argument on the command line. See OPERANDS for more information. With most devices ufsdump can automatically detect the endof-media. Consequently, the d, s, and t options are not necessary for multi-volume dumps, unless ufsdump does not understand the way the device detects the end-of-media, or the files are to be restored on a system with an older version of the restore command. OPTIONS 0-9 The "dump level." All files specified by files_to_dump that have been modified since the last ufsdump at a lower dump level are copied to the dump_file destination (normally a magnetic tape device). For instance, if a "level 2" dump was done on Monday, followed by a "level 4" dump on Tuesday, a subsequent "level 3" dump on Wednesday would contain all files modified or added since the "level 2" (Monday) backup. A "level 0" dump copies the entire file system to the dump_file. f dump_file Dump file. Use dump_file as the file to dump to, instead of /dev/rmt/0. If dump_file is specified as -, dump to standard output. If the name of the file is of the form machine:device, the dump is done from the specified machine over the network using rmt(1m). Since ufsdump is normally run by root, the name of the local machine must appear in the /.rhosts file of the remote machine. If the file is specified as user@machine:device, ufsdump will attempt to execute as the specified user on the remote
439 l n machine. The specified user must have a.rhosts file on the remote machine that allows the user invoking the command from the local machine to access the remote machine. Autoload. When the end-of-tape is reached before the dump is complete, take the drive offline and wait up to two minutes for the tape drive to be ready again. This gives autoloading (stackloader) tape drives a chance to load a new tape. If the drive is ready within two minutes, continue. If it is not, prompt for another tape and wait. Notify all operators in the sys group that ufsdump requires attention by sending messages to their terminals, in a manner similar to that used by the wall(1m) command. Otherwise, such messages are sent only to the terminals (such as the console) on which the user running ufsdump is logged in. N device_name Use device_name when recording information in /etc/dumpdates (see the u option) and when comparing against information in /etc/dumpdates for incremental dumps. The device_name provided can contain no white space as defined in scanf(3c) and is case-sensitive. o S v u Offline. Take the drive offline when the dump is complete or the end-of-media is reached and rewind the tape, or eject the diskette. In the case of some autoloading 8mm drives, the tape is removed from the drive automatically. This prevents another process which rushes in to use the drive, from inadvertently overwriting the media. Size estimate. Determine the amount of space that is needed to perform the dump without actually doing it, and display the estimated number of bytes it will take. This is useful with incremental dumps to determine how many volumes of media will be needed. Verify. After each tape or diskette is written, verify the contents of the media against the source file system. If any discrepancies occur, prompt for new media, then repeat the dump/verification process. The file system must be unmounted. This option cannot be used to verify a dump to standard output. Update the dump record. Add an entry to the file /etc/dumpdates, for each file system successfully dumped that includes the file system name (or device_name as specified with the N option), date, and dump level
440 ( 명령어형식 ) # ufsdump option(s) argument(s) Filesystem-Name(Raw Device) EX) ufsdump 백업예제 # ufsdump 0uf /dev/rmt/0 /dev/rdsk/c0t0d0s7 # ufsdump 0uf /dev/rmt/0 /export/home (/etc/vfstab 정의 ) # ufsdump uf /dev/rmt/0 /export/home (# ufsdump 9uf /dev/rmt/0 /export/home) # ufsdump 0f /dev/rmt/0n /dev/rdsk/c0t0d0s7 # ufsdump 0u /dev/rdsk/c0t0d0s7 (# ufsdump 0uf /dev/rmt/0 /export/home) EX) ufsdump 명령어를사용한파티션복사예제 # ufsdump 0f - /dev/rdsk/c0t0d0s7 (cd /home; ufsrestore xf -) # tar cvf -. (cd /disk2 ; tar xvf -) [ufsdump 명령어 options] ================================================================= option(s) Description ================================================================= : 전체백업 (Full Backup), 1-9: 증분백업 (Incremental Backup) Default :9 u - Update, /etc/dumpdates 백업시간을기록 S - EStimate, Size( 단위 : bytes) Full backup 용량확인 :df,du Incremental Backup 용량확인 : S option EX) # ufsdump 3S /export/home (# ufsdump 3Sf /dev/rmt/0 /export/home) # df -k /export/home # du -sk /export/home f - file or device, 백업매체를지정, Default: /dev/rmt/0 v - verbose l - autoloading, 하나의백업매체에데이터를모두기록못하면자동으로다른백업매체로바꾸어서기록. o - offline, 백업이끝나면백업매체를자동으로배출. ================================================================= [ 참고 ] ( Net Backup ) Remote Tape Device Backup(/.rhosts 설정필요 ) => ( 실무 ) Veritas Net Backup Manager # ufsdump 0uf solaris254:/dev/rmt/0 /export/home [ 형식 ] solaris254:/dev/rmt/0, user01@solaris254:/dev/rmt/ HOSTA HOSTB <Backup Server> /dev/rmt/0 < /export/home ~root/.rhosts HOSTB root # ufsdump 0uf HOSTA:/dev/rmt/0 /export/home
441 (2). ufsrestore 명령어 NAME ufsrestore - incremental file system restore DESCRIPTION The ufsrestore utility restores files from backup media created with the ufsdump command. ufsrestores's actions are controlled by the key argument. The key is exactly one function letter (i, r, R, t, or x) and zero or more function modifiers (letters). The key string contains no SPACE characters. Function modifier arguments are listed on the command line in the same order as their corresponding function modifiers appear in the key string. filename arguments which appear on the command line, or as arguments to an interactive command, are treated as shell glob patterns by the x and t functions; any files or directories matching the patterns are selected. The metacharacters *,?, and [ ] must be protected from the shell if they appear on the command line. There is no way to quote these metacharacters to explicitly match them in a filename. The temporary files rstdir* and rstmode* are placed in /tmp by default. If the environment variable TMPDIR is defined with a non-empty value, that location is used instead of /tmp. OPTIONS Function Letters You must specify one (and only one) of the function letters listed below. Note that i, x, and r are intended to restore files into an empty directory. The R function is intended for restoring into a populated directory. i r t x Interactive. After reading in the directory information from the media, ufsrestore invokes a shell-like interface that allows you to browse through the dump file's directory hierarchy and select individual files to be extracted. Restoration has the same semantics as x (see below). See Interactive Commands, below, for a description of available commands. Recursive. Starting with an empty directory and a level 0 dump, the r function recreates the filesystem relative to the current working directory, exactly as it appeared when the dump was made. Information used to restore incremental dumps on top of the full dump (for example, restoresymtable) is also included. Several ufsrestore runs are typical, one for each higher level of dump (0, 1,..., 9). Files that were deleted between the level 0 and a subsequent incremental dump will not exist after the final restore. To completely restore a file system, use the r function restore the level 0 dump, and again for each incremental dump. Although this function letter is intended for a complete restore onto a new file system (one just created with newfs(1m)), if the file system contains files not on the backup media, they are preserved. Table of contents. List each filename that appears on the media. If no filename argument is given, the root directory is listed. This results in a list of all files on the media, unless the h function modifier is in effect. The table of contents is taken from the media or from the specified archive file, when the a function modifier is used. The a function modifier is mutually exclusive with the x and r function letters. Extract the named files from the media. Files are restored to the same relative locations that they had in the original file system. If the filename argument matches a directory whose contents were written onto the media, and the h modifier is not in effect, the directory is recursively extracted, relative to the current directory, which is expected to be empty. For each file, the owner, modification time, and mode are restored (if possible)
442 l o v If you omit the filename argument or specify., the root directory is extracted. This results in the entire tape being extracted, unless the h modifier is in effect.. With the x function, existing files are overwritten and ufsrestore displays the names of the overwritten files. Overwriting a currently-running executable can have unfortunate consequences. Autoload. When the end-of-tape is reached before the restore is complete, take the drive off-line and wait up to two minutes (the default, see the T function modifier) for the tape drive to be ready again. This gives autoloading (stackloader) tape drives a chance to load a new tape. If the drive is ready within two minutes, continue. If it is not, prompt for another tape and wait. Offline. Take the drive off-line when the restore is complete or the end-of-media is reached and rewind the tape, or eject the diskette. In the case of some autoloading 8mm drives, the tape is removed from the drive automatically. Verbose. ufsrestore displays the name and inode number of each file it restores, preceded by its file type. ( 사용법 ) ufsrestore (i r x t)vf /dev/rmt/0 # ufsrestore ivf /dev/rmt/0 (-i : interactive) xvf (-x : extract) rvf (-r : restore) tvf (-t : content) EX) # ufsrestore rvf /dev/rmt/0 # ufsrestore xvf /dev/rmt/0./etc/passwd./etc/hosts [ufsrestore 명령어 options] ================================================================= option(s) Description ================================================================= i interactive r restore x extract t contents v verbose f file or device ================================================================= [ufsrestore 명령어의 i 옵션과같이쓸수있는명령어들 ] ================================================================= option(s) Description ================================================================= ls [direcotory] 현재디렉토리의파일과디렉토리출력 cd directory 특정디렉토리로이동 add [filename] 복구할파일목록에현재디렉토리나특정파일추가 delete filename 복구할파일목록에현재디렉토리나특정파일삭제 extract 선택한모든파일과디렉토리를복구 quit, q ufsrestore 명령어를빠져나감 marked 현재디렉토리에선택된파일의목록을출력 help 도움말 pwd 현재디렉토리표시 =================================================================
443 (3). 백업및복구예제 On-line Backup (X) Off-line Backup (0) 서비스중에백업을받는방식서비스를중지시킨상태에서백업을받는방식 Slice : /data1 Tape Device [ 그림 ] Offline 백업 (3-1). /export/home 파일시스템백업 (Off-line 백업 ) l 언마운트할수있는파일시스템 : ( 예 ) /export/home, /data1, /data2 -> umount 후백업. l 언마운트할수없는파일시스템 : ( 예 ) /, /usr -> Single User Mode 에서백업. 1 백업받을파티션 (EX: /export/home) 의사용량점검 # ufsdump 0S /export/home or # ufsdump 0S /dev/rdsk/c0t0d0s7 or # df -k /export/home 2 싱글유저 & umount 상태 # shutdown -i 1 -g 30 "System is being shutdown for Backup" or # umount /export/home 3 파일시스템점검및백업 # fsck /dev/rdsk/c0t0d0s7 # ufsdump 0uf /dev/rmt/0n /dev/rdsk/c0t0d0s
444 (3-2). 파일시스템복구 # ufsrestore rvf /dev/rmt/0 백업내용전체복구 # ufsrestore tvf /dev/rmt/0 백업내용확인 # ufsrestore ivf /dev/rmt/0 백업내용중몇개의파일복구 (3-2-1) /(root) 파일시스템복구 CD 부팅 복구작업 installboot 명령어수행 언마운트 & 점검 (a). CD(1 of 2) 부팅 <STOP + A> ok boot cdrom -s (b). 복구작업 # newfs /dev/rdsk/c0t0d0s0 (c0t0d0s0 : /(root) Partition) # mount /dev/dsk/c0t0d0s0 /a # cd /a # ufsrestore rvf /dev/rmt/0 # rm restoresymtable [ 참고 ] restoresymtable : information passed between incremental restores (c). installboot 명령어수행 # cd /usr/platform/`uname -m`/lib/fs/ufs ; ls # installboot bootblk /dev/rdsk/c0t0d0s0 (d). 언마운트 & 점검 # cd / ; umount /a # fsck /dev/rdsk/c0t0d0s0 # init 6 (3-2-2) /usr 파일시스템복구 CD 부팅 복구작업 언마운트 & 점검 (a). CD(1 of 2) 부팅 <STOP + A> ok boot cdrom -s (b). 복구작업 # newfs /dev/rdsk/c0t0d0s3 (c0t0d0s3 : /usr 파일시스템 ) # mount /dev/dsk/c0t0d0s3 /a # cd /a # ufsrestore rvf /dev/rmt/0 # rm restoresymtable (c). 언마운트 & 점검 # cd / ; umount /a # fsck /dev/rdsk/c0t0d0s3 # init
445 (3-2-3) 일반파일시스템복구 ( 예 :/export/home) 복구작업 언마운트 & 점검 (a). 복구작업 # umount /export/home # newfs /dev/rdsk/c0t0d0s7 # mount /dev/dsk/c0t0d0s7 /export/home # cd /export/home # ufsrestore rvf /dev/rmt/0 # rm restoresymtable (b). 언마운트 & 점검 # cd / ; umount /export/home # fsck /dev/rdsk/c0t0d0s7 # mount /export/home Filesystem(Slice): /data4, /data1 [Q & A] Inode 할당에대해서 (Inode Allocation) /data4/file1(3) -> Tape/file1(3) -> /data1/file10 file2(4) file2(4) file11 file3(5) file3(5) file file1, file2, file3 (restore) then what inode number? 파일시스템백업이되면, 백업받기전에존재하던파일들에대한 inode 정보들이테잎에저장이되었다가복구가되면, 복구된파일시스템에새로운 Inode 가할당이된다. Inode 는새로할당되게되는것이다. 다음예제는위의경우를테스트한예이다. # df -k /data4 # df -k /data1 # cd /data4 # touch file1 file2 file3 # ls -li file1 file2 file3 # ufsdump 0uf /backup/testdump.0 /data4 # cd /data1 # touch file10 file11 file12 # ufsrestore rvf /backup/testdump.0 # ls -li file*
 백업파일시스템 : /export/home(/dev/dsk/c0d0s7) 백업계획 : (Backup Level) 0 => 1 => 5 => 4 복구계획 : (Backup Level) 0 => 1 => 4 [ 그림 ] 백업계획 (3.")
446 (3-3) 백업 & 복구실습 (Solaris 10 X86 on VMWare) ( 알림 ) 스팍용으로실습하기위해서는슬라이스이름을변경해서테스트를한다. /dev/dsk/c0d0s7 -> /dev/dsk/c0t2d0s7 백업 / 복구실습계획 (Backup Practice Plan) 백업파일시스템 : /export/home(/dev/dsk/c0d0s7) 백업계획 : (Backup Level) 0 => 1 => 5 => 4 복구계획 : (Backup Level) 0 => 1 => 4 [ 그림 ] 백업계획 (3.3.1) /export/home 파일시스템백업 1 백업폴더생성및기존정보확인 # mkdir -p /backup # ls -l /etc/dumpdates -rw-rw-r-- 1 root sys 0 3월 27 15:13 /etc/dumpdates +----> 크기 '0' 확인 # df -h /export/home ( 백업받을파티션용량점검 ) (# ufsdump 0S /export/home) # ls -l /backup ( 백업받는매체 - Tape Device 생각 ) 2 /export/home Backup Level '0' 백업 (08 월 05 일 ) # umount /export/home # ufsdump 0uf /backup/dump.0 /export/home DUMP: Date of this level 0 dump: Mon Dec 01 14:23: /* 백업시작시간 */ DUMP: Date of last level 0 dump: the epoch DUMP: Dumping /dev/rdsk/c0d0s7 (solaris254:/export/home) to /backup/dump.0. DUMP: Mapping (Pass I) [regular files] DUMP: Mapping (Pass II) [directories] DUMP: Writing 32 Kilobyte records DUMP: Estimated 1084 blocks (542KB). DUMP: Dumping (Pass III) [directories] DUMP: Dumping (Pass IV) [regular files] DUMP: 1022 blocks (511KB) on 1 volume at 1692 KB/sec DUMP: DUMP IS DONE DUMP: Level 0 dump on Mon Dec 01 14:23: /* 백업종료시간 */ # cat /etc/dumpdates /dev/rdsk/c0d0s7 0 Mon Dec 1 14:23: [ 백업파티션 ] [ 백업레벨 ] [ 백업시간 ] -> # ufsdump 0uf /backup/dump.0 /export/home -> u : updates, /etc/dumpdates 파일에백업시간이등록된다. # ls -l /backup (# ufsrestore tvf /backup/dump.0) -rw root root 512K Dec 1 14:23 dump.0 # mount /export/home /* 08 월 05 일 ~ 08 월 06 일사이의증가분생성 */ # cp -r /etc/default /export/home
Solaris Express Developer Edition
 Solaris Express Developer Edition : 2008 1 Solaris TM Express Developer Edition Solaris OS. Sun / Solaris, Java, Web 2.0,,. Developer Solaris Express Developer Edition System Requirements. 768MB. SPARC
<4D F736F F F696E74202D206D61696E D F6E D20C7D8C5B720BDC3BDBAC5DB20C0FCC1A620C1B6B0C7202D20B3D7C6AEBFF6C5A920C0CEC5CDC6E4C0CCBDBA20C4ABB5E520BCB3C1A4>
 해킹시스템생성전제조건 (4)- Linux/Unix 네트워크설정및적용 학습목표 Linux/Unix 네트워크인터페이스설정에필요한사항 Linux/Unix 네트워크인터페이스설정에필요한사항 more Linux/Unix 네트워크인터페이스설정에필요한사항 개념 해킹시스템을만들기위한 4 번째단계는네트워크인터페이스카드에대한 TCP/IP 아키텍쳐기반의네트워크설정을함으로타시스템과의통신을가능케함.
K7VT2_QIG_v3
 1......... 2 3..\ 4 5 [R] : Enter Raid setup utility 6 Press[A]keytocreateRAID RAID Type: JBOD RAID 0 RAID 1: 2 7 " RAID 0 Auto Create Manual Create: 2 RAID 0 Block Size: 16K 32K
Network seminar.key
 Intro to Network .. 2 4 ( ) ( ). ?!? ~! This is ~ ( ) /,,,???? TCP/IP Application Layer Transfer Layer Internet Layer Data Link Layer Physical Layer OSI 7 TCP/IP Application Layer Transfer Layer 3 4 Network
운영체제실습_명령어
 운영체제실습 리눅스네트워크기본개념및설정 서 기옥 Contents 네트워크용어정의 IP 주소 네트워크기본명령어 네트워크관리명령어 네트워크설정파일 telnet 서버설정 네트워크용어정의 네트워크 (Network) : 전자적으로데이터를주고받기위한목적으로연결된 2 개이상의컴퓨터시스템 IP 주소와 Ethernet 주소 IP 주소 : 네트워크에연결된시스템을구분하는소프트웨어적인주소
ORANGE FOR ORACLE V4.0 INSTALLATION GUIDE (Online Upgrade) ORANGE CONFIGURATION ADMIN O
 ORANGE CONFIGURATION ADMIN O") Orange for ORACLE V4.0 Installation Guide ORANGE FOR ORACLE V4.0 INSTALLATION GUIDE...1 1....2 1.1...2 1.2...2 1.2.1...2 1.2.2 (Online Upgrade)...11 1.3 ORANGE CONFIGURATION ADMIN...12 1.3.1 Orange Configuration
Orange for ORACLE V4.0 Installation Guide ORANGE FOR ORACLE V4.0 INSTALLATION GUIDE...1 1....2 1.1...2 1.2...2 1.2.1...2 1.2.2 (Online Upgrade)...11 1.3 ORANGE CONFIGURATION ADMIN...12 1.3.1 Orange Configuration
Solaris 10 (x86) Installation Guide for VMware 7 Writer : 이경호
 Installation Guide for VMware 7 Writer : 이경호") Solaris 10 (x86) Installation Guide for VMware 7 Writer : 이경호 목차 1. 시스템구성... - 2-1.1. 개요... - 2-1.1.1. 정의... - 2-1.1.2. 목적... - 2-1.1.3. 환경... - 2-2. 준비사항... - 2-3. Virtual Machine Setup... - 3-4. Solaris10
Solaris 10 (x86) Installation Guide for VMware 7 Writer : 이경호 목차 1. 시스템구성... - 2-1.1. 개요... - 2-1.1.1. 정의... - 2-1.1.2. 목적... - 2-1.1.3. 환경... - 2-2. 준비사항... - 2-3. Virtual Machine Setup... - 3-4. Solaris10
본교재는수업용으로제작된게시물입니다. 영리목적으로사용할경우저작권법제 30 조항에의거법적처벌을받을수있습니다. [ 실습 ] 스위치장비초기화 1. NVRAM 에저장되어있는 'startup-config' 파일이있다면, 삭제를실시한다. SWx>enable SWx#erase sta
![본교재는수업용으로제작된게시물입니다. 영리목적으로사용할경우저작권법제 30 조항에의거법적처벌을받을수있습니다. [ 실습 ] 스위치장비초기화 1. NVRAM 에저장되어있는 'startup-config' 파일이있다면, 삭제를실시한다. SWx>enable SWx#erase sta](/thumbs/88/116915514.jpg "본교재는수업용으로제작된게시물입니다. 영리목적으로사용할경우저작권법제 30 조항에의거법적처벌을받을수있습니다. [ 실습 ] 스위치장비초기화 1. NVRAM 에저장되어있는 'startup-config' 파일이있다면, 삭제를실시한다. SWx>enable SWx#erase sta") [ 실습 ] 스위치장비초기화 1. NVRAM 에저장되어있는 'startup-config' 파일이있다면, 삭제를실시한다. SWx>enable SWx#erase startup-config Erasing the nvram filesystem will remove all configuration files Continue? [confirm] ( 엔터 ) [OK] Erase
[ 실습 ] 스위치장비초기화 1. NVRAM 에저장되어있는 'startup-config' 파일이있다면, 삭제를실시한다. SWx>enable SWx#erase startup-config Erasing the nvram filesystem will remove all configuration files Continue? [confirm] ( 엔터 ) [OK] Erase
PWR PWR HDD HDD USB USB Quick Network Setup Guide xdsl/cable Modem PC DVR 1~3 1.. DVR DVR IP xdsl Cable xdsl Cable PC PC DDNS (
 PWR PWR HDD HDD USB USB Quick Network Setup Guide xdsl/cable Modem PC DVR 1~3 1.. DVR DVR IP xdsl Cable xdsl Cable PC PC DDNS (http://ddns.hanwha-security.com) Step 1~5. Step, PC, DVR Step 1. Cable Step
APOGEE Insight_KR_Base_3P11
 Technical Specification Sheet Document No. 149-332P25 September, 2010 Insight 3.11 Base Workstation 그림 1. Insight Base 메인메뉴 Insight Base Insight Insight Base, Insight Base Insight Base Insight Windows
Microsoft PowerPoint - 06-IPAddress [호환 모드]
![Microsoft PowerPoint - 06-IPAddress [호환 모드]](/thumbs/84/90735609.jpg "Microsoft PowerPoint - 06-IPAddress [호환 모드]") Chapter 06 IP Address IP Address Internet address IP 계층에서사용되는식별자 32 bit 2 진주소 The address space of IPv4 is 2 32 or 4,294,967,296 netid 와 hostid 로구분 인터넷에서호스트와라우터를유일하게구분 IP Address Structure 2-Layer Hierarchical
Chapter 06 IP Address IP Address Internet address IP 계층에서사용되는식별자 32 bit 2 진주소 The address space of IPv4 is 2 32 or 4,294,967,296 netid 와 hostid 로구분 인터넷에서호스트와라우터를유일하게구분 IP Address Structure 2-Layer Hierarchical
USB USB DV25 DV25 REC SRN-475S REC SRN-475S LAN POWER LAN POWER Quick Network Setup Guide xdsl/cable Modem PC DVR 1~3 1.. DVR DVR IP xdsl Cable xdsl C
 USB USB DV25 DV25 REC SRN-475S REC SRN-475S LAN POWER LAN POWER Quick Network Setup Guide xdsl/cable Modem PC DVR 1~3 1.. DVR DVR IP xdsl Cable xdsl Cable PC PC Step 1~5. Step, PC, DVR Step 1. Cable Step
chapter4
 Basic Netw rk 1. ก ก ก 2. 3. ก ก 4. ก 2 1. 2. 3. 4. ก 5. ก 6. ก ก 7. ก 3 ก ก ก ก (Mainframe) ก ก ก ก (Terminal) ก ก ก ก ก ก ก ก 4 ก (Dumb Terminal) ก ก ก ก Mainframe ก CPU ก ก ก ก 5 ก ก ก ก ก ก ก ก ก ก
소개 TeraStation 을 구입해 주셔서 감사합니다! 이 사용 설명서는 TeraStation 구성 정보를 제공합니다. 제품은 계속 업데이트되므로, 이 설명서의 이미지 및 텍스트는 사용자가 보유 중인 TeraStation 에 표시 된 이미지 및 텍스트와 약간 다를 수
 사용 설명서 TeraStation Pro II TS-HTGL/R5 패키지 내용물: 본체 (TeraStation) 이더넷 케이블 전원 케이블 TeraNavigator 설치 CD 사용 설명서 (이 설명서) 제품 보증서 www.buffalotech.com 소개 TeraStation 을 구입해 주셔서 감사합니다! 이 사용 설명서는 TeraStation 구성 정보를
bn2019_2
 arp -a Packet Logging/Editing Decode Buffer Capture Driver Logging: permanent storage of packets for offline analysis Decode: packets must be decoded to human readable form. Buffer: packets must temporarily
0125_ 워크샵 발표자료_완성.key
 WordPress is a free and open-source content management system (CMS) based on PHP and MySQL. WordPress is installed on a web server, which either is part of an Internet hosting service or is a network host
Remote UI Guide
 Remote UI KOR Remote UI Remote UI PDF Adobe Reader/Adobe Acrobat Reader. Adobe Reader/Adobe Acrobat Reader Adobe Systems Incorporated.. Canon. Remote UI GIF Adobe Systems Incorporated Photoshop. ..........................................................
10X56_NWG_KOR.indd
 디지털 프로젝터 X56 네트워크 가이드 이 제품을 구입해 주셔서 감사합니다. 본 설명서는 네트워크 기능 만을 설명하기 위한 것입니다. 본 제품을 올바르게 사 용하려면 이 취급절명저와 본 제품의 다른 취급절명저를 참조하시기 바랍니다. 중요한 주의사항 이 제품을 사용하기 전에 먼저 이 제품에 대한 모든 설명서를 잘 읽어 보십시오. 읽은 뒤에는 나중에 필요할 때
Solaris 9 (x86) Installation Guide for VMware 7 Writer : 이경호
 Installation Guide for VMware 7 Writer : 이경호") Solaris 9 (x86) Installation Guide for VMware 7 Writer : 이경호 목차 1. 시스템구성... - 2-1.1. 개요... - 2-1.1.1. 정의... - 2-1.1.2. 목적... - 2-1.1.3. 환경... - 2-2. 준비사항... - 2-3. Virtual Machine Setup... - 3-4. Solaris9
Solaris 9 (x86) Installation Guide for VMware 7 Writer : 이경호 목차 1. 시스템구성... - 2-1.1. 개요... - 2-1.1.1. 정의... - 2-1.1.2. 목적... - 2-1.1.3. 환경... - 2-2. 준비사항... - 2-3. Virtual Machine Setup... - 3-4. Solaris9
4. 스위치재부팅을실시한다. ( 만약, Save 질문이나오면 'no' 를실시한다.) SWx#reload System configuration has been modified. Save? [yes/no]: no Proceed with reload? [confirm] (
![4. 스위치재부팅을실시한다. ( 만약, Save 질문이나오면 'no' 를실시한다.) SWx#reload System configuration has been modified. Save? [yes/no]: no Proceed with reload? [confirm] (](/thumbs/91/104875642.jpg "4. 스위치재부팅을실시한다. ( 만약, Save 질문이나오면 'no' 를실시한다.) SWx#reload System configuration has been modified. Save? [yes/no]: no Proceed with reload? [confirm] (") [ 실습 ] 스위치장비초기화 1. NVRAM 에저장되어있는 'startup-config' 파일이있다면, 삭제를실시한다. SWx>enable SWx#erase startup-config Erasing the nvram filesystem will remove all configuration files Continue? [confirm] ( 엔터 ) [OK] Erase
[ 실습 ] 스위치장비초기화 1. NVRAM 에저장되어있는 'startup-config' 파일이있다면, 삭제를실시한다. SWx>enable SWx#erase startup-config Erasing the nvram filesystem will remove all configuration files Continue? [confirm] ( 엔터 ) [OK] Erase
Snort Install Manual Ad2m VMware libnet tar.gz DebianOS libpcap tar.gz Putty snort tar.gz WinSCP snort rules 1. 첫번째로네트워크설정 1) ifconf
 ifconf") Snort Install Manual Ad2m VMware libnet-1.1.5.tar.gz DebianOS libpcap-1.1.1.tar.gz Putty snort-2.8.6.tar.gz WinSCP snort rules 1. 첫번째로네트워크설정 1) ifconfig 명령어로현재 IP를확인해본다. 2) vi /etc/network/interfaces 네트워크설정파일에아래와같이설정을해준다.
Snort Install Manual Ad2m VMware libnet-1.1.5.tar.gz DebianOS libpcap-1.1.1.tar.gz Putty snort-2.8.6.tar.gz WinSCP snort rules 1. 첫번째로네트워크설정 1) ifconfig 명령어로현재 IP를확인해본다. 2) vi /etc/network/interfaces 네트워크설정파일에아래와같이설정을해준다.
Copyright 2012, Oracle and/or its affiliates. All rights reserved.,.,,,,,,,,,,,,.,...,. U.S. GOVERNMENT END USERS. Oracle programs, including any oper
 Windows Netra Blade X3-2B( Sun Netra X6270 M3 Blade) : E37790 01 2012 9 Copyright 2012, Oracle and/or its affiliates. All rights reserved.,.,,,,,,,,,,,,.,...,. U.S. GOVERNMENT END USERS. Oracle programs,
Sun Java System Messaging Server 63 64
 Sun Java System Messaging Server 6.3 64 Sun Java TM System Communications Suite Sun Microsystems, Inc. 4150 Network Circle Santa Clara, CA 95054 U.S.A. : 820 2868 2007 7 Copyright 2007 Sun Microsystems,
Assign an IP Address and Access the Video Stream - Installation Guide
 설치 안내서 IP 주소 할당 및 비디오 스트림에 액세스 책임 본 문서는 최대한 주의를 기울여 작성되었습니다. 잘못되거나 누락된 정보가 있는 경우 엑시스 지사로 알려 주시기 바랍니다. Axis Communications AB는 기술적 또는 인쇄상의 오류에 대해 책 임을 지지 않으며 사전 통지 없이 제품 및 설명서를 변경할 수 있습니다. Axis Communications
휠세미나3 ver0.4
 andromeda@sparcs:/$ ls -al dev/sda* brw-rw---- 1 root disk 8, 0 2014-06-09 18:43 dev/sda brw-rw---- 1 root disk 8, 1 2014-06-09 18:43 dev/sda1 brw-rw---- 1 root disk 8, 2 2014-06-09 18:43 dev/sda2 andromeda@sparcs:/$
Copyright 2012, Oracle and/or its affiliates. All rights reserved.,,,,,,,,,,,,,.,..., U.S. GOVERNMENT END USERS. Oracle programs, including any operat
 Sun Server X3-2( Sun Fire X4170 M3) Oracle Solaris : E35482 01 2012 9 Copyright 2012, Oracle and/or its affiliates. All rights reserved.,,,,,,,,,,,,,.,..., U.S. GOVERNMENT END USERS. Oracle programs, including
CD-RW_Advanced.PDF
 HP CD-Writer Program User Guide - - Ver. 2.0 HP CD-RW Adaptec Easy CD Creator Copier, Direct CD. HP CD-RW,. Easy CD Creator 3.5C, Direct CD 3.0., HP. HP CD-RW TEAM ( 02-3270-0803 ) < > 1. CD...3 CD...5
28 THE ASIAN JOURNAL OF TEX [2] ko.tex [5]
![28 THE ASIAN JOURNAL OF TEX [2] ko.tex [5]](/thumbs/91/105270926.jpg "28 THE ASIAN JOURNAL OF TEX [2] ko.tex [5]") The Asian Journal of TEX, Volume 3, No. 1, June 2009 Article revision 2009/5/7 KTS THE KOREAN TEX SOCIETY SINCE 2007 2008 ko.tex Installing TEX Live 2008 and ko.tex under Ubuntu Linux Kihwang Lee * kihwang.lee@ktug.or.kr
The Asian Journal of TEX, Volume 3, No. 1, June 2009 Article revision 2009/5/7 KTS THE KOREAN TEX SOCIETY SINCE 2007 2008 ko.tex Installing TEX Live 2008 and ko.tex under Ubuntu Linux Kihwang Lee * kihwang.lee@ktug.or.kr
MySQL-Ch10
 10 Chapter.,,.,, MySQL. MySQL mysqld MySQL.,. MySQL. MySQL....,.,..,,.,. UNIX, MySQL. mysqladm mysqlgrp. MySQL 608 MySQL(2/e) Chapter 10 MySQL. 10.1 (,, ). UNIX MySQL, /usr/local/mysql/var, /usr/local/mysql/data,
Mango220 Android How to compile and Transfer image to Target
 Mango220 Android How to compile and Transfer image to Target http://www.mangoboard.com/ http://cafe.naver.com/embeddedcrazyboys Crazy Embedded Laboratory www.mangoboard.com cafe.naver.com/embeddedcrazyboys
untitled
 Push... 2 Push... 4 Push... 5 Push... 13 Push... 15 1 FORCS Co., LTD A Leader of Enterprise e-business Solution Push (Daemon ), Push Push Observer. Push., Observer. Session. Thread Thread. Observer ID.
DE1-SoC Board
 실습 1 개발환경 DE1-SoC Board Design Tools - Installation Download & Install Quartus Prime Lite Edition http://www.altera.com/ Quartus Prime (includes Nios II EDS) Nios II Embedded Design Suite (EDS) is automatically
01Àå
 CHAPTER 01 1 Fedora Fedora Linux Toolbox 2003 Fedora Core( ) http://fedoraproject.org www.redhat.com 2 CHAPTER Fedora RHEL GNU public license www.centos.org www.yellowdoglinux.com www. lineox.net www.
ARMBOOT 1
 100% 2003222 : : : () PGPnet 1 (Sniffer) 1, 2,,, (Sniffer), (Sniffer),, (Expert) 3, (Dashboard), (Host Table), (Matrix), (ART, Application Response Time), (History), (Protocol Distribution), 1 (Select
PowerPoint 프레젠테이션
 (Host) set up : Linux Backend RS-232, Ethernet, parallel(jtag) Host terminal Target terminal : monitor (Minicom) JTAG Cross compiler Boot loader Pentium Redhat 9.0 Serial port Serial cross cable Ethernet
PowerPoint 프레젠테이션
 사용자계정관리 운영체제실습 목차 Ⅲ. 사용자계정관리 4.1 사용자계정관리 4.2 그룹관리 4.3 사용자계정관련파일 4.4 패스워드관리 4.5 사용자신분확인 4.1 사용자계정관리 사용자생성관련명령어 사용자생성 : useradd / adduser 사용자삭제 : userdel 사용자정보변경 : usermod 패스워드설정및변경 : passwd 그룹생성관련명령어 group
Copyright 0, Oracle and/or its affiliates. All rights reserved.,.,,,,,,,,,,,,.,...,. U.S. GOVERNMENT RIGHTS Programs, software, databases, and related
 Virtual Machine Sun Fire X4800 M : E4570 0 8 Copyright 0, Oracle and/or its affiliates. All rights reserved.,.,,,,,,,,,,,,.,...,. U.S. GOVERNMENT RIGHTS Programs, software, databases, and related documentation
PowerPoint Presentation
 Data Protection Rapid Recovery x86 DR Agent based Backup - Physical Machine - Virtual Machine - Cluster Agentless Backup - VMware ESXi Deploy Agents - Windows - AD, ESXi Restore Machine - Live Recovery
Microsoft PowerPoint - comp_prac_081223_2.pptx
 Computer Programming Practice (2008 Winter) Practice 2 기본 Unix/Linux 명령어숙지 2008. 12. 23 Contents Linux commands Basic commands File and Directory User Data Filtering Process Etc Conclusion & Recommended
Chapter 1
 3 Oracle 설치 Objectives Download Oracle 11g Release 2 Install Oracle 11g Release 2 Download Oracle SQL Developer 4.0.3 Install Oracle SQL Developer 4.0.3 Create a database connection 2 Download Oracle 11g
PowerPoint 프레젠테이션
 Reasons for Poor Performance Programs 60% Design 20% System 2.5% Database 17.5% Source: ORACLE Performance Tuning 1 SMS TOOL DBA Monitoring TOOL Administration TOOL Performance Insight Backup SQL TUNING
°í¼®ÁÖ Ãâ·Â
 Performance Optimization of SCTP in Wireless Internet Environments The existing works on Stream Control Transmission Protocol (SCTP) was focused on the fixed network environment. However, the number of
#Ȳ¿ë¼®
 http://www.kbc.go.kr/ A B yk u δ = 2u k 1 = yk u = 0. 659 2nu k = 1 k k 1 n yk k Abstract Web Repertoire and Concentration Rate : Analysing Web Traffic Data Yong - Suk Hwang (Research
Microsoft PowerPoint - 02_Linux_Fedora_Core_8_Vmware_Installation [호환 모드]
![Microsoft PowerPoint - 02_Linux_Fedora_Core_8_Vmware_Installation [호환 모드]](/thumbs/39/20119028.jpg "Microsoft PowerPoint - 02_Linux_Fedora_Core_8_Vmware_Installation [호환 모드]") 리눅스 설치 Vmware를 이용한 Fedora Core 8 설치 소프트웨어실습 1 Contents 가상 머신 실습 환경 구축 Fedora Core 8 설치 가상 머신 가상 머신 가상 머신의 개념 VMware의 설치 VMware : 가상 머신 생성 VMware의 특징 실습 환경 구축 실습 환경 구축 Fedora Core 8 설치 가상 머신의 개념 가상 머신 (Virtual
리눅스 설치 Vmware를 이용한 Fedora Core 8 설치 소프트웨어실습 1 Contents 가상 머신 실습 환경 구축 Fedora Core 8 설치 가상 머신 가상 머신 가상 머신의 개념 VMware의 설치 VMware : 가상 머신 생성 VMware의 특징 실습 환경 구축 실습 환경 구축 Fedora Core 8 설치 가상 머신의 개념 가상 머신 (Virtual
#KM560
 KM-560 KM-560-7 PARTS BOOK KM-560 KM-560-7 INFORMATION A. Parts Book Structure of Part Book Unique code by mechanism Unique name by mechanism Explode view Ref. No. : Unique identifcation number by part
슬라이드 제목 없음
 2006-09-27 경북대학교컴퓨터공학과 1 제 5 장서브넷팅과슈퍼넷팅 서브넷팅 (subnetting) 슈퍼넷팅 (Supernetting) 2006-09-27 경북대학교컴퓨터공학과 2 서브넷팅과슈퍼넷팅 서브넷팅 (subnetting) 하나의네트워크를여러개의서브넷 (subnet) 으로분할 슈퍼넷팅 (supernetting) 여러개의서브넷주소를결합 The idea
슬라이드 1
 / 유닉스시스템개요 / 파일 / 프로세스 01 File Descriptor file file descriptor file type unix 에서의파일은단지바이트들의나열임 operating system 은파일에어떤포맷도부과하지않음 파일의내용은바이트단위로주소를줄수있음 file descriptor 는 0 이나양수임 file 은 open 이나 creat 로 file
6주차.key
 6, Process concept A program in execution Program code PCB (process control block) Program counter, registers, etc. Stack Heap Data section => global variable Process in memory Process state New Running
#KM-250(PB)
") PARTS BOOK FOR 1-NEEDLE, STRAIGHT LOCK-STITCH MACHINE SERIES KM-250AU-7S KM-250AU-7N KM-250A-7S KM-250A-7N KM-250B-7S KM-250B-7N KM-250BH-7S KM-250BH-7N KM-250BL-7S KM-250BL-7N KM-250AU KM-250A KM-250B
PARTS BOOK FOR 1-NEEDLE, STRAIGHT LOCK-STITCH MACHINE SERIES KM-250AU-7S KM-250AU-7N KM-250A-7S KM-250A-7N KM-250B-7S KM-250B-7N KM-250BH-7S KM-250BH-7N KM-250BL-7S KM-250BL-7N KM-250AU KM-250A KM-250B
05Àå
 CHAPTER 05 NT,, XP,. NT NTFS, XP. D,,. XP x NT,,, ( x, x ). NT/ /XP,.. PC NT NT. + Guide to Software: Understanding and Installing Windows 2000 and Windows NT + SOFTWARE Guide to Software 3/e SOFTWARE
PRO1_04E [읽기 전용]
![PRO1_04E [읽기 전용]](/thumbs/91/104875613.jpg "PRO1_04E [읽기 전용]") Siemens AG 1999 All rights reserved File: PRO1_04E1 Information and S7-300 2 S7-400 3 EPROM / 4 5 6 HW Config 7 8 9 CPU 10 CPU : 11 CPU : 12 CPU : 13 CPU : / 14 CPU : 15 CPU : / 16 HW 17 HW PG 18 SIMATIC
Siemens AG 1999 All rights reserved File: PRO1_04E1 Information and S7-300 2 S7-400 3 EPROM / 4 5 6 HW Config 7 8 9 CPU 10 CPU : 11 CPU : 12 CPU : 13 CPU : / 14 CPU : 15 CPU : / 16 HW 17 HW PG 18 SIMATIC
Interstage5 SOAP서비스 설정 가이드
 Interstage 5 Application Server ( Solaris ) SOAP Service Internet Sample Test SOAP Server Application SOAP Client Application CORBA/SOAP Server Gateway CORBA/SOAP Gateway Client INTERSTAGE SOAP Service
다음 사항을 꼭 확인하세요! 도움말 안내 - 본 도움말에는 iodd2511 조작방법 및 활용법이 적혀 있습니다. - 본 제품 사용 전에 안전을 위한 주의사항 을 반드시 숙지하십시오. - 문제가 발생하면 문제해결 을 참조하십시오. 중요한 Data 는 항상 백업 하십시오.
 메 뉴 다음 사항을 꼭 확인하세요! --------------------------------- 2p 안전을 위한 주의 사항 --------------------------------- 3p 구성품 --------------------------------- 4p 각 부분의 명칭 --------------------------------- 5p 제품의 규격
Microsoft Word - ntasFrameBuilderInstallGuide2.5.doc
 NTAS and FRAME BUILDER Install Guide NTAS and FRAME BUILDER Version 2.5 Copyright 2003 Ari System, Inc. All Rights reserved. NTAS and FRAME BUILDER are trademarks or registered trademarks of Ari System,
Copyright 2004 Sun Microsystems, Inc Network Circle, Santa Clara, CA U.S.A..,,. Sun. Sun. Berkeley BSD. UNIX X/Open Company, Ltd.. Sun, Su
 Java Desktop System 2 Sun Microsystems, Inc. 4150 Network Circle Santa Clara, CA 95054 U.S.A. : 817 7757 10 2004 9 Copyright 2004 Sun Microsystems, Inc. 4150 Network Circle, Santa Clara, CA 95054 U.S.A..,,.
LXR 설치 및 사용법.doc
 Installation of LXR (Linux Cross-Reference) for Source Code Reference Code Reference LXR : 2002512( ), : 1/1 1 3 2 LXR 3 21 LXR 3 22 LXR 221 LXR 3 222 LXR 3 3 23 LXR lxrconf 4 24 241 httpdconf 6 242 htaccess
SQL Developer Connect to TimesTen 유니원아이앤씨 DB 기술지원팀 2010 년 07 월 28 일 문서정보 프로젝트명 SQL Developer Connect to TimesTen 서브시스템명 버전 1.0 문서명 작성일 작성자
 SQL Developer Connect to TimesTen 유니원아이앤씨 DB 팀 2010 년 07 월 28 일 문서정보 프로젝트명 SQL Developer Connect to TimesTen 서브시스템명 버전 1.0 문서명 작성일 2010-07-28 작성자 김학준 최종수정일 2010-07-28 문서번호 20100728_01_khj 재개정이력 일자내용수정인버전
사용자계정관리 1. 사용자계정관리 사용자 (user), 그룹 (group) u 다중사용자시스템 (Multi-User System) - 1 대의시스템을동시에여러사람이접속하여쓸수있게하는시스템 u 사용자 (user) - 시스템관리자 : root (=Super user) -
, 그룹 (group) u 다중사용자시스템 (Multi-User System) - 1 대의시스템을동시에여러사람이접속하여쓸수있게하는시스템 u 사용자 (user) - 시스템관리자 : root (=Super user) -") 운영체제실습 사용자계정관리 2017. 6 표월성 wspyo74@naver.com cherub.sungkyul.ac.kr 목차 Ⅰ. 사용자계정관리 1. 사용자계정관리 2. 그룹관리 3. 사용자계정관련파일 4. 패스워드관리 5. 사용자신분확인 사용자계정관리 1. 사용자계정관리 사용자 (user), 그룹 (group) u 다중사용자시스템 (Multi-User System)
운영체제실습 사용자계정관리 2017. 6 표월성 wspyo74@naver.com cherub.sungkyul.ac.kr 목차 Ⅰ. 사용자계정관리 1. 사용자계정관리 2. 그룹관리 3. 사용자계정관련파일 4. 패스워드관리 5. 사용자신분확인 사용자계정관리 1. 사용자계정관리 사용자 (user), 그룹 (group) u 다중사용자시스템 (Multi-User System)
Windows Server 2012
 Windows Server 2012 Shared Nothing Live Migration Shared Nothing Live Migration 은 SMB Live Migration 방식과다른점은 VM 데이터파일의위치입니다. Shared Nothing Live Migration 방식은 Hyper-V 호스트의로컬디스크에 VM 데이터파일이위치합니다. 반면에, SMB
MAX+plus II Getting Started - 무작정따라하기
 무작정 따라하기 2001 10 4 / Version 20-2 0 MAX+plus II Digital, Schematic Capture MAX+plus II, IC, CPLD FPGA (Logic) ALTERA PLD FLEX10K Series EPF10K10QC208-4 MAX+plus II Project, Schematic, Design Compilation,
SMB_ICMP_UDP(huichang).PDF
.PDF") SMB(Server Message Block) UDP(User Datagram Protocol) ICMP(Internet Control Message Protocol) SMB (Server Message Block) SMB? : Microsoft IBM, Intel,. Unix NFS. SMB client/server. Client server request
SMB(Server Message Block) UDP(User Datagram Protocol) ICMP(Internet Control Message Protocol) SMB (Server Message Block) SMB? : Microsoft IBM, Intel,. Unix NFS. SMB client/server. Client server request
Orcad Capture 9.x
 OrCAD Capture Workbook (Ver 10.xx) 0 Capture 1 2 3 Capture for window 4.opj ( OrCAD Project file) Design file Programe link file..dsn (OrCAD Design file) Design file..olb (OrCAD Library file) file..upd
Windows 네트워크 사용 설명서
 Windows 네트워크 사용 설명서 (Wireless Manager mobile edition 5.5) 그림의 예로 사용된 프로젝터는 PT-FW300NTEA 입니다. 한국어 TQBH0205-5 (K) 목차 소프트웨어 라이센스 계약 3 무선 연결 사용 시 참고 사항 4 보안 관련 참고 사항 6 소프트웨어 요구 사항 12 시스템 요구 사항 12 Wireless
Sena Technologies, Inc. HelloDevice Super 1.1.0
 HelloDevice Super 110 Copyright 1998-2005, All rights reserved HelloDevice 210 ()137-130 Tel: (02) 573-5422 Fax: (02) 573-7710 E-Mail: support@senacom Website: http://wwwsenacom Revision history Revision
#KM-235(110222)
") PARTS BOOK KM-235A/B INFORMATION A. Parts Book Structure of Part Book Unique code by mechanism Unique name by mechanism Explode view Ref. No. : Unique identifcation number by part Parts No. : Unique Product
PARTS BOOK KM-235A/B INFORMATION A. Parts Book Structure of Part Book Unique code by mechanism Unique name by mechanism Explode view Ref. No. : Unique identifcation number by part Parts No. : Unique Product
PCServerMgmt7
 Web Windows NT/2000 Server DP&NM Lab 1 Contents 2 Windows NT Service Provider Management Application Web UI 3 . PC,, Client/Server Network 4 (1),,, PC Mainframe PC Backbone Server TCP/IP DCS PLC Network
Backup Exec
 (sjin.kim@veritas.com) www.veritas veritas.co..co.kr ? 24 X 7 X 365 Global Data Access.. 100% Storage Used Terabytes 9 8 7 6 5 4 3 2 1 0 2000 2001 2002 2003 IDC (TB) 93%. 199693,000 TB 2000831,000 TB.
Page 2 of 5 아니다 means to not be, and is therefore the opposite of 이다. While English simply turns words like to be or to exist negative by adding not,
 Page 1 of 5 Learn Korean Ep. 4: To be and To exist Of course to be and to exist are different verbs, but they re often confused by beginning students when learning Korean. In English we sometimes use the
C# Programming Guide - Types
 C# Programming Guide - Types 최도경 lifeisforu@wemade.com 이문서는 MSDN 의 Types 를요약하고보충한것입니다. http://msdn.microsoft.com/enus/library/ms173104(v=vs.100).aspx Types, Variables, and Values C# 은 type 에민감한언어이다. 모든
#KLZ-371(PB)
") PARTS BOOK KLZ-371 INFORMATION A. Parts Book Structure of Part Book Unique code by mechanism Unique name by mechanism Explode view Ref. No. : Unique identifcation number by part Parts No. : Unique Product
PARTS BOOK KLZ-371 INFORMATION A. Parts Book Structure of Part Book Unique code by mechanism Unique name by mechanism Explode view Ref. No. : Unique identifcation number by part Parts No. : Unique Product
Splentec V-WORM Quick Installation Guide Version: 1.0 Contact Information 올리브텍 주소 : 경기도성남시분당구구미로 11 ( 포인트타운 701호 ) URL: E-M
 URL: E-M") Splentec V-WORM Quick Installation Guide Version: 1.0 Contact Information 올리브텍 주소 : 경기도성남시분당구구미로 11 ( 포인트타운 701호 ) URL: http://www.olivetech.co.kr E-Mail: tech@olivetech.co.kr TEL: 031-726-4217 FAX: 031-726-4219
Splentec V-WORM Quick Installation Guide Version: 1.0 Contact Information 올리브텍 주소 : 경기도성남시분당구구미로 11 ( 포인트타운 701호 ) URL: http://www.olivetech.co.kr E-Mail: tech@olivetech.co.kr TEL: 031-726-4217 FAX: 031-726-4219
H3050(aap)
") USB Windows 7/ Vista 2 Windows XP English 1 2 3 4 Installation A. Headset B. Transmitter C. USB charging cable D. 3.5mm to USB audio cable - Before using the headset needs to be fully charged. -Connect
USB Windows 7/ Vista 2 Windows XP English 1 2 3 4 Installation A. Headset B. Transmitter C. USB charging cable D. 3.5mm to USB audio cable - Before using the headset needs to be fully charged. -Connect
 1. 회사소개 및 연혁 - 회사소개 회사소개 회사연혁 대표이사: 한종열 관계사 설립일 : 03. 11. 05 자본금 : 11.5억원 인 원 : 18명 에스오넷 미도리야전기코리 아 미도리야전기(일본) 2008 2007 Cisco Premier Partner 취득 Cisco Physical Security ATP 취득(진행) 서울시 강남구 도심방범CCTV관제센터
문서 대제목
 Linux OS Backup 교육자료 v1.1 2013. 12. 27. 이스턴네트웍스 기술지원팀전흥수 목차 1. Linux OS Backup & Cloning Layout 2. Solution Install & Configuration 3. Recovery Procedure 4. Reference Site - 1 - 1. Linux OS Backup / Cloning
PowerPoint 프레젠테이션
 Deep Learning 작업환경조성 & 사용법 ISL 안재원 Ubuntu 설치 작업환경조성 접속방법 사용예시 2 - ISO file Download www.ubuntu.com Ubuntu 설치 3 - Make Booting USB Ubuntu 설치 http://www.pendrivelinux.com/universal-usb-installer-easy-as-1-2-3/
TTA Verified : HomeGateway :, : (NEtwork Testing Team)
") TTA Verified : HomeGateway :, : (NEtwork Testing Team) : TTA-V-N-05-006-CC11 TTA Verified :2006 6 27 : 01 : 2005 7 18 : 2/15 00 01 2005 7 18 2006 6 27 6 7 9 Ethernet (VLAN, QoS, FTP ) (, ) : TTA-V-N-05-006-CC11
TTA Verified : HomeGateway :, : (NEtwork Testing Team) : TTA-V-N-05-006-CC11 TTA Verified :2006 6 27 : 01 : 2005 7 18 : 2/15 00 01 2005 7 18 2006 6 27 6 7 9 Ethernet (VLAN, QoS, FTP ) (, ) : TTA-V-N-05-006-CC11
제20회_해킹방지워크샵_(이재석)
") IoT DDoS DNS (jaeseog@sherpain.net) (www.sherpain.net) DDoS DNS DDoS / DDoS(Distributed DoS)? B Asia Broadband B Bots connect to a C&C to create an overlay network (botnet) C&C Provider JP Corp. Bye Bye!
IoT DDoS DNS (jaeseog@sherpain.net) (www.sherpain.net) DDoS DNS DDoS / DDoS(Distributed DoS)? B Asia Broadband B Bots connect to a C&C to create an overlay network (botnet) C&C Provider JP Corp. Bye Bye!
#KM-340BL
 PARTS BOOK KM-340BL 고속 1본침 본봉 상하송 재봉기 High Speed, 1-Needle, Upper and Lower Feed Lock Stitch Machine W/Large Hook PME-100707 SunStar CO., LTD. INFORMATION A. Parts Book Structure of Part Book Unique code
Simplify your Job Automatic Storage Management DB TSC
 Simplify your Job Automatic Storage Management DB TSC 1. DBA Challenges 2. ASM Disk group 3. Mirroring/Striping/Rebalancing 4. Traditional vs. ASM 5. ASM administration 6. ASM Summary Capacity in Terabytes
1217 WebTrafMon II
 (1/28) (2/28) (10 Mbps ) Video, Audio. (3/28) 10 ~ 15 ( : telnet, ftp ),, (4/28) UDP/TCP (5/28) centralized environment packet header information analysis network traffic data, capture presentation network
1. efolder 시스템구성 A. DB B. apache - mod-perl - PHP C. SphinxSearch ( 검색서비스 ) D. File Storage 2. efolder 설치순서 A. DB (MySQL) B. efolder Service - efolder
 D. File Storage 2. efolder 설치순서 A. DB (MySQL) B. efolder Service - efolder") Embian efolder 설치가이드 efolder 시스템구성 efolder 설치순서 Installation commands 1. efolder 시스템구성 A. DB B. apache - mod-perl - PHP C. SphinxSearch ( 검색서비스 ) D. File Storage 2. efolder 설치순서 A. DB (MySQL) B. efolder
Embian efolder 설치가이드 efolder 시스템구성 efolder 설치순서 Installation commands 1. efolder 시스템구성 A. DB B. apache - mod-perl - PHP C. SphinxSearch ( 검색서비스 ) D. File Storage 2. efolder 설치순서 A. DB (MySQL) B. efolder
Sena Device Server Serial/IP TM Version
 Sena Device Server Serial/IP TM Version 1.0.0 2005. 3. 7. Release Note Revision Date Name Description V1.0.0 2005-03-7 HJ Jeon Serial/IP 4.3.2 ( ) 210 137-130, : (02) 573-5422 : (02) 573-7710 email: support@sena.com
<C0CCBCBCBFB52DC1A4B4EBBFF82DBCAEBBE7B3EDB9AE2D313939392D382E687770>
 i ii iii iv v vi 1 2 3 4 가상대학 시스템의 국내외 현황 조사 가상대학 플랫폼 개발 이상적인 가상대학시스템의 미래상 제안 5 웹-기반 가상대학 시스템 전통적인 교수 방법 시간/공간 제약을 극복한 학습동기 부여 교수의 일방적인 내용전달 교수와 학생간의 상호작용 동료 학생들 간의 상호작용 가상대학 운영 공지사항,강의록 자료실, 메모 질의응답,
목차 소프트웨어 라이센스 계약 3 무선 연결 사용 시 참고 사항 4 보안 관련 참고 사항 6 Wireless Manager mobile edition 5.5 로 수행 가능한 작업 7 컴퓨터 확인 10 컴퓨터를 연결하기 위해 필요한 환경 10 소프트웨어 설치 / 제거 1
 Windows 사용 설명서 Wireless Manager ME 5.5 Wireless Manager mobile edition 5.5 F1111-0 KOREAN WM-LY8JC-K 목차 소프트웨어 라이센스 계약 3 무선 연결 사용 시 참고 사항 4 보안 관련 참고 사항 6 Wireless Manager mobile edition 5.5 로 수행 가능한 작업
강의10
 Computer Programming gdb and awk 12 th Lecture 김현철컴퓨터공학부서울대학교 순서 C Compiler and Linker 보충 Static vs Shared Libraries ( 계속 ) gdb awk Q&A Shared vs Static Libraries ( 계속 ) Advantage of Using Libraries Reduced
Microsoft PowerPoint - ch07.ppt
 chapter 07. 시스코라우터기본동작 한빛미디어 -1- 학습목표 시스코라우터외적, 내적구성요소 시스코라우터부팅단계 시스코라우터명령어모드 한빛미디어 -2- 시스코라우터구성요소 라우터외부구성요소 (1) [ 그림 ] 2600 라우터전면도 인터페이스카드 전원부 LED 라우터조건 한빛미디어 -3- 시스코라우터구성요소 라우터외부구성요소 (2) [ 그림 ] VTY 를이용한라우터접속
Network Security - Wired Sniffing 실습 ICNS Lab. Kyung Hee University
 Network Security - Wired Sniffing 실습 ICNS Lab. Kyung Hee University Outline Network Network 구조 Source-to-Destination 간 packet 전달과정 Packet Capturing Packet Capture 의원리 Data Link Layer 의동작 Wired LAN Environment
MPLAB C18 C
 MPLAB C18 C MPLAB C18 MPLAB C18 C MPLAB C18 C #define START, c:\mcc18 errorlevel{0 1} char isascii(char ch); list[list_optioin,list_option] OK, Cancel , MPLAB IDE User s Guide MPLAB C18 C
McAfee Email Security Virtual Appliance 5.6 설치 안내서
 McAfee Email Security Virtual Appliance 5.6 설치 안내서 저작권 Copyright 2011 McAfee, Inc. All Rights Reserved. 이 문서의 어떠한 부분도 McAfee, Inc. 또는 그 제공업체나 계열 회사의 명시적인 서명 승인 없이는 어떠한 형식이나 수단으로도 검색 시스템에 복제, 전송, 기록되거나
Something that can be seen, touched or otherwise sensed
 Something that can be seen, touched or otherwise sensed Things about an object Weight Height Material Things an object does Pen writes Book stores words Water have Fresh water Rivers Oceans have
1) 인증서만들기 ssl]# cat >www.ucert.co.kr.pem // 설명 : 발급받은인증서 / 개인키파일을한파일로저장합니다. ( 저장방법 : cat [ 개인키
![1) 인증서만들기 ssl]# cat >www.ucert.co.kr.pem // 설명 : 발급받은인증서 / 개인키파일을한파일로저장합니다. ( 저장방법 : cat [ 개인키](/thumbs/80/81384531.jpg "1) 인증서만들기 ssl]# cat >www.ucert.co.kr.pem // 설명 : 발급받은인증서 / 개인키파일을한파일로저장합니다. ( 저장방법 : cat [ 개인키") Lighttpd ( 단일도메인 ) SSL 인증서신규설치가이드. [ 고객센터 ] 한국기업보안. 유서트기술팀 1) 인증서만들기 [root@localhost ssl]# cat www.ucert.co.kr.key www.ucert.co.kr.crt >www.ucert.co.kr.pem // 설명 : 발급받은인증서 / 개인키파일을한파일로저장합니다. ( 저장방법 : cat
Lighttpd ( 단일도메인 ) SSL 인증서신규설치가이드. [ 고객센터 ] 한국기업보안. 유서트기술팀 1) 인증서만들기 [root@localhost ssl]# cat www.ucert.co.kr.key www.ucert.co.kr.crt >www.ucert.co.kr.pem // 설명 : 발급받은인증서 / 개인키파일을한파일로저장합니다. ( 저장방법 : cat
- 2 -
 - 1 - - 2 - - 3 - - 4 - - 5 - - 6 - - 7 - - 8 - - 9 - - 10 - - 11 - - 12 - - 13 - - 14 - - 15 - - 16 - - 17 - - 18 - - 19 - - 20 - - 21 - - 22 - - 23 - - 24 - - 25 - - 26 - - 27 - - 28 - - 29 - - 30 -
PowerPoint 프레젠테이션
 임베디드리눅스개발환경구축 Jo, Heeseung 개발환경 HBE-SM5-S4210 개발환경 타겟보드와리눅스가설치된호스트컴퓨터가필요 임베디드리눅스개발환경 - 호스트컴퓨터환경설치 - 호스트와타겟연결 - 디버그환경 호스트컴퓨터는임베디드시스템의동작을모니터링하는디버깅환경으로서의역할도수행 임베디드시스템을위한소프트웨어를개발하기위해서호스트시스템에구축하는개발환경 교차개발환경
PowerChute Personal Edition v3.1.0 에이전트 사용 설명서
 PowerChute Personal Edition v3.1.0 990-3772D-019 4/2019 Schneider Electric IT Corporation Schneider Electric IT Corporation.. Schneider Electric IT Corporation,,,.,. Schneider Electric IT Corporation..
기존에 Windchill Program 이 설치된 Home Directory 를 선택해준다. 프로그램설치후설치내역을확인해보면 Adobe Acrobat 6.0 Support 내역을확인할수 있다.
 PDMLink 에등록된 Office 문서들의 PDF 문서변환기능및 Viewer 기능을알아보자 PDM Link에서지원하는 [Product View Document Support] 기능은 Windows-Base 기반의 Microsoft Office 문서들을 PDMLink용 Viewer인 Product View를통한읽기가가능한 PDF Format 으로변환하는기능이다.
Portal_9iAS.ppt [읽기 전용]
![Portal_9iAS.ppt [읽기 전용]](/thumbs/104/163081918.jpg "Portal_9iAS.ppt [읽기 전용]") Application Server iplatform Oracle9 A P P L I C A T I O N S E R V E R i Oracle9i Application Server e-business Portal Client Database Server e-business Portals B2C, B2B, B2E, WebsiteX B2Me GUI ID B2C
Application Server iplatform Oracle9 A P P L I C A T I O N S E R V E R i Oracle9i Application Server e-business Portal Client Database Server e-business Portals B2C, B2B, B2E, WebsiteX B2Me GUI ID B2C
1) 인증서만들기 ssl]# cat >www.ucert.co.kr.pem // 설명 : 발급받은인증서 / 개인키파일을한파일로저장합니다. ( 저장방법 : cat [ 개인키
![1) 인증서만들기 ssl]# cat >www.ucert.co.kr.pem // 설명 : 발급받은인증서 / 개인키파일을한파일로저장합니다. ( 저장방법 : cat [ 개인키](/thumbs/80/81384552.jpg "1) 인증서만들기 ssl]# cat >www.ucert.co.kr.pem // 설명 : 발급받은인증서 / 개인키파일을한파일로저장합니다. ( 저장방법 : cat [ 개인키") Lighttpd ( 멀티도메인 ) SSL 인증서신규설치가이드. [ 고객센터 ] 한국기업보안. 유서트기술팀 1) 인증서만들기 [root@localhost ssl]# cat www.ucert.co.kr.key www.ucert.co.kr.crt >www.ucert.co.kr.pem // 설명 : 발급받은인증서 / 개인키파일을한파일로저장합니다. ( 저장방법 : cat
Lighttpd ( 멀티도메인 ) SSL 인증서신규설치가이드. [ 고객센터 ] 한국기업보안. 유서트기술팀 1) 인증서만들기 [root@localhost ssl]# cat www.ucert.co.kr.key www.ucert.co.kr.crt >www.ucert.co.kr.pem // 설명 : 발급받은인증서 / 개인키파일을한파일로저장합니다. ( 저장방법 : cat
GNU/Linux 1, GNU/Linux MS-DOS LOADLIN DOS-MBR LILO DOS-MBR LILO... 6
 GNU/ 1, qkim@pecetrirekr GNU/ 1 1 2 2 3 4 31 MS-DOS 5 32 LOADLIN 5 33 DOS- LILO 6 34 DOS- 6 35 LILO 6 4 7 41 BIOS 7 42 8 43 8 44 8 45 9 46 9 47 2 9 5 X86 GNU/LINUX 10 1 GNU/, GNU/ 2, 3, 1 : V 11, 2001
final_thesis
 CORBA/SNMP DPNM Lab. POSTECH email : ymkang@postech.ac.kr Motivation CORBA/SNMP CORBA/SNMP 2 Motivation CMIP, SNMP and CORBA high cost, low efficiency, complexity 3 Goal (Information Model) (Operation)
Page 2 of 6 Here are the rules for conjugating Whether (or not) and If when using a Descriptive Verb. The only difference here from Action Verbs is wh
 and If when using a Descriptive Verb. The only difference here from Action Verbs is wh") Page 1 of 6 Learn Korean Ep. 13: Whether (or not) and If Let s go over how to say Whether and If. An example in English would be I don t know whether he ll be there, or I don t know if he ll be there.
Page 1 of 6 Learn Korean Ep. 13: Whether (or not) and If Let s go over how to say Whether and If. An example in English would be I don t know whether he ll be there, or I don t know if he ll be there.