Contents 1. 개요 System Overview Hardware 구성환경 Network 구성환경 이중화구성환경 H/W and OS Information Hard
|
|
|
- 미선 돈
- 8 years ago
- Views:
Transcription
1 ORACLE 11G R2 RAC install On Multipath Environment Author 홍두표 Creation Date Last Updated Version 1.0 Copyright(C) 2004 Goodus Inc. All Rights Reserved Version 변경일자변경자 ( 작성자 ) 주요내용 홍두표문서최초작성 홍두표기술노트용으로변경
2 Contents 1. 개요 System Overview Hardware 구성환경 Network 구성환경 이중화구성환경 H/W and OS Information Hardware OS Partition 정보 ASM 구성정보 IP 구성정보 OS USER 정보 패키지 Pre-Installation Steps Preparing the system Host file Configuration Kernel Sysctl Configuration User resource limit 설정 NTP 설정 User Shell Configuration 보안설정 SSH 설정 Preparing Oracle ASM Installation ASM LIBRARY ASM Configuration Multipath 관련설정 Create ASM VOLUME Install requirement 확인 cluster verify utility Installation step Grid Infrastracture Install runinstaller Install 확인작업 Resource 및 Service 확인
3 network 확인 Process 확인 Database Installation ASMCA Database Software Installation Database 생성 Install 확인작업 Resource 및 Service 확인 결론

4 1. 개요. Database 라는특성상 oracle 이설치되는홖경에는맋은물리적이중화구성이적용되어운영하는경우 가맋습니다. Storage : storage 자체에서지원하는 RAID 구성 (0+1 ) Storage Network : Mpath, MPIO, PVLINKS, MPxIO, PowerPATH, HDLM.. 등 Network Device : IPMP, BONDING, EtherChannel, APA, Teaming 등 특히 RAC 구성에서 Storage 단구성을파악하지않고구성되는경우맋으며, 그중에서도 ASMLib 를이 용할경우디스크로의 path 설정을고려하여짂행하여야합니다. 본문서는 Linux OS 에서 EMC PowerPath 를사용하는경우로설치과정을통해 RAC 구성에있어 OS 및 hardware 홖경에따라고려해야할것이무엇인지짚어보고자합니다. 2. System Overview 2.1. Hardware 구성홖경. - 4

5 2.2. Network 구성홖경 2.3. 이중화구성홖경 DB Interconnect Network - 5
6 현재 Oracle 이 Interconnect 를위한 Network 가이중화되어있으며, OS 에서 bonding 을통해구성되 어있습니다. admin]$ ifconfig bond0 Link encap:ethernet HWaddr 00:18:71:7A:F0:84 inet addr: Bcast: Mask: inet6 addr: fe80::218:71ff:fe7a:f084/64 Scope:Link network-scripts]# cat /proc/net/bonding/bond0 Ethernet Channel Bonding Driver: v3.4.0 (October 7, 2008) Bonding Mode: fault-tolerance (active-backup) Primary Slave: eth1 (primary_reselect always) Currently Active Slave: eth1 MII Status: up MII Polling Interval (ms): 100 Up Delay (ms): 0 Down Delay (ms): 0 Slave Interface: eth1 MII Status: up Link Failure Count: 0 Permanent HW addr: 00:18:71:7a:f0:84 Slave Interface: eth2 MII Status: up Link Failure Count: 0 Permanent HW addr: 00:1b:78:56:35:5c [root@rdb1 network-scripts]# Oracle 에서는 cross-cable 을이용한서버갂 direct 연결을권고하지않으며, 가능한 Switch 를이용한 active-standby 구성을공고하고있습니다. Storage Network Server 와 Switch 갂이중화는되어있지않으며, Switch 와 Storage 갂 Line 이중화가되어있는상태입니다. - 6
7 실운영홖경에서는 switch 를포함하여 server-switch-storage 갂이중화구성을권고합니다. OS 에는 EMC Powerpath 를이용한 path 이중화 solution 이구성되어있습니다. ~]# powermt display dev=all Pseudo name=emcpowera CLARiiON ID=CK [rac1db] Logical device ID= A EFCE001A517DF11 [LUN 2] state=alive; policy=basicfailover; priority=0; queued-ios=0 Owner: default=sp A, current=sp A Array failover mode: 1 ============================================================================== Host Stor - -- I/O Path - -- Stats --- ### HW Path I/O Paths Interf. Mode State Q-IOs Errors ============================================================================== 0 qla2xxx sda SP A0 active alive qla2xxx sdah SP B0 active alive 0 0 Pseudo name=emcpowerab CLARiiON ID=CK [rac1db] Logical device ID= B F38CFAC17DF11 [LUN 93] 향후 ASM 구성시 sda, sdah 와같은 Native name 이아닌 emcpowera 와같은 pseudo name 을사용 합니다. Storage RAID Level Storage 단에서 RAID 1+0 로이중화구성되어있습니다. Storage 단에서이중화가구성되어있으므로향후 ASM Disk 구성시 redundancy level 을 external 로 설정할예정입니다. - 7
8 2.4. H/W and OS Information Hardware 항목 RDB1 ( rdb1) RDB2 ( rdb2 ) CPU 4cpu Dual-Core AMD Opteron(tm) Processor 2214 HE 4cpu Dual-Core AMD Opteron(tm) Processor 2214 HE MEMORY 8G Memory 8G Memory Total Local Disk 72 GB HDD * 2 (Mirroring) 72 GB HDD * 2 (Mirroring) Swap 8004 MB 8004 MB /tmp / (/dev/cciss/c0d0p1 free: K /) / (/dev/cciss/c0d0p1 free: K /) /dev/shm 8G 8G 물리적인 memory 가 8G 이고 Swap 공갂이 8G 에약갂못미치고있는상태로설치시 Warnning 이발 생하지맊무시하고짂행할수있습니다. Local Disk 는 cciss 로 RAID-1 으로구성되어있습니다. [root@rdb1 sbin]# hpacucli ctrl slot=1 show config Smart Array P400 in Slot 1 (sn: P61620D9SUO3XH) array A (SAS, Unused Space: 0 MB) logicaldrive 1 (68.3 GB, RAID 1, OK) physicaldrive 2I:1:1 (port 2I:box 1:bay 1, SAS, 72 GB, OK) physicaldrive 2I:1:2 (port 2I:box 1:bay 2, SAS, 72 GB, OK) /dev/shm 은 oracle 11g r2 에서 AMM 을사용할경우사용하는곳으로해당사이즈이상으로 oracle memory 를설정할수없습니다. 맊약 /dev/shm 사이즈가작다면아래와같은명령으로수정할수있습 니다. mount -t tmpfs tmpfs /dev/shm -o size=5120m OS 항목 RDB1 ( rdb1) RDB2 ( rdb2 ) OS Red Hat Enterprise Linux Server release 5.5 (Tikanga) (Red Hat ) Red Hat Enterprise Linux Server release 5.5 (Tikanga) (Red Hat ) Hostname rdb1 rdb2-8
9 Kernel Linux rdb el5 #1 SMP x86_64 x86_64 x86_64 GNU/Linux Linux rdb el5 #1 SMP x86_64 x86_64 x86_64 GNU/Linux gcc version gcc version gcc version Partition 정보 항목 Partitions (RDB1, RDB2) RDB1 disks]# df -k Filesystem 1K-blocks Used Available Use% Mounted on /dev/cciss/c0d0p % / /dev/emcpowera % /DB1ARC none % /dev/shm /dev/cciss/c0d0p % /data /dev/cciss/c0d0p % /rac Local /dev/emcpowera % /DGBACKUP [root@rdb1 disks]# RDB2 [root@rdb2 ~]# df -k Filesystem 1K-blocks Used Available Use% Mounted on /dev/cciss/c0d0p % / none % /dev/shm /dev/cciss/c0d0p % /data /dev/cciss/c0d0p % /rac /dev/emcpowera % /DB2ARC [root@rdb2 ~]# [root@rdb1 disks]# fdisk l.. Disk /dev/sda: GB, bytes 255 heads, 63 sectors/track, cylinders Units = cylinders of * 512 = bytes Device Boot Start End Blocks Id System /dev/sda Linux Storage /dev/sda Linux /dev/sda Linux Disk /dev/sdb: 57.9 GB, bytes 64 heads, 32 sectors/track, cylinders Units = cylinders of 2048 * 512 = bytes Device Boot Start End Blocks Id System /dev/sdb Linux.. - 9
10 Disk /dev/sdbn: 57.9 GB, bytes 64 heads, 32 sectors/track, cylinders Units = cylinders of 2048 * 512 = bytes Device Boot Start End Blocks Id System /dev/sdbn Linux Disk /dev/emcpowera: GB, bytes 255 heads, 63 sectors/track, cylinders Units = cylinders of * 512 = bytes Device Boot Start End Blocks Id System /dev/emcpowera Linux /dev/emcpowera Linux /dev/emcpowera Linux Disk /dev/emcpowerab: 57.9 GB, bytes 64 heads, 32 sectors/track, cylinders Units = cylinders of 2048 * 512 = bytes Device Boot Start End Blocks Id System /dev/emcpowerab Linux.. Disk /dev/emcpowern: 57.9 GB, bytes 64 heads, 32 sectors/track, cylinders Units = cylinders of 2048 * 512 = bytes Device Boot Start End Blocks Id System /dev/emcpowern Linux Disk /dev/emcpowero: 57.9 GB, bytes 64 heads, 32 sectors/track, cylinders Units = cylinders of 2048 * 512 = bytes Device Boot Start End Blocks Id System /dev/emcpowero Linux ASM 으로사용할 disk 로 emcpowerb~emcpowerag 를사용합니다. OCR,VOTE 를위한공갂으로 emcpowerb1,emcpowerc1,emcpowerd1 각 disk 에 1G 씩을할당합니다. Nomal redundancy 일경우 3 개의 asm disk 맊있으면설치가가능하며, storage 단에서 RAID 1+0 으로 구성되어있으나 OCR,VOTE 공갂은 Normal redundancy 로구성합니다. Oracle ASM 은기본적으로 Diskgroup 내에서 stripe 하여 data 를저장하며, Diskgroup 내균일하게저장될 수있도록구성되어있습니다. - 10

 의경우공식적인 requirement size 는명시하고있지않지만 patch 중여유공갂을 check 하므로최소 20G 이상의공갂이있어야합니다. 현재상태에서설치를짂행하기위해서는 ORACLE 설치 binary 는 /data 에위치시킵니다.")
11 그러므로 Diskgroup 내각 disk 의사이즈가동일한것이성능상이점이있습니다. 본가이드에서는 OCR,VOTE 를위해 emcpowerb 를 emcpowerb1, emcpowerb2 로 partitioning 하여짂행하였으나실운영홖경에서는 storage 구성단계에서 OCR,VOTE disk 를고려하여 disk 를구성한후나머지 disk 를모두동일사이즈로구성을권고합니다. 현 disk 구성 실운영 disk 구성 /rac 디렉토리에 Grid Infrastructure, Oracle RDMS 가설치될예정으로현재약 24.5G 정도할당되어있습니다. 향후설치를완료 (patch 포함 ) 하게되면약 13G 정도를사용하게되며, 진행될 patch ( ) 의경우공식적인 requirement size 는명시하고있지않지만 patch 중여유공갂을 check 하므로최소 20G 이상의공갂이있어야합니다. 현재상태에서설치를짂행하기위해서는 ORACLE 설치 binary 는 /data 에위치시킵니다. [root@rdb1 source]# pwd /data/source [root@rdb1 source]# ls -al total 24 drwxr-xr-x 6 root dba 4096 Dec 27 17:15. drwxr-xr-x 4 root root 4096 Dec 27 13:13.. drwxr-xr-x 2 grid drwxr-xr-x 4 grid dba 4096 Dec 22 17:55 asm dba 4096 Dec 23 14:14 grid drwxr-xr-x 4 oracle dba 4096 Dec 27 13:40 oracle - 11
12 drwxrwxr-x 5 oracle dba 4096 Dec 27 11:48 patch [root@rdb1 source]# ASM 구성정보 항 목 Partitions RDB1, RDB2 ASM (OCR,VOTE) /dev/emcpowerb1 OV01 (/dev/oracleasm/disks/ov01) ASM (OCR,VOTE) /dev/emcpowerc1 OV02 (/dev/oracleasm/disks/ov02) ASM (OCR,VOTE) /dev/emcpowerd1 OV03 (/dev/oracleasm/disks/ov03) /dev/emcpowerb2 /dev/emcpowerc2 /dev/emcpowerd2 VOL01 (/dev/oracleasm/disks/vol01) VOL02 (/dev/oracleasm/disks/vol02) VOL03 (/dev/oracleasm/disks/vol03) ASM(DGDATA1) /dev/emcpowere1 VOL04 (/dev/oracleasm/disks/vol04) ASM(DGDATA1) /dev/emcpowerf1 VOL05 (/dev/oracleasm/disks/vol05) ASM(DGDATA1) /dev/emcpowerg1 VOL06 (/dev/oracleasm/disks/vol06) ASM(DGDATA1) /dev/emcpowerh1 VOL07 (/dev/oracleasm/disks/vol07) ASM(DGDATA1) /dev/emcpoweri1 VOL08 (/dev/oracleasm/disks/vol08) ASM(DGDATA1) /dev/emcpowerj1 VOL09 (/dev/oracleasm/disks/vol09) ASM(DGDATA1) /dev/emcpowekg1 VOL10 (/dev/oracleasm/disks/vol10) ASM(DGDATA1) /dev/emcpowelg1 VOL11 (/dev/oracleasm/disks/vol11) ASM(DGDATA1) /dev/emcpowemg1 VOL12 (/dev/oracleasm/disks/vol12) ASM(DGDATA1) /dev/emcpowern1 VOL13 (/dev/oracleasm/disks/vol13) ASM(DGDATA1) /dev/emcpowero1 VOL14 (/dev/oracleasm/disks/vol14) ASM(DGDATA1) /dev/emcpowerp1 VOL15 (/dev/oracleasm/disks/vol15) ASM(DGDATA1) /dev/emcpowerq1 VOL16 (/dev/oracleasm/disks/vol16) ASM(DGDATA1) /dev/emcpowerr1 VOL17 (/dev/oracleasm/disks/vol17) ASM(DGBACKUP1) /dev/emcpowers1 VOL18 (/dev/oracleasm/disks/vol18) ASM(DGBACKUP1) /dev/emcpowert1 VOL19 (/dev/oracleasm/disks/vol19) ASM(DGBACKUP1) /dev/emcpoweru1 VOL20 (/dev/oracleasm/disks/vol20) ASM(DGBACKUP1) /dev/emcpowerv1 VOL21 (/dev/oracleasm/disks/vol21) ASM(DGBACKUP1) /dev/emcpowerw1 VOL22 (/dev/oracleasm/disks/vol22) ASM(DGBACKUP1) /dev/emcpowerx1 VOL23 (/dev/oracleasm/disks/vol23) ASM(DGBACKUP1) /dev/emcpowery1 VOL24 (/dev/oracleasm/disks/vol24) ASM(DGBACKUP1) /dev/emcpowerz1 VOL25 (/dev/oracleasm/disks/vol25) ASM(DGBACKUP1) /dev/emcpoweraa1 VOL26 (/dev/oracleasm/disks/vol26) ASM(DGBACKUP1) /dev/emcpowerab1 VOL27 (/dev/oracleasm/disks/vol27) ASM(DGBACKUP1) /dev/emcpowerac1 VOL28 (/dev/oracleasm/disks/vol28) - 12
13 ASM(DGBACKUP1) /dev/emcpowerad1 VOL29 (/dev/oracleasm/disks/vol29) ASM(DGBACKUP1) /dev/emcpowerae1 VOL30 (/dev/oracleasm/disks/vol30) ASM(DGBACKUP1) /dev/emcpoweraf1 VOL31 (/dev/oracleasm/disks/vol31) ASM(DGBACKUP1) /dev/emcpowerag1 VOL32 (/dev/oracleasm/disks/vol32) emcpowerb2, emcpowerc2, emcpowerd2 는 ASM Disk Group 에할당하지않습니다 IP 구성정보 항목 RDB1 (rdb1) RDB2 (rdb2) 비고 bond0 eth1 eth bond mode : active backup Interconnect network IP eth0 eth public eth0:1 eth virtual IP eth0:2 eth Scan IP interconnect 용 network 는 bonding 으로이중화되었으며, active_standby mode 로설정되어있습니다 OS USER 정보 USERNAME GROUP SHELL Home Direcoty PROFILE root(0) root(0) /bin/bash /root.bash_profile oracle(600) grid(601) dba(1001) asmadmin(1002) dba(1001) asmadmin(1002) /bin/bash /home/oracle.bash_profile /bin/bash /home/grid.bash_profile oracle 공식문서에는 oracle user: oinstall, dba, asmdba, grid user: oinstall, dba, asmadmin, asmdba, asmoper 로세분화하여설치권고합니다. OS User Home Directory 와 Oracle 설치 Directory 를다르게설정할것을권고합니다. 특히 Grid 의경우설치를완료하게되면해당설치 directory 의 owner 를 root 로변경하게되어 user home directory 와설치 directory 를동일하게가져갈경우 permission 문제가발생할수있습니다 패키지 Oracle 에서권고하는 package 목록과설치된 package 목록 - 13
14 ORACLE 권고 packages RDB1 (rdb1) RDB2 (rdb2) KERNEL 이상 el5 Packages binutils (x86_64) 이상 binutils el5 binutils el5 compat-libstdc (i386) 이상 compat-libstdc compat-libstdc compat-libstdc (x86_64) 이상 compat-libstdc compat-libstdc elfutils-libelf (x86_64) 이상 elfutils-libelf el5 elfutils-libelf el5 elfutils-libelf-devel (x86_64) 이상 elfutils-libelf-devel el5 elfutils-libelf-devel el5 elfutils-libelf-devel-static (x86_64) 이상 elfutils-libelf-devel-static el5 elfutils-libelf-devel-static el5 gcc (x86_64) 이상 gcc el5 gcc el5 gcc-c (x86_64) 이상 gcc-c el5 gcc-c el5 glibc (i686) 이상 glibc glibc glibc (x86_64) 이상 glibc glibc glibc-common-2.5 (x86_64) 이상 glibc-common glibc-common glibc-devel-2.5 (i386) 이상 glibc-devel glibc-devel glibc-devel-2.5 (x86_64) 이상 glibc-devel glibc-devel glibc-headers-2.5 (x86_64) 이상 glibc-headers glibc-headers kernel-headers (x86_64) 이상 kernel-headers el5 kernel-headers el5 ksh (x86_64) 이상 ksh el5 ksh el5 libaio (i386) 이상 libaio libaio libaio (x86_64) 이상 libaio libaio libaio-devel (i386) 이상 libaio-devel libaio-devel libaio-devel (x86_64) 이상 libaio-devel libaio-devel libgcc (i386) 이상 libgcc el5 libgcc el5 libgcc (x86_64) 이상 libgcc el5 libgcc el5 libgomp (x86_64) 이상 libgomp el5 libgomp el5 libstdc (i386) 이상 libstdc el5 libstdc el5 libstdc (x86_64) 이상 libstdc el5 libstdc el5 libstdc++-devel (x86_64) 이상 libstdc++-devel el5 libstdc++-devel el5 make-3.81 (x86_64) 이상 make el5 make el5 sysstat (x86_64) 이상 sysstat el5 sysstat el5 unixodbc (i386) 이상 unixodbc unixodbc unixodbc (x86_64) 이상 unixodbc unixodbc unixodbc-devel (i386) 이상 unixodbc-devel unixodbc-devel unixodbc-devel (x86_64) 이상 unixodbc-devel unixodbc-devel ASM - 14
15 oracleasm ( 커널버젼에맞출것 ) oracleasm el el5 oracleasm el el5 oracleasmlib oracleasmlib el5 oracleasmlib el5 oracleasm-support oracleasm-support el5 oracleasm-support el5 EMC Powerpath EMCpower.LINUX 이상 EMCpower.LINUX EMCpower.LINUX 붉은색글씨는 32bit 와 64bit 모두설치해야하는 package 입니다. oracleasm 은해당 hardware CPU architecture 와 OS kernel version 에맞추어설치해야합니다. Red Hat Enterprise Linux Server 5 asm download 주소 : Powerpath 를사용할경우 powerpath version 이상버전을사용해야합니다. ASMLib: oracleasm createdisk command fails: Device '/dev/emcpowera1 is not a partition [Failed] [ID ] Symptoms The issue is resolved with EMC PowerPath version 5.3 SP1 (5.3.1) - refer: The "oracleasm createdisk" command fails with the following error despite the device having been correctlypartitioned: Marking disk "/dev/emcpowera1" as an ASM disk: asmtool: Device "/dev/emcpowera1" is not a partition [FAILED] Cause EMC PowerPath versions <= do not properly support the I/O calls performed by oracleasm Solution The issue is resolved with EMC PowerPath version 5.3 SP1 (5.3.1) - refer: EMC PowerPath Family for Linux Version 5.3 Release Notes - January 25, 2010 (Fixed Problems) EMC Knowledgebase Solution emc Pre-Installation Steps 3.1. Preparing the system Host file Configuration /etc/hosts 파일에각노드의 Pulic IP 주소및 VIP, Interconnect 주소를등록합니다. (root 사용자로양쪽노드모두수행합니다.) [root@rdb1etc]# cat /etc/hosts # Do not remove the following line, or various programs # that require network functionality will fail localhost.localdomain localhost - 15
16 rdb1.goodus.com rdb rdb2.goodus.com rdb2 # Private LAN For Oracle RAC Interconnection (bond0) rdb1-priv rdb2-priv # Public Oracle Virtual IP -(VIP) rdb1-vip.goodus.com rdb1-vip rdb2-vip.goodus.com rdb2-vip # Public Oracle Scan IP rdb-scan.goodus.com rdb-scan Oracle Grid infrastructure 를위해서는 DNS 에 3 개의 scan IP 가필요하지맊여기서는 DNS 없이 hosts file 을이용하며이럴경우 scan IP 1 개로구성합니다. scan 없이이젂버젂방식으로사용할수있지맊 EM(Enterprise Manager) 를사용하기위해서는반듯이 SCAN 설정이필요합니다 Kernel Sysctl Configuration Oracle 을기동하기위한 OS kernel 값설정합니다. /etc/sysctl.conf 에아래항목을추가합니다. (root 사용자로양쪽노드모두수행합니다.) fs.aio-max-nr = fs.file-max = kernel.shmall = kernel.shmmni = 4096 kernel.sem = net.ipv4.ip_local_port_range = net.core.rmem_default = net.core.rmem_max = net.core.wmem_default = net.core.wmem_max = kernel.shmmax = 변경된설정사항을적용합니다. (root 사용자로양쪽노드모두수행합니다.) [root@rdb1 ~]# sysctl -p User resource limit 설정 - 16
17 OS user 에설정될 limit 값을조정합니다. /etc/security/limits.conf 에아래항목을추가합니다. (root 사용자로양쪽노드모두수행합니다.) oracle soft nproc 2047 oracle hard nproc oracle soft nofile 1024 oracle hard nofile grid soft nproc 2047 grid hard nproc grid soft nofile 1024 grid hard nofile limit 설정이 user login 후에적용될수있도록 pam 에등록합니다. /etc/pam.d/login 에아래항목을추가합니다. (root 사용자로양쪽노드모두수행합니다.) session required /lib64/security/pam_limits.so NTP 설정 11g r2 RAC 부터 Time 동기화를위해두가지종류의설정법이졲재합니다. NTP 를이용할경우 NTP 를이용하여 cluster node 갂 Time 동기화를수행하는것으로반듯이 x 옵션으로 ntp 를사용해야합니다. /etc/sysconfig/ntpd 에아래와같이 -x 옵션을추가한후 ntp service 를 restart 합니다. (root 사용자로양쪽노드모두수행합니다.) # Drop root to id 'ntp:ntp' by default. OPTIONS="-x -u ntp:ntp -p /var/run/ntpd.pid" # Set to 'yes' to sync hw clock after successful ntpdate SYNC_HWCLOCK=no # Additional options for ntpdate NTPDATE_OPTIONS="" - 17
18 ~]# service ntpd restart Shutting down ntpd: [ OK ] Starting ntpd: [ OK ] [root@rdb1 sysconfig]# ps -ef grep ntp ntp Dec22? 00:00:00 ntpd -x -u ntp:ntp -p /var/run/ntpd.pid root :50 pts/0 00:00:00 grep ntp [root@rdb1 sysconfig]# NTP 를이용하지않는경우 NTP 를이용하지않는경우 Grid Infrastructure 에서는 CTSSD daemon 을통해자체적으로동기화를수행 합니다. 따로설정이필요없습니다 User Shell Configuration grid, oracle 사용자의 shell 홖경을설정합니다. ( 사용자로아래와같이각각설정합니다.) grid user rdb1 #.bash_profile rdb2 #.bash_profile # Get the aliases and functions if [ -f ~/.bashrc ]; then. ~/.bashrc fi # Get the aliases and functions if [ -f ~/.bashrc ]; then. ~/.bashrc fi # User specific environment and startup programs PATH=$PATH:$HOME/bin:/bin:/sbin:/usr/bin:/usr/sbin:/usr/local/ bin:/usr/local/sbin export PATH export GRID_HOME=/rac/grid/product/ export ORACLE_SID=+ASM1 export PATH=$GRID_HOME/bin:$GRID_HOME/OPatch:$PATH export ORACLE_HOME=/rac/grid/product/ export DISPLAY= *.*:0.0 # User specific environment and startup programs PATH=$PATH:$HOME/bin:/bin:/sbin:/usr/bin:/usr/sbin:/usr/local/ bin:/usr/local/sbin export PATH export GRID_HOME=/rac/grid/product/ export ORACLE_SID=+ASM2 export PATH=$GRID_HOME/bin:$GRID_HOME/OPatch:$PATH export ORACLE_HOME=/rac/grid/product/ export DISPLAY= *.*:0.0 if [ $USER = "oracle" ] [ $USER = "grid" ]; then if [ $SHELL = "/bin/ksh" ]; then ulimit -p ulimit -n else if [ $USER = "oracle" ] [ $USER = "grid" ]; then if [ $SHELL = "/bin/ksh" ]; then ulimit -p ulimit -n else - 18
19 ulimit -u n fi umask 022 fi ulimit -u n fi umask 022 fi oracle user rdb1 #.bash_profile rdb2 #.bash_profile # Get the aliases and functions if [ -f ~/.bashrc ]; then. ~/.bashrc fi # Get the aliases and functions if [ -f ~/.bashrc ]; then. ~/.bashrc fi # User specific environment and startup programs PATH=$PATH:$HOME/bin export PATH stty erase ^H export ORACLE_BASE=/rac/oracle export ORACLE_HOME=$ORACLE_BASE/product/ export ORACLE_SID=RDB1 export ORACLE_UNQNAME=RAC1DB export ORACLE_TERM=xterm export PATH=/usr/sbin:$PATH export PATH=$ORACLE_HOME/bin:$ORACLE_HOME/OPatch:$PATH export LD_LIBRARY_PATH=$ORACLE_HOME/lib:/lib:/usr/lib export CLASSPATH=$ORACLE_HOME/JRE:$ORACLE_HOME/jlib:$ORACL E_HOME/rdbms/jlib export DISPLAY= :0.0 # User specific environment and startup programs PATH=$PATH:$HOME/bin export PATH stty erase ^H export ORACLE_BASE=/rac/oracle export ORACLE_HOME=$ORACLE_BASE/product/ export ORACLE_SID=RDB2 export ORACLE_UNQNAME=RAC1DB export ORACLE_TERM=xterm export PATH=/usr/sbin:$PATH export PATH=$ORACLE_HOME/bin:$ORACLE_HOME/OPatch:$PATH export LD_LIBRARY_PATH=$ORACLE_HOME/lib:/lib:/usr/lib export CLASSPATH=$ORACLE_HOME/JRE:$ORACLE_HOME/jlib:$ORACL E_HOME/rdbms/jlib export DISPLAY= :0.0 if [ $USER = "oracle" ] [ $USER = "grid" ]; then if [ $SHELL = "/bin/ksh" ]; then ulimit -p ulimit -n else ulimit -u n fi umask 022 fi if [ $USER = "oracle" ] [ $USER = "grid" ]; then if [ $SHELL = "/bin/ksh" ]; then ulimit -p ulimit -n else ulimit -u n fi umask 022 fi 보안설정 다양한보앆설정이졲재하며설정으로인해향후에발생할문제를미연에제거합니다. SELinux 설정해제 - 19
20 ( root 사용자로양쪽노드모두수행합니다.) ~]# cat /etc/selinux/config # This file controls the state of SELinux on the system. # SELINUX= can take one of these three values: # enforcing - SELinux security policy is enforced. # permissive - SELinux prints warnings instead of enforcing. # disabled - SELinux is fully disabled. SELINUX=disabled # SELINUXTYPE= type of policy in use. Possible values are: # targeted - Only targeted network daemons are protected. # strict - Full SELinux protection. SELINUXTYPE=targeted # SETLOCALDEFS= Check local definition changes SETLOCALDEFS=0 [root@rdb1 ~]# SELinux 는기졲의 rwx:rwx:rwx 를이용한접근제어를확장하여 daemon(process) level 의보앆설정을제공하는것으로위와같이설정하여 disable 시킵니다.(reboot 필요 ). SELinux 가홗성화되어있는경우설치시에문제가없을수있지맊설치후 sqlplus 등수행시 library access fail 이발생할수있습니다. SELinux 를계속사용할경우에는해당 library 에대한 file context 값을변경시켜주어야합니다. IPTABLES 설정해제 ( root 사용자로양쪽노드모두수행합니다.) [root@rdb1 ~]# iptables -L Chain INPUT (policy ACCEPT) target prot opt source destination Chain FORWARD (policy ACCEPT) target prot opt source destination Chain OUTPUT (policy ACCEPT) target prot opt source destination [root@rdb1 ~]# - 20
21 Linux 에서기본적으로제공하는 Network 방화벽으로위와같이설정되어있으면아무런정책이등록되지않은것 입니다. TCP Wrapper 설정 ( root 사용자로양쪽노드모두수행합니다.) [root@rdb2 ~]# cat /etc/hosts.allow # # hosts.allow This file describes the names of the hosts which are # allowed to use the local INET services, as decided # by the '/usr/sbin/tcpd' server. # sshd : , , , [root@rdb2 ~]# cat /etc/hosts.deny # # hosts.deny This file describes the names of the hosts which are # *not* allowed to use the local INET services, as decided # by the '/usr/sbin/tcpd' server. # # The portmap line is redundant, but it is left to remind you that # the new secure portmap uses hosts.deny and hosts.allow. In particular # you should know that NFS uses portmap! ALL : ALL [root@rdb2 ~]# TCP Wrapper 는 IP 기반의 TCP 접속을제어하는것으로 tcpd 를통해통싞하는모든서비스가설정된룰에적용받게됨. TCP Wrapper 를사용하는경우 11gr2 RAC 설치를위해서는 SSH daemon 을통해양쪽노드갂통싞이가능해야하므로위와같이양쪽노드의 IP 를등록합니다 SSH 설정 RAC 설치를위해서는양노드갂설치파일젂송및실행을위한 password 없이접속이가능해야합니다. ssh deamon 이홗성화되어있는지확인합니다. - 21
22 (grid, oracle user 로양쪽노드모두수행합니다.) ~]$ ps -ef grep ssh root Dec22? 00:00:00 /usr/sbin/sshd grid :59 pts/0 00:00:00 grep ssh [grid@rdb1 ~]$ SSH 공개키생성 grid user rdb1 [grid@rdb1 ~]$ ssh-keygen -t rsa Generating public/private rsa key pair. Enter file in which to save the key (/rac/grid/.ssh/id_rsa): Created directory '/rac/grid/.ssh'. Enter passphrase (empty for no passphrase): Enter same passphrase again: Your identification has been saved in /rac/grid/.ssh/id_rsa. Your public key has been saved in /rac/grid/.ssh/id_rsa.pub. The key fingerprint is: 90:82:e3:53:37:cf:8d:16:5b:c7:6a:9e:20:c2:a7:05 grid@rdb1 [grid@rdb1~]$ cd.ssh [[email protected]]$ cat id_rsa.pub > authorized_keys [[email protected]]$ cat authorized_keys ssh-rsa AAAAB3NzaC1yc2EAAAABIwAAAQEAzSmTrcOtC7/QIPhTnfSk/d+ R32q99QJrKxbq6N6FWabYMhZMV4ND8CN7A+5oYlgl8TR6uYuX 86nOUY+rZZhVi2yMn98j5bgcyDThrT0dB0xvvCQHH0lyiTh+sCiQi Y3DgV8chTlnbRlxHhFcHxyqZdSWX7U44JI/2rh8QX3EgrnUu9/PfQ SNOO9yvtXzA/KkvYpVGH5YjkDLgYvlzmYqYBEpeF0C5ccD/jme+Y 2mrVsMa4SLmu0JJoRzNEYSSzdVEakwniyYBf5+udTehF3PBtqSlAiil ncxun//w54xkc3364t7iadcxwoekhrxibuogvrdx57v5zm+bk0y QOoFRw== grid@rdb1 rdb2 [grid@rdb2 ~]$ ssh-keygen -t rsa Generating public/private rsa key pair. Enter file in which to save the key (/rac/grid/.ssh/id_rsa): Created directory '/rac/grid/.ssh'. Enter passphrase (empty for no passphrase): Enter same passphrase again: Your identification has been saved in /rac/grid/.ssh/id_rsa. Your public key has been saved in /rac/grid/.ssh/id_rsa.pub. The key fingerprint is: e6:cd:f3:73:43:2f:de:5b:53:96:d8:b3:8a:03:74:e6 grid@rdb2 [grid@rdb2 ~]$ cd.ssh [[email protected]]$ cat id_rsa.pub > authorized_keys [[email protected]]$ cat authorized_keys ssh-rsa AAAAB3NzaC1yc2EAAAABIwAAAQEA1+u2IIN+zNAIVt+RHtQpa5 7SI2Cjjad1aDB2UGsKsFI2+DO7daKjlR+nhcXi4g26im9nPbv3TwcH 14ho5hyFh+BT5Km3O3z4Jg8GNAO4F3Lj2IIH8uhY9ZMc3ofwdEV caeupo0d+qekuzwhx2pum6xxtd1sdpv0m4rmu1ik/0gkqdj2sa y1vqnuonbtgdv7wejqmekg97i66kxxi3jpvue81x0rl+gelews8m4 d32tltsty8w8yzrn18l1n5e5bk21huinbahk/5rhhevu559zw6sfez 2Q1qVtsdUyMvncMEhZr2My/KyZLQlIxkk6ajGOaziliy2dk9YwVoCB UiWw== grid@rdb2 authorized_keys 값에상대편 key 를추가한다. authorized_keys 값에상대편 key 를추가한다. [[email protected]]$ cat authorized_keys ssh-rsa AAAAB3NzaC1yc2EAAAABIwAAAQEAzSmTrcOtC7/QIPhTnfSk/d+ R32q99QJrKxbq6N6FWabYMhZMV4ND8CN7A+5oYlgl8TR6uYuX 86nOUY+rZZhVi2yMn98j5bgcyDThrT0dB0xvvCQHH0lyiTh+sCiQi Y3DgV8chTlnbRlxHhFcHxyqZdSWX7U44JI/2rh8QX3EgrnUu9/PfQ SNOO9yvtXzA/KkvYpVGH5YjkDLgYvlzmYqYBEpeF0C5ccD/jme+Y 2mrVsMa4SLmu0JJoRzNEYSSzdVEakwniyYBf5+udTehF3PBtqSlAiil ncxun//w54xkc3364t7iadcxwoekhrxibuogvrdx57v5zm+bk0y QOoFRw== grid@rdb1 [[email protected]]$ cat authorized_keys ssh-rsa AAAAB3NzaC1yc2EAAAABIwAAAQEA1+u2IIN+zNAIVt+RHtQpa5 7SI2Cjjad1aDB2UGsKsFI2+DO7daKjlR+nhcXi4g26im9nPbv3TwcH 14ho5hyFh+BT5Km3O3z4Jg8GNAO4F3Lj2IIH8uhY9ZMc3ofwdEV caeupo0d+qekuzwhx2pum6xxtd1sdpv0m4rmu1ik/0gkqdj2sa y1vqnuonbtgdv7wejqmekg97i66kxxi3jpvue81x0rl+gelews8m4 d32tltsty8w8yzrn18l1n5e5bk21huinbahk/5rhhevu559zw6sfez 2Q1qVtsdUyMvncMEhZr2My/KyZLQlIxkk6ajGOaziliy2dk9YwVoCB UiWw== grid@rdb2-22
23 ssh-rsa AAAAB3NzaC1yc2EAAAABIwAAAQEA1+u2IIN+zNAIVt+RHtQpa5 7SI2Cjjad1aDB2UGsKsFI2+DO7daKjlR+nhcXi4g26im9nPbv3TwcH 14ho5hyFh+BT5Km3O3z4Jg8GNAO4F3Lj2IIH8uhY9ZMc3ofwdEV caeupo0d+qekuzwhx2pum6xxtd1sdpv0m4rmu1ik/0gkqdj2say 1vqnUonBtgdv7wEJqMEkg97i66KXxI3jpVuE81X0Rl+gEleWs8m4d 32TlTsty8w8yzrn18L1N5E5bk21HuInbAHk/5rHhevU559zw6SFEz2 Q1qVtsdUyMvncMEhZr2My/KyZLQlIxkk6ajGOaziliy2dk9YwVoCB UiWw== ssh-rsa AAAAB3NzaC1yc2EAAAABIwAAAQEAzSmTrcOtC7/QIPhTnfSk/d+ R32q99QJrKxbq6N6FWabYMhZMV4ND8CN7A+5oYlgl8TR6uYuX 86nOUY+rZZhVi2yMn98j5bgcyDThrT0dB0xvvCQHH0lyiTh+sCiQi Y3DgV8chTlnbRlxHhFcHxyqZdSWX7U44JI/2rh8QX3EgrnUu9/PfQ SNOO9yvtXzA/KkvYpVGH5YjkDLgYvlzmYqYBEpeF0C5ccD/jme+Y 2mrVsMa4SLmu0JJoRzNEYSSzdVEakwniyYBf5+udTehF3PBtqSlAiil ncxun//w54xkc3364t7iadcxwoekhrxibuogvrdx57v5zm+bk0y QOoFRw== oracle user rdb1 ssh-keygen -t rsa Generating public/private rsa key pair. Enter file in which to save the key (/rac/oracle/.ssh/id_rsa): Created directory '/rac/oracle/.ssh'. Enter passphrase (empty for no passphrase): Enter same passphrase again: Your identification has been saved in /rac/oracle/.ssh/id_rsa. Your public key has been saved in /rac/oracle/.ssh/id_rsa.pub. The key fingerprint is: bf:8c:e2:a0:69:bb:6b:62:7b:1a:c3:da:5b:45:c9:79 cd.ssh cat id_rsa.pub > authorized_keys cat authorized_keys ssh-rsa AAAAB3NzaC1yc2EAAAABIwAAAQEAyZbCFTVYE/r6QaRidXOIc8A hwntuxow6ipac6700eiz5qy+xpv+/bjcmjclyigswahnfiyg+ae0 /d1hwywx1gbgnb0fvxsfwf6bzqjke0bxmscca/gxkdgmnsnns 36TQ/VpQ9Bkq/YnHeCiZo1EFS3klQISOiV0Dd3EkQShx4RT9taQ7o +S4HfPpl/15I3t+fIb4jwKp/tprJB6IQH3yka6V6gc+mJfIe3Z3aaWD9 YLUJhSRdPPebhzqkfyw/D0vjnSO6RniIBaY3YscCzno8l9L2XhdPYa wzwygdr1gia7cseawzhsfjkpvw5qr5cqecucz+2/aw0jlczegap 7sfw== rdb2 ~]$ ssh-keygen -t rsa Generating public/private rsa key pair. Enter file in which to save the key (/rac/oracle/.ssh/id_rsa): Created directory '/rac/oracle/.ssh'. Enter passphrase (empty for no passphrase): Enter same passphrase again: Your identification has been saved in /rac/oracle/.ssh/id_rsa. Your public key has been saved in /rac/oracle/.ssh/id_rsa.pub. The key fingerprint is: a4:8d:58:03:3d:1d:fb:20:99:3c:d3:e7:4b:f1:c2:28 ~]$ cd.ssh cat id_rsa.pub > authorized_keys cat authorized_keys ssh-rsa AAAAB3NzaC1yc2EAAAABIwAAAQEAvtSY969Kk/QvHfDWByVxD ZV2IX8eGPcSTU+1xC7L4fNnUuw8fuiwAPX+xR+Q21FcLpO6ENo6 KPVAE2d/G9+L/1A7CJ9PAUUgXywKwx+reyKrGB9/LHeMg3eBttd 51cjVnZO6tVFT9FwBHo8ihwurpFJr0yJgDAGoIXxVhbmgpjBF0Ln3 O649hul3PyAb1ld0p94q1zDyegAZ+YaLrVaSIHS8VDIWr6zo8P+er 95MuDL1B8bXZfAq/c7ojURWw1x72Dt/i4BFdlBG5AwaLm+7N1Uy ybn9kzq2tfi1eqcrkohsg6avp0spx5tn2nd0z4gtxlq8rcxhymze LlFtGndyew== authorized_keys 값에상대편 key 를추가한다. authorized_keys 값에상대편 key 를추가한다. cat authorized_keys ssh-rsa AAAAB3NzaC1yc2EAAAABIwAAAQEAyZbCFTVYE/r6QaRidXOIc8A hwntuxow6ipac6700eiz5qy+xpv+/bjcmjclyigswahnfiyg+ae0 /d1hwywx1gbgnb0fvxsfwf6bzqjke0bxmscca/gxkdgmnsnns 36TQ/VpQ9Bkq/YnHeCiZo1EFS3klQISOiV0Dd3EkQShx4RT9taQ7o +S4HfPpl/15I3t+fIb4jwKp/tprJB6IQH3yka6V6gc+mJfIe3Z3aaWD9 YLUJhSRdPPebhzqkfyw/D0vjnSO6RniIBaY3YscCzno8l9L2XhdPYa cat authorized_keys ssh-rsa AAAAB3NzaC1yc2EAAAABIwAAAQEAvtSY969Kk/QvHfDWByVxD ZV2IX8eGPcSTU+1xC7L4fNnUuw8fuiwAPX+xR+Q21FcLpO6ENo6 KPVAE2d/G9+L/1A7CJ9PAUUgXywKwx+reyKrGB9/LHeMg3eBttd 51cjVnZO6tVFT9FwBHo8ihwurpFJr0yJgDAGoIXxVhbmgpjBF0Ln3 O649hul3PyAb1ld0p94q1zDyegAZ+YaLrVaSIHS8VDIWr6zo8P+er 95MuDL1B8bXZfAq/c7ojURWw1x72Dt/i4BFdlBG5AwaLm+7N1Uy - 23
24 wzwygdr1gia7cseawzhsfjkpvw5qr5cqecucz+2/aw0jlczegap 7sfw== ssh-rsa AAAAB3NzaC1yc2EAAAABIwAAAQEAvtSY969Kk/QvHfDWByVxDZ V2IX8eGPcSTU+1xC7L4fNnUuw8fuiwAPX+xR+Q21FcLpO6ENo6K PVAE2d/G9+L/1A7CJ9PAUUgXywKwx+reyKrGB9/LHeMg3eBttd5 1cjVnZO6tVFT9FwBHo8ihwurpFJr0yJgDAGoIXxVhbmgpjBF0Ln3O 649hul3PyAb1ld0p94q1zDyegAZ+YaLrVaSIHS8VDIWr6zo8P+er9 5MuDL1B8bXZfAq/c7ojURWw1x72Dt/i4BFdlBG5AwaLm+7N1Uyy Bn9kZq2tFI1EQcRkOHSG6AvP0SPX5Tn2ND0z4GTxLq8rcxhyMzeLl FtGndyew== ybn9kzq2tfi1eqcrkohsg6avp0spx5tn2nd0z4gtxlq8rcxhymze LlFtGndyew== ssh-rsa AAAAB3NzaC1yc2EAAAABIwAAAQEAyZbCFTVYE/r6QaRidXOIc8A hwntuxow6ipac6700eiz5qy+xpv+/bjcmjclyigswahnfiyg+ae0 /d1hwywx1gbgnb0fvxsfwf6bzqjke0bxmscca/gxkdgmnsnns 36TQ/VpQ9Bkq/YnHeCiZo1EFS3klQISOiV0Dd3EkQShx4RT9taQ7 o+s4hfppl/15i3t+fib4jwkp/tprjb6iqh3yka6v6gc+mjfie3z3aaw D9YLUJhSRdPPebhzqkfyw/D0vjnSO6RniIBaY3YscCzno8l9L2XhdP YawzwYGDR1gia7cseaWzhsFJKpVW5QR5CQecUCz+2/aw0jLcZeG ap7sfw== 양쪽노드, grid, oracle user 에서아래와같이명령어를입력하여 password 입력없이자동실행가능한 지확인합니다. (grid, oracle user 로양쪽노드모두수행합니다.) rdb1 에서 grid user 의경우 ~]$ ssh rdb1 date The authenticity of host 'rdb1 ( )' can't be established. RSA key fingerprint is 09:48:2b:bf:0e:c3:d5:c8:62:2d:6b:92:20:3c:d5:40. Are you sure you want to continue connecting (yes/no)? yes Warning: Permanently added 'rdb1, ' (RSA) to the list of known hosts. Wed Dec 22 17:33:13 KST 2010 ~]$ ssh rdb1 date Wed Dec 22 17:33:16 KST 2010 ~]$ ssh rdb2 date The authenticity of host 'rdb2 ( )' can't be established. RSA key fingerprint is 09:48:2b:bf:0e:c3:d5:c8:62:2d:6b:92:20:3c:d5:40. Are you sure you want to continue connecting (yes/no)? yes Warning: Permanently added 'rdb2, ' (RSA) to the list of known hosts. Wed Dec 22 17:33:22 KST 2010 ~]$ ssh rdb2 date Wed Dec 22 17:33:25 KST 2010 ~]$ ssh rdb1-priv date The authenticity of host 'rdb1-priv ( )' can't be established. RSA key fingerprint is 09:48:2b:bf:0e:c3:d5:c8:62:2d:6b:92:20:3c:d5:40. Are you sure you want to continue connecting (yes/no)? yes - 24
25 Warning: Permanently added 'rdb1-priv, ' (RSA) to the list of known hosts. Wed Dec 22 17:34:44 KST 2010 ~]$ ssh rdb1-priv date Wed Dec 22 17:34:47 KST 2010 ~]$ ssh rdb2-priv date The authenticity of host 'rdb2-priv ( )' can't be established. RSA key fingerprint is 09:48:2b:bf:0e:c3:d5:c8:62:2d:6b:92:20:3c:d5:40. Are you sure you want to continue connecting (yes/no)? yes Warning: Permanently added 'rdb2-priv, ' (RSA) to the list of known hosts. Wed Dec 22 17:37:25 KST 2010 ~]$ ssh rdb2-priv date Wed Dec 22 17:37:28 KST Preparing Oracle ASM Installation ASM LIBRARY Linux 에서 ASM 구성에는크게두가지방식이있습니다. 1) ASM with ASMLIB I/O : ASM 이 raw block devices 를 ASMLib 를통해운영. Raw device 설정이따로필요없습니다. 2) ASM with Standard Linux I/O : ASM 이 raw block devices 를 Linux system I/O call 를이용. ASM 이사용해야하는모든 partition 에대해 raw device 를생성시켜주어야합니다. 여기서는 ASMLIB 를사용하는방식으로합니다. OS Kernel version 확인후 kernel 버전과동일한 el5 버젂을설치하도록합니다. ( root 사용자로양쪽노드모두수행합니다.) [root@rdb1~]# uname -r el5 [root@rdb1 asm]# ls -rlt total 252 -rw-r--r-- 1 root root Dec 22 17:53 oracleasm el el5.x86_64.rpm -rw-r--r-- 1 root root Dec 22 17:53 oracleasm-support el5.x86_64.rpm -rw-r--r-- 1 root root Dec 22 17:53 oracleasmlib el5.x86_64.rpm [root@rdb1 asm]# [root@rdb1 asm]# rpm -Uvh oracleasm-support el5.x86_64.rpm warning: oracleasm-support el5.x86_64.rpm: Header V3 DSA signature: NOKEY, key ID 1e5e0159 Preparing... ########################################### [100%] - 25
26 1:oracleasm-support ########################################### [100%] asm]# rpm -Uvh oracleasm el el5.x86_64.rpm warning: oracleasm el el5.x86_64.rpm: Header V3 DSA signature: NOKEY, key ID 1e5e0159 Preparing... ########################################### [100%] 1:oracleasm ########################################### [100%] asm]# rpm -Uvh oracleasmlib el5.x86_64.rpm warning: oracleasmlib el5.x86_64.rpm: Header V3 DSA signature: NOKEY, key ID 1e5e0159 Preparing... ########################################### [100%] 1:oracleasmlib ########################################### [100%] asm]# asm]# rpm -qa grep oracleasm oracleasmlib el5 oracleasm-support el5 oracleasm el el5 asm]# ASM Configuration Oracle ASM Module 을사용하기위해서는반드시 configuration 을해야합니다. 아래와같이 asm module 을설정합니다. (root 사용자로양쪽노드모두수행합니다.) rdb1 init.d]#./oracleasm configure Configuring the Oracle ASM library driver. This will configure the on-boot properties of the Oracle ASM library driver. The following questions will determine whether the driver is loaded on boot and what permissions it will have. The current values will be shown in brackets ('[]'). Hitting <ENTER> without typing an answer will keep that current value. Ctrl-C will abort. Default user to own the driver interface []: grid Default group to own the driver interface []: dba Start Oracle ASM library driver on boot (y/n) [n]: y Scan for Oracle ASM disks on boot (y/n) [y]: y Writing Oracle ASM library driver configuration: done Initializing the Oracle ASMLib driver: [ OK ] Scanning the system for Oracle ASMLib disks: [ OK ] [root@rdb1 init.d]# rdb2 [root@rdb2 asmlib]# cd /etc/init.d [root@rdb2 init.d]#./oracleasm configure Configuring the Oracle ASM library driver. - 26
27 This will configure the on-boot properties of the Oracle ASM library driver. The following questions will determine whether the driver is loaded on boot and what permissions it will have. The current values will be shown in brackets ('[]'). Hitting <ENTER> without typing an answer will keep that current value. Ctrl-C will abort. Default user to own the driver interface []: grid Default group to own the driver interface []: dba Start Oracle ASM library driver on boot (y/n) [n]: y Scan for Oracle ASM disks on boot (y/n) [y]: y Writing Oracle ASM library driver configuration: done Initializing the Oracle ASMLib driver: [ OK ] Scanning the system for Oracle ASMLib disks: [ OK ] [root@rdb2 init.d]# Multipath 관련설정 ASM 은 multipath 와관렦하여인식하지못하고모두하나의 path 로인식합니다. /dev/sda, /dev/sdb, 그리고이두가지 path 를묶은 /dev/multipatha 가있다고하면, ASM 은 /dev/sda, /dev/sdb, /dev/multipatha 각각을하나의 path 로인식하게되며, 무엇이인식되느냐는 storage driver 에달려있습니다. ASM 은 multipath disk : multipath path 를우선적으로인식시키기위하여아래와같이설정합니다. /etc/sysconfig/oracleasm 에아래항목을수정합니다. (root 사용자로양쪽노드모두수행합니다.) [root@rdb1 sysconfig]# cat oracleasm # # This is a configuration file for automatic loading of the Oracle # Automatic Storage Management library kernel driver. It is generated # By running /etc/init.d/oracleasm configure. Please use that method # to modify this file # # ORACLEASM_ENABELED: 'true' means to load the driver on boot. ORACLEASM_ENABLED=true # ORACLEASM_UID: Default user owning the /dev/oracleasm mount point. ORACLEASM_UID=grid # ORACLEASM_GID: Default group owning the /dev/oracleasm mount point. ORACLEASM_GID=dba - 27
28 # ORACLEASM_SCANBOOT: 'true' means scan for ASM disks on boot. ORACLEASM_SCANBOOT=true # ORACLEASM_SCANORDER: Matching patterns to order disk scanning ORACLEASM_SCANORDER="emcpower sd" # ORACLEASM_SCANEXCLUDE: Matching patterns to exclude disks from scan ORACLEASM_SCANEXCLUDE="" [root@rdb1 sysconfig]# Create ASM VOLUME. ASM 을구성할 VOLUME DISK 를생성하고확인합니다. /root/cr_asm_disk.sh 에실행시킬 script 생성합니다. (root 사용자로 rdb1 에서수행합니다.) [root@rdb1 disks]# cat /root/cr_asm_disk.sh oracleasm createdisk OV01 /dev/emcpowerb1 oracleasm createdisk OV02 /dev/emcpowerc1 oracleasm createdisk OV03 /dev/emcpowerd1 oracleasm createdisk VOL01 /dev/emcpowerb2 oracleasm createdisk VOL02 /dev/emcpowerc2 oracleasm createdisk VOL03 /dev/emcpowerd2 oracleasm createdisk VOL04 /dev/emcpowere1 oracleasm createdisk VOL05 /dev/emcpowerf1 oracleasm createdisk VOL06 /dev/emcpowerg1 oracleasm createdisk VOL07 /dev/emcpowerh1 oracleasm createdisk VOL08 /dev/emcpoweri1 oracleasm createdisk VOL09 /dev/emcpowerj1 oracleasm createdisk VOL10 /dev/emcpowerk1 oracleasm createdisk VOL11 /dev/emcpowerl1 oracleasm createdisk VOL12 /dev/emcpowerm1 oracleasm createdisk VOL13 /dev/emcpowern1 oracleasm createdisk VOL14 /dev/emcpowero1 oracleasm createdisk VOL15 /dev/emcpowerp1 oracleasm createdisk VOL16 /dev/emcpowerq1 oracleasm createdisk VOL17 /dev/emcpowerr1 oracleasm createdisk VOL18 /dev/emcpowers1 oracleasm createdisk VOL19 /dev/emcpowert1 oracleasm createdisk VOL20 /dev/emcpoweru1 oracleasm createdisk VOL21 /dev/emcpowerv1 oracleasm createdisk VOL22 /dev/emcpowerw1 oracleasm createdisk VOL23 /dev/emcpowerx1 oracleasm createdisk VOL24 /dev/emcpowery1 oracleasm createdisk VOL25 /dev/emcpowerz1 oracleasm createdisk VOL26 /dev/emcpoweraa1 oracleasm createdisk VOL27 /dev/emcpowerab1-28
29 oracleasm createdisk VOL28 /dev/emcpowerac1 oracleasm createdisk VOL29 /dev/emcpowerad1 oracleasm createdisk VOL30 /dev/emcpowerae1 oracleasm createdisk VOL31 /dev/emcpoweraf1 oracleasm createdisk VOL32 /dev/emcpowerag1 disks]# ~]#./cr_asm_disk.sh Writing disk header: done Instantiating disk: done Writing disk header: done Instantiating disk: done.. Writing disk header: done Instantiating disk: done Writing disk header: done Instantiating disk: done ~]# ~]# oracleasm listdisks OV01 OV02 OV03 VOL01 VOL02 VOL03 VOL04 VOL05 VOL06 VOL07 VOL08 VOL09 VOL10 VOL11 VOL12 VOL13 VOL14 VOL15 VOL16 VOL17 VOL18 VOL19 VOL20 VOL21 VOL22 VOL23 VOL24 VOL25-29
30 VOL26 VOL27 VOL28 VOL29 VOL30 VOL31 VOL32 ~]# 반대편노드에서 ASM VOL Disk 를인식시키고조회합니다. (root 사용자로 rdb2 에서수행합니다.) ~]# oracleasm scandisks Reloading disk partitions: done Cleaning any stale ASM disks... Scanning system for ASM disks... Instantiating disk "VOL27" Instantiating disk "VOL28" Instantiating disk "VOL29" Instantiating disk "VOL30" Instantiating disk "VOL31" Instantiating disk "VOL32" Instantiating disk "VOL15" Instantiating disk "VOL16" Instantiating disk "VOL17" Instantiating disk "VOL18" Instantiating disk "VOL19" Instantiating disk "VOL20" Instantiating disk "VOL21" Instantiating disk "VOL22" Instantiating disk "VOL23" Instantiating disk "VOL24" Instantiating disk "VOL25" Instantiating disk "VOL26" Instantiating disk "OV01" Instantiating disk "VOL01" Instantiating disk "OV02" Instantiating disk "VOL02" Instantiating disk "OV03" Instantiating disk "VOL03" Instantiating disk "VOL04" Instantiating disk "VOL05" Instantiating disk "VOL06" Instantiating disk "VOL07" Instantiating disk "VOL08" Instantiating disk "VOL09" Instantiating disk "VOL10" Instantiating disk "VOL11" Instantiating disk "VOL12" - 30
31 Instantiating disk "VOL13" Instantiating disk "VOL14" ~]# ~]# ~]# oracleasm listdisks OV01 OV02 OV03 VOL01 VOL02 VOL03 VOL04 VOL05 VOL06 VOL07 VOL08 VOL09 VOL10 VOL11 VOL12 VOL13 VOL14 VOL15 VOL16 VOL17 VOL18 VOL19 VOL20 VOL21 VOL22 VOL23 VOL24 VOL25 VOL26 VOL27 VOL28 VOL29 VOL30 VOL31 VOL32 ~]# major, minor number 확인. cluster 내의모든 node 에서공유 disk 에대해동일한 major,minor number 를가지고있어야합니다. 또한반듯이 reboot 을수행한후 major, minor 가 reboot 이전과동일한값을가지는지확인해야합니다. (Linux mpath 이나 LVM 을이용할경우자주발생하는문제로정확하게설정하지않으면 cluster node 가서로다른값을가지게되거나 reboot 젂후가다른값을가지게되어정상동작하지않게됨.) - 31
32 rdb1 sysconfig]# cd /dev/oracleasm/disks disks]# ls -al total 0 drwxr-xr-x 1 root root 0 Dec 22 17:58. drwxr-xr-x 4 root root 0 Dec 22 17:58.. brw-rw grid dba 120, 17 Dec 22 18:05 OV01 brw-rw grid dba 120, 33 Dec 22 18:06 OV02 brw-rw grid dba 120, 49 Dec 22 18:05 OV03 brw-rw grid dba 120, 18 Dec 22 18:05 VOL01 brw-rw grid dba 120, 34 Dec 22 18:05 VOL02 brw-rw grid dba 120, 50 Dec 22 18:05 VOL03 brw-rw grid dba 120, 65 Dec 22 18:05 VOL04 brw-rw grid dba 120, 81 Dec 22 18:05 VOL05 brw-rw grid dba 120, 97 Dec 22 18:05 VOL06 brw-rw grid dba 120, 113 Dec 22 18:05 VOL07 brw-rw grid dba 120, 129 Dec 22 18:05 VOL08 brw-rw grid dba 120, 145 Dec 22 18:05 VOL09 brw-rw grid dba 120, 161 Dec 22 18:05 VOL10 brw-rw grid dba 120, 177 Dec 22 18:05 VOL11 brw-rw grid dba 120, 193 Dec 22 18:05 VOL12 brw-rw grid dba 120, 209 Dec 22 18:05 VOL13 brw-rw grid dba 120, 225 Dec 22 18:05 VOL14 brw-rw grid dba 120, 241 Dec 22 18:05 VOL15 brw-rw grid dba 120, 257 Dec 22 18:05 VOL16 brw-rw grid dba 120, 273 Dec 22 18:05 VOL17 brw-rw grid dba 120, 289 Dec 22 18:05 VOL18 brw-rw grid dba 120, 305 Dec 22 18:05 VOL19 brw-rw grid dba 120, 321 Dec 22 18:05 VOL20 brw-rw grid dba 120, 337 Dec 22 18:05 VOL21 brw-rw grid dba 120, 353 Dec 22 18:05 VOL22 brw-rw grid dba 120, 369 Dec 22 18:05 VOL23 brw-rw grid dba 120, 385 Dec 22 18:05 VOL24 brw-rw grid dba 120, 401 Dec 22 18:05 VOL25 brw-rw grid dba 120, 417 Dec 22 18:05 VOL26 brw-rw grid dba 120, 433 Dec 22 18:05 VOL27 brw-rw grid dba 120, 449 Dec 22 18:05 VOL28 brw-rw grid dba 120, 465 Dec 22 18:05 VOL29 brw-rw grid dba 120, 481 Dec 22 18:05 VOL30 brw-rw grid dba 120, 497 Dec 22 18:05 VOL31 brw-rw grid dba 120, 513 Dec 22 18:05 VOL32 [root@rdb1 disks]# rdb2 [root@rdb2 sysconfig]# cd /dev/oracleasm/disks [root@rdb2 disks]# ls -al total 0 drwxr-xr-x 1 root root 0 Dec 22 17:59. drwxr-xr-x 4 root root 0 Dec 22 17:59.. brw-rw grid dba 120, 17 Dec 22 18:05 OV01 brw-rw grid dba 120, 33 Dec 22 18:06 OV02 brw-rw grid dba 120, 49 Dec 22 18:05 OV03 brw-rw grid dba 120, 18 Dec 22 18:05 VOL01 brw-rw grid dba 120, 34 Dec 22 18:05 VOL02 brw-rw grid dba 120, 50 Dec 22 18:05 VOL03 brw-rw grid dba 120, 65 Dec 22 18:05 VOL04 brw-rw grid dba 120, 81 Dec 22 18:05 VOL05 brw-rw grid dba 120, 97 Dec 22 18:05 VOL06 brw-rw grid dba 120, 113 Dec 22 18:05 VOL07 brw-rw grid dba 120, 129 Dec 22 18:05 VOL08 brw-rw grid dba 120, 145 Dec 22 18:05 VOL09 brw-rw grid dba 120, 161 Dec 22 18:05 VOL10 brw-rw grid dba 120, 177 Dec 22 18:05 VOL11 brw-rw grid dba 120, 193 Dec 22 18:05 VOL12 brw-rw grid dba 120, 209 Dec 22 18:05 VOL13 brw-rw grid dba 120, 225 Dec 22 18:05 VOL14 brw-rw grid dba 120, 241 Dec 22 18:05 VOL15 brw-rw grid dba 120, 257 Dec 22 18:05 VOL16 brw-rw grid dba 120, 273 Dec 22 18:05 VOL17 brw-rw grid dba 120, 289 Dec 22 18:05 VOL18 brw-rw grid dba 120, 305 Dec 22 18:05 VOL19 brw-rw grid dba 120, 321 Dec 22 18:05 VOL20 brw-rw grid dba 120, 337 Dec 22 18:05 VOL21 brw-rw grid dba 120, 353 Dec 22 18:05 VOL22 brw-rw grid dba 120, 369 Dec 22 18:05 VOL23 brw-rw grid dba 120, 385 Dec 22 18:05 VOL24 brw-rw grid dba 120, 401 Dec 22 18:05 VOL25 brw-rw grid dba 120, 417 Dec 22 18:05 VOL26 brw-rw grid dba 120, 433 Dec 22 18:05 VOL27 brw-rw grid dba 120, 449 Dec 22 18:05 VOL28 brw-rw grid dba 120, 465 Dec 22 18:05 VOL29 brw-rw grid dba 120, 481 Dec 22 18:05 VOL30 brw-rw grid dba 120, 497 Dec 22 18:05 VOL31 brw-rw grid dba 120, 513 Dec 22 18:05 VOL32 [root@rdb2 disks]# major number 가 emc powerpath 의경우 120 이일반적이며, 만약 8 로잡혀있다면 powerpath 가 아닌 sd# single path 를사용하고있는것으로반듯이확인해야합니다. - 32
33 3.3. Install requirement 확인 cluster verify utility 설치젂마지막으로양쪽노드에서설치에필요한모든설정이완료되었는지확인합니다. 아래명령어의결과는반듯이모두통과해야맊설치할수있는것은아니지맊권고사항으로모두통과 할수있도록준비해야합니다. (grid 사용자로 rdb1 에서수행합니다.). Grid Infrastructure CD 위치로이동. grid]$./runcluvfy.sh stage -pre crsinst -n rdb1,rdb2 -verbose Performing pre-checks for cluster services setup Checking node reachability... Check: Node reachability from node "rdb1" Destination Node Reachable? rdb1 yes rdb2 yes Result: Node reachability check passed from node "rdb1" Checking user equivalence... Check: User equivalence for user "grid" Node Name Comment rdb2 passed rdb1 passed Result: User equivalence check passed for user "grid" Checking node connectivity... Checking hosts config file... Node Name Status Comment rdb2 rdb1 passed passed Verification of the hosts config file successful Interface information for node "rdb2" Name IP Address Subnet Gateway Def. Gateway HW Address MTU - 33
34 bond :1B:78:95:AC:3A 1500 eth :1B:78:95:AC: Interface information for node "rdb1" Name IP Address Subnet Gateway Def. Gateway HW Address MTU bond :18:71:7A:F0: eth :18:71:7A:F0: Check: Node connectivity of subnet " " Source Destination Connected? rdb2:bond0 rdb1:bond0 yes Result: Node connectivity passed for subnet " " with node(s) rdb2,rdb1 Check: TCP connectivity of subnet " " Source Destination Connected? rdb1: rdb2: passed Result: TCP connectivity check passed for subnet " " Check: Node connectivity of subnet " " Source Destination Connected? rdb2:eth0 rdb1:eth0 yes Result: Node connectivity passed for subnet " " with node(s) rdb2,rdb1 Check: TCP connectivity of subnet " " Source Destination Connected? rdb1: rdb2: passed Result: TCP connectivity check passed for subnet " " Interfaces found on subnet " " that are likely candidates for VIP are: rdb2 eth0: rdb1 eth0: Interfaces found on subnet " " that are likely candidates for a private interconnect are: rdb2 bond0: rdb1 bond0: Result: Node connectivity check passed - 34
35 Check: Total memory rdb2 7.8GB ( KB) 1.5GB ( KB) passed rdb1 7.8GB ( KB) 1.5GB ( KB) passed Result: Total memory check passed Check: Available memory rdb2 7.65GB ( KB) 50MB ( KB) passed rdb1 7.49GB ( KB) 50MB ( KB) passed Result: Available memory check passed Check: Swap space rdb2 7.46GB ( KB) 7.8GB ( KB) failed rdb1 7.46GB ( KB) 7.8GB ( KB) failed Result: Swap space check failed Check: Free disk space for "rdb2:/tmp" Path Node Name Mount point Available Required Comment /tmp rdb2 / 6.14GB 1GB passed Result: Free disk space check passed for "rdb2:/tmp" Check: Free disk space for "rdb1:/tmp" Path Node Name Mount point Available Required Comment /tmp rdb1 / 6.12GB 1GB passed Result: Free disk space check passed for "rdb1:/tmp" Check: User existence for "grid" Node Name Status Comment rdb2 exists passed rdb1 exists passed Result: User existence check passed for "grid" Check: Group existence for "oinstall" Node Name Status Comment rdb2 does not exist failed rdb1 does not exist failed Result: Group existence check failed for "oinstall" - 35
36 Check: Group existence for "dba" Node Name Status Comment rdb2 exists passed rdb1 exists passed Result: Group existence check passed for "dba" Check: Membership of user "grid" in group "oinstall" [as Primary] Node Name User Exists Group Exists User in Group Primary Comment rdb2 yes yes no N/A failed rdb1 yes yes no N/A failed Result: Membership check for user "grid" in group "oinstall" [as Primary] failed Check: Membership of user "grid" in group "dba" Node Name User Exists Group Exists User in Group Comment rdb2 yes yes yes passed rdb1 yes yes yes passed Result: Membership check for user "grid" in group "dba" passed Check: Run level Node Name run level Required Comment rdb2 3 3,5 passed rdb1 3 3,5 passed Result: Run level check passed Check: Hard limits for "maximum open file descriptors" Node Name Type Available Required Comment rdb2 hard passed rdb1 hard passed Result: Hard limits check passed for "maximum open file descriptors" Check: Soft limits for "maximum open file descriptors" Node Name Type Available Required Comment rdb2 soft passed rdb1 soft passed Result: Soft limits check passed for "maximum open file descriptors" Check: Hard limits for "maximum user processes" Node Name Type Available Required Comment rdb2 hard passed rdb1 hard passed Result: Hard limits check passed for "maximum user processes" - 36
37 Check: Soft limits for "maximum user processes" Node Name Type Available Required Comment rdb2 soft passed rdb1 soft passed Result: Soft limits check passed for "maximum user processes" Check: System architecture rdb2 x86_64 x86_64 passed rdb1 x86_64 x86_64 passed Result: System architecture check passed Check: Kernel version rdb el passed rdb el passed Result: Kernel version check passed Check: Kernel parameter for "semmsl" Node Name Configured Required Comment rdb passed rdb passed Result: Kernel parameter check passed for "semmsl" Check: Kernel parameter for "semmns" Node Name Configured Required Comment rdb passed rdb passed Result: Kernel parameter check passed for "semmns" Check: Kernel parameter for "semopm" Node Name Configured Required Comment rdb passed rdb passed Result: Kernel parameter check passed for "semopm" Check: Kernel parameter for "semmni" Node Name Configured Required Comment rdb passed rdb passed Result: Kernel parameter check passed for "semmni" - 37
38 Check: Kernel parameter for "shmmax" Node Name Configured Required Comment rdb passed rdb passed Result: Kernel parameter check passed for "shmmax" Check: Kernel parameter for "shmmni" Node Name Configured Required Comment rdb passed rdb passed Result: Kernel parameter check passed for "shmmni" Check: Kernel parameter for "shmall" Node Name Configured Required Comment rdb passed rdb passed Result: Kernel parameter check passed for "shmall" Check: Kernel parameter for "file-max" Node Name Configured Required Comment rdb passed rdb passed Result: Kernel parameter check passed for "file-max" Check: Kernel parameter for "ip_local_port_range" Node Name Configured Required Comment rdb2 between 9000 & between 9000 & passed rdb1 between 9000 & between 9000 & passed Result: Kernel parameter check passed for "ip_local_port_range" Check: Kernel parameter for "rmem_default" Node Name Configured Required Comment rdb passed rdb passed Result: Kernel parameter check passed for "rmem_default" Check: Kernel parameter for "rmem_max" Node Name Configured Required Comment rdb passed rdb passed Result: Kernel parameter check passed for "rmem_max" - 38
39 Check: Kernel parameter for "wmem_default" Node Name Configured Required Comment rdb passed rdb passed Result: Kernel parameter check passed for "wmem_default" Check: Kernel parameter for "wmem_max" Node Name Configured Required Comment rdb passed rdb passed Result: Kernel parameter check passed for "wmem_max" Check: Kernel parameter for "aio-max-nr" Node Name Configured Required Comment rdb passed rdb passed Result: Kernel parameter check passed for "aio-max-nr" Check: Package existence for "make-3.81" rdb2 make el5 make-3.81 passed rdb1 make el5 make-3.81 passed Result: Package existence check passed for "make-3.81" Check: Package existence for "binutils " rdb2 binutils el5 binutils passed rdb1 binutils el5 binutils passed Result: Package existence check passed for "binutils " Check: Package existence for "gcc-4.1" rdb2 gcc el5 gcc-4.1 passed rdb1 gcc el5 gcc-4.1 passed Result: Package existence check passed for "gcc-4.1" Check: Package existence for "libaio (i386)" rdb2 libaio (i386) libaio (i386) passed rdb1 libaio (i386) libaio (i386) passed Result: Package existence check passed for "libaio (i386)" - 39
40 Check: Package existence for "libaio (x86_64)" rdb2 libaio (x86_64) libaio (x86_64) passed rdb1 libaio (x86_64) libaio (x86_64) passed Result: Package existence check passed for "libaio (x86_64)" Check: Package existence for "glibc (i686)" rdb2 glibc (i686) glibc (i686) passed rdb1 glibc (i686) glibc (i686) passed Result: Package existence check passed for "glibc (i686)" Check: Package existence for "glibc (x86_64)" rdb2 glibc (x86_64) glibc (x86_64) passed rdb1 glibc (x86_64) glibc (x86_64) passed Result: Package existence check passed for "glibc (x86_64)" Check: Package existence for "compat-libstdc (i386)" rdb2 compat-libstdc (i386) compat-libstdc (i386) passed rdb1 compat-libstdc (i386) compat-libstdc (i386) passed Result: Package existence check passed for "compat-libstdc (i386)" Check: Package existence for "compat-libstdc (x86_64)" rdb2 compat-libstdc (x86_64) compat-libstdc (x86_64) passed rdb1 compat-libstdc (x86_64) compat-libstdc (x86_64) passed Result: Package existence check passed for "compat-libstdc (x86_64)" Check: Package existence for "elfutils-libelf (x86_64)" rdb2 elfutils-libelf el5 (x86_64) elfutils-libelf (x86_64) passed rdb1 elfutils-libelf el5 (x86_64) elfutils-libelf (x86_64) passed Result: Package existence check passed for "elfutils-libelf (x86_64)" Check: Package existence for "elfutils-libelf-devel-0.125" rdb2 elfutils-libelf-devel el5 elfutils-libelf-devel passed rdb1 elfutils-libelf-devel el5 elfutils-libelf-devel passed Result: Package existence check passed for "elfutils-libelf-devel-0.125" - 40
41 Check: Package existence for "glibc-common-2.5" rdb2 glibc-common glibc-common-2.5 passed rdb1 glibc-common glibc-common-2.5 passed Result: Package existence check passed for "glibc-common-2.5" Check: Package existence for "glibc-devel-2.5 (i386)" rdb2 glibc-devel (i386) glibc-devel-2.5 (i386) passed rdb1 glibc-devel (i386) glibc-devel-2.5 (i386) passed Result: Package existence check passed for "glibc-devel-2.5 (i386)" Check: Package existence for "glibc-devel-2.5 (x86_64)" rdb2 glibc-devel (x86_64) glibc-devel-2.5 (x86_64) passed rdb1 glibc-devel (x86_64) glibc-devel-2.5 (x86_64) passed Result: Package existence check passed for "glibc-devel-2.5 (x86_64)" Check: Package existence for "glibc-headers-2.5" rdb2 glibc-headers glibc-headers-2.5 passed rdb1 glibc-headers glibc-headers-2.5 passed Result: Package existence check passed for "glibc-headers-2.5" Check: Package existence for "gcc-c " rdb2 gcc-c el5 gcc-c passed rdb1 gcc-c el5 gcc-c passed Result: Package existence check passed for "gcc-c " Check: Package existence for "libaio-devel (i386)" rdb2 libaio-devel (i386) libaio-devel (i386) passed rdb1 libaio-devel (i386) libaio-devel (i386) passed Result: Package existence check passed for "libaio-devel (i386)" Check: Package existence for "libaio-devel (x86_64)" rdb2 libaio-devel (x86_64) libaio-devel (x86_64) passed rdb1 libaio-devel (x86_64) libaio-devel (x86_64) passed Result: Package existence check passed for "libaio-devel (x86_64)" - 41
42 Check: Package existence for "libgcc (i386)" rdb2 libgcc el5 (i386) libgcc (i386) passed rdb1 libgcc el5 (i386) libgcc (i386) passed Result: Package existence check passed for "libgcc (i386)" Check: Package existence for "libgcc (x86_64)" rdb2 libgcc el5 (x86_64) libgcc (x86_64) passed rdb1 libgcc el5 (x86_64) libgcc (x86_64) passed Result: Package existence check passed for "libgcc (x86_64)" Check: Package existence for "libstdc (i386)" rdb2 libstdc el5 (i386) libstdc (i386) passed rdb1 libstdc el5 (i386) libstdc (i386) passed Result: Package existence check passed for "libstdc (i386)" Check: Package existence for "libstdc (x86_64)" rdb2 libstdc el5 (x86_64) libstdc (x86_64) passed rdb1 libstdc el5 (x86_64) libstdc (x86_64) passed Result: Package existence check passed for "libstdc (x86_64)" Check: Package existence for "libstdc++-devel (x86_64)" rdb2 libstdc++-devel el5 (x86_64) libstdc++-devel (x86_64) passed rdb1 libstdc++-devel el5 (x86_64) libstdc++-devel (x86_64) passed Result: Package existence check passed for "libstdc++-devel (x86_64)" Check: Package existence for "sysstat-7.0.2" rdb2 sysstat el5 sysstat passed rdb1 sysstat el5 sysstat passed Result: Package existence check passed for "sysstat-7.0.2" Check: Package existence for "unixodbc (i386)" rdb2 unixodbc (i386) unixodbc (i386) passed rdb1 unixodbc (i386) unixodbc (i386) passed Result: Package existence check passed for "unixodbc (i386)" - 42
43 Check: Package existence for "unixodbc (x86_64)" rdb2 unixodbc (x86_64) unixodbc (x86_64) passed rdb1 unixodbc (x86_64) unixodbc (x86_64) passed Result: Package existence check passed for "unixodbc (x86_64)" Check: Package existence for "unixodbc-devel (i386)" rdb2 unixodbc-devel (i386) unixodbc-devel (i386) passed rdb1 unixodbc-devel (i386) unixodbc-devel (i386) passed Result: Package existence check passed for "unixodbc-devel (i386)" Check: Package existence for "unixodbc-devel (x86_64)" rdb2 unixodbc-devel (x86_64) unixodbc-devel (x86_64) passed rdb1 unixodbc-devel (x86_64) unixodbc-devel (x86_64) passed Result: Package existence check passed for "unixodbc-devel (x86_64)" Check: Package existence for "ksh " rdb2 ksh el5 ksh passed rdb1 ksh el5 ksh passed Result: Package existence check passed for "ksh " Checking for multiple users with UID value 0 Result: Check for multiple users with UID value 0 passed Check: Current group ID Result: Current group ID check passed Checking Core file name pattern consistency... Core file name pattern consistency check passed. Checking to make sure user "grid" is not in "root" group Node Name Status Comment rdb2 does not exist passed rdb1 does not exist passed Result: User "grid" is not part of "root" group. Check passed Check default user file creation mask rdb passed rdb passed Result: Default user file creation mask check passed - 43
44 Starting Clock synchronization checks using Network Time Protocol(NTP)... NTP Configuration file check started... The NTP configuration file "/etc/ntp.conf" is available on all nodes NTP Configuration file check passed Checking daemon liveness... Check: Liveness for "ntpd" Node Name Running? rdb2 yes rdb1 yes Result: Liveness check passed for "ntpd" Checking NTP daemon command line for slewing option "-x" Check: NTP daemon command line Node Name Slewing Option Set? rdb2 yes rdb1 yes Result: NTP daemon slewing option check passed Checking NTP daemon's boot time configuration, in file "/etc/sysconfig/ntpd", for slewing option "-x" Check: NTP daemon's boot time configuration Node Name Slewing Option Set? rdb2 yes rdb1 yes Result: NTP daemon's boot time configuration check for slewing option passed NTP common Time Server Check started... NTP Time Server " " is common to all nodes on which the NTP daemon is running NTP Time Server " " is common to all nodes on which the NTP daemon is running Check of common NTP Time Server passed Clock time offset check from NTP Time Server started... Checking on nodes "[rdb2, rdb1]"... Check: Clock time offset from NTP Time Server Time Server: Time Offset Limit: msecs Node Name Time Offset Status rdb passed - 44
45 rdb passed Time Server " " has time offsets that are within permissible limits for nodes "[rdb2, rdb1]". Time Server: Time Offset Limit: msecs Node Name Time Offset Status rdb passed rdb passed Time Server " " has time offsets that are within permissible limits for nodes "[rdb2, rdb1]". Clock time offset check passed Result: Clock synchronization check using Network Time Protocol(NTP) passed Pre-check for cluster services setup was unsuccessful on all the nodes. grid]$ 권장 SWAP size 미달로인한 fail 과 oinstall group 이없음으로발생한 fail 뿐으로중요사항이아니므로 pass 합니다. - 45
 [grid@rdb1 grid]$./runinstaller Starting Oracle Universal Installer... Checking Temp space: must be greater than 120 MB. Actual 3180 MB Passed Checking swap space: must be greater than 150 MB.")

46 4. Installation step 4.1. Grid Infrastracture Install runinstaller Grid Infrastructure 설치를위해 grid user 로로그인후 GRID binary directory 에서 runinstaller 를 실행합니다. (grid 사용자로 rdb1 에서수행합니다.) grid]$./runinstaller Starting Oracle Universal Installer... Checking Temp space: must be greater than 120 MB. Actual 3180 MB Passed Checking swap space: must be greater than 150 MB. Actual 7633 MB Passed Checking monitor: must be configured to display at least 256 colors >>> Could not execute auto check for display colors using command /usr/bin/xdpyinfo. Check if the DISPLAY variable is set. Failed <<<< Some requirement checks failed. You must fulfill these requirements before continuing with the installation, Continue? (y/n) [n] y >>> Ignoring required pre-requisite failures. Continuing... Preparing to launch Oracle Universal Installer from /tmp/orainstall _ pm. Please wait...[grid@rdb1 grid]$ You can find the log of this install session at: /rac/grid/orainventory/logs/installactions _ pm.log GUI 를이용하여설치수행 1. Select Installation Option 2. Select Installation Type ㆍ Install and Configure Grid Infrastructure for a Cluster 선택 ㆍ Advanced Installation 선택 - 46


47 3. Select Product Languages 4. Grid Plug and Play Information ㆍ Korean 을추가 5. Cluster Node Information ㆍ Cluster Name : rac1db ㆍ SCAN Name : rdb-scan ㆍ SCAN Port : 1521 ㆍ Configure GNS : 체크해제 6. Specify Network Interface Usage ㆍ Edit 버튺을클릭하여다음사항을수정합니다. rdb1.goodus.com rdb1 rdb1-vip.goodus.com rdb1-vip ㆍ Add 버튺을클릭하여다음사항을추가합니다. rdb2, rdb2-vip 7. Storage Option Information ㆍ bond0 : Interconnect Network 로 Private 선택 ㆍ eth0 : Public Network 로 Public 선택 8. Create ASM Disk Group - I ㆍ ASM 선택 ㆍ OCR, VOTE 용 ASM Disk Group 생성 ㆍ Disk Group Name : RAC_OV_DG ㆍ Redundancy : Normal - 47


48 9. Create ASM Disk Group - II ㆍ화면에 ASM Disk 가보이지않으면 Change Discovery Path 클릭후아래추가 Disk Discovery Path : /dev/oracleasm/disks 10. Specify ASM Password I ㆍ OCR, VOTE 용 disk 공갂으로 Redundancy 가 Normal 인경우최소 3 개의 ASM Disk 가필요합니다. ㆍ OV01, OV02, OV03 체크 11. Specify ASM Password II ㆍ SYS, ASMSNMP password 입력 12. Failure Isolation Support ㆍ Password 가기본보앆성을충족시키지못하면 Warning 메시지 : Yes 클릭 13. Privileged Operating System Groups - I ㆍ IPMI 를사용할것인지선택 : 사용하지않음선택ㆍ본장비에는현재 IPMI module 이올라가있습니다. IPMI management network 홖경만구성되면사용할수있습니다. URL : 14. Privileged Operating System Groups - II ㆍ OSDBA : dba ㆍ기본 group 과다른설정으로발생하는 Warning 메시지 : Yes 클릭 - 48


49 ㆍ OSOPER : dba ㆍ OSASM : asmadmin 15. Specify Installation Location 16. Create Inventory ㆍ설치될 Directory 정보를입력합니다. Oracle Base : /rac/grid/base Software Location : /rac/grid/product/ ㆍ Inventory Directory : /rac/grid/orainventory 17. Perform Prerequisite Checks - I 18. Perform Prereuisite Checks - II ㆍ설치젂 requirement check 수행 ㆍ Swap 영역이권고치에미달되어 Warning 메시지발생 : Ignore All 체크 19. Summary 20. Setup ㆍ Summary ㆍ설치짂행 - 49
![21. Execute Configuration Scripts 22. orainstroot.sh 수행 rdb1 : [root@rdb1 ~]# /rac/grid/orainventory/orainstroot.sh Changing permissions of /rac/grid/orainventory.](/docs-images/66/55253829/images/50-1.jpg "Adding read,write permissions for group. Removing read,write,execute permissions for world. Changing groupname of /rac/grid/orainventory to dba. The execution of the script is complete.")
50 21. Execute Configuration Scripts 22. orainstroot.sh 수행 rdb1 : [root@rdb1 ~]# /rac/grid/orainventory/orainstroot.sh Changing permissions of /rac/grid/orainventory. Adding read,write permissions for group. Removing read,write,execute permissions for world. Changing groupname of /rac/grid/orainventory to dba. The execution of the script is complete. [root@rdb1 ~]# rdb2 : [root@rdb2 oracle]# /rac/grid/orainventory/orainstroot.sh Changing permissions of /rac/grid/orainventory. Adding read,write permissions for group. Removing read,write,execute permissions for world. 23. root.sh 수행 (rdb1) [root@rdb1 ~]# /rac/grid/product/11.2.0/root.sh Running Oracle 11g root.sh script... The following environment variables are set as: ORACLE_OWNER= grid ORACLE_HOME= /rac/grid/product/ Enter the full pathname of the local bin directory: [/usr/local/bin]: Copying dbhome to /usr/local/bin... Copying oraenv to /usr/local/bin... Copying coraenv to /usr/local/bin... Creating /etc/oratab file... Entries will be added to the /etc/oratab file as needed by Database Configuration Assistant when a database is created Finished running generic part of root.sh script. Now product-specific root actions will be performed :47:38: Parsing the host name :47:38: Checking for super user privileges :47:38: User has super user privileges Using configuration parameter file: /rac/grid/product/11.2.0/crs/install/crsconfig_params Creating trace directory LOCAL ADD MODE Creating OCR keys for user 'root', privgrp 'root'.. Operation successful. root wallet root wallet cert root cert export peer wallet profile reader wallet pa wallet peer wallet keys pa wallet keys peer cert request pa cert request peer cert pa cert peer root cert TP profile reader root cert TP pa root cert TP peer pa cert TP Changing groupname of /rac/grid/orainventory to dba. The execution of the script is complete. [root@rdb2 oracle]# 23. root.sh 수행 (rdb1) 계속 profile reader peer cert TP peer user cert pa user cert Adding daemon to inittab CRS-4123: Oracle High Availability Services has been started. ohasd is starting CRS-2672: Attempting to start 'ora.gipcd' on 'rdb1' CRS-2672: Attempting to start 'ora.mdnsd' on 'rdb1' CRS-2676: Start of 'ora.gipcd' on 'rdb1' succeeded CRS-2676: Start of 'ora.mdnsd' on 'rdb1' succeeded CRS-2672: Attempting to start 'ora.gpnpd' on 'rdb1' CRS-2676: Start of 'ora.gpnpd' on 'rdb1' succeeded CRS-2672: Attempting to start 'ora.cssdmonitor' on 'rdb1' CRS-2676: Start of 'ora.cssdmonitor' on 'rdb1' succeeded CRS-2672: Attempting to start 'ora.cssd' on 'rdb1' CRS-2672: Attempting to start 'ora.diskmon' on 'rdb1' CRS-2676: Start of 'ora.diskmon' on 'rdb1' succeeded CRS-2676: Start of 'ora.cssd' on 'rdb1' succeeded CRS-2672: Attempting to start 'ora.ctssd' on 'rdb1' CRS-2676: Start of 'ora.ctssd' on 'rdb1' succeeded ASM created and started successfully. DiskGroup RAC_OV_DG created successfully. clscfg: -install mode specified Successfully accumulated necessary OCR keys. Creating OCR keys for user 'root', privgrp 'root'.. Operation successful. CRS-2672: Attempting to start 'ora.crsd' on 'rdb1' CRS-2676: Start of 'ora.crsd' on 'rdb1' succeeded CRS-4256: Updating the profile Successful addition of voting disk 95d59037a3054fcbbfcf2a4360a Successful addition of voting disk 8ceebb0896af4fdbbf64cf602e08f87e. Successful addition of voting disk 95f52f6a470e4f56bf8df3178cf Successfully replaced voting disk group with +RAC_OV_DG. CRS-4256: Updating the profile CRS-4266: Voting file(s) successfully replaced ## STATE File Universal Id File Name Disk group ONLINE 95d59037a3054fcbbfcf2a4360a61250 (/dev/oracleasm/disks/ov01) [RAC_OV_DG] 2. ONLINE 8ceebb0896af4fdbbf64cf602e08f87e (/dev/oracleasm/disks/ov02) - 50
51 pa peer cert TP profile reader pa cert TP 23. root.sh 수행 (rdb1) 계속 [RAC_OV_DG] Located 3 voting disk(s). CRS-2673: Attempting to stop 'ora.crsd' on 'rdb1' CRS-2677: Stop of 'ora.crsd' on 'rdb1' succeeded CRS-2673: Attempting to stop 'ora.asm' on 'rdb1' CRS-2677: Stop of 'ora.asm' on 'rdb1' succeeded CRS-2673: Attempting to stop 'ora.ctssd' on 'rdb1' CRS-2677: Stop of 'ora.ctssd' on 'rdb1' succeeded CRS-2673: Attempting to stop 'ora.cssdmonitor' on 'rdb1' CRS-2677: Stop of 'ora.cssdmonitor' on 'rdb1' succeeded CRS-2673: Attempting to stop 'ora.cssd' on 'rdb1' CRS-2677: Stop of 'ora.cssd' on 'rdb1' succeeded CRS-2673: Attempting to stop 'ora.gpnpd' on 'rdb1' CRS-2677: Stop of 'ora.gpnpd' on 'rdb1' succeeded CRS-2673: Attempting to stop 'ora.gipcd' on 'rdb1' CRS-2677: Stop of 'ora.gipcd' on 'rdb1' succeeded CRS-2673: Attempting to stop 'ora.mdnsd' on 'rdb1' CRS-2677: Stop of 'ora.mdnsd' on 'rdb1' succeeded CRS-2672: Attempting to start 'ora.mdnsd' on 'rdb1' CRS-2676: Start of 'ora.mdnsd' on 'rdb1' succeeded CRS-2672: Attempting to start 'ora.gipcd' on 'rdb1' CRS-2676: Start of 'ora.gipcd' on 'rdb1' succeeded CRS-2672: Attempting to start 'ora.gpnpd' on 'rdb1' CRS-2676: Start of 'ora.gpnpd' on 'rdb1' succeeded CRS-2672: Attempting to start 'ora.cssdmonitor' on 'rdb1' CRS-2676: Start of 'ora.cssdmonitor' on 'rdb1' succeeded CRS-2672: Attempting to start 'ora.cssd' on 'rdb1' CRS-2672: Attempting to start 'ora.diskmon' on 'rdb1' CRS-2676: Start of 'ora.diskmon' on 'rdb1' succeeded CRS-2676: Start of 'ora.cssd' on 'rdb1' succeeded CRS-2672: Attempting to start 'ora.ctssd' on 'rdb1' CRS-2676: Start of 'ora.ctssd' on 'rdb1' succeeded CRS-2672: Attempting to start 'ora.asm' on 'rdb1' CRS-2676: Start of 'ora.asm' on 'rdb1' succeeded CRS-2672: Attempting to start 'ora.crsd' on 'rdb1' CRS-2676: Start of 'ora.crsd' on 'rdb1' succeeded CRS-2672: Attempting to start 'ora.evmd' on 'rdb1' CRS-2676: Start of 'ora.evmd' on 'rdb1' succeeded CRS-2672: Attempting to start 'ora.asm' on 'rdb1' CRS-2676: Start of 'ora.asm' on 'rdb1' succeeded CRS-2672: Attempting to start 'ora.rac_ov_dg.dg' on 'rdb1' CRS-2676: Start of 'ora.rac_ov_dg.dg' on 'rdb1' succeeded CRS-2672: Attempting to start 'ora.registry.acfs' on 'rdb1' CRS-2676: Start of 'ora.registry.acfs' on 'rdb1' succeeded rdb1 2010/12/27 14:54:04 /rac/grid/product/11.2.0/cdata/rdb1/backup_ _ olr Configure Oracle Grid Infrastructure for a Cluster... succeeded Updating inventory properties for clusterware Starting Oracle Universal Installer... Checking swap space: must be greater than 500 MB. Actual 7633 MB Passed The inventory pointer is located at /etc/orainst.loc The inventory is located at /rac/grid/orainventory 'UpdateNodeList' was successful. [root@rdb1 ~]# [RAC_OV_DG] 3. ONLINE 95f52f6a470e4f56bf8df3178cf46594 (/dev/oracleasm/disks/ov03) 24. root.sh 수행 (rdb2) [root@rdb2 oracle]# /rac/grid/product/11.2.0/root.sh Running Oracle 11g root.sh script... The following environment variables are set as: ORACLE_OWNER= grid ORACLE_HOME= /rac/grid/product/ Enter the full pathname of the local bin directory: [/usr/local/bin]: Copying dbhome to /usr/local/bin... Copying oraenv to /usr/local/bin... Copying coraenv to /usr/local/bin... Creating /etc/oratab file... Entries will be added to the /etc/oratab file as needed by Database Configuration Assistant when a database is created Finished running generic part of root.sh script. Now product-specific root actions will be performed :55:16: Parsing the host name :55:16: Checking for super user privileges :55:16: User has super user privileges Using configuration parameter file: /rac/grid/product/11.2.0/crs/install/crsconfig_params Creating trace directory LOCAL ADD MODE Creating OCR keys for user 'root', privgrp 'root'.. Operation successful. Adding daemon to inittab CRS-4123: Oracle High Availability Services has been started. ohasd is starting CRS-4402: The CSS daemon was started in exclusive mode but found an active CSS daemon on node rdb1, number 1, and is terminating An active cluster was found during exclusive startup, restarting to join the cluster CRS-2672: Attempting to start 'ora.mdnsd' on 'rdb2' CRS-2676: Start of 'ora.mdnsd' on 'rdb2' succeeded CRS-2672: Attempting to start 'ora.gipcd' on 'rdb2' CRS-2676: Start of 'ora.gipcd' on 'rdb2' succeeded CRS-2672: Attempting to start 'ora.gpnpd' on 'rdb2' CRS-2676: Start of 'ora.gpnpd' on 'rdb2' succeeded CRS-2672: Attempting to start 'ora.cssdmonitor' on 'rdb2' CRS-2676: Start of 'ora.cssdmonitor' on 'rdb2' succeeded CRS-2672: Attempting to start 'ora.cssd' on 'rdb2' CRS-2672: Attempting to start 'ora.diskmon' on 'rdb2' CRS-2676: Start of 'ora.diskmon' on 'rdb2' succeeded CRS-2676: Start of 'ora.cssd' on 'rdb2' succeeded CRS-2672: Attempting to start 'ora.ctssd' on 'rdb2' CRS-2676: Start of 'ora.ctssd' on 'rdb2' succeeded CRS-2672: Attempting to start 'ora.drivers.acfs' on 'rdb2' CRS-2676: Start of 'ora.drivers.acfs' on 'rdb2' succeeded CRS-2672: Attempting to start 'ora.asm' on 'rdb2' CRS-2676: Start of 'ora.asm' on 'rdb2' succeeded CRS-2672: Attempting to start 'ora.crsd' on 'rdb2' CRS-2676: Start of 'ora.crsd' on 'rdb2' succeeded CRS-2672: Attempting to start 'ora.evmd' on 'rdb2' CRS-2676: Start of 'ora.evmd' on 'rdb2' succeeded rdb2 2010/12/27 14:58:50 /rac/grid/product/11.2.0/cdata/rdb2/backup_ _ olr Configure Oracle Grid Infrastructure for a Cluster... succeeded Updating inventory properties for clusterware Starting Oracle Universal Installer... Checking swap space: must be greater than 500 MB. Actual 7633 MB Passed The inventory pointer is located at /etc/orainst.loc The inventory is located at /rac/grid/orainventory - 51
![25. Oracle Grid Infrastructure 'UpdateNodeList' was successful. [root@rdb2 oracle]# 26.](/docs-images/66/55253829/images/52-1.jpg "Oracle Grid Infrastructure ㆍ해당 log 확인 ==================================================== INFO: Checking Single Client Access Name (SCAN)... INFO: Checking name resolution setup for \"rdb-scan\".")
 failed INFO: ERROR: INFO: PRVF-4664 : Found inconsistent name resolution entries for SCAN name \"rdbscan\" INFO: Verification of SCAN VIP and Listener setup failed")
52 25. Oracle Grid Infrastructure 'UpdateNodeList' was successful. oracle]# 26. Oracle Grid Infrastructure ㆍ해당 log 확인 ==================================================== INFO: Checking Single Client Access Name (SCAN)... INFO: Checking name resolution setup for "rdb-scan"... INFO: ERROR: INFO: PRVF-4664 : Found inconsistent name resolution entries for SCAN name "rdbscan" INFO: ERROR: INFO: PRVF-4657 : Name resolution setup check for "rdb-scan" (IP address: ) failed INFO: ERROR: INFO: PRVF-4664 : Found inconsistent name resolution entries for SCAN name "rdbscan" INFO: Verification of SCAN VIP and Listener setup failed ==================================================== OUI 는 rdb-scan 이름풀이를위해 nslookup 명령을이용하여 DNS 에문의하게되어있어 hosts 파일을이용하는 install 에서 error 가발생한것으로무시하여도되는 error 입니다. ㆍ완료 4.2. Install 확인작업 Resource 및 Service 확인 crs 에등록된각종 resource 및 service 를확인한다. ( 양쪽노드모두수행 ) [root@rdb2 oracle]# crsctl stat res -t NAME TARGET STATE SERVER STATE_DETAILS Local Resources ora.rac_ov_dg.dg - 52
53 ONLINE ONLINE ONLINE ONLINE rdb1 rdb2 ora.asm ONLINE ONLINE rdb1 Started ONLINE ONLINE rdb2 Started ora.eons ONLINE ONLINE ONLINE ONLINE rdb1 rdb2 ora.gsd OFFLINE OFFLINE OFFLINE OFFLINE rdb1 rdb2 ora.net1.network ONLINE ONLINE ONLINE ONLINE rdb1 rdb2 ora.ons ONLINE ONLINE ONLINE ONLINE rdb1 rdb2 ora.registry.acfs ONLINE ONLINE ONLINE ONLINE rdb1 rdb Cluster Resources ora.listener_scan1.lsnr 1 ONLINE ONLINE rdb1 ora.oc4j 1 OFFLINE OFFLINE ora.rdb1.vip 1 ONLINE ONLINE rdb1 ora.rdb2.vip 1 ONLINE ONLINE rdb2 ora.scan1.vip 1 ONLINE ONLINE rdb1 [root@rdb2 oracle]# network 확인 - 53
54 network ( public, vip, interconnect, scan-ip ) 확인 ( 양쪽노드모두확인 ) rdb1 [grid@rdb1 ~]$ ifconfig bond0 Link encap:ethernet HWaddr 00:18:71:7A:F0:84 inet addr: Bcast: Mask: inet6 addr: fe80::218:71ff:fe7a:f084/64 Scope:Link UP BROADCAST RUNNING MASTER MULTICAST MTU:1500 Metric:1 RX packets: errors:0 dropped:0 overruns:0 frame:0 TX packets: errors:0 dropped:0 overruns:0 carrier:0 collisions:0 txqueuelen:0 RX bytes: (4.4 GiB) TX bytes: (2.5 GiB) eth0 Link encap:ethernet HWaddr 00:18:71:7A:F0:82 inet addr: Bcast: Mask: inet6 addr: fe80::218:71ff:fe7a:f082/64 Scope:Link UP BROADCAST RUNNING MULTICAST MTU:1500 Metric:1 RX packets: errors:0 dropped:0 overruns:0 frame:0 TX packets: errors:0 dropped:0 overruns:0 carrier:0 collisions:0 txqueuelen:1000 RX bytes: (6.8 GiB) TX bytes: (32.5 GiB) Interrupt:201 Memory:f f eth0:1 Link encap:ethernet HWaddr 00:18:71:7A:F0:82 inet addr: Bcast: Mask: UP BROADCAST RUNNING MULTICAST MTU:1500 Metric:1 Interrupt:201 Memory:f f eth0:2 Link encap:ethernet HWaddr 00:18:71:7A:F0:82 inet addr: Bcast: Mask: UP BROADCAST RUNNING MULTICAST MTU:1500 Metric:1 Interrupt:201 Memory:f f eth1 Link encap:ethernet HWaddr 00:18:71:7A:F0:84 UP BROADCAST RUNNING SLAVE MULTICAST MTU:1500 Metric:1 RX packets: errors:0 dropped:0 overruns:0 frame:0 TX packets: errors:0 dropped:0 overruns:0 carrier:0-54
55 collisions:0 txqueuelen:1000 RX bytes: (4.4 GiB) TX bytes: (2.5 GiB) Interrupt:233 Memory:fa fa eth2 Link encap:ethernet HWaddr 00:18:71:7A:F0:84 UP BROADCAST RUNNING SLAVE MULTICAST MTU:1500 Metric:1 RX packets: errors:0 dropped:0 overruns:0 frame:0 TX packets:0 errors:0 dropped:0 overruns:0 carrier:0 collisions:0 txqueuelen:1000 RX bytes: (6.0 MiB) TX bytes:0 (0.0 b) Memory:f9fe0000-fa lo Link encap:local Loopback inet addr: Mask: inet6 addr: ::1/128 Scope:Host UP LOOPBACK RUNNING MTU:16436 Metric:1 RX packets: errors:0 dropped:0 overruns:0 frame:0 TX packets: errors:0 dropped:0 overruns:0 carrier:0 collisions:0 txqueuelen:0 RX bytes: (1.0 GiB) TX bytes: (1.0 GiB) ~]$ rdb2 ~]# ifconfig bond0 Link encap:ethernet HWaddr 00:1B:78:95:AC:3A inet addr: Bcast: Mask: inet6 addr: fe80::21b:78ff:fe95:ac3a/64 Scope:Link UP BROADCAST RUNNING MASTER MULTICAST MTU:1500 Metric:1 RX packets: errors:0 dropped:0 overruns:0 frame:0 TX packets: errors:0 dropped:0 overruns:0 carrier:0 collisions:0 txqueuelen:0 RX bytes: (2.5 GiB) TX bytes: (4.4 GiB) eth0 Link encap:ethernet HWaddr 00:1B:78:95:AC:38 inet addr: Bcast: Mask: inet6 addr: fe80::21b:78ff:fe95:ac38/64 Scope:Link UP BROADCAST RUNNING MULTICAST MTU:1500 Metric:1-55
56 RX packets: errors:0 dropped:342 overruns:0 frame:0 TX packets: errors:0 dropped:0 overruns:0 carrier:0 collisions:0 txqueuelen:1000 RX bytes: (31.7 GiB) TX bytes: (586.4 MiB) Interrupt:201 Memory:f f eth0:1 Link encap:ethernet HWaddr 00:1B:78:95:AC:38 inet addr: Bcast: Mask: UP BROADCAST RUNNING MULTICAST MTU:1500 Metric:1 Interrupt:201 Memory:f f eth1 Link encap:ethernet HWaddr 00:1B:78:95:AC:3A UP BROADCAST RUNNING SLAVE MULTICAST MTU:1500 Metric:1 RX packets: errors:0 dropped:0 overruns:0 frame:0 TX packets: errors:0 dropped:0 overruns:0 carrier:0 collisions:0 txqueuelen:1000 RX bytes: (2.5 GiB) TX bytes: (4.4 GiB) Interrupt:233 Memory:fa fa eth2 Link encap:ethernet HWaddr 00:1B:78:95:AC:3A UP BROADCAST RUNNING SLAVE MULTICAST MTU:1500 Metric:1 RX packets: errors:0 dropped:0 overruns:0 frame:0 TX packets:1 errors:0 dropped:0 overruns:0 carrier:0 collisions:0 txqueuelen:1000 RX bytes: (6.0 MiB) TX bytes:90 (90.0 b) Memory:f9fe0000-fa lo Link encap:local Loopback inet addr: Mask: inet6 addr: ::1/128 Scope:Host UP LOOPBACK RUNNING MTU:16436 Metric:1 RX packets: errors:0 dropped:0 overruns:0 frame:0 TX packets: errors:0 dropped:0 overruns:0 carrier:0 collisions:0 txqueuelen:0 RX bytes: (993.0 MiB) TX bytes: (993.0 MiB) ~]# - 56
57 Process 확인 process 를확인한다. ( 양쪽노드모두수행 ) [root@rdb1 ~]# ps -ef grep oh root :45? 00:00:01 /rac/grid/product/11.2.0/bin/ohasd.bin reboot root :55 pts/0 00:00:00 grep oh root Dec24? 00:00:00 /bin/sh /etc/init.d/init.ohasd run [root@rdb1 ~]# [root@rdb1 ~]# ps -ef grep d.bin root :48? 00:00:01 /rac/grid/product/11.2.0/bin/ohasd.bin reboot grid :50? 00:00:00 /rac/grid/product/11.2.0/bin/mdnsd.bin grid :50? 00:00:00 /rac/grid/product/11.2.0/bin/gipcd.bin grid :50? 00:00:00 /rac/grid/product/11.2.0/bin/gpnpd.bin grid :51? 00:00:00 /rac/grid/product/11.2.0/bin/ocssd.bin root :52? 00:00:00 /rac/grid/product/11.2.0/bin/octssd.bin grid :52? 00:00:00 /rac/grid/product/11.2.0/bin/oclskd.bin root :52? 00:00:01 /rac/grid/product/11.2.0/bin/crsd.bin reboot grid :52? 00:00:00 /rac/grid/product/11.2.0/bin/evmd.bin root :52? 00:00:00 /rac/grid/product/11.2.0/bin/oclskd.bin root :54 pts/1 00:00:00 grep d.bin [root@rdb1 ~]# [root@rdb1 ~]# ps -ef grep pmon grid :12? 00:00:00 asm_pmon_+asm1 root :13 pts/0 00:00:00 grep pmon [root@rdb1 ~]# [root@rdb1 ~]# ps -ef grep LISTENER grid :54? 00:00:00 /rac/grid/product/11.2.0/bin/tnslsnr LISTENER_SCAN1 -inherit grid :01? 00:00:00 /rac/grid/product/11.2.0/bin/tnslsnr LISTENER -inherit root :31 pts/0 00:00:00 grep LISTENER [root@rdb1 ~]# 4.3. Database Installation ASMCA Database 설치및생성을위해 ASM diskgroup 을생성합니다. - 57


58 grid user 로로그인한후 asmca 를실행한다. ( 한쪽노드에서만작업 ) 1. Disk Groups 2. Create Disk Group - I ㆍ Disk Group Name : DGDATA1 ㆍ Redundancy : External (None) ㆍ Disk 선택 3. Create Disk Group - II 4. Create Disk Group 5. 같은방식으로 DGBACKUP1 생성 5. 종료 - 58
![4.3.2. Database Software Installation oracle user 로로그인후 database media 위치에서 runinstaller 실행 (oracle 사용자로 rdb1 에서수행합니다.) [oracle@rdb1 database]$./runinstaller Starting Oracle Universal Installer.](/docs-images/66/55253829/images/59-1.jpg ".. Checking Temp space: must be greater than 120 MB. Actual 5928 MB Passed Checking swap space: must be greater than 150 MB.")
59 Database Software Installation oracle user 로로그인후 database media 위치에서 runinstaller 실행 (oracle 사용자로 rdb1 에서수행합니다.) database]$./runinstaller Starting Oracle Universal Installer... Checking Temp space: must be greater than 120 MB. Actual 5928 MB Passed Checking swap space: must be greater than 150 MB. Actual 7633 MB Passed Checking monitor: must be configured to display at least 256 colors >>> Could not execute auto check for display colors using command /usr/bin/xdpyinfo. Check if the DISPLAY variable is set. Failed <<<< Some requirement checks failed. You must fulfill these requirements before continuing with the installation, Continue? (y/n) [n] y >>> Ignoring required pre-requisite failures. Continuing... Preparing to launch Oracle Universal Installer from /tmp/orainstall _ am. Please wait...[oracle@rdb1 database]$ You can find the log of this install session at: /rac/grid/orainventory/logs/installactions _ am.log 1. Configure Security Updates 2. Select Installation Option ㆍ 공백 ㆍ Install database software only 선택 - 59


 체크 ㆍ Select Options 클릭 : Choose Components 에서선택 ㆍ Oracle Base :")
60 ㆍ I wish to receive. : 체크해제ㆍ KO16KSC5601 DB 생성을위해서는반듯이 DBCA 명령으로구성해야합니다. 그러므로반듯이 software only 로설치. ㆍ Create and Configure a database 선택시 KO16MSWIN949 만선택할수있습니다. 3. Node Selection 4. Select Product Languages ㆍ Real Application Clusters database installation 선택 ㆍ select all 클릭 ㆍ Korean 추가 5. Select Database Edition 6. Specify Installation Location ㆍ Enterprise Edition (4.29GB) 체크 ㆍ Select Options 클릭 : Choose Components 에서선택 ㆍ Oracle Base : /rac/oracle ㆍ Software Location : /rac/oracle/product/ Privileged Operating System Groups 8. Perform Prerequisite Checks - I ㆍ모두 dba group 선택 ㆍ설치젂 requirement 검사를수행합니다. - 60
 [root@rdb1 ~]# /rac/oracle/product/11.2.0/root.sh Running Oracle 11g root.sh script... 14.")
![Execute Configuration scripts (rdb2) [root@rdb2 ~]# /rac/oracle/product/11.2.0/root.sh Running Oracle 11g root.sh script.](/docs-images/66/55253829/images/61-3.jpg ".. The following environment variables are set as: ORACLE_OWNER= oracle ORACLE_HOME= /rac/oracle/product/11.2.")
 [n]: y Copying dbhome to /usr/local/bin.")
61 9. Perform Prerequisite Checks - II 10. Summary ㆍ Swap 공갂이권고값에비해약갂낮아발생합니다. ㆍ Ignore All 체크 11. Install Product ㆍ설정값을확인한후 Finish 클릭 12. Execute Configuration scripts ㆍ root.sh 를각 cluster node 별로실행시킵니다. ㆍ설치짂행 13. Execute Configuration scripts (rdb1) [root@rdb1 ~]# /rac/oracle/product/11.2.0/root.sh Running Oracle 11g root.sh script Execute Configuration scripts (rdb2) [root@rdb2 ~]# /rac/oracle/product/11.2.0/root.sh Running Oracle 11g root.sh script... The following environment variables are set as: ORACLE_OWNER= oracle ORACLE_HOME= /rac/oracle/product/ The following environment variables are set as: ORACLE_OWNER= oracle ORACLE_HOME= /rac/oracle/product/ Enter the full pathname of the local bin directory: [/usr/local/bin]: The file "dbhome" already exists in /usr/local/bin. Overwrite it? (y/n) [n]: y Copying dbhome to /usr/local/bin... The file "oraenv" already exists in /usr/local/bin. Overwrite it? (y/n) [n]: y Copying oraenv to /usr/local/bin... The file "coraenv" already exists in /usr/local/bin. Overwrite it? (y/n) [n]: y Copying coraenv to /usr/local/bin... Entries will be added to the /etc/oratab file as needed by Database Configuration Assistant when a database is created Finished running generic part of root.sh script. Now product-specific root actions will be performed. Finished product-specific root actions. Enter the full pathname of the local bin directory: [/usr/local/bin]: The file "dbhome" already exists in /usr/local/bin. Overwrite it? (y/n) [n]: The file "oraenv" already exists in /usr/local/bin. Overwrite it? (y/n) [n]: The file "coraenv" already exists in /usr/local/bin. Overwrite it? (y/n) [n]: Entries will be added to the /etc/oratab file as needed by Database Configuration Assistant when a database is created Finished running generic part of root.sh script. Now product-specific root actions will be performed. Finished product-specific root actions. [root@rdb2 ~]# - 61
![[root@rdb1 ~]# 15. Finish 4.3.](/docs-images/66/55253829/images/62-1.jpg "3. Database 생성 KO16KSC5601")

 1. Welcome 2.")


62 ~]# 15. Finish Database 생성 KO16KSC5601 로설치하기위해서는반듯이 DBCA 를통해 DB 를생성시켜야합니다. (oracle 사용자로 rdb1 에서 dbca 수행합니다.) 1. Welcome 2. Welcome ㆍ Oracle Real Application Clusters database 선택 3. Welcome ㆍ Create a Database 선택 4. Welcome ㆍ General Purpose or Transaction Processing 선택 ㆍ Admin-Managed 방식선택 - 62


63 5. Enterprise Manager ㆍ Global Database Name : RAC1DB ㆍ SID Prefiex : RAC1DB ㆍ Select All 선택 6. Automatic Maintenance Tasks ㆍ Configure Enterprise Manager 선택 ㆍ Enable automatic maintenance tasks 선택 7. Password 8. Storage Type and Locations ㆍ Password 설정 ㆍ Use Oracle-Managed Files 선택 ㆍ Database Area : +DGDATA1 9. ASM SNMP password 10. Recovery Options ㆍ ASMSNMP password 입력 ㆍ Specify Flash Recovery Area 선택 Flash Recovery Area : +DGBACKUP1 Flash Recovery Area Size : ㆍ Enable Archiving 체크 - 63

 : 5120MB")


64 11. Sample Schemas 12. Custom Scripts ㆍ선택없음 ㆍ No scripts to run 13. Memory 14. Sizing ㆍ Typical Memory Size (SGA and PGA) : 5120MB ㆍ Use Automatic Memory Management 체크해제 ㆍ Processes : 1000 입력 15. Character Sets 16. Connection Mode ㆍ Show recommended character sets only 체크해제ㆍ KO16KSC5601 선택ㆍ National Character Set : UTF8 ㆍ Default Language : Korean ㆍ Default Territory : Korea ㆍ Dedicated Server Mode 선택 - 64


![( 양쪽노드에서모두확인 ) [root@rdb1 source]# crsctl stat res -t](/docs-images/66/55253829/images/65-3.jpg)
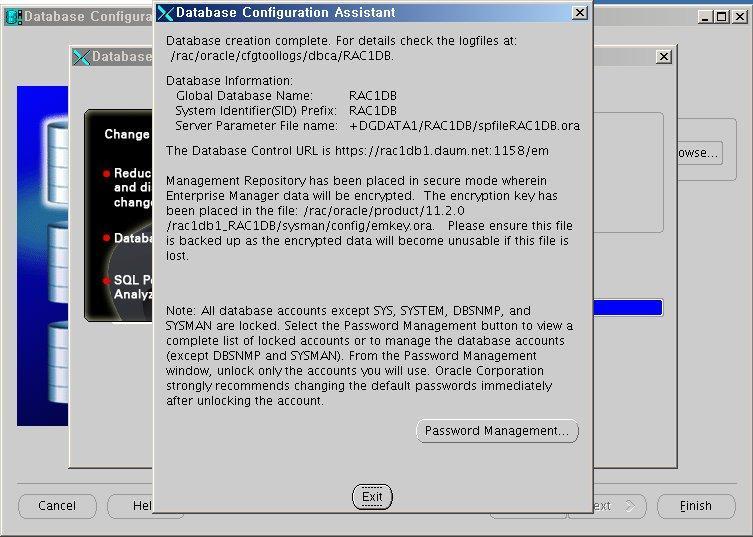
65 17. Datafiles 18. Database Creation Options ㆍ Redo size : 100M 로수정 ㆍ Finish 클릭 19. Setup 20. Finish ㆍ Exit 클릭 4.4. Install 확인작업 Resource 및 Service 확인 crs 에등록된각종 resource 및 service 를확인한다. ( 양쪽노드에서모두확인 ) [root@rdb1 source]# crsctl stat res -t NAME TARGET STATE SERVER STATE_DETAILS Local Resources ora.dgbackup1.dg - 65
66 OFFLINE OFFLINE OFFLINE OFFLINE rdb1 rdb2 ora.dgdata1.dg ONLINE ONLINE ONLINE ONLINE rdb1 rdb2 ora.listener.lsnr ONLINE ONLINE ONLINE ONLINE rdb1 rdb2 ora.rac_ov_dg.dg ONLINE ONLINE ONLINE ONLINE rdb1 rdb2 ora.asm ONLINE ONLINE rdb1 Started ONLINE ONLINE rdb2 Started ora.eons ONLINE ONLINE ONLINE ONLINE rdb1 rdb2 ora.gsd OFFLINE OFFLINE OFFLINE OFFLINE rdb1 rdb2 ora.net1.network ONLINE ONLINE ONLINE ONLINE rdb1 rdb2 ora.ons ONLINE ONLINE ONLINE ONLINE rdb1 rdb2 ora.registry.acfs ONLINE ONLINE ONLINE ONLINE rdb1 rdb Cluster Resources ora.listener_scan1.lsnr 1 ONLINE ONLINE rdb2 ora.oc4j 1 OFFLINE OFFLINE ora.rac1db.db 1 ONLINE ONLINE rdb1 Open - 66
67 2 ONLINE ONLINE rdb2 Open ora.rdb1.vip 1 ONLINE ONLINE rdb1 ora.rdb2.vip 1 ONLINE ONLINE rdb2 ora.scan1.vip 1 ONLINE ONLINE rdb2 [root@rdb1 source]# - 67
68 5. 결론 RAC 의특성상 OS / Hardware 의특성을고려해야맊제대로된 RAC 구성이완료됩니다. 특히 RAC 부터는 Muticast 지원유무, HAIP 등기졲보다나은 Oracle Grid 홖경구성을위한몇가 지요소가추가되었습니다. 현재가상화홖경, 고성능, Cluster 화된 solution 등 IT infra 의변화가계속일어나고있는상황에서 ORACLE RAC 구조는또다른변화가필요할수있을지도모릅니다. 이런변화에서제대로된구성을위해서준비해야할사항을정리해봅니다. 변화하는기술에대한관심 구성에사용될구성도 구성시구성도를그려보십시요. 그리다보면저희들이미쳐파악하지못한사항이나, check 사항, 장애포 인트등을준비할수있습니다. Oracle Certification 확인 OS, hardware, 구성로직에대한 oracle Certification 를확인합니다. 확인없이짂행하다최악의경우구 성실패로이어질수있습니다. 구성 solution 과의 Bug, Error 확인 미리구성과정에서발생하는 error 자료를준비하여, 빠른구성을수행할수있습니다. Test 구성 Test plan 을가지고반듯이 Test 구성을통한검증을수행합니다. - 68
Oracle Database 11g R2 Installation Guide for OEL5(x86) Writer : 이경호
 Writer : 이경호") Oracle Database 11g R2 Installation Guide for OEL5(x86) Writer : 이경호 - 1 - 1. 시스템구성 1.1. 개요 1.1.1. 정의 - VMware 7 을이용하여 Oracle Database 11g R2 를설치합니다. 1.1.2. 목적 - 실습을위한 Oracle Database 11g R2 설치가이드를작성합니다.
Oracle Database 11g R2 Installation Guide for OEL5(x86) Writer : 이경호 - 1 - 1. 시스템구성 1.1. 개요 1.1.1. 정의 - VMware 7 을이용하여 Oracle Database 11g R2 를설치합니다. 1.1.2. 목적 - 실습을위한 Oracle Database 11g R2 설치가이드를작성합니다.
휠세미나3 ver0.4
 andromeda@sparcs:/$ ls -al dev/sda* brw-rw---- 1 root disk 8, 0 2014-06-09 18:43 dev/sda brw-rw---- 1 root disk 8, 1 2014-06-09 18:43 dev/sda1 brw-rw---- 1 root disk 8, 2 2014-06-09 18:43 dev/sda2 andromeda@sparcs:/$
Oracle Database 11gR2 RAC Install Step by Step on VSphere Author 박철현 Creation Date Last Updated Version 0.1 Copyright(C) 2004 Goodus Inc. All
 2004 Goodus Inc. All") Oracle Database 11gR2 RAC Install Step by Step on VSphere Author 박철현 Creation Date 2011.7.6 Last Updated Version 0.1 Copyright(C) 2004 Goodus Inc. All Rights Reserved Version 변경일자변경자 ( 작성자 ) 주요내용 1 2 Contents
Oracle Database 11gR2 RAC Install Step by Step on VSphere Author 박철현 Creation Date 2011.7.6 Last Updated Version 0.1 Copyright(C) 2004 Goodus Inc. All Rights Reserved Version 변경일자변경자 ( 작성자 ) 주요내용 1 2 Contents
Simplify your Job Automatic Storage Management DB TSC
 Simplify your Job Automatic Storage Management DB TSC 1. DBA Challenges 2. ASM Disk group 3. Mirroring/Striping/Rebalancing 4. Traditional vs. ASM 5. ASM administration 6. ASM Summary Capacity in Terabytes
ENT5_ora11g_R2_ hwp
 Linux Ent 5 환경에 oracle 11g R2 설치 step 2 커널설정 아래오라클설치는카페의게시판에제공되는 11gR2 설치를위한리눅스설치과정을수행한경우보장한다. 리눅스설치가궁금하다면 'OS, Network' 게시판에 RedHat 5.X 설치 - 오라클 11g R2 설치를위한 게시물을참고한다. 1. Linux 환경설정 step 1 oracle 관리계정및그룹생성
슬라이드 1
 OEL 5. Oracle 11g R2 RAC_ASM 차범철 2012. 3. 7 목 목 차 차 Step 1. 리눅스설치 Step 2. 설치환경설정 Step 3. GRID 설치 Step 4. Oracle 엔진설치 Step 5. ASMCA Step 6. Database 생성 Step 7. 테스트 Step 1. 리눅스설치 Vmware workstation 세팅 OEL
K7VT2_QIG_v3
 1......... 2 3..\ 4 5 [R] : Enter Raid setup utility 6 Press[A]keytocreateRAID RAID Type: JBOD RAID 0 RAID 1: 2 7 " RAID 0 Auto Create Manual Create: 2 RAID 0 Block Size: 16K 32K
ORANGE FOR ORACLE V4.0 INSTALLATION GUIDE (Online Upgrade) ORANGE CONFIGURATION ADMIN O
 ORANGE CONFIGURATION ADMIN O") Orange for ORACLE V4.0 Installation Guide ORANGE FOR ORACLE V4.0 INSTALLATION GUIDE...1 1....2 1.1...2 1.2...2 1.2.1...2 1.2.2 (Online Upgrade)...11 1.3 ORANGE CONFIGURATION ADMIN...12 1.3.1 Orange Configuration
Orange for ORACLE V4.0 Installation Guide ORANGE FOR ORACLE V4.0 INSTALLATION GUIDE...1 1....2 1.1...2 1.2...2 1.2.1...2 1.2.2 (Online Upgrade)...11 1.3 ORANGE CONFIGURATION ADMIN...12 1.3.1 Orange Configuration
슬라이드 1
 UGENS SNC Techinical Report OEL6 + 12C RAC 사원최재정 UGENS SNC 목차 1. 12c 설치된곳에자료수집 2. SERVER DB 삭제 3. 12c grid 설치 4. oracle 12c 설치 5. 확인 2 Vi.bash_profile if [ -f ~/.bashrc ]; then. ~/.bashrc fi # User specific
PWR PWR HDD HDD USB USB Quick Network Setup Guide xdsl/cable Modem PC DVR 1~3 1.. DVR DVR IP xdsl Cable xdsl Cable PC PC DDNS (
 PWR PWR HDD HDD USB USB Quick Network Setup Guide xdsl/cable Modem PC DVR 1~3 1.. DVR DVR IP xdsl Cable xdsl Cable PC PC DDNS (http://ddns.hanwha-security.com) Step 1~5. Step, PC, DVR Step 1. Cable Step
Remote UI Guide
 Remote UI KOR Remote UI Remote UI PDF Adobe Reader/Adobe Acrobat Reader. Adobe Reader/Adobe Acrobat Reader Adobe Systems Incorporated.. Canon. Remote UI GIF Adobe Systems Incorporated Photoshop. ..........................................................
PowerPoint 프레젠테이션
 (Host) set up : Linux Backend RS-232, Ethernet, parallel(jtag) Host terminal Target terminal : monitor (Minicom) JTAG Cross compiler Boot loader Pentium Redhat 9.0 Serial port Serial cross cable Ethernet
R50_51_kor_ch1
 S/N : 1234567890123 Boot Device Priority NumLock [Off] Enable Keypad [By NumLock] Summary screen [Disabled] Boor-time Diagnostic Screen [Disabled] PXE OPROM [Only with F12]
주식회사커브 Oracle 12c CentOS 7 에설치 이문서는 Atlassian 제품군을설치하기위한 Oracle 12c 를 CentOS 7 에설치하는방법에대한가이드를공유하기위해작성되었다. Version OS : Cent OS 7 64bit DB : Oracle 12c
 Oracle 12c CentOS 7 에설치 이문서는 Atlassian 제품군을설치하기위한 Oracle 12c 를 CentOS 7 에설치하는방법에대한가이드를공유하기위해작성되었다. Version OS : Cent OS 7 64bit DB : Oracle 12c R2(12.2.0.1.0) prerequisites: swap 5G 공간추천 오라클설치 패키지설치 Oracle
vm-웨어-앞부속
 VMware vsphere 4 This document was created using the official VMware icon and diagram library. Copyright 2009 VMware, Inc. All rights reserved. This product is protected by U.S. and international copyright
소개 TeraStation 을 구입해 주셔서 감사합니다! 이 사용 설명서는 TeraStation 구성 정보를 제공합니다. 제품은 계속 업데이트되므로, 이 설명서의 이미지 및 텍스트는 사용자가 보유 중인 TeraStation 에 표시 된 이미지 및 텍스트와 약간 다를 수
 사용 설명서 TeraStation Pro II TS-HTGL/R5 패키지 내용물: 본체 (TeraStation) 이더넷 케이블 전원 케이블 TeraNavigator 설치 CD 사용 설명서 (이 설명서) 제품 보증서 www.buffalotech.com 소개 TeraStation 을 구입해 주셔서 감사합니다! 이 사용 설명서는 TeraStation 구성 정보를
APOGEE Insight_KR_Base_3P11
 Technical Specification Sheet Document No. 149-332P25 September, 2010 Insight 3.11 Base Workstation 그림 1. Insight Base 메인메뉴 Insight Base Insight Insight Base, Insight Base Insight Base Insight Windows
PRO1_04E [읽기 전용]
![PRO1_04E [읽기 전용]](/thumbs/91/104875613.jpg "PRO1_04E [읽기 전용]") Siemens AG 1999 All rights reserved File: PRO1_04E1 Information and S7-300 2 S7-400 3 EPROM / 4 5 6 HW Config 7 8 9 CPU 10 CPU : 11 CPU : 12 CPU : 13 CPU : / 14 CPU : 15 CPU : / 16 HW 17 HW PG 18 SIMATIC
Siemens AG 1999 All rights reserved File: PRO1_04E1 Information and S7-300 2 S7-400 3 EPROM / 4 5 6 HW Config 7 8 9 CPU 10 CPU : 11 CPU : 12 CPU : 13 CPU : / 14 CPU : 15 CPU : / 16 HW 17 HW PG 18 SIMATIC
solution map_....
 SOLUTION BROCHURE RELIABLE STORAGE SOLUTIONS ETERNUS FOR RELIABILITY AND AVAILABILITY PROTECT YOUR DATA AND SUPPORT BUSINESS FLEXIBILITY WITH FUJITSU STORAGE SOLUTIONS kr.fujitsu.com INDEX 1. Storage System
USB USB DV25 DV25 REC SRN-475S REC SRN-475S LAN POWER LAN POWER Quick Network Setup Guide xdsl/cable Modem PC DVR 1~3 1.. DVR DVR IP xdsl Cable xdsl C
 USB USB DV25 DV25 REC SRN-475S REC SRN-475S LAN POWER LAN POWER Quick Network Setup Guide xdsl/cable Modem PC DVR 1~3 1.. DVR DVR IP xdsl Cable xdsl Cable PC PC Step 1~5. Step, PC, DVR Step 1. Cable Step
Solaris Express Developer Edition
 Solaris Express Developer Edition : 2008 1 Solaris TM Express Developer Edition Solaris OS. Sun / Solaris, Java, Web 2.0,,. Developer Solaris Express Developer Edition System Requirements. 768MB. SPARC
Copyright 2012, Oracle and/or its affiliates. All rights reserved.,,,,,,,,,,,,,.,..., U.S. GOVERNMENT END USERS. Oracle programs, including any operat
 Sun Server X3-2( Sun Fire X4170 M3) Oracle Solaris : E35482 01 2012 9 Copyright 2012, Oracle and/or its affiliates. All rights reserved.,,,,,,,,,,,,,.,..., U.S. GOVERNMENT END USERS. Oracle programs, including
1217 WebTrafMon II
 (1/28) (2/28) (10 Mbps ) Video, Audio. (3/28) 10 ~ 15 ( : telnet, ftp ),, (4/28) UDP/TCP (5/28) centralized environment packet header information analysis network traffic data, capture presentation network
Oracle Database 10g: Self-Managing Database DB TSC
 Oracle Database 10g: Self-Managing Database DB TSC Agenda Overview System Resource Application & SQL Storage Space Backup & Recovery ½ Cost ? 6% 12 % 6% 6% 55% : IOUG 2001 DBA Survey ? 6% & 12 % 6% 6%
MAX+plus II Getting Started - 무작정따라하기
 무작정 따라하기 2001 10 4 / Version 20-2 0 MAX+plus II Digital, Schematic Capture MAX+plus II, IC, CPLD FPGA (Logic) ALTERA PLD FLEX10K Series EPF10K10QC208-4 MAX+plus II Project, Schematic, Design Compilation,
목차 BUG offline replicator 에서유효하지않은로그를읽을경우비정상종료할수있다... 3 BUG 각 partition 이서로다른 tablespace 를가지고, column type 이 CLOB 이며, 해당 table 을 truncate
 ALTIBASE HDB 6.1.1.5.6 Patch Notes 목차 BUG-39240 offline replicator 에서유효하지않은로그를읽을경우비정상종료할수있다... 3 BUG-41443 각 partition 이서로다른 tablespace 를가지고, column type 이 CLOB 이며, 해당 table 을 truncate 한뒤, hash partition
본교재는수업용으로제작된게시물입니다. 영리목적으로사용할경우저작권법제 30 조항에의거법적처벌을받을수있습니다. [ 실습 ] 스위치장비초기화 1. NVRAM 에저장되어있는 'startup-config' 파일이있다면, 삭제를실시한다. SWx>enable SWx#erase sta
![본교재는수업용으로제작된게시물입니다. 영리목적으로사용할경우저작권법제 30 조항에의거법적처벌을받을수있습니다. [ 실습 ] 스위치장비초기화 1. NVRAM 에저장되어있는 'startup-config' 파일이있다면, 삭제를실시한다. SWx>enable SWx#erase sta](/thumbs/88/116915514.jpg "본교재는수업용으로제작된게시물입니다. 영리목적으로사용할경우저작권법제 30 조항에의거법적처벌을받을수있습니다. [ 실습 ] 스위치장비초기화 1. NVRAM 에저장되어있는 'startup-config' 파일이있다면, 삭제를실시한다. SWx>enable SWx#erase sta") [ 실습 ] 스위치장비초기화 1. NVRAM 에저장되어있는 'startup-config' 파일이있다면, 삭제를실시한다. SWx>enable SWx#erase startup-config Erasing the nvram filesystem will remove all configuration files Continue? [confirm] ( 엔터 ) [OK] Erase
[ 실습 ] 스위치장비초기화 1. NVRAM 에저장되어있는 'startup-config' 파일이있다면, 삭제를실시한다. SWx>enable SWx#erase startup-config Erasing the nvram filesystem will remove all configuration files Continue? [confirm] ( 엔터 ) [OK] Erase
본문서는 초급자들을 대상으로 최대한 쉽게 작성하였습니다. 본문서에서는 설치방법만 기술했으며 자세한 설정방법은 검색을 통하시기 바랍니다. 1. 설치개요 워드프레스는 블로그 형태의 홈페이지를 빠르게 만들수 있게 해 주는 프로그램입니다. 다양한 기능을 하는 플러그인과 디자인
 스마일서브 CLOUD_Virtual 워드프레스 설치 (WORDPRESS INSTALL) 스마일서브 가상화사업본부 Update. 2012. 09. 04. 본문서는 초급자들을 대상으로 최대한 쉽게 작성하였습니다. 본문서에서는 설치방법만 기술했으며 자세한 설정방법은 검색을 통하시기 바랍니다. 1. 설치개요 워드프레스는 블로그 형태의 홈페이지를 빠르게 만들수 있게
 OPCTalk for Hitachi Ethernet 1 2. Path. DCOMwindow NT/2000 network server. Winsock update win95. . . 3 Excel CSV. Update Background Thread Client Command Queue Size Client Dynamic Scan Block Block
10X56_NWG_KOR.indd
 디지털 프로젝터 X56 네트워크 가이드 이 제품을 구입해 주셔서 감사합니다. 본 설명서는 네트워크 기능 만을 설명하기 위한 것입니다. 본 제품을 올바르게 사 용하려면 이 취급절명저와 본 제품의 다른 취급절명저를 참조하시기 바랍니다. 중요한 주의사항 이 제품을 사용하기 전에 먼저 이 제품에 대한 모든 설명서를 잘 읽어 보십시오. 읽은 뒤에는 나중에 필요할 때
Copyright 2012, Oracle and/or its affiliates. All rights reserved.,.,,,,,,,,,,,,.,...,. U.S. GOVERNMENT END USERS. Oracle programs, including any oper
 Windows Netra Blade X3-2B( Sun Netra X6270 M3 Blade) : E37790 01 2012 9 Copyright 2012, Oracle and/or its affiliates. All rights reserved.,.,,,,,,,,,,,,.,...,. U.S. GOVERNMENT END USERS. Oracle programs,
Sun Java System Messaging Server 63 64
 Sun Java System Messaging Server 6.3 64 Sun Java TM System Communications Suite Sun Microsystems, Inc. 4150 Network Circle Santa Clara, CA 95054 U.S.A. : 820 2868 2007 7 Copyright 2007 Sun Microsystems,
PCServerMgmt7
 Web Windows NT/2000 Server DP&NM Lab 1 Contents 2 Windows NT Service Provider Management Application Web UI 3 . PC,, Client/Server Network 4 (1),,, PC Mainframe PC Backbone Server TCP/IP DCS PLC Network
LXR 설치 및 사용법.doc
 Installation of LXR (Linux Cross-Reference) for Source Code Reference Code Reference LXR : 2002512( ), : 1/1 1 3 2 LXR 3 21 LXR 3 22 LXR 221 LXR 3 222 LXR 3 3 23 LXR lxrconf 4 24 241 httpdconf 6 242 htaccess
AKG 설 맞이 사내 특판 이벤트
 ORACLE RAC 설치매뉴얼 (11g+HACMP 6.1+RAWDEVICE) OTS 유명수, 정명호 2015.08.04 Contents 1. HACMP 설치 2. HACMP 설정 3. 사전준비사항 4. Grid 설치 5. DB 엔진설치 6. DB 생성 7. 설치확인및설정사항 1. HACMP 설치 (1/5) HACMP S/W 를특정디렉토리에압축해제 smit installp
untitled
 Push... 2 Push... 4 Push... 5 Push... 13 Push... 15 1 FORCS Co., LTD A Leader of Enterprise e-business Solution Push (Daemon ), Push Push Observer. Push., Observer. Session. Thread Thread. Observer ID.
Backup Exec
 ([email protected]) www.veritas veritas.co..co.kr ? 24 X 7 X 365 Global Data Access.. 100% Storage Used Terabytes 9 8 7 6 5 4 3 2 1 0 2000 2001 2002 2003 IDC (TB) 93%. 199693,000 TB 2000831,000 TB.
vm-웨어-01장
 Chapter 16 21 (Agenda). (Green),., 2010. IT IT. IT 2007 3.1% 2030 11.1%, IT 2007 1.1.% 2030 4.7%, 2020 4 IT. 1 IT, IT. (Virtualization),. 2009 /IT 2010 10 2. 6 2008. 1970 MIT IBM (Mainframe), x86 1. (http
Mango220 Android How to compile and Transfer image to Target
 Mango220 Android How to compile and Transfer image to Target http://www.mangoboard.com/ http://cafe.naver.com/embeddedcrazyboys Crazy Embedded Laboratory www.mangoboard.com cafe.naver.com/embeddedcrazyboys
Microsoft Word - 기술노트36_11g R1 Clusterware를 이용한 Oracle HA 구성 _최종본_.doc
 Goodus 기술노트 [36 회 ] 11g R1 Clusterware 를이용한 Oracle H/A 구성 Author 유광복, 조연철, 백순성 Creation Date 2008-11-31 Last Updated 2008-12-03 Version 1.0 Copyright(C) 2004 Goodus Inc. All Rights Reserved Version 변경일자
chapter4
 Basic Netw rk 1. ก ก ก 2. 3. ก ก 4. ก 2 1. 2. 3. 4. ก 5. ก 6. ก ก 7. ก 3 ก ก ก ก (Mainframe) ก ก ก ก (Terminal) ก ก ก ก ก ก ก ก 4 ก (Dumb Terminal) ก ก ก ก Mainframe ก CPU ก ก ก ก 5 ก ก ก ก ก ก ก ก ก ก
PowerPoint Presentation
 Data Protection Rapid Recovery x86 DR Agent based Backup - Physical Machine - Virtual Machine - Cluster Agentless Backup - VMware ESXi Deploy Agents - Windows - AD, ESXi Restore Machine - Live Recovery
H3050(aap)
") USB Windows 7/ Vista 2 Windows XP English 1 2 3 4 Installation A. Headset B. Transmitter C. USB charging cable D. 3.5mm to USB audio cable - Before using the headset needs to be fully charged. -Connect
USB Windows 7/ Vista 2 Windows XP English 1 2 3 4 Installation A. Headset B. Transmitter C. USB charging cable D. 3.5mm to USB audio cable - Before using the headset needs to be fully charged. -Connect
untitled
 1... 2 System... 3... 3.1... 3.2... 3.3... 4... 4.1... 5... 5.1... 5.2... 5.2.1... 5.3... 5.3.1 Modbus-TCP... 5.3.2 Modbus-RTU... 5.3.3 LS485... 5.4... 5.5... 5.5.1... 5.5.2... 5.6... 5.6.1... 5.6.2...
디지털포렌식학회 논문양식
 ISSN : 1976-5304 http://www.kdfs.or.kr Virtual Online Game(VOG) 환경에서의 디지털 증거수집 방법 연구 이 흥 복, 정 관 모, 김 선 영 * 대전지방경찰청 Evidence Collection Process According to the Way VOG Configuration Heung-Bok Lee, Kwan-Mo
4. 스위치재부팅을실시한다. ( 만약, Save 질문이나오면 'no' 를실시한다.) SWx#reload System configuration has been modified. Save? [yes/no]: no Proceed with reload? [confirm] (
![4. 스위치재부팅을실시한다. ( 만약, Save 질문이나오면 'no' 를실시한다.) SWx#reload System configuration has been modified. Save? [yes/no]: no Proceed with reload? [confirm] (](/thumbs/91/104875642.jpg "4. 스위치재부팅을실시한다. ( 만약, Save 질문이나오면 'no' 를실시한다.) SWx#reload System configuration has been modified. Save? [yes/no]: no Proceed with reload? [confirm] (") [ 실습 ] 스위치장비초기화 1. NVRAM 에저장되어있는 'startup-config' 파일이있다면, 삭제를실시한다. SWx>enable SWx#erase startup-config Erasing the nvram filesystem will remove all configuration files Continue? [confirm] ( 엔터 ) [OK] Erase
[ 실습 ] 스위치장비초기화 1. NVRAM 에저장되어있는 'startup-config' 파일이있다면, 삭제를실시한다. SWx>enable SWx#erase startup-config Erasing the nvram filesystem will remove all configuration files Continue? [confirm] ( 엔터 ) [OK] Erase
Mars OS 1.0.2 System Administration Guide
 Mars OS 1.0.2 시스템 관리 가이드 NetApp, Inc. www.netapp.com/kr 부품 번호:215-09731_A0 2015년 2월 4일 수요일 2 목차 목차 Mars OS 정보 12 Mars OS의 기능 13 고성능 13 업계 최고의 스토리지 효율성 13 시스템 모니터링 13 비휘발성 메모리를 사용하여 안정성 및 성능 향상 13 클러스터링
1. GigE Camera Interface를 위한 최소 PC 사양 CPU : Intel Core 2 Duo, 2.4GHz이상 RAM : 2GB 이상 LANcard : Intel PRO/1000xT 이상 VGA : PCI x 16, VRAM DDR2 RAM 256MB
 Revision 1.0 Date 11th Nov. 2013 Description Established. Page Page 1 of 9 1. GigE Camera Interface를 위한 최소 PC 사양 CPU : Intel Core 2 Duo, 2.4GHz이상 RAM : 2GB 이상 LANcard : Intel PRO/1000xT 이상 VGA : PCI x
28 THE ASIAN JOURNAL OF TEX [2] ko.tex [5]
![28 THE ASIAN JOURNAL OF TEX [2] ko.tex [5]](/thumbs/91/105270926.jpg "28 THE ASIAN JOURNAL OF TEX [2] ko.tex [5]") The Asian Journal of TEX, Volume 3, No. 1, June 2009 Article revision 2009/5/7 KTS THE KOREAN TEX SOCIETY SINCE 2007 2008 ko.tex Installing TEX Live 2008 and ko.tex under Ubuntu Linux Kihwang Lee * [email protected]
The Asian Journal of TEX, Volume 3, No. 1, June 2009 Article revision 2009/5/7 KTS THE KOREAN TEX SOCIETY SINCE 2007 2008 ko.tex Installing TEX Live 2008 and ko.tex under Ubuntu Linux Kihwang Lee * [email protected]
PowerChute Personal Edition v3.1.0 에이전트 사용 설명서
 PowerChute Personal Edition v3.1.0 990-3772D-019 4/2019 Schneider Electric IT Corporation Schneider Electric IT Corporation.. Schneider Electric IT Corporation,,,.,. Schneider Electric IT Corporation..
2 CentOS 6 Minimal 설치 1.2 설치 DVD 로부팅 DVD 를드라이브에넣고 BIOS 설정을 DVD 에서부트하도록설정시작합니다. 그러면다음과같은시작옵션이있습 니다. 여기에서 Install or upgrade an exissting system 을선택합니다.
 1. CentOS 6 Minimal 설치 1.1 CentOS 6 Minimal 설치준비 ㅇㅇ아아앙 1.1.1 What is CentOS? CentOS is an Enterprise Linux distribution based on the freely available sources from Red Hat Enterprise Li nux. Each CentOS
MySQL-Ch10
 10 Chapter.,,.,, MySQL. MySQL mysqld MySQL.,. MySQL. MySQL....,.,..,,.,. UNIX, MySQL. mysqladm mysqlgrp. MySQL 608 MySQL(2/e) Chapter 10 MySQL. 10.1 (,, ). UNIX MySQL, /usr/local/mysql/var, /usr/local/mysql/data,
05Àå
 CHAPTER 05 NT,, XP,. NT NTFS, XP. D,,. XP x NT,,, ( x, x ). NT/ /XP,.. PC NT NT. + Guide to Software: Understanding and Installing Windows 2000 and Windows NT + SOFTWARE Guide to Software 3/e SOFTWARE
PRO1_09E [읽기 전용]
![PRO1_09E [읽기 전용]](/thumbs/88/115329251.jpg "PRO1_09E [읽기 전용]") Siemens AG 1999 All rights reserved File: PRO1_09E1 Information and - ( ) 2 3 4 5 Monitor/Modify Variables" 6 7 8 9 10 11 CPU 12 Stop 13 (Forcing) 14 (1) 15 (2) 16 : 17 : Stop 18 : 19 : (Forcing) 20 :
Siemens AG 1999 All rights reserved File: PRO1_09E1 Information and - ( ) 2 3 4 5 Monitor/Modify Variables" 6 7 8 9 10 11 CPU 12 Stop 13 (Forcing) 14 (1) 15 (2) 16 : 17 : Stop 18 : 19 : (Forcing) 20 :
Microsoft Word - zfs-storage-family_ko.doc
 데이터 관리 용이성과 스토리지 효율성을 하나로 결합 주요 기능 및 이점 획기적인 가격 대비 성능과 혁신적인 단순성을 하나로 결합 특징 문제를 손쉽게 발견 및 수정하고 성능을 최적화할 수 있는 탁월한 관리 툴 포괄적이고 통합된 데이터 서비스 및 프로토콜 액티브-액티브 클러스터 옵션 데이터 압축 및 인라인 중복 제거 지속적인 데이터 증가로 인해 오늘날 IT 인프라는
Sena Device Server Serial/IP TM Version
 Sena Device Server Serial/IP TM Version 1.0.0 2005. 3. 7. Release Note Revision Date Name Description V1.0.0 2005-03-7 HJ Jeon Serial/IP 4.3.2 ( ) 210 137-130, : (02) 573-5422 : (02) 573-7710 email: [email protected]
Assign an IP Address and Access the Video Stream - Installation Guide
 설치 안내서 IP 주소 할당 및 비디오 스트림에 액세스 책임 본 문서는 최대한 주의를 기울여 작성되었습니다. 잘못되거나 누락된 정보가 있는 경우 엑시스 지사로 알려 주시기 바랍니다. Axis Communications AB는 기술적 또는 인쇄상의 오류에 대해 책 임을 지지 않으며 사전 통지 없이 제품 및 설명서를 변경할 수 있습니다. Axis Communications
Pacemaker/Corosync 클러스터에서 GFS2구성
 2019/07/09 23:42 1/2 Pacemaker/Corosync 클러스터에서 GFS2 구성 목차 Pacemaker/Corosync 클러스터에서 GFS2구성... 1 작업개요... 1 구성환경... 1 패키지설치... 2 Clustered Locking LVM사용... 2 DLM 및 CLVMD 클러스터리소스작성... 3 리소스순서및코로케이션... 4 LVM
목차 1. 제품 소개... 4 1.1 특징... 4 1.2 개요... 4 1.3 Function table... 5 2. 기능 소개... 6 2.1 Copy... 6 2.2 Compare... 6 2.3 Copy & Compare... 6 2.4 Erase... 6 2
 유영테크닉스( 주) 사용자 설명서 HDD014/034 IDE & SATA Hard Drive Duplicator 유 영 테 크 닉 스 ( 주) (032)670-7880 www.yooyoung-tech.com 목차 1. 제품 소개... 4 1.1 특징... 4 1.2 개요... 4 1.3 Function table... 5 2. 기능 소개... 6 2.1 Copy...
<목 차 > 제 1장 일반사항 4 I.사업의 개요 4 1.사업명 4 2.사업의 목적 4 3.입찰 방식 4 4.입찰 참가 자격 4 5.사업 및 계약 기간 5 6.추진 일정 6 7.사업 범위 및 내용 6 II.사업시행 주요 요건 8 1.사업시행 조건 8 2.계약보증 9 3
 열차운행정보 승무원 확인시스템 구축 제 안 요 청 서 2014.6. 제 1장 일반사항 4 I.사업의 개요 4 1.사업명 4 2.사업의 목적 4 3.입찰 방식 4 4.입찰 참가 자격 4 5.사업 및 계약 기간 5 6.추진 일정 6 7.사업 범위 및 내용 6 II.사업시행 주요 요건 8 1.사업시행 조건 8 2.계약보증 9 3.시운전 및 하자보증 10
bn2019_2
 arp -a Packet Logging/Editing Decode Buffer Capture Driver Logging: permanent storage of packets for offline analysis Decode: packets must be decoded to human readable form. Buffer: packets must temporarily
Microsoft PowerPoint - 알고리즘_1주차_2차시.pptx
 Chapter 2 Secondary Storage and System Software References: 1. M. J. Folk and B. Zoellick, File Structures, Addison-Wesley. 목차 Disks Storage as a Hierarchy Buffer Management Flash Memory 영남대학교데이터베이스연구실
시스코 무선랜 설치운영 매뉴얼(AP1200s_v1.1)
") [ Version 1.3 ] Access Point,. Access Point IP 10.0.0.1, Subnet Mask 255.255.255.224, DHCP Client. DHCP Server IP IP,, IP 10.0.0.X. (Tip: Auto Sensing Straight, Cross-over.) step 1]. step 2] LAN. step
[ Version 1.3 ] Access Point,. Access Point IP 10.0.0.1, Subnet Mask 255.255.255.224, DHCP Client. DHCP Server IP IP,, IP 10.0.0.X. (Tip: Auto Sensing Straight, Cross-over.) step 1]. step 2] LAN. step
untitled
 Memory leak Resource 力 金 3-tier 見 Out of Memory( 不 ) Memory leak( 漏 ) 狀 Application Server Crash 理 Server 狀 Crash 類 JVM 說 例 行說 說 Memory leak Resource Out of Memory Memory leak Out of Memory 不論 Java heap
s SINUMERIK 840C Service and User Manual DATA SAVING & LOADING & & /
 SINUMERIK 840C Service and Uer Manual DATA SAVING & LOADING & & / / NC, RS232C /. NC NC / Computer link () Device ( )/PC / / Print erial Data input RS232C () Data output Data management FLOPPY DRIVE, FLOPPY
DE1-SoC Board
 실습 1 개발환경 DE1-SoC Board Design Tools - Installation Download & Install Quartus Prime Lite Edition http://www.altera.com/ Quartus Prime (includes Nios II EDS) Nios II Embedded Design Suite (EDS) is automatically
Integ
 HP Integrity HP Chipset Itanium 2(Processor 9100) HP Integrity HP, Itanium. HP Integrity Blade BL860c HP Integrity Blade BL870c HP Integrity rx2660 HP Integrity rx3600 HP Integrity rx6600 2 HP Integrity
6주차.key
 6, Process concept A program in execution Program code PCB (process control block) Program counter, registers, etc. Stack Heap Data section => global variable Process in memory Process state New Running
오라클 데이터베이스 10g 핵심 요약 노트
 1 10g 10g SYSAUX 10g 22 Oracle Database 10g, 10g. 10g. (Grid), 10g.. 10g SYSAUX (ASM, Automatic Storage Management) 10g 10g. g. (DBA).,., 1).,..? 10g,.. (Larry Ellison).. (Leverage Components), (ASM) (
Copyright 0, Oracle and/or its affiliates. All rights reserved.,.,,,,,,,,,,,,.,...,. U.S. GOVERNMENT RIGHTS Programs, software, databases, and related
 Virtual Machine Sun Fire X4800 M : E4570 0 8 Copyright 0, Oracle and/or its affiliates. All rights reserved.,.,,,,,,,,,,,,.,...,. U.S. GOVERNMENT RIGHTS Programs, software, databases, and related documentation
Microsoft PowerPoint - eSlim SV5-2510 [080116]
![Microsoft PowerPoint - eSlim SV5-2510 [080116]](/thumbs/39/20150967.jpg "Microsoft PowerPoint - eSlim SV5-2510 [080116]") Innovation for Total Solution Provider!! eslim SV5-2510 Opteron Server 2008. 03 ESLIM KOREA INC. 1. 제 품 개 요 eslim SV5-2510 Server Quad-Core and Dual-Core Opteron 2000 Series 6 internal HDD bays for SAS
Innovation for Total Solution Provider!! eslim SV5-2510 Opteron Server 2008. 03 ESLIM KOREA INC. 1. 제 품 개 요 eslim SV5-2510 Server Quad-Core and Dual-Core Opteron 2000 Series 6 internal HDD bays for SAS
Microsoft PowerPoint - eSlim SV5-2410 [20080402]
![Microsoft PowerPoint - eSlim SV5-2410 [20080402]](/thumbs/40/20557413.jpg "Microsoft PowerPoint - eSlim SV5-2410 [20080402]") Innovation for Total Solution Provider!! eslim SV5-2410 Opteron Server 2008. 3 ESLIM KOREA INC. 1. 제 품 개 요 eslim SV5-2410 Server Quad-Core and Dual-Core Opteron 2000 Series Max. 4 Disk Bays for SAS and
Innovation for Total Solution Provider!! eslim SV5-2410 Opteron Server 2008. 3 ESLIM KOREA INC. 1. 제 품 개 요 eslim SV5-2410 Server Quad-Core and Dual-Core Opteron 2000 Series Max. 4 Disk Bays for SAS and
다음 사항을 꼭 확인하세요! 도움말 안내 - 본 도움말에는 iodd2511 조작방법 및 활용법이 적혀 있습니다. - 본 제품 사용 전에 안전을 위한 주의사항 을 반드시 숙지하십시오. - 문제가 발생하면 문제해결 을 참조하십시오. 중요한 Data 는 항상 백업 하십시오.
 메 뉴 다음 사항을 꼭 확인하세요! --------------------------------- 2p 안전을 위한 주의 사항 --------------------------------- 3p 구성품 --------------------------------- 4p 각 부분의 명칭 --------------------------------- 5p 제품의 규격
리뉴얼 xtremI 최종 softcopy
 SSD를 100% 이해한 CONTENTS SSD? 03 04 05 06 07 08 09 10 11 12 13 15 14 17 18 18 19 03 SSD SSD? Solid State Drive(SSD) NAND NAND DRAM SSD [ 1. SSD ] CPU( )RAM Cache Memory Firmware GB RAM Cache Memory Memory
슬라이드 제목 없음
 < > Target cross compiler Target code Target Software Development Kit (SDK) T-Appl T-Appl T-VM Cross downloader Cross debugger Case 1) Serial line Case 2) LAN line LAN line T-OS Target debugger Host System
임베디드시스템설계강의자료 4 (2014 년도 1 학기 ) 김영진 아주대학교전자공학과
 김영진 아주대학교전자공학과") 임베디드시스템설계강의자료 4 (2014 년도 1 학기 ) 김영진 아주대학교전자공학과 Outline n n n n n n 보드개요보드연결필수패키지, Tool-Chain 설치 Kernel, file system build Fastboot 및 Tera Term설치 Kernel, file system 이미지전송및설치 - 2 - Young-Jin Kim X-Hyper320TKU
임베디드시스템설계강의자료 4 (2014 년도 1 학기 ) 김영진 아주대학교전자공학과 Outline n n n n n n 보드개요보드연결필수패키지, Tool-Chain 설치 Kernel, file system build Fastboot 및 Tera Term설치 Kernel, file system 이미지전송및설치 - 2 - Young-Jin Kim X-Hyper320TKU
CD-RW_Advanced.PDF
 HP CD-Writer Program User Guide - - Ver. 2.0 HP CD-RW Adaptec Easy CD Creator Copier, Direct CD. HP CD-RW,. Easy CD Creator 3.5C, Direct CD 3.0., HP. HP CD-RW TEAM ( 02-3270-0803 ) < > 1. CD...3 CD...5
목차 제 1 장 inexio Touch Driver소개... 3 1.1 소개 및 주요 기능... 3 1.2 제품사양... 4 제 2 장 설치 및 실행... 5 2.1 설치 시 주의사항... 5 2.2 설치 권고 사양... 5 2.3 프로그램 설치... 6 2.4 하드웨
 최종 수정일: 2010.01.15 inexio 적외선 터치스크린 사용 설명서 [Notes] 본 매뉴얼의 정보는 예고 없이 변경될 수 있으며 사용된 이미지가 실제와 다를 수 있습니다. 1 목차 제 1 장 inexio Touch Driver소개... 3 1.1 소개 및 주요 기능... 3 1.2 제품사양... 4 제 2 장 설치 및 실행... 5 2.1 설치 시
Windows 네트워크 사용 설명서
 Windows 네트워크 사용 설명서 (Wireless Manager mobile edition 5.5) 그림의 예로 사용된 프로젝터는 PT-FW300NTEA 입니다. 한국어 TQBH0205-5 (K) 목차 소프트웨어 라이센스 계약 3 무선 연결 사용 시 참고 사항 4 보안 관련 참고 사항 6 소프트웨어 요구 사항 12 시스템 요구 사항 12 Wireless
안전을 위한 주의사항 제품을 올바르게 사용하여 위험이나 재산상의 피해를 미리 막기 위한 내용이므로 반드시 지켜 주시기 바랍니다. 2 경고 설치 관련 지시사항을 위반했을 때 심각한 상해가 발생하거나 사망에 이를 가능성이 있는 경우 설치하기 전에 반드시 본 기기의 전원을
 Digital Video Recorder 간편설명서 XD3316 안전을 위한 주의사항 제품을 올바르게 사용하여 위험이나 재산상의 피해를 미리 막기 위한 내용이므로 반드시 지켜 주시기 바랍니다. 2 경고 설치 관련 지시사항을 위반했을 때 심각한 상해가 발생하거나 사망에 이를 가능성이 있는 경우 설치하기 전에 반드시 본 기기의 전원을 차단하고, 전원 플러그를 동시에
1. What is AX1 AX1 Program은 WIZnet 사의 Hardwired TCP/IP Chip인 iinchip 들의성능평가및 Test를위해제작된 Windows 기반의 PC Program이다. AX1은 Internet을통해 iinchip Evaluation
 1. What is AX1 AX1 Program은 WIZnet 사의 Hardwired TCP/IP Chip인 iinchip 들의성능평가및 Test를위해제작된 Windows 기반의 PC Program이다. AX1은 Internet을통해 iinchip Evaluation Board(EVB B/D) 들과 TCP/IP Protocol로연결되며, 연결된 TCP/IP
11111111111111111111111111111111111111111111111111111111111111111111111111111
 서울시 금천구 가산동 448 대륭테크노타운 3차 301호 전화 : (02)838-0760 팩스 : (02)838-0782 메일 : [email protected] www.gyrosoft.co.kr www.gyro3d.com 매뉴얼 버전 : 1.00 (발행 2008.6.1) 이 설명서의 어느 부분도 자이로소프트(주)의 승인 없이 일부 또는 전부를 복제하여
The Self-Managing Database : Automatic Health Monitoring and Alerting
 The Self-Managing Database : Automatic Health Monitoring and Alerting Agenda Oracle 10g Enterpirse Manager Oracle 10g 3 rd Party PL/SQL API Summary (Self-Managing Database) ? 6% 6% 12% 55% 6% Source: IOUG
SQL Developer Connect to TimesTen 유니원아이앤씨 DB 기술지원팀 2010 년 07 월 28 일 문서정보 프로젝트명 SQL Developer Connect to TimesTen 서브시스템명 버전 1.0 문서명 작성일 작성자
 SQL Developer Connect to TimesTen 유니원아이앤씨 DB 팀 2010 년 07 월 28 일 문서정보 프로젝트명 SQL Developer Connect to TimesTen 서브시스템명 버전 1.0 문서명 작성일 2010-07-28 작성자 김학준 최종수정일 2010-07-28 문서번호 20100728_01_khj 재개정이력 일자내용수정인버전
Oracle Regular Expression
 Installing Oracle Cloud Control 12c on Oracle Linux 6.1 SEUNGCHEOL HAN 설치에앞서 현재설치과정은 Oracle Linux Enterprise 6.1 (64bit) 에서진행됩니다. Oracle Cloud Control 12c 설치를위해 Repository DB 로사용할 Oracle 11g R2 (11.2.0.3)
GNU/Linux 1, GNU/Linux MS-DOS LOADLIN DOS-MBR LILO DOS-MBR LILO... 6
 GNU/ 1, qkim@pecetrirekr GNU/ 1 1 2 2 3 4 31 MS-DOS 5 32 LOADLIN 5 33 DOS- LILO 6 34 DOS- 6 35 LILO 6 4 7 41 BIOS 7 42 8 43 8 44 8 45 9 46 9 47 2 9 5 X86 GNU/LINUX 10 1 GNU/, GNU/ 2, 3, 1 : V 11, 2001
PowerPoint 프레젠테이션
 Reasons for Poor Performance Programs 60% Design 20% System 2.5% Database 17.5% Source: ORACLE Performance Tuning 1 SMS TOOL DBA Monitoring TOOL Administration TOOL Performance Insight Backup SQL TUNING
,,,,,, (41) ( e f f e c t ), ( c u r r e n t ) ( p o t e n t i a l difference),, ( r e s i s t a n c e ) 2,,,,,,,, (41), (42) (42) ( 41) (Ohm s law),
 ( e f f e c t ), ( c u r r e n t ) ( p o t e n t i a l difference),, ( r e s i s t a n c e ) 2,,,,,,,, (41), (42) (42) ( 41) (Ohm s law),") 1, 2, 3, 4, 5, 6 7 8 PSpice EWB,, ,,,,,, (41) ( e f f e c t ), ( c u r r e n t ) ( p o t e n t i a l difference),, ( r e s i s t a n c e ) 2,,,,,,,, (41), (42) (42) ( 41) (Ohm s law), ( ),,,, (43) 94 (44)
1, 2, 3, 4, 5, 6 7 8 PSpice EWB,, ,,,,,, (41) ( e f f e c t ), ( c u r r e n t ) ( p o t e n t i a l difference),, ( r e s i s t a n c e ) 2,,,,,,,, (41), (42) (42) ( 41) (Ohm s law), ( ),,,, (43) 94 (44)
Microsoft Word - 10g RAC on Win2k.doc
 10g RAC on Win2K Document Control Date Author Change References 2006-03-30 신종근 초기작성함 1-1 ** Agenda 1. 작업목적 Down-Time 최소화!! 2. Pre-Install 환경 3. CRS Install 4. DBMS S/W Install 5. 9i 10g Upgrade 6. 문제점및주의사항
Microsoft PowerPoint - comp_prac_081223_2.pptx
 Computer Programming Practice (2008 Winter) Practice 2 기본 Unix/Linux 명령어숙지 2008. 12. 23 Contents Linux commands Basic commands File and Directory User Data Filtering Process Etc Conclusion & Recommended
VZ94-한글매뉴얼
 KOREAN / KOREAN VZ9-4 #1 #2 #3 IR #4 #5 #6 #7 ( ) #8 #9 #10 #11 IR ( ) #12 #13 IR ( ) #14 ( ) #15 #16 #17 (#6) #18 HDMI #19 RGB #20 HDMI-1 #21 HDMI-2 #22 #23 #24 USB (WLAN ) #25 USB ( ) #26 USB ( ) #27