CM indd
|
|
|
- 나나 원
- 7 years ago
- Views:
Transcription


1 HP Designjet 4520/4520ps Printer Assembly Instructions Scanner (mfp only)/ 掃描器掃描器 ( 僅限 ( 僅限 mfp ) / 스캐너 (mfp 전용 ) / Scanner (hanya mfp) Read these instructions carefully... What you will need for this procedure HP Designjet 4520/4520ps 印表機系列組裝說明 - Because some of the components of the printer are bulky, you will need up to four people to lift them. When this is necessary, this symbol is displayed: - To assemble the printer you will need at least 3 5 m (10 16 ft) of empty floor space, and about four hours. 10 cm 179 cm HP Designjet 4520/4520ps 프린터시리즈조립지침서 HP Designjet 4520/4520ps Petunjuk Perakitan HP Designjet 4520 with Scanner. If you have bought the HP Designjet 4520 with a scanner, you can reduce the overall setup time by assembling the scanner first and then switching it on. The scanner will take one hour to warm up when started for the first time. 具備掃描器功能的 HP Designjet 4520 如果您已購買具備掃描器功能的 HP Designjet 4520, 先組裝掃描器並開啟掃描器電源, 可降低整體的設定時間 初次啟動時, 掃描器會使用一個小時的時間來預熱 스캐너가있는 HP Designjet 4520 스캐너가있는 HP Designjet 4520 을구매한경우스캐너를먼저조립한다음전원을켜면전체설치시간을단축할수있습니다. 스캐너를처음시작할때예열하는데한시간이걸립니다. Printer HP Designjet 4520 dengan Scanner. Jika Anda telah membeli HP Designjet 4520 dengan scanner, Anda dapat mengurangi waktu persiapan awal keseluruhan dengan merakit scanner terlebih dahulu kemudian mengaktifkannya. Scanner akan memerlukan waktu pemanasan sekitar satu jam saat diaktifkan untuk pertama kali.? In case of difficulty, please consult: - Your printer s Embedded Web Server - Driver and Documentation CD 如果有問題, 請參閱 : 印表機的嵌入式 Web 伺服器驅動程式與說明文件 CD 請仔細閱讀下列說明... 執行此程序需知由於某些印表機元件的體積很大, 您可能需要多達四個人來搬動 如有必要, 會顯示下列符號 : 組裝印表機需要至少 3 5 公尺 (10 16 英呎 ) 的空置地面, 以及大約四個小時的時間 본지침서를꼼꼼히읽어보십시오. 이절차에서필요한사항일부프린터부품은부피가크기때문에들어올리는데최대 4 명이있어야합니다. 이러한상황에대한기호는다음과같이표시됩니다. 프린터를조립하려면적어도 3 x 5m (10 x 16 피트 ) 의빈공간이있어야하며조립하는데 4 시간정도가걸립니다. Bacalah petunjuk ini dengan seksama... Apa yang akan Anda perlukan untuk prosedur ini - Mengingat beberapa komponen printer cukup besar, Anda akan memerlukan empat orang untuk mengangkatnya. Bila hal ini diperlukan, simbol ini ditampilkan: - Untuk merakit printer Anda akan memerlukan ruang lantai kosong setidaknya 3 5 m (10 16 ft), dan sekitar empat jam. Printer working area Before you start unpacking, consider where you are going to put the assembled printer. You should allow some clear space at the back and at the front of the printer. The recommended clearances are shown in the illustration above. 印表機工作區拆開包裝箱之前, 請考慮好用來放置組裝印表機的位置 印表機前後均應留出空間 建議留出的空間距離如上圖所示 프린터작동영역포장을풀기전에조립된프린터를놓을위치를고려합니다. 프린터가놓일앞 / 뒤에는약간의빈공간이있어야합니다. 권장되는공간크기는위의그림에나와있습니다. Daerah kerja printer Sebelum mulai membuka kemasan, pertimbangkan di mana Anda akan menempatkan printer. Anda harus menyediakan cukup ruang kosong di belakang dan di depan printer. Jarak ruang yang dianjurkan ditampilkan pada ilustrasi di atas Hewlett-Packard Company Inkjet Commercial Division Avenida Graells Sant Cugat del Vallès Barcelona Spain All rights reserved Printed in Germany Imprimé en Allemagne Stampato in Germania 문제가있을경우문의하시기바랍니다. 프린터의내장웹서버드라이버및설명서 CD Jika mengalami kesulitan, harap merujuk pada: - Server Web Terpadu printer Anda - CD Driver dan Dokumentasi x4

 Kotak suplai sekali pakai, termasuk Kit Perawatan (harap disimpandi tempat yang aman) Spare box (used on page I and J of these setup instructions) 備用箱 ( 用於安裝說明的第 I 和 J 頁 ) 예비박스 ( 이설치지침서의페이지 I")
 Cut the strap around the boxes carefully, as the boxes may fall as soon as the strap is cut. 小心地剪斷綁住箱子的綑紮帶, 因為綑紮帶一剪斷, 箱子可能就會掉落 박스를둘러싸고있는끈이잘리자마자바로박스가떨어져나가므로이끈을조심해서자릅니다.")
2 The shapes on the boxes identify the contents. 您可以透過包裝箱上的形狀標記識別箱中的內容物 박스위에새겨진다음모양으로내용물을식별합니다. Bentuk kotak menunjukkan isinya. Mark on box 包裝箱上的標記박스에새겨진표시 Tanda pada kotak Contents of box 包裝箱中的內容物박스내용물 Isi kotak Printer body 印表機機身프린터본체 Badan printer Stand and bin assembly 支架與紙槽組件스탠드및용지함조립품 Dudukan dan rakitan nampan Consumables box, including Maintenance Kit (please keep this safe) 耗材箱, 包括 維護套件 ( 請妥善保存此套件 ) 유지보수키트가들어있는소모품박스 ( 이박스를안전하게유지하십시오.) Kotak suplai sekali pakai, termasuk Kit Perawatan (harap disimpandi tempat yang aman) Spare box (used on page I and J of these setup instructions) 備用箱 ( 用於安裝說明的第 I 和 J 頁 ) 예비박스 ( 이설치지침서의페이지 I 및J에서사용됨 ) Kotak suku cadang (digunakan pada halaman I dan J dari petunjuk pengaturan awal ini) Roll module 捲筒模組롤모듈 Modul gulungan Scanner body (mfp only) 掃描器機身 ( 僅限 mfp ) 스캐너본체 (mfp 전용 ) Badan scanner (hanya mfp) Cut the strap around the boxes carefully, as the boxes may fall as soon as the strap is cut. 小心地剪斷綁住箱子的綑紮帶, 因為綑紮帶一剪斷, 箱子可能就會掉落 박스를둘러싸고있는끈이잘리자마자바로박스가떨어져나가므로이끈을조심해서자릅니다. Potong tali pengikat di sekeliling kotak dengan hati-hati, karena kotak mungkin jatuh begitu tali dipotong. Preliminary unpacking: Outside Europe 初步拆封歐洲以外사전포장풀기유럽외지역 Persiapan membuka kemasan Di luar Eropa Preliminary unpacking: Europe 初步拆封歐洲사전포장풀기유럽 Persiapan membuka kemasan Eropa Scanner stand (mfp only) 掃描器支架 ( 僅限 mfp ) 스캐너스탠드 (mfp 전용 ) Dudukan scanner (hanya mfp)

.")


3 x2 1 1 x2 2 3 Remove all the upper four plastic handles from both sides of the box (two each side). Carefully fold the two side lids up onto the top of the box as shown, then remove the two boxes. 從包裝箱兩側的上方取出四個塑膠把手 ( 每側各兩個 ) 如圖所示, 小心地將個側蓋向上折到箱子頂部, 然後取下兩個箱子 박스양쪽 ( 각각 2 개씩 ) 상단에있는플라스틱손잡이 4 개를모두제거합니다. 위에서보는것처럼 2 개의사이드덮개를박스위쪽으로주의해서접은다음, 박스 2 개를제거합니다. Lepaskan keempat tangkai plastik dari kedua sisi kotak (dua di setiap sisi). Dengan hati-hati lipat kedua penutup samping ke atas kotak seperti ditunjukkan, kemudian keluarkan kedua kotak di samping. Remove the 2 lids. Place the consumables and spare boxes in front of the printer body. Then lower the stand and bin box onto the consumables and spare boxes. 卸下 2 個護蓋 將耗材箱和備用箱放印表機機身前方 然後將支架與紙槽箱置於耗材箱和備用箱之上 2 개의덮개를제거합니다. 소모품박스와예비박스를프린터본체앞에놓습니다. 그런다음스탠드및용지함조립품박스를소모품박스와예비박스에내려놓습니다. Lepaskan kedua penutup. Letakkan kotak suplai sekali pakai dan suku cadang di depan badan printer. Kemudian turunkan kotak dudukan dan nampan ke atas kotak suplai sekali pakai dan suku cadang. Lower the roll module box onto the consumables and spare boxes. Then lower the roll module box onto the floor. Then remove the consumables and spare boxes. 將捲筒模組置於耗材箱和備用箱之上 接著將捲筒模組放到地板上 然後移開耗材箱和備用箱 롤모듈박스를소모품박스와예비박스에내려놓습니다. 그럼다음롤모듈박스를바닥에내려놓습니다. 그런다음소모품박스와예비박스를제거합니다. Turunkan kotak modul gulungan ke atas kotak suplai sekali pakai dan suku cadang. Kemudian turunkan kotak modul gulungan ke lantai. Kemudian singkirkan kotak suplai sekali pakai dan suku cadang.


4 Remove the main printer box. 卸下主印表機包裝箱 메인프린터박스를제거합니다. Keluarkan kotak utama printer. Remove the two packing pieces. 取出兩個包裝墊塊 보호용마개 2개를제거합니다. Keluarkan kedua bantalan pengiriman. When you are unpacking the stand assembly, you will see that there is anti-slip material around two of the wheels on the feet. DO NOT REMOVE this material yet. 拆封支架組件的包裝時, 您將會看到包住兩個腳輪的防滑材料 請先勿去除此材料 Remove the first tray containing the parts for the bin. 取出內含紙槽零件的第一個紙匣 용지함부품이들어있는첫번째용지함을꺼냅니다. 스탠드조립품의포장을풀어보면발에있는바퀴 2 개에미끄럼방지재가부착되어있습니다. 이방지재를아직제거하지마십시오. Keluarkan baki pertama yang berisi komponen nampan. Saat membuka rakitan dudukan, Anda akan melihat bahan anti-slip di sekeliling kedua roda kaki. JANGAN LEPASKAN bahan ini pada tahap ini.


![Dari baki kedua, keluarkan kedua kotak bertanda L [Ki] dan R [Ka]. Letakkan keduanya di lantai seperti ditunjukkan.](/docs-images/62/48374513/images/5-3.jpg "Lower the cross-brace on to the L and R boxes. 將橫形支撐架放下至 L 與 R 包裝箱上 가로버팀대를 L 과 R 이표시된박스에내려놓습니다.")
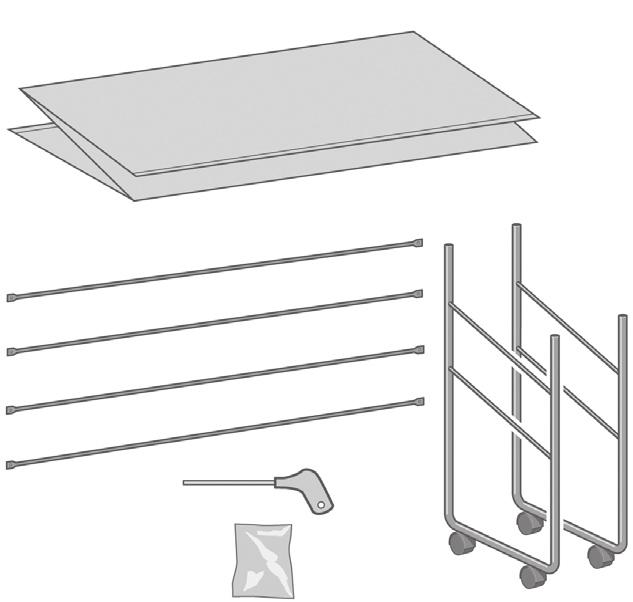
5 Two holes/ 兩個孔구멍 2 개 Dua lubang One hole 一個孔구멍 1개 Satu lubang Right/ 右오른쪽 Kanan Left/ 左왼쪽 / Kiri Remove the second tray from the stand and bin assembly box. This tray contains the stand legs. 從支架與紙槽組件箱內取出第二個紙匣 此紙匣內含支架腳 스탠드및용지함조립품박스에서두번째용지함을꺼냅니다. 이용지함에는스탠드다리가들어있습니다. Keluarkan baki kedua dari kotak dudukan dan rakitan nampan. Baki ini berisi kaki dudukan. From the second tray, remove the two boxes marked with L and R. Place them on the floor as shown. 從第二個紙匣內取出標有 L 與 R 的兩個包裝箱, 並如下所示將其放在地板上 두번째용지함에서 L 과 R 이표시된박스 2 개를제거합니다. 위에서보는것처럼이 2 개의박스를바닥에놓습니다. Dari baki kedua, keluarkan kedua kotak bertanda L [Ki] dan R [Ka]. Letakkan keduanya di lantai seperti ditunjukkan. Lower the cross-brace on to the L and R boxes. 將橫形支撐架放下至 L 與 R 包裝箱上 가로버팀대를 L 과 R 이표시된박스에내려놓습니다. Turunkan penahan-silang di atas kotak L [Ki] dan R [Ka]. You now need to identify which is the left and the right side of the cross-brace. 您需要識別橫形支撐架的左側與右側 가로버팀대의왼쪽면과오른쪽면을확인해야합니다. Anda perlu mengenali mana sisi kiri [left] dan kanan [right] penahan-silang.

 及右腳架 (B) 取下左腳架的兩個腳架護蓋 위에서보는것처럼왼쪽다리 (A) 와오른쪽다리 (B) 를확인합니다. 왼쪽다리에서다리덮개 2 개를제거합니다.")


6 Now you will need the bag of screws and the screwdriver provided. You may notice that the screwdriver is slightly magnetic. 此時, 您將需要隨附的一袋螺絲與螺絲起子 您可能會發現螺絲起子略帶磁性 이제나사와드라이버가들어있는주머니가필요합니다. 드라이버가약간의자성을띠고있음을알수있습니다. Sekarang Anda memerlukan tas sekrup dan obeng yang tersedia. Anda mungkin melihat bahwa obeng sedikit berdaya magnet. Identify the left leg (A) and the right leg (B) as shown above. Remove the two leg covers from the left leg. 如上所示找到左腳架 (A) 及右腳架 (B) 取下左腳架的兩個腳架護蓋 위에서보는것처럼왼쪽다리 (A) 와오른쪽다리 (B) 를확인합니다. 왼쪽다리에서다리덮개 2 개를제거합니다. Kenali kaki kiri (A) dan kaki kanan (B) seperti ditunjukkan di atas. Lepaskan kedua penutup kaki dari kaki kiri. Lower the left leg onto the left side of the crossbrace. The left leg will fit only on the left side of the cross-brace. 將左腳架放下至橫形支撐架的左側上 左腳架只能裝在橫形支撐架的左側 왼쪽다리를가로버팀대의왼쪽면에내려놓습니다. 왼쪽다리는가로버팀대의왼쪽면에만맞습니다. Turunkan kaki kiri ke sebelah kiri penahansilang. Kaki kiri hanya akan tepat pada sisi kiri penahan-silang. Fix the left leg to the cross-brace using four screws on the inner side of the leg. 用腳架內側的四顆螺絲將左腳架固定到橫形支撐架上 다리안쪽에있는나사 4 개를사용하여왼쪽다리를가로버팀대에고정시킵니다. Kencangkan kaki kiri ke penahan-silang menggunakan empat sekrup pada sisi dalam kaki.


7 Fix the left leg to the cross-brace using two screws on the outer side of the leg. 用腳架外側的兩顆螺絲將左腳架固定到橫形支撐架上 다리바깥쪽에있는나사 2 개를사용하여왼쪽다리를가로버팀대에고정시킵니다. Kencangkan kaki kiri ke penahan-silang menggunakan dua sekrup pada sisi luar kaki. Lower the right leg onto the right side of the crossbrace. The right leg will fit only on the right side of the cross-brace. 將右腳架放下至橫形支撐架的右側上 右腳架只能裝到橫形支撐架的右側 오른쪽다리를가로버팀대의오른쪽면에내려놓습니다. 오른쪽다리는가로버팀대의오른쪽면에만맞습니다. Turunkan kaki kanan ke sebelah kanan penahansilang. Kaki kanan hanya akan tepat pada sisi kanan penahan-silang. Fix the right leg to the cross-brace using four screws on the inner side of the leg. 用腳架內側的四顆螺絲將右腳架固定到橫形支撐架上 다리안쪽에있는나사 4 개를사용하여오른쪽다리를가로버팀대에고정시킵니다. Kencangkan kaki kanan ke penahan-silang menggunakan empat sekrup pada sisi dalam kaki. Fix the right leg to the cross-brace using two screws on the outer side of the leg. 用腳架外側的兩顆螺絲將右腳架固定到橫形支撐架上 다리바깥쪽에있는나사 2 개를사용하여오른쪽다리를가로버팀대에고정시킵니다. Kencangkan kaki kanan ke penahan-silang menggunakan dua sekrup pada sisi luar kaki.


8 Fix the stand cross-bar using four screws. 用四顆螺絲固定支架橫桿 Position a foot on the left leg. There are pins to help you to position the foot correctly. Do not remove the anti-slip material from the wheel. Fix the left foot using four screws. 用四顆螺絲固定左側支腳 Position a foot on the right leg. There are pins to help you to position the foot correctly. Do not remove the anti-slip material from the wheel. 나사 4 개를사용하여스탠드크로스바를고정시킵니다. Kencangkan penahan-silang dudukan menggunakan empat sekrup. 定位左腳架上的支腳 支腳上有插腳可協助您正確定位支腳 請勿撕下腳輪上的防滑材料 발을왼쪽다리에끼워넣습니다. 핀으로발을정확히끼워넣습니다. 바퀴의미끄럼방지재를제거하지마십시오. 나사 4 개를사용하여왼쪽발을고정시킵니다. Kencangkan pijakan kiri menggunakan empat sekrup. 定位右腳架上的支腳 支腳上有插腳可協助您正確定位支腳 請勿撕下腳輪上的防滑材料 발을오른쪽다리에끼워넣습니다. 핀으로발을정확히끼워넣습니다. 바퀴의미끄럼방지재를제거하지마십시오. Pasang pijakan pada kaki kiri. Tersedia pin untuk membantu Anda memasang pijakan dengan benar. Jangan lepaskan bahan anti-slip dari roda. Pasang pijakan pada kaki kanan. Tersedia pin untuk membantu Anda memasang pijakan dengan benar. Jangan lepaskan bahan antislip dari roda.


9 x2 Left Leg/ 左腳架왼쪽다리 / Kaki kiri Right Leg/ 右腳架오른쪽다리 / Kaki kanan Fix the right foot using four screws. 用四顆螺絲固定右側支腳 나사 4 개를사용하여오른쪽발을고정시킵니다. Kencangkan pijakan kanan menggunakan empat sekrup. Turn the stand assembly into an upright position as shown above. 如上圖所示, 將支架組件翻轉至直立位置 위에서보는것처럼스탠드조립품을수직으로돌려놓습니다. Putar rakitan dudukan ke posisi tegak seperti ditunjukkan. Open the box containing the roll module. Remove the plastic bag containing the screws. 打開裝有捲筒模組的包裝箱 取出裝有螺絲的塑膠袋 롤모듈이들어있는박스를엽니다. 나사가들어있는비닐주머니를꺼냅니다. Buka kotak yang berisi modul gulungan. Keluarkan kotak plastik yang berisi sekrup. Please take note of the colored plugs located on the legs. 請注意腳架上的彩色插栓 왼쪽다리의파란색플러그를제거합니다. Harap memperhatikan sumbat berwarna pada kaki.


10 Remove the blue plug on the left leg. Locate the pin into the left leg. Remove the blue plug on the right leg. Locate the pin into the right leg. 取下左腳架上的藍色插栓 將插腳插入左腳架 取下右腳架上的藍色插栓 將插腳插入右腳架 왼쪽다리의파란색플러그를제거합니다. 핀을왼쪽다리에끼워넣습니다. 오른쪽다리의파란색플러그를제거합니다. 핀을오른쪽다리에끼워넣습니다. Lepaskan sumbat biru pada kaki kiri. Masukkan pin ke kaki kiri. Lepaskan sumbat biru pada kaki kanan. Masukkan pin ke kaki kanan.


11 Remove the top yellow plug on the left leg. Locate the pin into the interior of the left leg. Remove the top yellow plug on the right leg. Locate the pin into the interior of the right leg. 取下左腳架上位置較高的黃色插栓 將插腳插入左腳架內側 取下右腳架上位置較高的黃色插栓 將插腳插入右腳架內側 왼쪽다리의위쪽노란색플러그를제거합니다. Lepaskan sumbat atas kuning pada kaki kiri. 핀을왼쪽다리안쪽으로끼워넣습니다. Masukkan pin ke sisi dalam kaki kiri. 오른쪽다리의위쪽노란색플러그를제거합니다. Lepaskan sumbat atas kuning pada kaki kanan. 핀을오른쪽다리안쪽으로끼워넣습니다. Masukkan pin ke sisi dalam kaki kanan.

![此時, 您需要識別印表機的左側與右側 此資訊顯示在側邊的泡沫包裝材料上 您還需要識別印表機的背面 이제프린터의왼쪽과오른쪽을확인해야합니다. 이정보는스티로폼팩끝에나와있습니다. 또한프린터뒷면도확인하십시오. Anda perlu mengenali mana sisi kiri [left] dan kanan [right] printer.](/docs-images/62/48374513/images/12-1.jpg "Informasi ini terdapat pada bantalan gabus di ujung. Kenali juga bagian belakang [rear] printer. Pull open the protective plastic from the base of the printer.")


12 Do not replace these screws after 44 removal!/ 請勿在卸除後重新插入這些螺絲! / 이나사를푼다음다시삽입하지마십시오. / Jangan masukkan kembali sekrup ini setelah dilepaskan! You now need to identify the left and right of the printer. This information is shown on the foam end packs. Also identify the rear of the printer. 此時, 您需要識別印表機的左側與右側 此資訊顯示在側邊的泡沫包裝材料上 您還需要識別印表機的背面 이제프린터의왼쪽과오른쪽을확인해야합니다. 이정보는스티로폼팩끝에나와있습니다. 또한프린터뒷면도확인하십시오. Anda perlu mengenali mana sisi kiri [left] dan kanan [right] printer. Informasi ini terdapat pada bantalan gabus di ujung. Kenali juga bagian belakang [rear] printer. Pull open the protective plastic from the base of the printer. Please ensure that there is a threemeter space clear of obstructions to the rear of the printer and one meter at the front of the printer. Remove the two desiccant bags from the printer. 從印表機底部拉開保護塑膠袋 請確保距離印表機背面三公尺以及正面一公尺的範圍內沒有任何障礙物 取出印表機內的兩包乾燥劑 프린터의밑판에서안전플라스틱을당겨엽니다. 프린터후면으로 3 미터의빈공간과전면으로 1 미터공간이있는지확인합니다. 프린터에서방습제주머니 2 개를제거합니다. Tarik untuk membuka plastik pelindung dari alas printer. Harap pastikan bahwa tersedia jarak ruang bebas hambatan tiga-meter di belakang printer dan satu meter di depan printer. Keluarkan dua kantung dessicant dari printer. Using the screwdriver supplied, remove the two screws that hold Drawer 1 in place. Note: the screws are only for transit, they are not to be replaced. 使用提供的螺絲起子, 取下固定 1 號安裝盒的兩顆螺絲 注 : 該螺絲僅用於運輸用途, 並非用於更换 제공된드라이버를사용하여드로어 1 을고정시킨나사 2 개를풉니다. 주 : 이나사는운반용이며다른나사로대체될수없습니다. Dengan menggunakan obeng yang disertakan, lepaskan kedua sekrup yang menahan Laci 1 di tempatnya. Catatan: sekrup ini hanya untuk pengiriman, tidak perlu dipasang kembali. Slide Drawer 1 out until it touches the foam packaging. 向外滑出 1 號安裝盒, 直到接觸到泡沫包裝材料 드로어 1 을스티로폼포장지에닿을때까지밖으로밀어냅니다. Geser Laci 1 keluar sampai menyentuh gabus kemasan.


13 Left Leg/ 左腳架왼쪽다리. / Kaki kiri x2 Right Leg/ 右腳架오른쪽다리. / Kaki kanan Advance warning: in the next step, make sure you position the stand pins in the holes in the center of the printer body brackets. 事先警告 : 下一步驟中, 請確定將支架插腳與印表機機身托架中間的孔對齊 사전경고 : 다음단계에서스탠드핀을프린터본체브래킷가운데있는구멍에끼워넣었는지확인합니다. Peringatan awal: pada langkah berikutnya, pastikan Anda memasang pin dudukan pada lubang di tengah braket badan printer. Lift the stand assembly onto the printer body. The anti-slip material should face to the rear of the printer. 將支架組件放到印表機機身上 綠色箭頭指示的位置處理此設備 應將防滑材料朝向印表機背面 스탠드조립품을프린터본체쪽으로들어올립니다. 미끄럼방지재가프린터후면을향하게해야합니다. Angkat rakitan dudukan ke badan printer. Bahan anti-slip harus menghadap ke bagian belakang printer. Fix the right side of the stand to the printer using one screw. Make sure that the screw is fully tightened. 用一顆螺絲將支架右側固定到印表機上 確定已旋緊螺絲 나사 1 개를사용하여스탠드오른쪽을프린터에고정시킵니다. 나사가단단히고정되었는지확인합니다. Kencangkan sisi kanan dudukan ke printer menggunakan satu sekrup. Pastikan bahwa sekrup dikencangkan sepenuhnya. Slide Drawer 1 forwards to gain better access for the front screw. Fix the left side of the stand to the printer using two screws. Make sure that the screws are fully tightened. 向前滑出 1 號安裝盒, 以便接觸前面的螺絲 用兩顆螺絲將支架左側固定到印表機上 確定已旋緊螺絲 앞쪽나사에접근이쉽도록드로어 1 을앞으로밀어냅니다. 나사 2 개를사용하여스탠드왼쪽을프린터에고정시킵니다. 나사가단단히고정되었는지확인합니다. Geser Laci 1 ke depan untuk memudahkan akses ke sekrup depan. Kencangkan sisi kiri dudukan ke printer menggunakan dua sekrup. Pastikan bahwa sekrup dikencangkan sepenuhnya.


14 x4 Important information 重要資訊중요정보 Informasi penting Before unpacking the roll module, note that you should only handle this piece of equipment using the points indicated by the green arrows shown above. 拆開捲筒模組包裝之前, 請注意只能按上述綠色箭頭指示的位置處理此設備 롤모듈의포장을풀기전에위에서보는것처럼녹색화살표로표시된지점만을이용해서본장비를처리해야한다는점에유의하십시오. Open the box containing the roll module, then remove the two foam supports. 打開裝有捲筒模組的包裝箱, 然後取下兩個泡沫支撐包裝材料 롤모듈이있는박스를연다음, 폼지지대 2 개를제거합니다. Buka kotak yang berisi modul gulungan, kemudian keluarkan kedua bantalan gabus. Remove the roll module from the packaging box. 從包裝箱中取出捲筒模組 포장박스에서롤모듈을꺼냅니다. Keluarkan modul gulungan dari kotak kemasan. Remove the roll module from the plastic bag. 從塑膠袋中取出捲筒模組 비닐주머니에서롤모듈을꺼냅니다. Keluarkan modul gulungan dari kantong plastik. Sebelum membuka kemasan modul gulungan, perhatikan bahwa Anda harus memegang peralatan ini hanya di titik yang ditunjukkan oleh anak panah hijau di atas.


15 x4 x4 Rear of the printer/ 印表機後方프린터후면 / Bagian belakang printer Remove the remaining two yellow plugs from the left and right legs. It is important to remember the positions of these holes. 從左右腳架上取下剩餘的兩個黃色插栓 請務必記住這些孔的位置 왼쪽다리와오른쪽다리에남아있는노란색플러그 2 개를제거합니다. 이구멍의위치를기억해두는것이중요합니다. Keluarkan dua sumbat kuning yang tersisa dari kaki kiri dan kanan. Penting untuk mengingat posisi dari lubang tersebut. Turn the roll module over into an inverted position as shown above. Then carry it to the front of the inverted printer. 如上圖所示, 將捲筒模組翻轉至倒置位置, 然後將其移至翻轉的印表機的前方 위에서보는것처럼롤모듈을뒤집혀진모양으로돌린다음뒤집혀진프린터앞으로옮깁니다. Putar modul gulungan ke posisi terbalik seperti ditunjukkan. Kemudian bawa ke depan printer yang terbalik. Rest the roll module next to the first printer crossbar. 將捲筒模組放在第一個印表機橫桿旁邊 롤모듈을첫번째프린터크로스바옆에놓습니다. Sandarkan modul gulungan di samping palang silang pertama printer. Before the roll module is moved into its final position, please note that the roll module should sit on the pins that were located on the stand legs earlier. 將捲筒模組移入定位之前, 請注意應將其置於早先插入支架腳架的插腳上 롤모듈을최종위치로이동하기전에롤모듈은앞서스탠드다리에있던핀위에있어야한다는점에유의하십시오. Sebelum modul gulungan dipindahkan ke posisi akhir, harap diperhatikan bahwa modul harus didudukkan pada pin yang disebutkan di atas pada dudukan.


16 x3 x2 x1 Three people are needed, two at the front and one at the rear of the printer. The two at the front should lift the roll module and then, with the help of the third person at the rear, lower it vertically onto the pins located earlier on the stand. 需要三個人, 兩位在印表機前方, 一位在後方 前方的兩位員應該舉起捲筒模組, 然後在後方人員的協助下, 將捲筒模組垂直往下放到之前插入支架的插腳上 Look at the front of the roll module and check that it comes close to the legs of the stand. 觀察捲筒模組前端, 確認它接近支架腳架 롤모듈의앞을보고롤모듈이스탠드다리에가까워졌는지확인합니다. Lihat bagian depan modul gulungan dan periksa apakah sudah dekat dengan kaki dudukan. Fix the roll module to the right leg of the stand using two additional screws. 將捲筒模組固定到支架的右腳架上 나사 2 개를추가로사용하여롤모듈을스탠드의오른쪽다리에고정시킵니다. Kencangkan modul gulungan ke kaki kanan dudukan. Fix the roll module to the left leg of the stand using two collar-headed screws. 將捲筒模組固定到支架的左腳架上 색으로표시된머리나사 2 개를사용해서롤모듈을스탠드의왼쪽다리에고정시킵니다. Kencangkan modul gulungan ke kaki kiri dudukan. 총세사람이필요하며두사람은프린터앞에한사람은프린터뒤에있어야합니다. 프린터앞에두사람은롤모듈을들어올린다음프린터뒤에있는세번째사람의도움으로프린터를앞서스탠드에있던핀위에수직으로내려놓습니다. Dibutuhkan tiga orang, dua di depan dan satu di belakang printer. Kedua orang di depan harus mengangkat modul gulungan kemudian, dengan dibantu orang ketiga di belakang, menurunkannya secara vertikal ke pin yang disebutkan di atas pada dudukan.


17 x4 Fix the roll module to the right leg of the stand. 用另外兩顆螺絲將捲筒模組固定到支架的右腳架上 롤모듈을스탠드의오른쪽다리에고정시킵니다. Kencangkan modul gulungan ke kaki kanan dudukan menggunakan dua sekrup tambahan. Fix the roll module to the left leg of the stand. 用兩顆環頭螺絲將捲筒模組固定到支架的左腳架上 롤모듈을스탠드의왼쪽다리에고정시킵니다. Kencangkan modul gulungan ke kaki kiri dudukan menggunakan dua sekrup kepala kupu-kupu. Place the spare and consumables boxes against the rear of the printer box. The arrows on the boxes must point towards the printer box. Check that the anti-slip material is still fixed to the two rear wheels. 將備用箱和耗材箱靠在印表機箱的背面 備用箱和耗材箱上的箭頭必須指向印表機箱 檢查防滑材料是否仍固定在兩個後腳輪上 예비박스및소모품박스를프린터박스뒤에놓습니다. 박스의화살표가프린터박스쪽을향해야합니다. 미끄럼방지재가뒷바퀴 2 개에그대로고정되어있는지확인합니다. Using four people, rotate the printer on to the spare and consumables boxes. 四個人合作將印表機翻轉到備用箱和耗材箱上 네사람을동원하여프린터를예비박스및소모품박스쪽으로회전시킵니다. Dibutuhkan empat orang, putar printer ke atas kotak suku cadang dan kotak suplai sekali pakai. Letakkan kotak suku cadang dan suplai sekali pakai menempel belakang kotak printer. Panah pada kotak harus mengarah ke kotak printer. Periksa apakah bahan anti-slip masih terpasang pada kedua roda belakang.


18 x4 Rotate the printer until its rear rests on the spare and consumables boxes and the wheels with the anti-slip material touch the floor. 翻轉印表機, 直到其背面靠在備用箱和耗材箱上, 而帶有防滑材料的腳輪觸及地板 프린터뒤가예비박스및소모품박스에오고미끄럼방지재가있는바퀴가바닥에닿을때까지프린터를회전시킵니다. Putar printer sampai bagian belakangnya menumpu pada kotak suku cadang dan suplai sekali pakai dan roda dengan bahan anti-slip menyentuh lantai. Remove the pallet before trying to lift the printer into an upright position. 先移走貨架, 再嘗試將印表機抬起成直立的姿勢 프린터를수직으로들어올리기전에팔레트를제거합니다. Lepaskan palet sebelum mencoba menegakkan printer. Using four people and the hand holds on the rear of the printer body, carefully lift the printer into an upright position. 四個人合作, 握住印表機機身的背面, 小心地將印表機抬起成直立的姿勢 네사람을동원하여손으로프린터본체뒤쪽을잡고조심스럽게프린터를수직으로들어올립니다. Dibutuhkan empat orang dengan tangan memegang bagian belakang badan printer, tegakkan printer dengan hati-hati. Rotate the printer into an upright position. The anti-slip material should stop the printer from sliding forwards. 將印表機翻轉至直立姿勢 防滑材料應會阻止印表機向前滑動 프린터를수직으로회전시킵니다. 미끄럼방지재는프린터가앞쪽으로미끄러지지않게해줍니다. Putar printer ke posisi tegak. Bahan antislip seharusnya menahan printer agar tidak bergeser ke depan.

, then clip the rear edge (2) into place.")
, kemudian jepitkan tepi belakang (2) ke tempatnya.")
, 然後將後緣 (2) 卡入定位 오른쪽다리덮개를오른쪽다리앞 (1) 에놓은다음뒤모서리 (2) 에고정합니다.")
19 Remove the two foam end packs and the plastic covering the printer. 取下印表機兩側的泡沫包裝材料與包住印表機的塑膠套 스티로폼팩 2 개와프린터를덮고있는비닐을제거합니다. Keluarkan dua bantalan gabus di ujung dan plastik yang membungkus printer. Position the left leg cover on the front of the left leg (1), then clip the rear edge (2) into place. 將左腳架護蓋與左腳架的前端對齊 (1), 然後將後緣 (2) 卡入定位 왼쪽다리덮개를왼쪽다리앞 (1) 에놓은다음뒤모서리 (2) 에고정합니다. Letakkan penutup kaki kiri di depan kaki kiri (1), kemudian jepitkan tepi belakang (2) ke tempatnya. Position the right leg cover on the front of the right leg (1), then clip the rear edge (2) into place. 將右腳架護蓋與右腳架的前端對齊 (1), 然後將後緣 (2) 卡入定位 오른쪽다리덮개를오른쪽다리앞 (1) 에놓은다음뒤모서리 (2) 에고정합니다. Letakkan penutup kaki kanan di depan kaki kanan (1), kemudian jepitkan tepi belakang (2) ke tempatnya. Remove the anti-slip material from the two rear wheels on the stand assembly. 取下支架組件兩個後腳輪上的防滑材料 스탠드조립품의뒷바퀴 2 개에서미끄럼방지재를제거합니다. Lepaskan bahan anti-slip dari kedua roda belakang rakitan dudukan.


20 Remove the packing tapes 1 to 10. 取下 1 至 10 的包裝膠帶 포장테이프 1에서 10번까지모두제거합니다. Lepaskan pita pengiriman 1 sampai 10. Open the printer window. Then remove the two window inserts and the ink tube packing material. 打開印表機上蓋 然後移除上蓋中的兩個襯墊與墨水管包裝材料 프린터창을엽니다. 2 개의창삽입물및잉크튜브포장재를제거합니다. Buka jendela printer. Kemudian keluarkan dua sisipan jendela dan bahan kemasan tabung tinta. Remove the protective covering from the printer window and the front panel screen. 取下印表機上蓋和前控制面板螢幕上的保護膜 프린터창및제어판화면에서보호용덮개를제거합니다. Lepaskan lapisan pelindung dari jendela printer dan layar panel depan. Open the printhead cleaner door and remove the carriage packing material. Then close the cleaner door. 打開印字頭清潔器擋門, 取出托架包裝材料, 然後合上清潔器擋門 프린트헤드클리너덮개문을열고카트리지포장재를제거한다음클리너덮개문을닫습니다. Buka pintu pembersih kepala cetak dan lepaskan bahan kemasan carriage. Kemudian tutup pintu pembersih.


21 Remove the two yellow plastic screws from the right and left side of the paper feed. Caution: Be very careful when removing. 取下進紙匣左右兩側的兩顆黃色塑膠螺絲 용지공급함의왼쪽과오른쪽에서 2 개의노란색플라스틱나사를제거합니다. Lepaskan kedua sekrup plastik kuning dari sisi kanan dan kiri pengumpan kertas. Remove the two yellow plastic screws from the left and right side of Drawer 2. Caution: Be very careful when removing. 取下 2 號安裝盒左右兩側的兩顆黃色塑膠螺絲 드로어 2 의왼쪽과오른쪽에서 2 개의노란색플라스틱나사를제거합니다. Lepaskan dua sekrup kuning dari sisi kiri dan kanan Laci 2. Using the cable supplied, connect the roll module to the printer. 使用提供的纜線將捲筒模組連接至印表機 제공된케이블을사용하여롤모듈을프린터에연결합니다. Menggunakan kabel yang disertakan, hubungkan modul gulungan ke printer. A Gigabit Ethernet socket is provided for connection to a network. Two FireWire sockets are provided for direct connection to computers. 提供一個可用於網路連線的高速乙太網路插孔, 還提供兩個可用於直接連接電腦的 FireWire 插孔 네트워크에연결하도록 Gigabit Ethernet 소켓이제공됩니다. 컴퓨터에직접연결하도록 FireWire 소켓 2 개가제공됩니다. Soket Gigabit Ethernet tersedia untuk koneksi ke jaringan. Dua soket FireWire tersedia untuk koneksi langsung ke komputer.


 key. 請稍候, 直至出現此訊息 ( 約需要 10 分鐘 ) 使用向上和向下鍵以反白顯示您使用的語言 按下 選擇 (ü) 鍵 이메시지가나타날때까지기다립니다 ( 최대 10 분 ). 위쪽 / 아래쪽화살표키를사용하여해당언어를강조표시합니다. 선택 (ü) 키를누릅니다.")
22 Plug the power cable into the rear of the printer, then plug the other end into the AC power outlet. 將電源線插接至印表機的背面, 然後將另一端插入交流電源插座 전원케이블을프린터뒤에연결한다음다른쪽끝은 AC 전원콘센트에연결합니다. Tancapkan kabel listrik ke bagian belakang printer, lalu tancapkan ujung yang lain ke stopkontak AC. Turn the power switch at the rear of the printer to the on position. 將印表機背面的電源開關切換至開啟的位置 프린터뒤쪽에있는전원스위치를켭니다. Putar saklar daya di bagian belakang printer ke posisi hidup. If the power light on the front panel remains off, press the Power key to switch on the printer. Note: This printer is Energy Star compliant and can be left switched on without wasting energy. Leaving it on improves response time and overall system reliability. 如果前控制面板上的電源指示燈未亮起, 請按下 電源 鍵以開啟印表機電源 註 : 此印表機符合能源之星規範, 電源開啟不會浪費任何能源 電源開啟可以增加反應時間和整體系統穩定性 Wait until you see this message (~10 minutes). Highlight your language using the Up and Down keys. Press the Select (ü) key. 請稍候, 直至出現此訊息 ( 約需要 10 分鐘 ) 使用向上和向下鍵以反白顯示您使用的語言 按下 選擇 (ü) 鍵 이메시지가나타날때까지기다립니다 ( 최대 10 분 ). 위쪽 / 아래쪽화살표키를사용하여해당언어를강조표시합니다. 선택 (ü) 키를누릅니다. Tunggu sampai Anda melihat pesan ini (~10 menit). Sorot bahasa Anda menggunakan tombol Naik dan Turun. Tekan tombol Pilih (ü). 제어판의전원램프가꺼져있다면전원키를눌러프린터를켭니다. 주 : 본프린터는 Energy Star 를준수하며에너지낭비없이켜진상태를유지할수있습니다. 켜진상태로두기때문에응답시간및전체시스템신뢰성이향상됩니다. Jika lampu daya pada panel depan mati, tekan tombol Daya untuk menghidupkan printer. Catatan: Printer ini memenuhi standar Energy Star dan dapat dibiarkan hidup tanpa memboroskan energi. Membiarkan printer hidup meningkatkan waktu tanggapan dan keandalan sistem secara keseluruhan.


23 The front panel will now display how to install the ink supplies. 此時前控制面板將顯示如何安裝供墨系統 제어판에잉크소모품설치방법이표시됩니다. Panel depan akan menampilkan cara memasang suplai tinta. Remove the printheads, printhead cleaners, and ink cartridges from the consumables box. 從耗材箱中取出印字頭 印字頭清潔器及墨水匣 소모품박스에서프린트헤드, 프린트헤드클리너및잉크카트리지를제거합니다. Keluarkan kepala cetak, pembersih kepala cetak, dan kartrid tinta dari kotak suplai sekali pakai. Find the ink cartridge door, which is on the left side of the printer. 找到位於印表機左側的墨水匣擋門 프린터왼쪽에있는잉크카트리지덮개를찾습니다. Temukan pintu kartrid tinta, yang terdapat di sebelah kiri printer. Open the ink cartridge door. 打開墨水匣擋門 잉크카트리지덮개를엽니다. Buka pintu kartrid tinta.


24 To release the ink cartridge drawer, gently pull the blue handle down. 要鬆開墨水匣安裝盒, 請將藍色把手輕輕往下拉 잉크카트리지함을분리하려면파란색손잡이를가볍게당겨내립니다. Untuk melepaskan dudukan kartrid tinta, tarik tangkai biru ke bawah dengan hati-hati. Slide the ink cartridge drawer out. 向外滑出墨水匣安裝盒 잉크카트리지함을바깥쪽으로밀어냅니다. Geser dudukan kartrid tinta keluar. Place the ink cartridge onto the ink cartridge drawer. Note that there are marks on the drawer showing the correct location. 將墨水匣放入墨水匣安裝盒 請注意, 安裝盒上的標記為表示正確的位置 잉크카트리지를잉크카트리지함에놓습니다. 단, 잉크카트리지함에는올바른위치를나타내는마크가있습니다. Letakkan kartrid tinta pada dudukan kartrid tinta. Perhatikan bahwa tanda pada dudukan menunjukkan lokasi yang benar. Position the ink cartridge at the rear of the drawer as indicated. 如圖所示, 將墨水匣安裝在安裝盒的後面 보는것처럼잉크카트리지를함뒤에놓습니다. Tempatkan kartrid tinta di bagian belakang dudukan seperti ditunjukkan.


 until you see this front panel message.")
25 Push the ink cartridge drawer back into the printer until it locks into position. 將墨水匣安裝盒推入印表機, 直到卡入定位 잉크카트리지함이제위치에고정될때까지프린터안쪽으로밀어줍니다. Dorong dudukan kartrid tinta kembali ke dalam printer sampai terkunci di tempatnya. Following the same instructions, install the other three ink cartridges. 按照相同的指示安裝其他三個墨水匣 잉크카트리지덮개를닫습니다. Dengan cara yang sama, pasang ketiga kartrid tinta lainnya. Close the ink cartridge door. 蓋上墨水匣擋門 잉크카트리지덮개를닫습니다. Tutup pintu kartrid tinta. Wait (about a minute) until you see this front panel message. 請稍候約一分鐘, 直至前控制面板出現此訊息 이제어판메시지가나타날때까지기다립니다 ( 약 1 분 ). Tunggu (sekitar satu menit) sampai Anda melihat pesan panel depan ini.


26 Open the printer window. 打開印表機上蓋 프린터창을엽니다. Buka jendela printer. Remove the packing tape that is holding down the printhead carriage latch. 撕下黏住印字頭拖架閂鎖的包裝膠帶 프린트헤드카트리지걸쇠를누르고있는포장테이프를제거합니다. Pull up and release the latch on top of the carriage assembly. 拉起並鬆開托架組件頂部的閂鎖 캐리지조립품위에있는카트리지걸쇠를위로당겨분리합니다. Lift up the cover. This will give you access to the setup printheads. 提起護蓋 您即可裝卸設定印字頭 덮개를들어올립니다. 그러면설치된프린트헤드에접근할수있습니다. Lepaskan pita pengiriman yang menahan kait carriage kepala cetak. Tarik ke atas dan lepaskan kait di atas rakitan carriage. Angkat penutup. Ini memberi Anda akses ke kepala cetak pengaturan.


27 Before removing the setup printheads, look at the window on top of each one and check that the printhead contains ink. 在取出設定印字頭之前, 看看每個印字頭的上蓋並檢查印字頭是否有墨水 설치된프린트헤드를꺼내기전에각초기화프린트헤드맨위의창을보고프린트헤드에잉크가있는지확인합니다. Sebelum mengeluarkan kepala cetak pengaturan, lihat jendela di atas setiap kepala cetak dan pastikan kepala cetak berisi tinta. To remove a setup printhead, lift up the blue handle. 要取出設定印字頭, 提起藍色把手 설치된프린트헤드를꺼내려면파란색손잡이를들어올립니다. Untuk mengeluarkan kepala cetak pengaturan, angkat tangkai biru. Using the blue handle, gently disengage the setup printhead from the carriage. 使用藍色把手, 輕輕地將設定印字頭從托架脫離.. 파란색손잡이를사용하여캐리지에서설치된프린트헤드를가볍게분리합니다. Menggunakan tangkai biru, dengan perlahan lepaskan kepala cetak pengaturan dari carriage. Lift the setup printhead until it is released from the carriage assembly. Then remove the other setup printheads. 提起設定印字頭, 直至其脫離托架組件 然後取出其他設定印字頭 캐리지조립품에서설치된프린트헤드가분리될때까지들어올립니다. 그런다음다른설치된프린트헤드를꺼냅니다. Angkat kepala cetak pengaturan sampai terlepas dari rakitan carriage. Kemudian lepaskan kepala cetak lainnya.


28 Remove the blue protective cap and the clear protective tape from the printhead. 取下藍色保護蓋並撕下印字頭上的透明保護膠帶 프린트헤드에서파란색보호마개와투명한보호용테이프를제거합니다. Lepaskan tutup pelindung biru dan pita pelindung bening dari kepala cetak. Lower all the printheads vertically into their correct positions. 將所有印字頭垂直向下放至正確位置 모든프린트헤드를올바른위치에수직으로내려놓습니다. Turunkan semua kepala cetak lurus ke bawah ke posisinya yang benar. Seat the printheads slowly and carefully. 小心仔細地插接印字頭 프린트헤드를천천히조심스럽게끼웁니다. Tempatkan kepala cetak dengan perlahan dan hati-hati. Make sure the printheads are correctly seated. When all the printheads are installed, the front panel prompts, Close printhead cover and window. 請確定印字頭插接正確 安裝所有印字頭後, 前控制面板將顯示 : 合上印字頭護蓋與上蓋 프린트헤드가제대로놓였는지확인합니다. 모든프린트헤드가설치되면제어판에 프린트헤드덮개및창을닫으십시오 라는메시지가나타납니다. Pastikan kepala cetak terpasang dengan benar. Setelah semua kepala cetak terpasang, panel depan menampilkan, Close printhead cover and window [Tutup penutup dan jendela kepala cetak].

![그래도문제가계속되면드라이버및설명서 CD 를참조하시기바랍니다. Jika Reseat [Setel ulang dudukan] ditampilkan pada panel depan, periksa apakah pita pelindung telah dilepaskan. Kemudian coba dudukkan kembali dengan lebih kuat.](/docs-images/62/48374513/images/29-1.jpg "Jika masih bermasalah, rujuk pada CD Driver and Documentation (Driver dan Dokumentasi). Close the carriage assembly cover. 合上托架組件護蓋 캐리지조립품덮개를닫습니다. Tutup penutup rakitan carriage.")
29 If Reseat is displayed on the front panel, check that the protective tape has been removed. Then try reseating the printhead more firmly. If the problem persists, refer to the Driver and Documentation CD. 如果前控制面板上顯示 重新插接, 請檢查是否撕下保護膠帶 然後嘗試更穩固地重新插接印字頭 如果問題仍然存在, 請參閱驅動程式與說明文件 CD 제어판에 재설정 이표시될경우보호용테이프를제거했는지확인합니다. 그런다음더단단히프린트헤드를다시끼웁니다. 그래도문제가계속되면드라이버및설명서 CD 를참조하시기바랍니다. Jika Reseat [Setel ulang dudukan] ditampilkan pada panel depan, periksa apakah pita pelindung telah dilepaskan. Kemudian coba dudukkan kembali dengan lebih kuat. Jika masih bermasalah, rujuk pada CD Driver and Documentation (Driver dan Dokumentasi). Close the carriage assembly cover. 合上托架組件護蓋 캐리지조립품덮개를닫습니다. Tutup penutup rakitan carriage. Make sure the latch engages correctly. 確定閂鎖正確扣住 걸쇠가제대로걸려있는지확인합니다. Pastikan kait terkunci dengan benar. Close the printer window. 合上印表機的上蓋 프린터창을닫습니다. Tutup jendela printer.
. Wait until you see this front panel message. 請稍候, 直至前控制面板出現此訊息 이제어판메시지가나타날때까지기다립니다.")

30 Please wait while the printer checks the printheads (~1 minute). 請稍候, 印表機會檢查印字頭 ( 約需要 1 分鐘 ) 프린터가프린트헤드를확인할때까지기다립니다 ( 최대 1 분 ). Harap tunggu sementara printer memeriksa kepala cetak (~1 menit). Wait until you see this front panel message. 請稍候, 直至前控制面板出現此訊息 이제어판메시지가나타날때까지기다립니다. Tunggu sampai Anda melihat pesan panel depan ini. Press the printhead cleaner door, which is on the right side of the printer. 按下位於印表機右側的印字頭清潔器擋門 프린터오른쪽에있는프린트헤드클리너덮개문을누릅니다. Tekan pintu pembersih kepala cetak, yang terdapat di sebelah kanan printer. Open the printhead cleaner door. 打開印字頭清潔器擋門 프린트헤드클리너덮개문을엽니다. Buka pintu pembersih kepala cetak.


31 Insert the printhead cleaner into the slot of the correct color. 將印字頭清潔器插入正確顏色的插槽中 프린터헤드클리너를올바른색상슬롯에끼워넣습니다. Push the printhead cleaner in and down until it clicks into place. 將印字頭清潔器向內向下推, 直至卡入定位 프린트헤드클리너가제자리에들어맞을때까지아래로누릅니다. Insert the other seven printhead cleaners into the correct slots. 將其他七個印字頭清潔器插入正確的插槽中 7 개의다른프린트헤드클리너도올바른슬롯에끼워넣습니다. Close the printhead cleaner door. 合上印字頭清潔器擋門 프린트헤드클리너덮개문을닫습니다. Tutup pintu pembersih kepala cetak. Masukkan pembersih kepala cetak ke celah dengan warna yang benar. Dorong pembersih kepala cetak masuk dan ke bawah sampai terkunci di tempatnya. Masukkan ketujuh pembersih kepala cetak lain ke celah yang benar.


32 Wait until you see this front panel message. Press the Select key. 請稍候, 直至前控制面板出現此訊息 按下 選擇 鍵 이제어판메시지가나타날때까지기다립니다. 선택키를누릅니다. Tunggu sampai Anda melihat pesan panel depan ini. Tekan tombol Pilih. To load the paper roll from Drawer 1 into the printer. From the front panel, highlight the Paper icon and press the Select key. 要從 1 號安裝盒將捲筒紙裝入印表機 在前控制面板上, 反白顯示 紙張 圖示並按下 選擇 鍵 드로어 1 에서프린터로롤용지를넣으려면제어판에서용지아이콘을강조표시하고선택키를누릅니다. Untuk mengisikan gulungan kertas dari Laci 1 ke dalam printer. Dari panel depan, sorot ikon Kertas lalu tekan tombol Pilih. From the front panel, highlight Paper load and press the Select key. 從前控制面板中, 反白顯示 裝入紙張 並按下 選擇 鍵 제어판에서 용지넣기 를강조표시하고선택키를누릅니다. Dari panel depan, sorot Paper load [Pengisian kertas] lalu tekan tombol Pilih. The front panel displays the above. Highlight Load roll 1 and press the Select key. 前控制面板將顯示以上訊息 反白顯示 裝入捲筒紙 1 並按下 選擇 key 제어판에위와같이표시됩니다. 롤용지 1 넣기 를강조표시하고선택키를누릅니다. Tampilan panel depan seperti di atas. Sorot Load roll 1 [Isikan gulungan 1] lalu tekan tombol Pilih.


33 Using two hands, pull out Drawer 1. 用雙手拉出 1 號安裝盒 양손으로드로어 1을당겨꺼냅니다. Menggunakan dua tangan, geser keluar Laci 1. Remove spindle from Drawer 1. 從 1 號安裝盒中取出捲軸 드로어 1에서스핀들을제거합니다. Keluarkan tangkai gulungan dari Laci 1. Shown above is one of the core adaptors supplied. Use these when the roll core is of a larger diameter. 上圖是其中一個提供的捲筒配接器 當捲筒芯棒直徑較大時, 請使用這些捲筒配接器 위에나온것은제공되는중심대어댑터중하나입니다. 롤코어의직경이클때이중심대어댑터를사용합니다. Salah satu adaptor inti yang disertakan ditampilkan di atas. Gunakan adaptor apabila inti gulungan berdiameter besar. Remove the blue-colored stop from the left end of the spindle. Keep the spindle horizontal. 取出捲軸左端的藍色止動器 將捲軸保持在水平位置 스핀들의왼쪽끝에서파란색고정마개를제거합니다. 스핀들을수평으로유지합니다. Lepaskan penahan berwarna biru dari ujung kiri tangkai gulungan. Jaga tangkai gulungan pada posisi mendatar.


34 Slide the roll of paper that came with your printer onto the spindle. Make sure the paper is oriented exactly as shown. 將印表機隨附的捲筒紙滑入捲軸 確定紙張如圖所示的方向裝入 프린터와함께제공되는롤용지를스핀들에끼워넣습니다. 용지방향이위의그림과같은지확인합니다. Masukkan gulungan kertas yang disertakan dengan printer Anda ke tangkai gulungan. Pastikan orientasi kertas tepat seperti yang ditunjukkan. Push the black right-hand stop onto the roll. Make sure it is correctly seated. 將右側的黑色止動器推到捲筒紙上 確定其安裝正確 검정색오른쪽고정마개를롤에눌러넣습니다. 이고정마개가제대로끼워졌는지확인합니다. Dorong penahan hitam sisi kanan ke tangkai gulungan. Pastikan penahan terpasang dengan benar. Put the blue-colored stop onto the spindle. 將藍色止動器置於捲軸上 파란색고정마개를스핀들에끼워넣습니다. Masukkan penahan biru ke tangkai gulungan. Push the blue left-hand stop onto the roll. Make sure it is correctly seated. 將左側的藍色止動器推到捲筒紙上 確定其安裝正確 파란색왼쪽고정마개를롤에눌러넣습니다. 이고정마개가제대로끼워졌는지확인합니다. Dorong penahan biru kiri ke gulungan. Pastikan penahan terpasang dengan benar.


35 As shown above, hold the spindle assembly using the blue and black stops. 如上圖所示, 從藍色與黑色止動器握住捲軸組件 위에서보는것처럼파란색및검정색고정마개를사용하여스핀들조립품을고정시킵니다. Seperti ditunjukkan di atas, tahan rakitan tangkai gulungan menggunakan penahan biru dan hitam. With the blue stop on the left, lower the spindle into Drawer 1. 將藍色止動器面向左側, 將捲軸放入 1 號安裝盒 왼쪽의파란색고정마개로스핀들을드로어 1 로내립니다. Dengan penahan biru di sebelah kiri, turunkan tangkai gulungan ke dalam Laci 1. Lift the blue lever on Drawer 1. This is located on the right-hand side of the printer and above Drawer 1. 向上提起 1 號安裝盒上的藍色手柄 此手柄位於印表機右側, 在 1 號安裝盒上方 드로어 1 의파란색레버를들어올립니다. 파란색레버는프린터오른쪽에드로어 1 위에있습니다. Angkat tuas biru pada Laci 1. Tuas ini terletak di sisi kanan printer dan di atas Laci 1. Feed the paper from roll 1 onto the drawer 1 platen. Align the paper parallel with the blue lines on the right side of the platen. The paper edge does not need to be aligned exactly with a specific blue line, but between the two outer lines. 將捲筒 1 中的紙張裝入 1 號安裝盒壓板 將紙張與壓板右側的藍色線對齊 紙張邊緣不必與特定藍色線準確對齊, 但應介於兩條外部線條之間 롤 1 의용지를드로어 1 의인자판에공급합니다. 용지를인자판오른쪽에있는파란색선에수평으로맞게정렬합니다. 용지가장자리가특정파란색선에정확하게정렬될필요는없고바깥쪽두선사이에위치하면됩니다. Masukkan kertas dari gulungan 1 ke pelat cetak laci 1. Atur kertas sejajar dengan garis biru di sisi kanan pelat. Tepi kertas tidak harus tepat pada garis biru tertentu, tetapi di antara kedua garis terluar.


36 Feed the paper for a few centimeters more after the printer beeps, then turn the roller backwards to tension the paper correctly. 在印表機發出嗶聲後將紙張再送入幾公分, 然後向後轉動滾筒以正確拉緊紙張 프린터에서경보음이울리면용지를몇센티미터더밀어넣은후용지를팽팽하게하기위해롤러를뒤쪽으로돌립니다. Masukkan kertas beberapa senti lagi setelah printer berbunyi bip, kemudian gulung kembali untuk menegangkan kertas dengan benar. Lower the blue lever for Drawer 1. 放下 1 號安裝盒的藍色手柄 드로어 1의파란색레버를내립니다. Turunkan tuas biru pada Laci 1. Push in Drawer 1. 推入 1 號安裝盒 드로어 1을밀어넣습니다. Dorong masuk Laci 1. Using the stops, carefully wind the excess paper back on to the spindle. 使用止動器, 小心地將多餘的紙張繞回到捲軸上 고정마개를사용하여여분의용지를다시스핀들에조심스럽게끼웁니다. Menggunakan penahan, dengan hati-hati gulung sisa kertas ke tangkai gulungan.
37 The front panel displays the above. Highlight the paper type you have loaded and press the Select key. 前控制面板將顯示以上訊息 反白顯示 裝入捲筒紙 1 並按下 選擇 鍵 제어판에위와같이표시됩니다. 넣은용지종류를강조표시하고선택키를누릅니다. Tampilan panel depan seperti di atas. Sorot jenis kertas yang telah Anda isikan lalu tekan tombol Pilih. Select the roll length if known. 選擇捲筒紙長度 ( 如果已知 ) 알고있으면롤길이를선택합니다. Pilih panjang gulungan jika diketahui. To load the roll paper from Drawer 2: from the front panel, highlight the Paper icon and press the Select key. 要從 2 號安裝盒裝入捲筒紙, 請在前控制面板上, 反白顯示紙張圖示並按下 選擇 鍵 Drawer 2 에서프린터로롤용지를넣으려면제어판에서 Paper 아이콘을강조표시하고선택키를누릅니다. Untuk mengisikan kertas gulungan dari Laci 2: dari panel depan, sorot ikon Kertas lalu tekan tombol Pilih. From the front panel, highlight Paper load and press the Select key. 從前控制面板中, 反白顯示 裝入紙張 並按下 選擇 鍵 제어판에서 Paper Load 를강조표시하고선택키를누릅니다. Dari panel depan, sorot Paper load [Pengisian kertas] lalu tekan tombol Pilih.

![前控制面板將顯示以上訊息 反白顯示 裝入捲筒紙 2 並按下 選擇 鍵 제어판에위와같이표시됩니다. 롤용지 2 넣기 를강조표시하고선택키를누릅니다. Tampilan panel depan seperti di atas. Sorot Load roll 2 [Isikan gulungan 2] lalu tekan tombol Pilih.](/docs-images/62/48374513/images/38-2.jpg "Using two hands, pull out Drawer 2. 用雙手拉出 2 號安裝盒 양손으로드로어 2를당겨꺼냅니다. Menggunakan dua tangan, geser keluar Laci 2. Remove the spindle from Drawer 2. 從 2 號安裝盒中取出捲軸 드로어 2에서스핀들을제거합니다.")
38 Load the spindle using the same procedure as described by points 127 to 133. 使用 127 至 133 點描述的同樣程序裝入捲軸 위에서설명한 127 에서 133 까지의동일한절차를따라스핀들을넣습니다. Masukkan tangkai gulungan menggunakan prosedur yang sama seperti diuraikan pada butir 127 s.d 133. The front panel displays the above. Highlight Load roll 2 and press the Select key. 前控制面板將顯示以上訊息 反白顯示 裝入捲筒紙 2 並按下 選擇 鍵 제어판에위와같이표시됩니다. 롤용지 2 넣기 를강조표시하고선택키를누릅니다. Tampilan panel depan seperti di atas. Sorot Load roll 2 [Isikan gulungan 2] lalu tekan tombol Pilih. Using two hands, pull out Drawer 2. 用雙手拉出 2 號安裝盒 양손으로드로어 2를당겨꺼냅니다. Menggunakan dua tangan, geser keluar Laci 2. Remove the spindle from Drawer 2. 從 2 號安裝盒中取出捲軸 드로어 2에서스핀들을제거합니다. Keluarkan tangkai gulungan dari Laci 2.


39 With the blue stop on the left, lower the spindle into Drawer 2. 將藍色止動器面向左側, 將捲軸放入 2 號安裝盒 왼쪽의파란색고정마개로스핀들을드로어 2 로내립니다. Dengan penahan biru di sebelah kiri, turunkan tangkai gulungan ke dalam Laci 2. Lift the blue lever on Drawer 2. This is located on the right-hand side of the printer and under Drawer 1. 向上提起 2 號安裝盒上的藍色手柄 此手柄位於印表機右側, 在 1 號安裝盒下方 드로어 2 의파란색레버를들어올립니다. 파란색레버는프린터오른쪽에드로어 1 아래에있습니다. Angkat tuas biru pada Laci 2. Tuas ini terletak di sisi kanan printer dan di bawah Laci 1. Feed the paper from roll 2 onto the drawer 2 platen. Align the paper parallel with the blue lines on the right side of the platen. The paper edge does not need to be aligned exactly with a specific blue line, but between the two outer lines. 將捲筒 2 中的紙張裝入 2 號安裝盒壓板 將紙張與壓板右側的藍色線對齊 紙張邊緣不必與特定藍色線準確對齊, 但應介於兩條外部線條之間 롤 2 의용지를드로어 2 의인자판에공급합니다. 용지를인자판오른쪽에있는파란색선에수평으로맞게정렬합니다. 용지가장자리가특정파란색선에정확하게정렬될필요는없고바깥쪽두선사이에위치하면됩니다. Feed the paper for a few centimeters more after the printer beeps, then turn the roller backwards to tension the paper correctly. 在印表機發出嗶聲後將紙張再送入幾公分, 然後向後轉動滾筒以正確拉緊紙張 프린터에서경보음이울리면용지를몇센티미터더밀어넣은후용지를팽팽하게하기위해롤러를뒤쪽으로돌립니다. Masukkan kertas beberapa senti lagi setelah printer berbunyi bip, kemudian gulung kembali untuk menegangkan kertas dengan benar. Masukkan kertas dari gulungan 2 ke pelat cetak laci 2. Atur kertas sejajar dengan garis biru di sisi kanan pelat. Tepi kertas tidak harus tepat pada garis biru tertentu, tetapi di antara kedua garis terluar.


40 Lower the blue lever for Drawer 2. 放下 2 號安裝盒的藍色手柄 드로어 2의파란색레버를내립니다. Turunkan tuas biru pada Laci 2. Using two hands, push in Drawer 2. 用雙手推入 2 號安裝盒 양손으로드로어 2 를밀어넣습니다 Menggunakan dua tangan, dorong masuk Laci 2. Using the stops, carefully wind the excess paper back on to the spindle. 使用止動器, 小心地將多餘的紙張繞回到捲軸上 고정마개를사용하여여분의용지를다시스핀들에조심스럽게끼웁니다. Menggunakan penahan, dengan hati-hati gulung sisa kertas ke tangkai gulungan. The front panel displays the above. Highlight the paper type you have loaded and press the Select key. 前控制面板將顯示以上訊息 反白顯示已裝入的紙張類型, 然後按下 選擇 鍵 제어판에위와같이표시됩니다. 넣으려는용지종류를강조표시하고선택키를누릅니다. Tampilan panel depan seperti di atas. Sorot jenis kertas yang telah Anda isikan lalu tekan tombol Pilih.


41 PC, Macintosh or workstation PC, Macintosh 或工作站 PC, Macintosh 또는워크스테이션 PC, Macintosh atau workstation Select the roll length if known. 選擇捲筒紙長度 ( 如果已知 ) 알고있으면롤길이를선택합니다. Pilih panjang gulungan jika diketahui. Pass the LAN cable through the hook at the rear of the printer. 將 LAN 纜線穿過印表機背面的鉤扣 LAN 케이블을프린터뒤쪽에있는후크에걸어통과시킵니다. Lewatkan kabel LAN melalui kait di bagian belakang printer. The roll module provides an extra socket to connect an optional accessory. Caution: do not attempt to use this socket for any other purpose. 捲筒模組提供額外的插孔以連接選購附件 注意 : 切勿將此插孔用於任何其他用途 롤모듈은옵션부속품을연결하는추가소켓을제공합니다. 주의 : 다른용도로는이소켓을사용하지마십시오. Modul gulungan dilengkapi soket tambahan untuk menghubungkan aksesori opsional. Perhatian: jangan mencoba menggunakan soket ini untuk keperluan apa pun lainnya. Printer 印表機프린터 Printer Server 伺服器서버 Server PC, Macintosh or workstation PC, Macintosh 或工作站 PC, Macintosh 또는워크스테이션 PC, Macintosh atau workstation Your printer can be connected to a computer directly or to one or more computers via a network. 印表機可直接與一台電腦連線, 或透過網路與多台電腦連線 프린터를컴퓨터에직접연결하거나네트워크를통해한대이상의컴퓨터에연결할수있습니다. Printer Anda dapat dihubungkan langsung ke komputer atau ke satu atau lebih komputer melalui jaringan.

42 x2


43 Locate the bin against the printer. Now you have completed the assembly of your printer. The following pages describe how to configure your computer for successful printing. 將紙槽裝到印表機上 至此即已組裝完成印表機 以下將說明如何設定電腦以成功列印 용지함을프린터에끼워넣습니다. 이제프린터조립을완료했습니다. 다음페이지에서는성공적인인쇄를위한컴퓨터구성방법을설명합니다. Tempatkan nampan menempel pada printer. Anda telah menyelesaikan perakitan printer Anda. Halaman berikut ini menguraikan cara mengkonfigurasi komputer Anda untuk pencetakan yang berhasil.
44 Note for MAC & Windows USB connection: Do not connect the computer to the printer yet. You must first install the printer driver software on the computer. Insert the HP start up Kit CD/DVD into your computer. For Windows: * If the CD/DVD does not start automatically, run autorun.exe program on the root folder on the CD/DVD. * To install a Network Printer click on Express Network Install otherwise click on Custom Install and follow the instructions on your screen. For Mac: * If the CD/DVD does not start automatically, open the CD/DVD icon on your desktop. * Open the Mac OS X HP Designjet Installer icon and follow the instructions on your screen. NOTE: You can download the latest software from: or 在 Mac 中 : * 如果 DVD 沒有自動執行, 請開啟桌面上的 DVD 圖示 * 開啟 Mac OS X HP Designjet Installer 圖示, 並且依照螢幕上指示進行 註 : 如果安裝失敗, 請在這裡重新安裝軟體 : 或 MAC 및 Windows USB 연결을위한안내 아직컴퓨터를프린터에연결하지마십시오. 먼저프린터드라이버소프트웨어를컴퓨터에설치합니다. HP Start-Up Kit(HP 시작키트 ) DVD 를컴퓨터에삽입합니다. Windows 의경우 : * DVD 가자동으로실행되지않는경우 DVD 의루트폴더에서 autorun.exe 프로그램을실행합니다. Catatan tentang sambungan USB untuk MAC & Windows: Jangan sambungkan dulu komputer ke printer. Anda harus terlebih dulu menginstal perangkat lunak driver printer di komputer. Masukkan DVD HP Start Up Kit ke komputer Untuk Windows: * Jika DVD tidak memulai secara otomatis, jalankan program autorun.exe pada folder akar DVD. * Untuk menginstal Network Printer, klik Express Network Install atau klik Custom Install, kemudian jalankan petunjuk pada layar. Untuk Mac: * Jika DVD tidak memulai secara otomatis, buka ikon DVD di desktop. * Buka ikon Mac OS X HP Designjet Installer, kemudian jalankan petunjuk pada layar. CATATAN: Jika penginstalan gagal, instal ulang perangkat lunak dari: or Legal notices 法律聲明법적고지사항 Informasi hukum Copyright 2009 Hewlett-Packard Development Company, L.P. The information contained herein is subject to change without notice. The only warranties for HP products and services are set forth in the express warranty statements accompanying such products and services. Nothing herein should be construed as constituting an additional warranty. HP shall not be liable for technical or editorial errors or omissions contained herein. 此文件所包含資訊如有更改, 恕不另行通知 HP 產品和服務的唯一保固明確記載於該等產品和服務所隨附的保固聲明中 本文件的任何部分都不可構成任何額外的保固 HP 不負責本文件在技術上或編輯上的錯誤或疏失 여기에수록된정보는예고없이변경될수있습니다. HP 는 HP 제품및서비스와함께제공된보증서에명시된사항에대해서만보증합니다. 이문서의어떤내용도추가보증으로간주되어서는안됩니다. HP 는이문서에포함된기술또는편집상의오류나누락된내용에대해책임지지않습니다. Informasi yang terdapat dalam dokumen ini dapat berubah tanpa pemberitahuan sebelumnya. Satu-satunya jaminan untuk berbagai Produk dan layanan HP adalah yang terdapat dalam pernyataan jaminan tertulis yang menyertai produk dan layanan tersebut. Tidak ada informasi apapun dalam dokumen ini yang dapat ditafsirkan sebagai jaminan tambahan. HP tidak bertanggung jawab atas kesalahan teknis, editorial, atau kelalaian yang terdapat dalam dokumen ini. 請注意, 當 MAC 與 Windows USB 連線時 : * 네트워크프린터를설치하려면 Express 네트워크설치를클릭하거나사용자지정설치를클릭한다음화면의지침을따릅니다. Mac 의경우 : Trademarks Microsoft ; and Windows ; are U.S. registered trademarks of Microsoft Corporation. FireWire is a trademark of Apple Computer, Inc., registered in the U.S. and other countries. 請不要急著將電腦連接到印表機 您必須先在電腦上安裝印表機驅動程式軟體 * DVD 가자동으로실행되지않는경우바탕화면에서 DVD 아이콘을엽니다. 將 HP Start-Up Kit DVD 放入電腦 在 Windows 中 : * Mac OS X HP Designjet Installer 아이콘을열고화면의지침을따릅니다. * 如果 DVD 沒有自動執行, 請執行 DVD 根資料夾中的 autorun.exe 程式 주 : 설치하는데실패한경우다음위치에서각각의소프트웨어를다시설치합니다. * 如果要安裝網路印表機, 請按一下 快速網路安裝 或 自訂安裝, 並且依照螢幕上的指示進行 또는
LJ1200 Getting Started Guide-XL-EN,TC,ID,KO,TH,VI
 getting started guide petunjuk untuk memulai penggunaan hp LaserJet 1220 copy scan Copyright Information Copyright Hewlett-Packard Company 2002 All Rights Reserved. Reproduction, adaptation, or translation
LJ1200 Getting Started Guide - XL-EN, TC, KO, TH, ID, VI
 getting started guide petunjuk untuk memulai penggunaan hp LaserJet 1200 Copyright Information Copyright Hewlett-Packard Company 2002 All Rights Reserved. Reproduction, adaptation, or translation without
< 좌측면 ><Gambar sebelah kiri> < 정면 ><Gambar depan>
 기능시험평가지 Formulir Evaluasi Ujian Keahlian 업종 평가시간 : 4 분 Durasi untuk Tes: 4 menit Ⅰ. 과제의구성 Prosedur Tes 구분 Prosedur 과제 Tes ke- 과제 Tes ke- 3 과제 Tes ke-3 세부과제명 Subjek Tes 핀꽂기 Menusuk peniti 작업물걸기 Menggantung
- 이 문서는 삼성전자의 기술 자산으로 승인자만이 사용할 수 있습니다 Part Picture Description 5. R emove the memory by pushing the fixed-tap out and Remove the WLAN Antenna. 6. INS
 [Caution] Attention to red sentence 3-1. Disassembly and Reassembly R520/ 1 2 1 1. As shown in picture, adhere Knob to the end closely into the arrow direction(1), then push the battery up (2). 2. Picture
LJ1220 Getting Started Guide-XL- EN,TC,ID,KO,TH,VI
 getting started guide petunjuk untuk memulai penggunaan hp LaserJet 1220 print copy scan Copyright Information Copyright Hewlett-Packard Company 2002 All Rights Reserved. Reproduction, adaptation, or translation
< 좌측면 > <Gambar sebelah kiri> < 정면 > <Gambar depan>
 기능시험평가지 Formulir Evaluasi Ujian Keahlian 업종 평가시간 : 5 분 Durasi untuk Tes: 5 menit Ⅰ. 과제의구성 Prosedur Tes 구분 Prosedur 1 과제 Tes ke-1 과제 Tes ke- 3 과제 Tes ke-3 세부과제명 Subjek Tes 핀꽂기 Menusuk peniti 작업물걸기 Menggantung
QRG110plusnr.fm
 HP Designjet 110plus series Quick reference guide Part number: C7796-9024646 Languages: K Ind Size: A5 Paper: 80 g. recycling paper recommended, but we leave it up to each DC to use the most cost efficient
6. Separate HDD by pulling in the arrow direction. * Cautions Avoid lifting HDD excessively, because Connector can be damaged ODD Remove
 3-1. Disassembly and Reassembly R510 [Caution] Attention to red sentence. 2 2 1. Before disassembling, the AC adaptor and Battery must be separated. 2. AS mark No.1/2 put KNOB-Battery to end of each side,
< 좌측면 ><Gambar sebelah kiri> < 정면 ><Gambar depan>
 기능시험평가지 Formulir Evaluasi Ujian Keahlian 업종 평가시간 : 3 분 30 초 Durasi untuk Tes: 3 menit 30 detik Ⅰ. 과제의구성 Prosedur Tes 구분 Prosedur 과제 Tes ke- 과제 Tes ke- 3 과제 Tes ke-3 세부과제명 Subjek Tes 핀꽂기 Menusuk peniti
Unpack the printer Membuka kemasan printer 프린터포장풀기 拆裝印表機 Remove the accessories from the printer box. You will find the documentation and soft
 1 2 Read these instructions carefully... What you will need for this procedure Because the printer is heavy, you may need three people to unpack it. When more than one person is needed, this symbol is
70 diklasifikan berdasarkan perubahan letak dan perubahan cara pelafalan kemudian dianalisis penyebabnya. Berikut adalah variasi cara ucap konsonan ya
 BAB IV KESIMPULAN Kesimpulan Dari hasil analisis sebelumnya dapat disimpulkan bahwa dalam mengucapkan suatu konsonan, Song Manse mengalami beberapa tahapan. Song Manse tidak secara langsung dapat mengucapkan
Microsoft Word - skill test.docx
 기능수준평가평가지 PANDUAN TES KETERAMPILAN 직종 (JENIS PEKERJAAN) 전직종공통 (UNTUK SEMUA JENIS PEKERJAAN) 비번호 (personal identification number) 과제명 (JUDUL) 성명 (NAMA) 체력평가 (TES FISIK) 평가시간 WAKTU TES : 3 분 (3 MENIT) I.
00.1
 HOSPA Chipboard screws with countersunk head Material: Drive: Cross recess PZ galvanized yellow chromatized nickel plated burnished Partly threaded, galvanized or yellow chromatized dk k L d m Head Ø dk
Getting Started Guide
 HP Scanjet N6310 Getting Started Guide Getting Started Guide Panduan Persiapan 시작안내서 6.5 x 9 FRONT COVER Argentina 0-800-555-5000 Argentina (Buenos Aires) 54-11-4708-1600 Australia 13 10 47 Australia (dialing
Logitech Folio S37 Contents English 3 한국어
 Folio S37 for Samsung Galaxy Tab 3 (7.0") Setup Guide Read this guide before use Logitech Folio S37 Contents English 3 한국어 7 www.logitech.com/support 11 2 PDF www.logitech.com/support/folio-s37 Know your
EN You can find legal and warranty information on the CD. Further information is available at HP s support Web site (
 EN HP Designjet T1120 SD-MFP Quick reference guide ZHTW HP Designjet T1120 SD-MFP 快速參考指南 KO HP Designjet T1120 SD-MFP 빠른참조설명서 ID HP Designjet T1120 SD-MFP Panduan ringkas EN You can find legal and warranty
QRGSmall.book
 EN Quick reference guide ZHTW KO ID HP Designjet T11 MFP / 45 mfp / 45 스캐너 / 빠른참조설명서 HP Designjet T11 MFP/ 45 mfp/45 Scanner / Panduan ringkas EN You can find legal and warranty information on the CD.
PowerChute Personal Edition v3.1.0 에이전트 사용 설명서
 PowerChute Personal Edition v3.1.0 990-3772D-019 4/2019 Schneider Electric IT Corporation Schneider Electric IT Corporation.. Schneider Electric IT Corporation,,,.,. Schneider Electric IT Corporation..
H3050(aap)
") USB Windows 7/ Vista 2 Windows XP English 1 2 3 4 Installation A. Headset B. Transmitter C. USB charging cable D. 3.5mm to USB audio cable - Before using the headset needs to be fully charged. -Connect
USB Windows 7/ Vista 2 Windows XP English 1 2 3 4 Installation A. Headset B. Transmitter C. USB charging cable D. 3.5mm to USB audio cable - Before using the headset needs to be fully charged. -Connect
HP LaserJet Pro M402, M403 Getting Started Guide - XLWW
 LaserJet Pro M402, M403 Getting Started Guide 2 English... 1 Bahasa Indonesia... 4 한국어... 7 ไทย...10 IMPORTANT: Follow Steps 1-2 on the printer hardware setup poster, then continue with Step 3. www.hp.com/support/ljm402
HP LaserJet Pro M203 Getting Started Guide - XLWW
 LaserJet Pro M203 Getting Started Guide English...1 Bahasa Indonesia...4 한국어...7 ไทย... 10 IMPORTANT: First, follow Steps 1-3 on the printer hardware setup poster, then continue with Step 4. www.hp.com/support/ljm203
HP LaserJet Pro M101-M104, HP LaserJet Ultra M105-M106 Getting Started Guide - XLWW
 IMPORTANT: First, follow Steps 1-3 on the printer hardware setup poster, then continue with Step 4. LaserJet Pro M101-M104, LaserJet Ultra M105-M106 Getting Started Guide www.hp.com/support/ljm101 www.register.hp.com
<32B1B3BDC32E687770>
 008년도 상반기 제회 한 국 어 능 력 시 험 The th Test of Proficiency in Korean 일반 한국어(S-TOPIK 중급(Intermediate A 교시 이해 ( 듣기, 읽기 수험번호(Registration No. 이 름 (Name 한국어(Korean 영 어(English 유 의 사 항 Information. 시험 시작 지시가 있을
DE1-SoC Board
 실습 1 개발환경 DE1-SoC Board Design Tools - Installation Download & Install Quartus Prime Lite Edition http://www.altera.com/ Quartus Prime (includes Nios II EDS) Nios II Embedded Design Suite (EDS) is automatically
Chapter 1
 3 Oracle 설치 Objectives Download Oracle 11g Release 2 Install Oracle 11g Release 2 Download Oracle SQL Developer 4.0.3 Install Oracle SQL Developer 4.0.3 Create a database connection 2 Download Oracle 11g
HP Color LaserJet Pro M452dw Getting Started Guide - XLWW
 Color LaserJet Pro M452dw Getting Started Guide English... 1 Bahasa Indonesia... 4 한국어... 7 ไทย...10 IMPORTANT: Follow Steps 1-2 on the printer hardware setup poster, and then continue with Step 3. www.hp.com/support/colorljm452
Page 2 of 6 Here are the rules for conjugating Whether (or not) and If when using a Descriptive Verb. The only difference here from Action Verbs is wh
 and If when using a Descriptive Verb. The only difference here from Action Verbs is wh") Page 1 of 6 Learn Korean Ep. 13: Whether (or not) and If Let s go over how to say Whether and If. An example in English would be I don t know whether he ll be there, or I don t know if he ll be there.
Page 1 of 6 Learn Korean Ep. 13: Whether (or not) and If Let s go over how to say Whether and If. An example in English would be I don t know whether he ll be there, or I don t know if he ll be there.
인도네시아인 종합한국어2(본책)_표지-3쇄.indd
_표지-3쇄.indd") Buku Pelajaran Bahasa Korea yang Disesuaikan untuk Pelajaran Bahasa Korea yang Efisien bagi Orang Indonesia Bahasa Korea Terpadu untuk Orang Indonesia Buku Latihan Ahn Kyung Hwa / Cho Hyun Yong Florian
Buku Pelajaran Bahasa Korea yang Disesuaikan untuk Pelajaran Bahasa Korea yang Efisien bagi Orang Indonesia Bahasa Korea Terpadu untuk Orang Indonesia Buku Latihan Ahn Kyung Hwa / Cho Hyun Yong Florian
#KM-235(110222)
") PARTS BOOK KM-235A/B INFORMATION A. Parts Book Structure of Part Book Unique code by mechanism Unique name by mechanism Explode view Ref. No. : Unique identifcation number by part Parts No. : Unique Product
PARTS BOOK KM-235A/B INFORMATION A. Parts Book Structure of Part Book Unique code by mechanism Unique name by mechanism Explode view Ref. No. : Unique identifcation number by part Parts No. : Unique Product
농심-내지
 Magazine of NONGSHIM 2012_ 03 농심이 필요할 때 Magazine of NONGSHIM 농심그룹 사보 농심 통권 제347호 발행일 2012년 3월 7일 월간 발행인 박준 편집인 유종석 발행처 (주)농심 02-820-7114 서울특별시 동작구 신대방동 370-1 홈페이지 www.nongshim.com 블로그 blog.nongshim.com
HP Color LaserJet Pro M452nw M452dn Getting Started Guide - XLWW
 Color LaserJet Pro M452nw, M452dn Getting Started Guide English... 1 Bahasa Indonesia... 4 한국어... 7 ไทย...10 IMPORTANT: Follow Steps 1-2 on the printer hardware setup poster, and then continue with Step
chapter4
 Basic Netw rk 1. ก ก ก 2. 3. ก ก 4. ก 2 1. 2. 3. 4. ก 5. ก 6. ก ก 7. ก 3 ก ก ก ก (Mainframe) ก ก ก ก (Terminal) ก ก ก ก ก ก ก ก 4 ก (Dumb Terminal) ก ก ก ก Mainframe ก CPU ก ก ก ก 5 ก ก ก ก ก ก ก ก ก ก
¹Ìµå¹Ì3Â÷Àμâ
 MIDME LOGISTICS Trusted Solutions for 02 CEO MESSAGE MIDME LOGISTICS CO., LTD. 01 Ceo Message We, MIDME LOGISTICS CO., LTD. has established to create aduance logistics service. Try to give confidence to
K7VT2_QIG_v3
 1......... 2 3..\ 4 5 [R] : Enter Raid setup utility 6 Press[A]keytocreateRAID RAID Type: JBOD RAID 0 RAID 1: 2 7 " RAID 0 Auto Create Manual Create: 2 RAID 0 Block Size: 16K 32K
MF5900 Series MF Driver Installation Guide
 한국어 MF 드라이버설치설명서 사용자소프트웨어 CD-ROM................................................ 1.................................................................... 1..............................................................................
Copyright 2012, Oracle and/or its affiliates. All rights reserved.,.,,,,,,,,,,,,.,...,. U.S. GOVERNMENT END USERS. Oracle programs, including any oper
 Windows Netra Blade X3-2B( Sun Netra X6270 M3 Blade) : E37790 01 2012 9 Copyright 2012, Oracle and/or its affiliates. All rights reserved.,.,,,,,,,,,,,,.,...,. U.S. GOVERNMENT END USERS. Oracle programs,
KM-380BL,BLB(100908)
") PARTS BOOK KM-380BL KM-380BLB KM-380BL KM-380BLB MODEL FOR HEAVY MATERIAL KM-380BL CYLINDER-BED TYPE, 1-NEEDLE UNISON FEED, VERTICAL LARGE HOOK, LOCK-STITCH MACHINE. KM-380BLB CYLINDER-BED TYPE, 1-NEEDLE
PARTS BOOK KM-380BL KM-380BLB KM-380BL KM-380BLB MODEL FOR HEAVY MATERIAL KM-380BL CYLINDER-BED TYPE, 1-NEEDLE UNISON FEED, VERTICAL LARGE HOOK, LOCK-STITCH MACHINE. KM-380BLB CYLINDER-BED TYPE, 1-NEEDLE
Hardware Manual TSP100
 Trademark acknowledgments TSP: Star Micronics., Ltd. Notice All rights reserved. Reproduction of any part of this manual in any form whatsoever, without STAR s express permission is forbidden. The contents
#KM560
 KM-560 KM-560-7 PARTS BOOK KM-560 KM-560-7 INFORMATION A. Parts Book Structure of Part Book Unique code by mechanism Unique name by mechanism Explode view Ref. No. : Unique identifcation number by part
#KLZ-371(PB)
") PARTS BOOK KLZ-371 INFORMATION A. Parts Book Structure of Part Book Unique code by mechanism Unique name by mechanism Explode view Ref. No. : Unique identifcation number by part Parts No. : Unique Product
PARTS BOOK KLZ-371 INFORMATION A. Parts Book Structure of Part Book Unique code by mechanism Unique name by mechanism Explode view Ref. No. : Unique identifcation number by part Parts No. : Unique Product
Copyright 0, Oracle and/or its affiliates. All rights reserved.,.,,,,,,,,,,,,.,...,. U.S. GOVERNMENT RIGHTS Programs, software, databases, and related
 Virtual Machine Sun Fire X4800 M : E4570 0 8 Copyright 0, Oracle and/or its affiliates. All rights reserved.,.,,,,,,,,,,,,.,...,. U.S. GOVERNMENT RIGHTS Programs, software, databases, and related documentation
ENGLISH Introduction Congratulations on your purchase and welcome to Philips! To fully benefit from the support that Philips offers, register your pro
 HQ6990, HQ6970, HQ6950, HQ690 3 4 5 6 7 CHARGE 8 9 0 3 4 5 6 7 8 9 0 ENGLISH Introduction Congratulations on your purchase and welcome to Philips! To fully benefit from the support that Philips offers,
Solo2 wireless Quick Start Guide
 beatsbydre.com facebook.com/beatsbydre @beatsbydre @beatsbydre +beatsbydre FOLD + FIT WIRELESS MODE R 90º EN Expand and collapse to play and store. CN JP KR 헤드폰을사용하려면펴고, 보관하려면접으십시오. ZH 展開耳杯播放 ID Buka dan
MF Driver Installation Guide
 Korean MF 드라이버 설치설명서 사용자 소프트웨어 CD-ROM... 드라이버 및 소프트웨어 정보...1 지원되는 운영 체제...1 MF 드라이버 및 MF Toolbox 설치... [쉬운 설치]를 사용한 설치...2 [사용자 정의 설치]를 사용한 설치...10 USB 케이블 연결(USB를 이용해 연결하는 경우만)...20 설치 결과 확인...21 온라인
#KM-350AB..
 PARTS BOOK KM-350A-7S KM-350A-7N KM-350B-7S KM-350B-7N KM-350A KM-350B PARTS BOOK KM-350A-7S KM-350A-7N KM-350B-7S KM-350B-7N KM-350A KM-350B PME-051121 MODEL FOR THIN MATERIAL KM-350A-7S 1-NEEDLE, NEEDLE
비어 있음
 VYPYR. VYPYR 15 VYPYR 120,. 43 Peavey. VYPYR., " ". TransTube " ", 266MHz SHARC. VYPYR 5,.,,. VYPYR. AC. IEC ( )... : 24 "( 30cm). 0 - Input. 1 - Stompbox Encoder VYPYR15.. 11.!. 2 - Amp Encoder.. 2. LED
Page 2 of 5 아니다 means to not be, and is therefore the opposite of 이다. While English simply turns words like to be or to exist negative by adding not,
 Page 1 of 5 Learn Korean Ep. 4: To be and To exist Of course to be and to exist are different verbs, but they re often confused by beginning students when learning Korean. In English we sometimes use the
*KM-380BL,BLB724.
 PARTS BOOK KM-380BL KM-380BLB KM-380BL KM-380BLB PME-051104 MODEL FOR HEAVY MATERIAL KM-380BL CYLINDER-BED TYPE, 1-NEEDLE UNISON FEED, VERTICAL LARGE HOOK, LOCK-STITCH MACHINE. KM-380BLB CYLINDER-BED TYPE,
HP Color LaserJet Pro CP1020 Series Getting Started Guide - XLWW
 Color LaserJet Pro CP1020 Series Getting Started Guide 2 English... 1 Bahasa Indonesia... 4 한국어... 7 ไทย...10 IMPORTANT: Follow Steps 1-3 on the printer hardware setup poster, then continue with Step 4
APOGEE Insight_KR_Base_3P11
 Technical Specification Sheet Document No. 149-332P25 September, 2010 Insight 3.11 Base Workstation 그림 1. Insight Base 메인메뉴 Insight Base Insight Insight Base, Insight Base Insight Base Insight Windows
#KM-340BL
 PARTS BOOK KM-340BL 고속 1본침 본봉 상하송 재봉기 High Speed, 1-Needle, Upper and Lower Feed Lock Stitch Machine W/Large Hook PME-100707 SunStar CO., LTD. INFORMATION A. Parts Book Structure of Part Book Unique code
ISP and CodeVisionAVR C Compiler.hwp
 USBISP V3.0 & P-AVRISP V1.0 with CodeVisionAVR C Compiler http://www.avrmall.com/ November 12, 2007 Copyright (c) 2003-2008 All Rights Reserved. USBISP V3.0 & P-AVRISP V1.0 with CodeVisionAVR C Compiler
3. 명칭맞추기 : 60 장 Mencocokkan nama: 60 buah 면접관이제시하는물품의명칭을한국어로말하시오. Jawablah nama barang yang ditunjuk oleh penilik dalam bahasa Korea. 목장갑 Sarung Tanga
 기능시험평가지 Formulir Evaluasi Ujian Keahlian 업종 Kategori 평가시간 : 4 분 Durasi untuk Tes: 4 menit Ⅰ. 요구사항및평가내용 Tuntutan dan Evaluasi 1. 한국어기초대화 Komunikasi dasar dalam bahasa Korea 본인소개와함께자신의강점과관련경험, 취업후계획을한국어로말하시오
Product A4
 2 APTIV Film Versatility and Performance APTIV Film Versatility and Performance 3 4 APTIV Film Versatility and Performance APTIV Film Versatility and Performance 5 PI Increasing Performance PES PPSU PSU
온라인등록용 메뉴얼
 WIZPLAT Corporation User Manual Gigabit LAN Port + USB3.0 HUB 사용자 설명서 이번에는 Gigabit LAN Port + USB3.0 HUB 를 구입해 주셔서 대단히 감사합니다. 이 사용설명서에는 중요한 주의 사항과 제품의 취급방법이 설명되어 있습니다. 사용하기 전에 설명서를 잘 읽어 보신 후 본 제품을 바르고
2014 HSC Korean Continuers
 Centre Number 2014 HIGHER SCHOOL CERTIFICATE EXAMINATION Student Number Korean Continuers Total marks 80 Section I Pages 2 4 General Instructions Reading time 10 minutes Working time 2 hours and 50 minutes
2 min 응용 말하기 01 I set my alarm for 7. 02 It goes off. 03 It doesn t go off. 04 I sleep in. 05 I make my bed. 06 I brush my teeth. 07 I take a shower.
 스피킹 매트릭스 특별 체험판 정답 및 스크립트 30초 영어 말하기 INPUT DAY 01 p.10~12 3 min 집중 훈련 01 I * wake up * at 7. 02 I * eat * an apple. 03 I * go * to school. 04 I * put on * my shoes. 05 I * wash * my hands. 06 I * leave
레이아웃 1
 Volkswagen R The new Golf R *사진 일부 사양은 실제 국내 판매 모델과 차이가 있을 수 있습니다. Volkswagen R GmbH 고성능 및 특화 모델을 전문적으로 개발하기 위해 탄생한 폭스바겐 R GmbH는 강력한 주행성능을 바탕으로 업그레이드된 스포츠카(R 모델), 다이내믹한 스타일을 갖춘 독립된 패키지(R-Line) 등을 생산하고
Solaris Express Developer Edition
 Solaris Express Developer Edition : 2008 1 Solaris TM Express Developer Edition Solaris OS. Sun / Solaris, Java, Web 2.0,,. Developer Solaris Express Developer Edition System Requirements. 768MB. SPARC
K_R9000PRO_101.pdf
 GV-R9000 PRO Radeon 9000 PRO Upgrade your Life REV 101 GV-R9000 PRO - 2-2002 11 1 12 ATi Radeon 9000 PRO GPU 64MB DDR SDRAM 275MHz DirectX 81 SMARTSHADER ATI SMOOTHVISION 3D HYDRAVISION ATI CATLYST DVI-I
112초등정답3-수학(01~16)ok
ok") Visang 1 110 0 30 0 0 10 3 01030 5 10 6 1 11 3 1 7 8 9 13 10 33 71 11 6 1 13 1 7\6+3=5 15 3 5\3+=17 8 9\8+=76 16 7 17 7 18 6 15 19 1 0 < 1 18 1 6\1+=76 6 < 76 6 16 1 7 \7+1=55 < 55 15 1 1 3 113 1 5? =60?6=10
Visang 1 110 0 30 0 0 10 3 01030 5 10 6 1 11 3 1 7 8 9 13 10 33 71 11 6 1 13 1 7\6+3=5 15 3 5\3+=17 8 9\8+=76 16 7 17 7 18 6 15 19 1 0 < 1 18 1 6\1+=76 6 < 76 6 16 1 7 \7+1=55 < 55 15 1 1 3 113 1 5? =60?6=10
- 2 -
 - 1 - - 2 - - 3 - - 4 - - 5 - - 6 - - 7 - - 8 - - 9 - - 10 - - 11 - - 12 - - 13 - - 14 - - 15 - - 16 - - 17 - - 18 - - 19 - - 20 - - 21 - - 22 - - 23 - - 24 - - 25 - - 26 - - 27 - - 28 - - 29 - - 30 -
Å©·¹Àγ»Áö20p
 Main www.bandohoist.com Products Wire Rope Hoist Ex-proof Hoist Chain Hoist i-lifter Crane Conveyor F/A System Ci-LIFTER Wire Rope Hoist & Explosion-proof Hoist Mono-Rail Type 1/2ton~20ton Double-Rail
# KM
 PARTS BOOK 1-NEEDLE, STRAIGHT LOCK-STITCH MACHINE WITH VERTICAL EDGE TRIMMER 1-NEEDLE, NEEDLE FEED LOCK-STITCH MACHINE WITH VERTICAL EDGE TRIMMER MODEL KM-506 SERIES KM-506-7S 1-NEEDLE, STRAIGHT LOCK-STITCH
: Symantec Backup Exec System Recovery 8:............................................................................. 3..............................
 W H I T : E PA P E R : C U S TO M I Z E Confidence in a connected world. Symantec Backup Exec System Recovery 8: : Symantec Backup Exec System Recovery 8:.............................................................................
하나님의 선한 손의 도우심 이세상에서 가장 큰 축복은 하나님이 나와 함께 하시는 것입니다. 그 이 유는 하나님이 모든 축복의 근원이시기 때문입니다. 에스라서에 보면 하나님의 선한 손의 도우심이 함께 했던 사람의 이야기 가 나와 있는데 에스라 7장은 거듭해서 그 비결을
 새벽이슬 2 0 1 3 a u g u s t 내가 이스라엘에게 이슬과 같으리니 그가 백합화같이 피 겠고 레바논 백향목같이 뿌리가 박힐것이라. Vol 5 Number 3 호세아 14:5 하나님의 선한 손의 도우심 이세상에서 가장 큰 축복은 하나님이 나와 함께 하시는 것입니다. 그 이 유는 하나님이 모든 축복의 근원이시기 때문입니다. 에스라서에 보면 하나님의 선한
Table of Contents Section Page Section Page Important Safety Instructions... 2 Introduction... 4 Unpacking and Checking Carton Contents... 4 Caster/Ca
 OWNER S MANUAL 22.5 LITRE WET/DRY VAC WD0655AU0 WD0655KR0 WD0655ND0 FOR QUESTIONS OR INFORMATION CONTACT US AT www.ridgid.com.au WARNING: To reduce the risk of injury, the user must read and understand
Remote UI Guide
 Remote UI KOR Remote UI Remote UI PDF Adobe Reader/Adobe Acrobat Reader. Adobe Reader/Adobe Acrobat Reader Adobe Systems Incorporated.. Canon. Remote UI GIF Adobe Systems Incorporated Photoshop. ..........................................................
MENU TREATMENT NEST 2018 KELAS 2 CABANG CIKARANG.cdr
 Info Franchise Nest : 081389191300 franchise@nestspa.co.id ATTENTION / 주의 The service you have selected can not be changed Thank you 선택하신서비스는변경할수없습니다. 감사합니다 P R O M O / 프로모션 MASSAGE 90 + FACE ACUPRESSURE
목차 윈도우드라이버 1. 매뉴얼안내 운영체제 (OS) 환경 윈도우드라이버준비 윈도우드라이버설치 Windows XP/Server 2003 에서설치 Serial 또는 Parallel 포트의경우.
 환경 윈도우드라이버준비 윈도우드라이버설치 Windows XP/Server 2003 에서설치 Serial 또는 Parallel 포트의경우.") 소프트웨어매뉴얼 윈도우드라이버 Rev. 3.03 SLP-TX220 / TX223 SLP-TX420 / TX423 SLP-TX400 / TX403 SLP-DX220 / DX223 SLP-DX420 / DX423 SLP-DL410 / DL413 SLP-T400 / T403 SLP-T400R / T403R SLP-D220 / D223 SLP-D420 / D423
소프트웨어매뉴얼 윈도우드라이버 Rev. 3.03 SLP-TX220 / TX223 SLP-TX420 / TX423 SLP-TX400 / TX403 SLP-DX220 / DX223 SLP-DX420 / DX423 SLP-DL410 / DL413 SLP-T400 / T403 SLP-T400R / T403R SLP-D220 / D223 SLP-D420 / D423
목차 제 1 장 inexio Touch Driver소개... 3 1.1 소개 및 주요 기능... 3 1.2 제품사양... 4 제 2 장 설치 및 실행... 5 2.1 설치 시 주의사항... 5 2.2 설치 권고 사양... 5 2.3 프로그램 설치... 6 2.4 하드웨
 최종 수정일: 2010.01.15 inexio 적외선 터치스크린 사용 설명서 [Notes] 본 매뉴얼의 정보는 예고 없이 변경될 수 있으며 사용된 이미지가 실제와 다를 수 있습니다. 1 목차 제 1 장 inexio Touch Driver소개... 3 1.1 소개 및 주요 기능... 3 1.2 제품사양... 4 제 2 장 설치 및 실행... 5 2.1 설치 시
IRISCard Anywhere 5
 이 빠른 사용자 가이드는 IRISCard Anywhere 5 및 IRISCard Corporate 5 스캐너의 설치와 시작을 도와 드립니다. 이 스캐너와 함께 제공되는 소프트웨어는: - Cardiris Pro 5 및 Cardiris Corporate 5 for CRM (Windows 용) - Cardiris Pro 4 (Mac OS 용) Cardiris 의
English Introduction Congratulations on your purchase and welcome to Philips! To fully benefit from the support that Philips offers, register your pro
 1 AT620 AT610 User manual 2 3 4 5 6 7 8 9 10 11 12 13 14 15 16 17 18 19 20 21 22 23 24 25 26 4222.002.5447.1 English Introduction Congratulations on your purchase and welcome to Philips! To fully benefit
DR-M140 사용 설명서
 사용 설명서 본 스캐너를 사용하기 전에 이 설명서를 읽으십시 오. 이 설명서를 다 읽은 후에는 이후에 참조할 수 있 도록 안전한 곳에 보관하십시오. 보증과 A/S 이 제품에는 보증서가 있습니다. 보증서는 구매처에서 받을 수 있습니다. 구매한 날짜 구매처 등의 기 입을 확인한 후 내용을 정확히 읽고 잘 보관하십시오. 보증기간 보증기간은 구매한 날로부터 1년 입니다.
12È«±â¼±¿Ü339~370
 http://www.kbc.go.kr/ k Si 2 i= 1 Abstract A Study on Establishment of Fair Trade Order in Terrestrial Broadcasting Ki - Sun Hong (Professor, Dept. of Journalism & Mass Communication,
A11344 ASUS Warranty Information Form Mr/Mrs/Miss: Telephone Number: Address: Address: Purchase Date (DD/MM/YYYY): / / Dealer s Name: Dealer s
: / / Dealer s Name: Dealer s") WARRANTY CARD English / Korean / Indonesian A11344 ASUS Warranty Information Form Mr/Mrs/Miss: Telephone Number: Address: E-mail Address: Purchase Date (DD/MM/YYYY): / / Dealer s Name: Dealer s Address:
WARRANTY CARD English / Korean / Indonesian A11344 ASUS Warranty Information Form Mr/Mrs/Miss: Telephone Number: Address: E-mail Address: Purchase Date (DD/MM/YYYY): / / Dealer s Name: Dealer s Address:
Copyrights and Trademarks Autodesk SketchBook Mobile (2.0.2) 2013 Autodesk, Inc. All Rights Reserved. Except as otherwise permitted by Autodesk, Inc.,
 2013 Autodesk, Inc. All Rights Reserved. Except as otherwise permitted by Autodesk, Inc.,") Autodesk SketchBook Mobile Copyrights and Trademarks Autodesk SketchBook Mobile (2.0.2) 2013 Autodesk, Inc. All Rights Reserved. Except as otherwise permitted by Autodesk, Inc., this publication, or parts
Autodesk SketchBook Mobile Copyrights and Trademarks Autodesk SketchBook Mobile (2.0.2) 2013 Autodesk, Inc. All Rights Reserved. Except as otherwise permitted by Autodesk, Inc., this publication, or parts
MF3010 MF Driver Installation Guide
 한국어 MF 드라이버설치설명서 사용자소프트웨어 CD-ROM................................................ 1.................................................................... 1..............................................................................
6. 설치가시작되는동안 USB 드라이버가자동으로로드됩니다. USB 드라이버가성공적으로로드되면 Setup is starting( 설치가시작되는중 )... 화면이표시됩니다. 7. 화면지침에따라 Windows 7 설치를완료합니다. 방법 2: 수정된 Windows 7 ISO
... 화면이표시됩니다. 7. 화면지침에따라 Windows 7 설치를완료합니다. 방법 2: 수정된 Windows 7 ISO") Windows 7 설치및 PCIE RAID 설정정보 DK173 초판 11월 2016 A. Windows 7 및 USB 드라이버설치 칩셋사양에따라 Windows 7 설치중에 USB 키보드 / 마우스를사용하려면시스템에서 USB 드라이버를사전로드해야합니다. 이절에서는 USB 드라이버사전로드방법과 Windows 7 설치방법에대해서설명합니다. 방법 1: SATA ODD
Windows 7 설치및 PCIE RAID 설정정보 DK173 초판 11월 2016 A. Windows 7 및 USB 드라이버설치 칩셋사양에따라 Windows 7 설치중에 USB 키보드 / 마우스를사용하려면시스템에서 USB 드라이버를사전로드해야합니다. 이절에서는 USB 드라이버사전로드방법과 Windows 7 설치방법에대해서설명합니다. 방법 1: SATA ODD
Output file
 240 241 242 243 244 245 246 247 248 249 250 251 252 253 254 255 256 257 An Application for Calculation and Visualization of Narrative Relevance of Films Using Keyword Tags Choi Jin-Won (KAIST) Film making
step 1-1
 Written by Dr. In Ku Kim-Marshall STEP BY STEP Korean 1 through 15 Action Verbs Table of Contents Unit 1 The Korean Alphabet, hangeul Unit 2 Korean Sentences with 15 Action Verbs Introduction Review Exercises
(specifications) 3 ~ 10 (introduction) 11 (storage bin) 11 (legs) 11 (important operating requirements) 11 (location selection) 12 (storage bin) 12 (i
 3 ~ 10 (introduction) 11 (storage bin) 11 (legs) 11 (important operating requirements) 11 (location selection) 12 (storage bin) 12 (i") SERVICE MANUAL N200M / N300M / N500M ( : R22) e-mail : jhyun00@koreacom homepage : http://wwwicematiccokr (specifications) 3 ~ 10 (introduction) 11 (storage bin) 11 (legs) 11 (important operating requirements)
SERVICE MANUAL N200M / N300M / N500M ( : R22) e-mail : jhyun00@koreacom homepage : http://wwwicematiccokr (specifications) 3 ~ 10 (introduction) 11 (storage bin) 11 (legs) 11 (important operating requirements)
72129o
 유지보수정보 Third Edition Second Printing Part No 97773 Genie Industries 1 9 10 12 14 16 20 21 26 28 36 http//wwwgenieliftcom techpub@genieindcom Copyright 2000 Genie Industries 6, 2002 10 2 2, 2004 8 3 2,
먼저 읽어 보세요! 주 의 : 화재의 위험을 줄이려면, 본 장비를 비 혹은 습기에 노출하지 않도록 하시기 바랍니다. 화재의 위험을 줄이려면, 본 장비를 모든 종류의 액체로부터 멀리하시기 바랍니다. 액체가 흐르거나 튈 염려가 없는 장소에 보관하시고, 장비 위에 어떤 종류
 사용 설명서 메모리 카드 드라이브 Model No. AU-XPD1 한 국 어 본 제품을 사용하기 전에, 이 설명서를 주의깊게 읽어 보시고, 만약을 위해 보관하시기 바랍니다. SS0714KT0 -PS Printed in Korea VQT5L02 먼저 읽어 보세요! 주 의 : 화재의 위험을 줄이려면, 본 장비를 비 혹은 습기에 노출하지 않도록 하시기 바랍니다.
6자료집최종(6.8))
)") Chapter 1 05 Chapter 2 51 Chapter 3 99 Chapter 4 151 Chapter 1 Chapter 6 7 Chapter 8 9 Chapter 10 11 Chapter 12 13 Chapter 14 15 Chapter 16 17 Chapter 18 Chapter 19 Chapter 20 21 Chapter 22 23 Chapter
Chapter 1 05 Chapter 2 51 Chapter 3 99 Chapter 4 151 Chapter 1 Chapter 6 7 Chapter 8 9 Chapter 10 11 Chapter 12 13 Chapter 14 15 Chapter 16 17 Chapter 18 Chapter 19 Chapter 20 21 Chapter 22 23 Chapter
<30353132BFCFB7E15FC7D1B1B9C1A4BAB8B9FDC7D0C8B85F31352D31BCF6C1A4C8AEC0CE2E687770>
 지상파 방송의 원격송신과 공중송신권 침해여부에 관한 사례연구 Case Study on Copyright Infringement of Remote Transmission of Television Program 최정열(Choe, Jeong-Yeol) * 목 차 Ⅰ. 서론 Ⅱ. 사실 관계 및 재판의 경과 1. 원격시청기기 및 그 사용방법 등 2. 피고의 서비스 3.
Stage 2 First Phonics
 ORT Stage 2 First Phonics The Big Egg What could the big egg be? What are the characters doing? What do you think the story will be about? (큰 달걀은 무엇일까요? 등장인물들은 지금 무엇을 하고 있는 걸까요? 책은 어떤 내용일 것 같나요?) 대해 칭찬해
English (original instructions) 中文 ( 简体 ) 中文 ( 繁體 ) BAHASA INDONESIA ภาษาไทย tiếng việt 57 Copyright DEWALT B
 中文 ( 简体 ) 中文 ( 繁體 ) BAHASA INDONESIA ภาษาไทย tiếng việt 57 Copyright DEWALT B") D25413 D25414 D25415 D25430 English (original instructions) 中文 ( 简体 ) 中文 ( 繁體 ) BAHASA INDONESIA ภาษาไทย 3 12 21 30 39 48 tiếng việt 57 Copyright DEWALT B Figure 1 l d e h a k j b o f c Figure 2 Figure
D25413 D25414 D25415 D25430 English (original instructions) 中文 ( 简体 ) 中文 ( 繁體 ) BAHASA INDONESIA ภาษาไทย 3 12 21 30 39 48 tiếng việt 57 Copyright DEWALT B Figure 1 l d e h a k j b o f c Figure 2 Figure
Microsoft Word - Direction (Transport Guide)
") IBS Center for Geometry and Physics Transportation Guide to Gyeongju & Hotel Hyundai At a Glance Transportation Travel Travel Time Fare (KRW) / One way Schedules & Timetables Incheon Int l Airport Gyeongju
IBS Center for Geometry and Physics Transportation Guide to Gyeongju & Hotel Hyundai At a Glance Transportation Travel Travel Time Fare (KRW) / One way Schedules & Timetables Incheon Int l Airport Gyeongju
사용시 기본적인 주의사항 경고 : 전기 기구를 사용할 때는 다음의 기본적인 주의 사항을 반드시 유의하여야 합니다..제품을 사용하기 전에 반드시 사용법을 정독하십시오. 2.물과 가까운 곳, 욕실이나 부엌 그리고 수영장 같은 곳에서 제품을 사용하지 마십시오. 3.이 제품은
 OPERATING INSTRUCTIONS OPERATING INSTRUCTIONS 사용자설명서 TourBus 0 & TourBus 5 사용시 기본적인 주의사항 경고 : 전기 기구를 사용할 때는 다음의 기본적인 주의 사항을 반드시 유의하여야 합니다..제품을 사용하기 전에 반드시 사용법을 정독하십시오. 2.물과 가까운 곳, 욕실이나 부엌 그리고 수영장 같은 곳에서
TOOLS Software Installation Guide
 Steinberg TOOLS 소프트웨어설치안내서 정보 이소프트웨어및설치안내서는 Yamaha Corporation 이독점저작권을가지고있습니다. 제조사의사전동의없이어떠한방법으로든전체또는부분적으로소프트웨어를복사하거나이설치안내서를복제하는것은명백히금지됩니다. Steinberg/Yamaha 는소프트웨어및문서자료사용에관하여어떠한대변또는보증을하지않으며, 이설치안내서및소프트웨어사용결과에대하여책임있는것으로간주될수없습니다.
0125_ 워크샵 발표자료_완성.key
 WordPress is a free and open-source content management system (CMS) based on PHP and MySQL. WordPress is installed on a web server, which either is part of an Internet hosting service or is a network host
설치 순서 Windows 98 SE/Me/2000/XP 1 PC를 켜고 Windows를 시작합니다. 아직 컴퓨터에 프린터를 연결하지 마십시오. 2 PC에 P-S100 CD-ROM(프 린터 드라이버)을 삽입합니다. 3 설치 프로그램을 시작합니다. q CD-ROM의 PS1
을 삽입합니다. 3 설치 프로그램을 시작합니다. q CD-ROM의 PS1") 디지털 사진 프린터 P-S100 프린터 드라이버 설치 가이드 사용하는 컴퓨터에 따라 제공된 프린터 드라이버를 설치합니다. 설치 절차 에 대한 자세한 내용은 CD-ROM의 Readme 파일을 참조하십시오. 작동 환경 Windows 호환 모델: IBM PC/AT 및 호환품 운영 체제: Windows 98 SE/Me/2000/XP (Windows 98 SE/Me/2000/XP
디지털 사진 프린터 P-S100 프린터 드라이버 설치 가이드 사용하는 컴퓨터에 따라 제공된 프린터 드라이버를 설치합니다. 설치 절차 에 대한 자세한 내용은 CD-ROM의 Readme 파일을 참조하십시오. 작동 환경 Windows 호환 모델: IBM PC/AT 및 호환품 운영 체제: Windows 98 SE/Me/2000/XP (Windows 98 SE/Me/2000/XP
(Table of Contents) 2 (Specifications) 3 ~ 10 (Introduction) 11 (Storage Bins) 11 (Legs) 11 (Important Operating Requirements) 11 (Location Selection)
 2 (Specifications) 3 ~ 10 (Introduction) 11 (Storage Bins) 11 (Legs) 11 (Important Operating Requirements) 11 (Location Selection)") SERVICE MANUAL (Table of Contents) 2 (Specifications) 3 ~ 10 (Introduction) 11 (Storage Bins) 11 (Legs) 11 (Important Operating Requirements) 11 (Location Selection) 12 (Storage Bins) 12 (Ice Machine)
SERVICE MANUAL (Table of Contents) 2 (Specifications) 3 ~ 10 (Introduction) 11 (Storage Bins) 11 (Legs) 11 (Important Operating Requirements) 11 (Location Selection) 12 (Storage Bins) 12 (Ice Machine)
Microsoft Word - ntasFrameBuilderInstallGuide2.5.doc
 NTAS and FRAME BUILDER Install Guide NTAS and FRAME BUILDER Version 2.5 Copyright 2003 Ari System, Inc. All Rights reserved. NTAS and FRAME BUILDER are trademarks or registered trademarks of Ari System,
#DPK5(PB)(9.8.19)
(9.8.19)") PARTS BOOK DPK-5 포스트 베드, 1본침 본봉 지그재그 재봉기 Post Bed, Single-Needle Lock Stitch Zig Zag Sewing Machines PME-090929 SunStar CO., LTD. INFORMATION A. Parts Book 구성 Structure of Part Book ① ② ③ ④ ⑤⑥ ⑦ ⑧⑨ ① 관계
PARTS BOOK DPK-5 포스트 베드, 1본침 본봉 지그재그 재봉기 Post Bed, Single-Needle Lock Stitch Zig Zag Sewing Machines PME-090929 SunStar CO., LTD. INFORMATION A. Parts Book 구성 Structure of Part Book ① ② ③ ④ ⑤⑥ ⑦ ⑧⑨ ① 관계
2 전원 코드를 연결합니다. 출력 용지함을 기기 밖으로 꺼내고 문서 스토퍼 를 펼칩니다. 중요 아직 USB 케이블을 연결하지 마십시오. 전원 코드를 연결합니다. 경고 접지된 플러그가 기기에 장착되어 있어야 합니다. 2 1 Windows 사용자: 다음으로 3페이지 상단
 빠른 설정 가이드 바로 시작 ADS-2100 기기를 설정하기 전에 먼저 제품 안전 가이드를 읽은 다음 올바른 설정과 설치를 위해 이 빠른 설정 가이드를 읽어 주시기 바랍니다. 경고 경고는 피하지 않을 경우 사망에 이르거나 심각한 부상을 초래할 수 있는 잠재적으로 위험한 상 황을 나타냅니다. 1 기기 포장 풀기 및 구성품 확인 상자에 포함된 구성품은 국가에 따라
4 5 4. Hi-MO 애프터케어 시스템 편 5. 오비맥주 카스 카스 후레쉬 테이블 맥주는 천연식품이다 편 처음 스타일 그대로, 부탁 케어~ Hi-MO 애프터케어 시스템 지속적인 모발 관리로 끝까지 스타일이 유지되도록 독보적이다! 근데 그거 아세요? 맥주도 인공첨가물이
 1 2 On-air 3 1. 이베이코리아 G마켓 용평리조트 슈퍼브랜드딜 편 2. 아모레퍼시픽 헤라 루즈 홀릭 리퀴드 편 인쇄 광고 올해도 겨울이 왔어요. 당신에게 꼭 해주고 싶은 말이 있어요. G마켓에선 용평리조트 스페셜 패키지가 2만 6900원! 역시 G마켓이죠? G마켓과 함께하는 용평리조트 스페셜 패키지. G마켓의 슈퍼브랜드딜은 계속된다. 모바일 쇼핑 히어로
Microsoft Word - Installation and User Manual_CMD V2.2_.doc
 CARDMATIC CMD INSTALLATION MANUAL 씨앤에이씨스템(C&A SYSTEM Co., Ltd.) 본사 : 서울특별시 용산구 신계동 24-1(금양빌딩 2층) TEL. (02)718-2386( 代 ) FAX. (02) 701-2966 공장/연구소 : 경기도 고양시 일산동구 백석동 1141-2 유니테크빌 324호 TEL. (031)907-1386
17-221~235설계01철도사장교1.ps
 17-221~235설계01철도사장교1.ps 2012.12.26 19:59 페이지221 VOL.19 설계사례 222 김종학, 이경훈, 손준상, 송혜금 236 미호천 1교의 계획 및 설계 김재기, 이경훈, 김기혁, 곽태영 248 하나대교(가칭)의 계획 및 설계 이명재, 이경훈, 박 철, 박흥희, 조재원, 이대규 274 국도18호선 진도대교 성능개선공사 실시설계용역