NodeMCU 입문하기 목차 1. NodeMCU란? 2. NodeMCU로할수있는프로젝트 3. NodeMCU 개발환경구축하기 4. NodeMCU를사용하여 HELLO WORLD! 웹에출력하기 5. NodeMCU로 Blink 예제실행하기 6. 원격으로 LED 제어하기 7.
|
|
|
- 혜진 창
- 5 years ago
- Views:
Transcription
1 NodeMCU 입문하기 목차 1. NodeMCU란? 2. NodeMCU로할수있는프로젝트 3. NodeMCU 개발환경구축하기 4. NodeMCU를사용하여 HELLO WORLD! 웹에출력하기 5. NodeMCU로 Blink 예제실행하기 6. 원격으로 LED 제어하기 7. 원격으로 RGB LED 제어하기 8. 원격으로온습도모니터링하기 9. 원격으로화분의수분량모니터링하기 X62 LCD에원격으로텍스트출력하기 11. 미세먼지모니터링


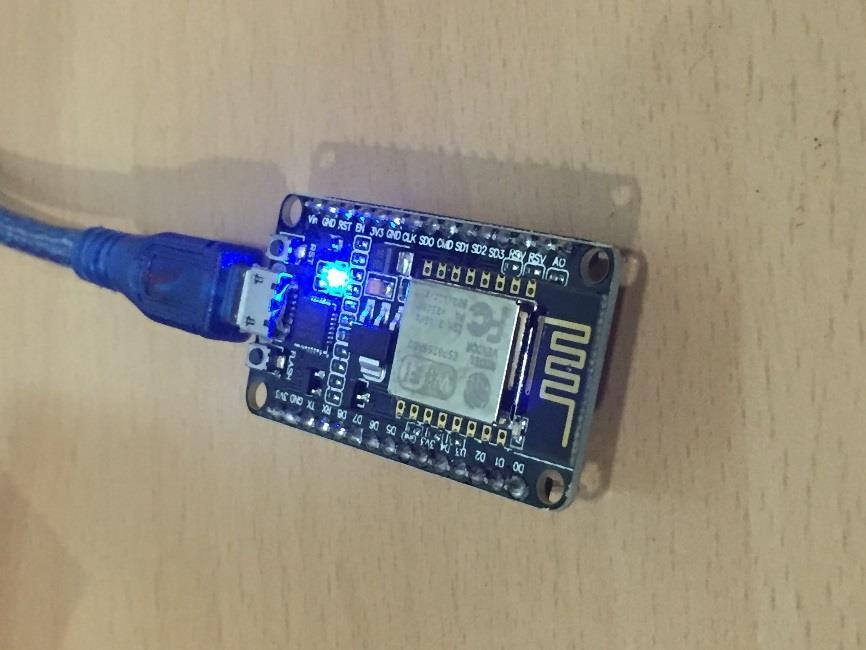
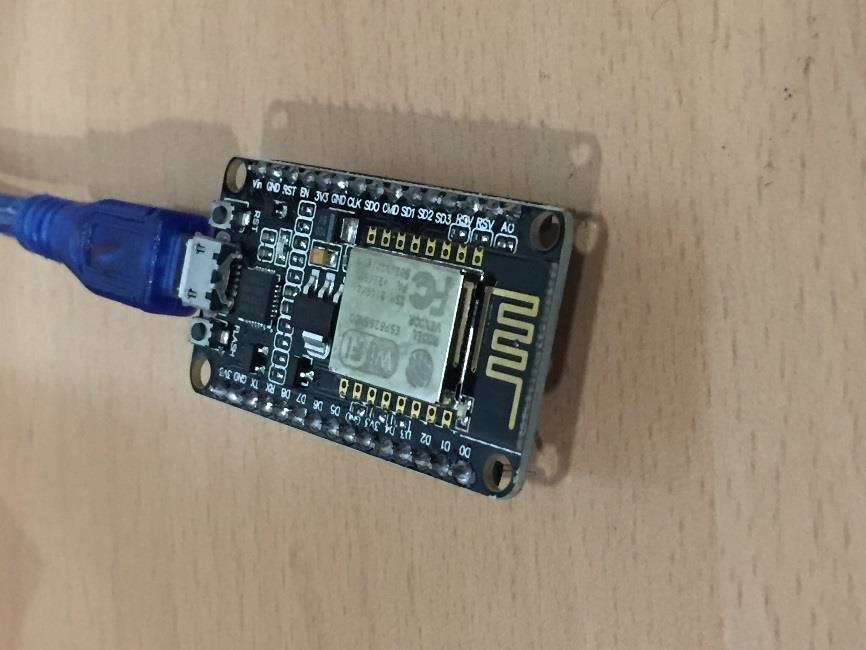
2 1. NodeMCU 란? NodeMCU ( 노드엠씨유 ) 는오픈소스사물인터넷 (IoT) 플랫폼으로와이파이기능이구현된 MCU 개발보드라고생각할수있습니다. 아두이노및라즈베리파이를사용해보신분이라면한번쯤들어보셨을 ESP8266 와이파이모듈을개발한 ESPRESSIF사의 ESP 모듈을사용합니다. 이름에서의미하는것처럼사물인터넷노드용 MCU이며, 작은크기와저렴한가격으로네트워크기능이구현된아두이노라고생각할수있습니다. 메카솔루션에서판매하고있는 NodeMCU V1.0은 ESP-12E를사용하며, USB 신호를 UART 신호로변경하기위해서 CP2012 칩셋을사용하고있습니다. 마이크로USB의앞쪽에있는조그만칩이 CP2012이고, 오른쪽의안테나와알루미늄쉴드가 ESP E SOC이며, 중앙의검정색칩이 LM1117로 5V 전압을 3.3V로변환합니다.
3

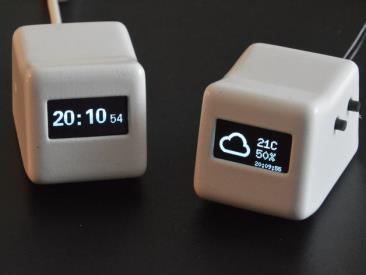
4 [NodeMCU V1.0 의핀배치도 ] 2. NodeMCU 로할수있는프로젝트 아두이노와와이파이모듈로할수있었던원격제어, 원격모니터링이주로 NodeMCU 로할수 있는프로젝트입니다. 3D 프린터를활용하여현재시간과날씨습도등의데이터를웹을통해받은후디스플레이를
5 할수도있으며, 저렴한 DHT11 센서를통해원격으로온습도센싱을한후디스플레이를할수도있습니다. 뿐만아니라, 스마트플러그를통한전력센싱과전력제어, 그리고비닐하우스내에서광량조절및온습도조절등다양한분야에서도활용할수있습니다.

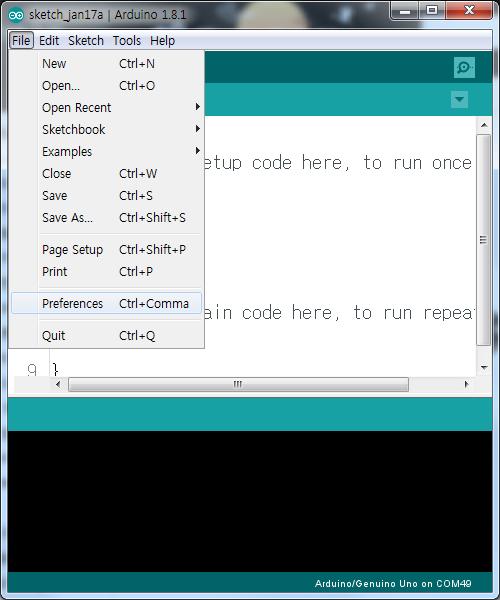
6 3. NodeMCU 개발환경구축하기 NodeMCU는 Lua라는프로그램언어를통해개발할수있습니다. 하지만, 많은사람들이아두이노 IDE를통해프로그래밍을하면서보다많은자료가공유되고, 편리하게사용되고있습니다. 본챕터에서는아두이노 IDE를통한 NodeMCU 개발환경을구축하고, 기본예제인 Blink 프로그램을업로드해보도록하겠습니다. 먼저, NodeMCU 에 USB 마이크로케이블을통해 PC 에연결합니다. 그러면다음과같이 CP2012 드 라이버가설치되는것을윈도우즈오른쪽하단에서확인할수있습니다. 제대로설치되었는지보기위해서는 PC 의장치관리자의포트를통해재확인할수있습니다. 아두이노 IDE 를설치했다면, Tools ( 도구 ) Boards Manager ( 보드매니저 ) 를통해 ESP8266 개발툴킷 을설치합니다.

7
 Board ( 보드 ) 설정에서")
")
8 설치가완료된후, 아두이노 IDE 의 Tools ( 도구 ) Board ( 보드 ) 설정에서 NodeMCU 1.0 (ESP-12E Module) 이라는보드를찾을수있습니다. 클릭을해서지정을합니다.

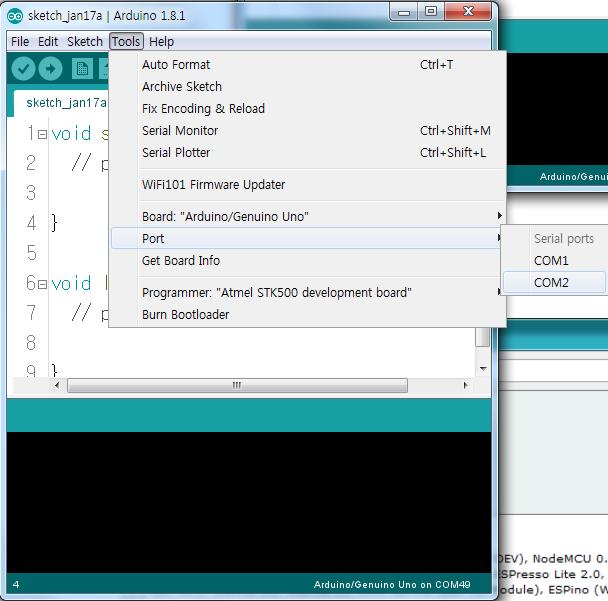
9 그다음에는 NodeMCU가연결된포트를 Tools ( 도구 ) Port ( 포트 ) 를통해설정합니다. 보드선택할때와마찬가지로클릭을해서지정을하게되는데, 여러개의 COM 포트가있다면연결된 NodeMCU를 PC에서뺐다가다시연결하면서변화가있는 COM 포트번호를선택할수있습니다.
10
11

12
13 4. NodeMCU 를사용하여 HELLO WORLD! 웹에출력하기 #include <ESP8266WiFi.h> const char* ssid = "iptime"; const char* password = ""; WiFiServer server(80); void setup() { Serial.begin(115200); delay(10); // Connect to WiFi network Serial.println(); Serial.println(); Serial.print("Connecting to "); Serial.println(ssid); WiFi.begin(ssid, password); while (WiFi.status()!= WL_CONNECTED) { delay(500); Serial.print("."); Serial.println(""); Serial.println("WiFi connected"); // Start the server server.begin(); Serial.println("Server started"); // Print the IP address Serial.print("Use this URL to connect: "); Serial.print(" Serial.print(WiFi.localIP()); Serial.println("/");
14 void loop() { // Check if a client has connected WiFiClient client = server.available(); if (!client) { return; // Wait until the client sends some data Serial.println("new client"); while(!client.available()){ delay(1); // Read the first line of the request String request = client.readstringuntil('\r'); Serial.println(request); client.flush(); // Return the response client.println("http/ OK"); client.println("content-type: text/html"); client.println(""); // do not forget this one client.println("<!doctype HTML>"); client.println("<html>"); client.print("hello WORLD!"); client.println("</html>"); delay(1); Serial.println("Client disonnected"); Serial.println(""); 업로드가완료된후에, 오른쪽상단의시리얼모니터링버튼을클릭하고 NodeMCU 의리셋버튼을 누르면원격접속하기위한 URL 을확인할수있습니다.

15 을스마트폰에서접속하면 HELLO WORLD! 라는텍스트를다음과같이확인할 수있습니다.
; 를실행하면 LED가켜져야한다고생각하는데, NodeMCU에서는이부분이반대로되어있다. 그이유는다음의 NodeMCU의스케메틱을통해확인해볼수있다.")
16 5. NodeMCU 로 Blink 예제실행하기 NodeMCU를사용하여 Blink 예제를사용해보면다른점을발견할수있는데, 바로내장된 LED이다. digitalwrite(led, HIGH); 를실행하면 LED가켜져야한다고생각하는데, NodeMCU에서는이부분이반대로되어있다. 그이유는다음의 NodeMCU의스케메틱을통해확인해볼수있다. NodeMCU 에서제공하는스케메틱을보면, 오른쪽상단의블럭에서내장 LED 와연결된 GPIO16 번 이 LED 의 (-) 극에연결이되어있다. 확대해서살펴보면다음과같다.
17 GPIO16이 LOW인상태이면, LED는 3V3을입력받고불이켜지게되며, GPIO16이상태가 HIGH가되면, LED의양단의전위차가 0이되어불이꺼지게된다. 일반적인아두이노의 13번내장 LED와는방향이반대이기때문에같은예제를사용하더라도반대로 LED가작동하는것을확인할수있다. 때문에, NodeMCU를사용하여내장된 LED를제어한다면다음과같은코드를사용할수있다. int LED_pin = 16; int turn_on = 0; int turn_off = 1; void setup() { // put your setup code here, to run once: pinmode(led_pin, OUTPUT); digitalwrite(led_pin, turn_off); void loop() { // put your main code here, to run repeatedly: digitalwrite(led_pin, turn_on); delay(1000);
18 digitalwrite(led_pin, turn_off); delay(1000);
19 6. 원격으로 LED 제어하기 #include <ESP8266WiFi.h> const char* ssid = "iptime"; const char* password = ""; WiFiServer server(80); // 변수지정 int LED_pin = 16; int turn_on = 0; int turn_off = 1; void setup() { Serial.begin(115200); delay(10); pinmode(led_pin, OUTPUT); digitalwrite(led_pin, turn_off); // Connect to WiFi network Serial.println(); Serial.println(); Serial.print("Connecting to "); Serial.println(ssid); WiFi.begin(ssid, password); while (WiFi.status()!= WL_CONNECTED) { delay(500); Serial.print("."); Serial.println(""); Serial.println("WiFi connected"); // Start the server
20 server.begin(); Serial.println("Server started"); // Print the IP address Serial.print("Use this URL to connect: "); Serial.print(" Serial.print(WiFi.localIP()); Serial.println("/"); void loop() { // Check if a client has connected WiFiClient client = server.available(); if (!client) { return; // Wait until the client sends some data Serial.println("new client"); while(!client.available()){ delay(1); // Read the first line of the request String request = client.readstringuntil('\r'); Serial.println(request); client.flush(); // Match the request int value = turn_off; if (request.indexof("/led=on")!= -1) { digitalwrite(led_pin, turn_on); value = turn_on; if (request.indexof("/led=off")!= -1) { digitalwrite(led_pin, turn_off); value = turn_off;
21 // Return the response client.println("http/ OK"); client.println("content-type: text/html"); client.println(""); // do not forget this one client.println("<!doctype HTML>"); client.println("<html>"); client.print("led pin is now: "); if(value == turn_on) { client.print("on"); else { client.print("off"); client.println("<br><br>"); client.println("<a href=\"/led=on\"\"><button>turn On </button></a>"); client.println("<a href=\"/led=off\"\"><button>turn Off </button></a><br />"); client.println("</html>"); delay(1); Serial.println("Client disonnected"); Serial.println(""); 스마트폰에서접속을한후에, 버튼을클릭하게되면다음과같이원격으로 LED 가제어되는것을 확인할수있습니다.
22


23 7. 원격으로 RGB LED 제어하기 #include <ESP8266WiFi.h> const char* ssid = "iptime"; const char* password = ""; WiFiServer server(80); // 변수지정 int LED_pin_R = 5; // D1 int LED_pin_G = 4; // D2
24 int LED_pin_B = 0; // D3 // Anode int turn_on = 0; int turn_off = 1; // Cathode // int turn_on = 1; // int turn_off = 0; void setup() { Serial.begin(115200); delay(10); pinmode(led_pin_r, OUTPUT); pinmode(led_pin_g, OUTPUT); pinmode(led_pin_b, OUTPUT); digitalwrite(led_pin_r, turn_off); digitalwrite(led_pin_g, turn_off); digitalwrite(led_pin_b, turn_off); // Connect to WiFi network Serial.println(); Serial.println(); Serial.print("Connecting to "); Serial.println(ssid); WiFi.begin(ssid, password); while (WiFi.status()!= WL_CONNECTED) { delay(500); Serial.print("."); Serial.println(""); Serial.println("WiFi connected"); // Start the server server.begin(); Serial.println("Server started");
25 // Print the IP address Serial.print("Use this URL to connect: "); Serial.print(" Serial.print(WiFi.localIP()); Serial.println("/"); void loop() { // Check if a client has connected WiFiClient client = server.available(); if (!client) { return; // Wait until the client sends some data Serial.println("new client"); while(!client.available()){ delay(1); // Read the first line of the request String request = client.readstringuntil('\r'); Serial.println(request); client.flush(); // Match the request int value_r = turn_off; int value_g = turn_off; int value_b = turn_off; if (request.indexof("/led_r=on")!= -1) { digitalwrite(led_pin_r, turn_on); value_r = turn_on; if (request.indexof("/led_r=off")!= -1) { digitalwrite(led_pin_r, turn_off);
26 value_r = turn_off; if (request.indexof("/led_g=on")!= -1) { digitalwrite(led_pin_g, turn_on); value_g = turn_on; if (request.indexof("/led_g=off")!= -1) { digitalwrite(led_pin_g, turn_off); value_g = turn_off; if (request.indexof("/led_b=on")!= -1) { digitalwrite(led_pin_b, turn_on); value_b = turn_on; if (request.indexof("/led_b=off")!= -1) { digitalwrite(led_pin_b, turn_off); value_b = turn_off; // Return the response client.println("http/ OK"); client.println("content-type: text/html"); client.println(""); // do not forget this one client.println("<!doctype HTML>"); client.println("<html>"); client.println("<meta http-equiv='content-type' content='text/html' charset='utf-8'/>"); client.println("<br><br>"); client.println("<a href=\"/led_r=on\"\"><button> 빨간색 LED ON </button></a>"); client.println("<a href=\"/led_r=off\"\"><button> 빨간색 LED OFF </button></a><br/>"); client.println("<a href=\"/led_g=on\"\"><button> 녹색 LED ON </button></a>"); client.println("<a href=\"/led_g=off\"\"><button> 녹색 LED OFF </button></a><br/>"); client.println("<a href=\"/led_b=on\"\"><button> 파랑색 LED ON </button></a>"); client.println("<a href=\"/led_b=off\"\"><button> 파랑색 LED OFF </button></a><br/>");
27 client.println("</html>"); delay(1); Serial.println("Client disonnected"); Serial.println("");
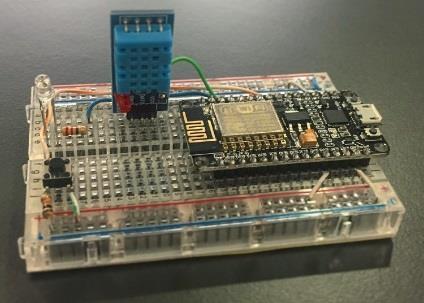
28 8. 원격으로온습도모니터링하기 HELLO WORLD! 예제에서는 NodeMCU 웹서버에접속한브라우저에 HTML로텍스트를표현해보았습니다. 이번에는텍스트뿐만아니라온도와습도를센서를사용하여모니터링하고, 이를웹서버의브라우저에표현해보도록하겠습니다. 그리고, 스마트폰을통해원격으로접속하여확인하는프로그램을작성해보겠습니다. 사용할온습도센서는 DHT11 기반의온습도센서로다음과같습니다. 사양 (Specification) 작동전압 : DC 3.3V ~ 5V 온도범위 : 0 ~ 50 / 정밀도 ± 2 습도범위 : 0~90% RH / 정밀도 ± 5% 디지털인터페이스크기 : 30 x 21 mm 먼저, DHT11 센서를사용하기위해서다음의링크를참고해볼수있습니다. 상단의링크에라이브러리에대한사용법및링크가있지만, 직접라이브러리압축파일은다음의링크에서다운로드받습니다. 그리고, 창의오른쪽에녹색버튼인 Clone or download 을클릭해서압축파일을받습니다.
")

29 두개의압축파일을받은후에, 아두이노 IDE 의 Sketch ( 스케치 ) Include Library Add.ZIP Library 를통해추가합니다.

30 먼저, 원격이아닌온습도만모니터링하는프로그램은다음과같습니다. #include "DHT.h" #define DHTPIN 2 // DHT11 이연결된핀 #define DHTTYPE DHT11 // DHT 11, DHT 시리즈중 11 을선택합니다. DHT dht(dhtpin, DHTTYPE); void setup() { Serial.begin(9600); Serial.println("DHTxx test!");
31 dht.begin(); void loop() { delay(2000); float h = dht.readhumidity();// 습도를측정합니다. float t = dht.readtemperature();// 온도를측정합니다. float f = dht.readtemperature(true);// 화씨온도를측정합니다. // 값읽기에오류가있으면오류를출력합니다. if (isnan(h) isnan(t) isnan(f)) { Serial.println("Failed to read from DHT sensor!"); return; // 보정된화씨값을가져옵니다. float hif = dht.computeheatindex(f, h); // 보정된섭씨값을가져옵니다. float hic = dht.computeheatindex(t, h, false); Serial.print("Humidity: "); Serial.print(h); Serial.print(" %\t"); Serial.print("Temperature: "); Serial.print(t); Serial.print(" *C "); Serial.print(f); Serial.print(" *F\t"); Serial.print("Heat index: "); Serial.print(hic); Serial.print(" *C "); Serial.print(hif); Serial.println(" *F"); 시리얼모니터링을통해, 온습도가잘출력되는것을확인한후원격으로데이터를모니터링하기 위해다음의코드를업로드해봅니다.
32 #include <ESP8266WiFi.h> const char* ssid = "iptime"; const char* password = ""; #include "DHT.h" #define DHTPIN 2 // DHT11이연결된핀 #define DHTTYPE DHT11 // DHT 11, DHT시리즈중 11을선택합니다. DHT dht(dhtpin, DHTTYPE); WiFiServer server(80); void setup() { Serial.begin(115200); delay(10); Serial.println("DHTxx test!"); dht.begin(); // Connect to WiFi network Serial.println(); Serial.println(); Serial.print("Connecting to "); Serial.println(ssid); WiFi.begin(ssid, password); while (WiFi.status()!= WL_CONNECTED) { delay(500); Serial.print("."); Serial.println(""); Serial.println("WiFi connected"); // Start the server server.begin(); Serial.println("Server started"); // Print the IP address
33 Serial.print("Use this URL to connect: "); Serial.print(" Serial.print(WiFi.localIP()); Serial.println("/"); void loop() { // Check if a client has connected WiFiClient client = server.available(); if (!client) { return; // Wait until the client sends some data Serial.println("new client"); while(!client.available()){ delay(1); // Read the first line of the request String request = client.readstringuntil('\r'); Serial.println(request); client.flush(); delay(2000); float h = dht.readhumidity();// 습도를측정합니다. float t = dht.readtemperature();// 온도를측정합니다. float f = dht.readtemperature(true);// 화씨온도를측정합니다. // 값읽기에오류가있으면오류를출력합니다. if (isnan(h) isnan(t) isnan(f)) { Serial.println("Failed to read from DHT sensor!"); return; // 보정된화씨값을가져옵니다. float hif = dht.computeheatindex(f, h);
34 // 보정된섭씨값을가져옵니다. float hic = dht.computeheatindex(t, h, false); // Return the response client.println("http/ OK"); client.println("content-type: text/html"); client.println(""); // do not forget this one client.println("<!doctype HTML>"); client.println("<html>"); client.print("humidity: "); client.print(h); client.print(" %\t"); client.print("temperature: "); client.print(t); client.print(" *C "); client.print(f); client.print(" *F\t"); client.print("heat index: "); client.print(hic); client.print(" *C "); client.print(hif); client.println(" *F"); client.println("</html>"); delay(1); Serial.println("Client disonnected"); Serial.println(""); 시리얼모니터링을위해브라우저에서 을접속해봅니다.
35
")

36 9. 원격으로화분의수분량모니터링하기 사양 (Specification) 토양수분센서아날로그인터페이스센싱부표면금도금입력전압 : 3.3~5V 출력전압 : 0~3.6V 전체크기 : 60 x 20mm 센싱부크기 : 40 x 20mm
37 #include <ESP8266WiFi.h> const char* ssid = "iptime"; const char* password = ""; WiFiServer server(80); void setup() { Serial.begin(115200); delay(10); // Connect to WiFi network Serial.println(); Serial.println(); Serial.print("Connecting to "); Serial.println(ssid); WiFi.begin(ssid, password); while (WiFi.status()!= WL_CONNECTED) { delay(500); Serial.print("."); Serial.println(""); Serial.println("WiFi connected"); // Start the server server.begin(); Serial.println("Server started"); // Print the IP address Serial.print("Use this URL to connect: "); Serial.print(" Serial.print(WiFi.localIP()); Serial.println("/"); void loop() { // Check if a client has connected WiFiClient client = server.available();
38 if (!client) { return; // Wait until the client sends some data Serial.println("new client"); while(!client.available()){ delay(1); // Read the first line of the request String request = client.readstringuntil('\r'); Serial.println(request); client.flush(); delay(2000); int waterlevel = analogread(0); // Return the response client.println("http/ OK"); client.println("content-type: text/html"); client.println(""); // do not forget this one client.println("<!doctype HTML>"); client.println("<html>"); client.print("water level: "); client.print(waterlevel); client.println("</html>"); delay(1); Serial.println("Client disonnected"); Serial.println("");
39 동일한방법으로아날로그센서를사용하는조도센서, 사운드센서, 수위센서, 가스센서등에사용할수있습니다. 사양 (Specification) CDS 황화카드뮴광센서아날로그인터페이스작동전압 : DC 3.3V ~ 5V 크기 : 23 x 21 mm

 아날로그인터페이스작동전압 : 3.")
40 사양 (Specification) LM386 기반사운드센서아날로그인터페이스작동전압 : DC 5V 크기 : 26 x 21 mm 무게 : 5g 사양 (Specification) 아날로그인터페이스작동전압 : 3.3~5V 크기 : 60 x 40mm 무게 : 4g
41 사양 (Specification) MQ 시리즈가스센서아날로그인터페이스작동전압 : 5V 크기 : 38 x 21mm 측정가스 : 알코올

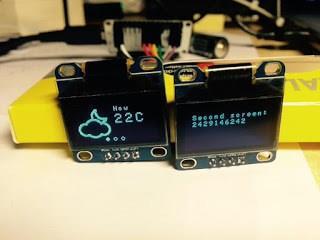
42 X62 LCD 에원격으로텍스트출력하기 사양 (Specification) 0.96 인치 OLED 디스플레이 SSD1306 드라이버칩사용 I2C 인터페이스 I2C 주소 : 0x3C 해상도 : 128x64 컬러 : 검정 / 배경, 흰색 / 글씨크기 : 38 x 28 x 9mm 무게 : 16g


43 OLED I2C GND VCC SDA SCL NodeMCU 보드 GND 3V3 D2 D1 /* Hello World OLED Test */ #include "SSD1306.h" // alias for `#include "SSD1306Wire.h"`
44 SSD1306 display(0x3c, 5, 4); // Initialise the OLED display using Wire library void setup() { Serial.begin(115200); display.init(); // Initialising the UI will init the display too. display.flipscreenvertically(); display.clear(); drawhelloworld(); display.display(); void loop() { void drawhelloworld() { display.settextalignment(text_align_left); display.setfont(arialmt_plain_10); display.drawstring(0, 0, "Mechasolution"); display.setfont(arialmt_plain_16); display.drawstring(0, 10, "Mechasolution"); display.setfont(arialmt_plain_24); display.drawstring(0, 26, "Mechasolution");


45 11. 미세먼지모니터링 int measurepin = 0; int ledpower = 5; unsigned int samplingtime = 280; unsigned int deltatime = 40; unsigned int sleeptime = 9680; float vomeasured = 0; float calcvoltage = 0; float dustdensity = 0;
46 void setup(){ Serial.begin(9600); pinmode(ledpower,output); void loop(){ digitalwrite(ledpower,low); delaymicroseconds(samplingtime); vomeasured = analogread(measurepin); delaymicroseconds(deltatime); digitalwrite(ledpower,high); delaymicroseconds(sleeptime); calcvoltage = vomeasured*(5.0/1024); dustdensity = 0.17*calcVoltage-0.1; if ( dustdensity < 0) { dustdensity = 0.00; Serial.println("Raw Signal Value (0-1023):"); Serial.println(voMeasured); Serial.println("Voltage:"); Serial.println(calcVoltage); Serial.println("Dust Density:"); Serial.println(dustDensity); delay(1000); 원격미세먼지모니터링 #include <ESP8266WiFi.h> const char* ssid = "iptime";
47 const char* password = ""; // 먼지센서모니터링용변수 int measurepin = 0; int ledpower = 5; unsigned int samplingtime = 280; unsigned int deltatime = 40; unsigned int sleeptime = 9680; float vomeasured = 0; float calcvoltage = 0; float dustdensity = 0; WiFiServer server(80); void setup() { Serial.begin(115200); delay(10); pinmode(ledpower,output); // Connect to WiFi network Serial.println(); Serial.println(); Serial.print("Connecting to "); Serial.println(ssid); WiFi.begin(ssid, password); while (WiFi.status()!= WL_CONNECTED) { delay(500); Serial.print("."); Serial.println(""); Serial.println("WiFi connected"); // Start the server server.begin(); Serial.println("Server started");
48 // Print the IP address Serial.print("Use this URL to connect: "); Serial.print(" Serial.print(WiFi.localIP()); Serial.println("/"); void loop() { // Check if a client has connected WiFiClient client = server.available(); if (!client) { return; // Wait until the client sends some data Serial.println("new client"); while(!client.available()){ delay(1); // Read the first line of the request String request = client.readstringuntil('\r'); Serial.println(request); client.flush(); delay(1000); digitalwrite(ledpower,low); delaymicroseconds(samplingtime); vomeasured = analogread(measurepin); delaymicroseconds(deltatime); digitalwrite(ledpower,high); delaymicroseconds(sleeptime); calcvoltage = vomeasured*(5.0/1024); dustdensity = 0.17*calcVoltage-0.1;
49 if ( dustdensity < 0) { dustdensity = 0.00; // Return the response client.println("http/ OK"); client.println("content-type: text/html"); client.println(""); // do not forget this one client.println("<!doctype HTML>"); client.println("<html>"); client.print("raw Signal Value (0-1023): "); client.println(vomeasured); client.print("voltage:"); client.println(calcvoltage); client.print("dust Density:"); client.println(dustdensity); client.println("</html>"); delay(1); Serial.println("Client disonnected"); Serial.println("");
Microsoft PowerPoint - es-arduino-lecture-03
 임베디드시스템개론 : Arduino 활용 Lecture #3: Button Input & FND Control 2012. 3. 25 by 김영주 강의목차 디지털입력 Button switch 입력 Button Debounce 7-Segment FND : 직접제어 7-Segment FND : IC 제어 2 디지털입력 : Switch 입력 (1) 실습목표 아두이노디지털입력처리실습
 ü ü ü #include #include #include #include Servo servoleft; Servo servoright; int sensorvalue1, sensorvalue2; // 각각앞쪽과뒤쪽의조도센서 int voltage, voltage2;
Install stm32cubemx and st-link utility
 STM32CubeMX and ST-LINK Utility for STM32 Development 본문서는 ST Microelectronics 의 ARM Cortex-M 시리즈 Microcontroller 개발을위해제공되는 STM32CubeMX 와 STM32 ST-LINK Utility 프로그램의설치과정을설명합니다. 본문서는 Microsoft Windows 7
<C0CCBCBCBFB52DC1A4B4EBBFF82DBCAEBBE7B3EDB9AE2D313939392D382E687770>
 i ii iii iv v vi 1 2 3 4 가상대학 시스템의 국내외 현황 조사 가상대학 플랫폼 개발 이상적인 가상대학시스템의 미래상 제안 5 웹-기반 가상대학 시스템 전통적인 교수 방법 시간/공간 제약을 극복한 학습동기 부여 교수의 일방적인 내용전달 교수와 학생간의 상호작용 동료 학생들 간의 상호작용 가상대학 운영 공지사항,강의록 자료실, 메모 질의응답,
K&R2 Reference Manual 번역본
 typewriter structunion struct union if-else if if else if if else if if if if else else ; auto register static extern typedef void char short int long float double signed unsigned const volatile { } struct
<4D F736F F F696E74202D20B8B6C0CCC5A9B7CEC7C1B7CEBCBCBCAD202839C1D6C2F7207E203135C1D6C2F >
 10주차 문자 LCD 의인터페이스회로및구동함수 Next-Generation Networks Lab. 5. 16x2 CLCD 모듈 (HY-1602H-803) 그림 11-18 19 핀설명표 11-11 번호 분류 핀이름 레벨 (V) 기능 1 V SS or GND 0 GND 전원 2 V Power DD or V CC +5 CLCD 구동전원 3 V 0 - CLCD 명암조절
SBR-100S User Manual
 ( 1 / 13 ) SBR-100S 모델에 대한 사용자 펌웨어 업그레이드 방법을 안내해 드립니다. SBR-100S 는 신규 펌웨어가 있을시 FOTA(자동업데이트) 기능을 통하여 자동 업그레이드가 되며, 필요시 사용자가 신규 펌웨어를 다운받아 수동으로 업그레이드 할 수 있습니다. 1. 준비하기 1.1 연결 장치 준비 펌웨어 업그레이드를 위해서는 SBR-100S
PowerPoint 프레젠테이션
 Web server porting 2 Jo, Heeseung Web 을이용한 LED 제어 Web 을이용한 LED 제어프로그램 web 에서데이터를전송받아타겟보드의 LED 를조작하는프로그램을작성하기위해다음과같은소스파일을생성 2 Web 을이용한 LED 제어 LED 제어프로그램작성 8bitled.html 파일을작성 root@ubuntu:/working/web# vi
목차 1 아두이노와이어링 & 코딩 1-1 아두이노초보자를위한 아두이노와이어링과코딩에의한 LED ON OFF 12 Coding_LED_ON_OFF_ 아두이노초보자에게위험스러운 아두이노코딩에의한 LED
 목차 1 아두이노와이어링 & 코딩 1-1 아두이노초보자를위한 아두이노와이어링과코딩에의한 LED ON OFF 12 Coding_LED_ON_OFF_01 http://blog.daum.net/ejleep1/360 1-2 아두이노초보자에게위험스러운 아두이노코딩에의한 LED ON OFF 16 Coding_Dangerous_LED_ON_OFF_01 http://blog.daum.net/ejleep1/370
목차 윈도우드라이버 1. 매뉴얼안내 운영체제 (OS) 환경 윈도우드라이버준비 윈도우드라이버설치 Windows XP/Server 2003 에서설치 Serial 또는 Parallel 포트의경우.
 환경 윈도우드라이버준비 윈도우드라이버설치 Windows XP/Server 2003 에서설치 Serial 또는 Parallel 포트의경우.") 소프트웨어매뉴얼 윈도우드라이버 Rev. 3.03 SLP-TX220 / TX223 SLP-TX420 / TX423 SLP-TX400 / TX403 SLP-DX220 / DX223 SLP-DX420 / DX423 SLP-DL410 / DL413 SLP-T400 / T403 SLP-T400R / T403R SLP-D220 / D223 SLP-D420 / D423
소프트웨어매뉴얼 윈도우드라이버 Rev. 3.03 SLP-TX220 / TX223 SLP-TX420 / TX423 SLP-TX400 / TX403 SLP-DX220 / DX223 SLP-DX420 / DX423 SLP-DL410 / DL413 SLP-T400 / T403 SLP-T400R / T403R SLP-D220 / D223 SLP-D420 / D423
< 제누이노스타트키트 > 사용설명서 목차 1. Arduino IDE 설치하기 2. Genuino 연결및 Arduino IDE 셋팅하기 3. 센서설명및연결도, 예제소스 1
 < 제누이노스타트키트 > 사용설명서 목차 1. Arduino IDE 설치하기 2. Genuino 연결및 Arduino IDE 셋팅하기 3. 센서설명및연결도, 예제소스 1 1. Arduino IDE 설치하기 1) Arduino IDE 다운로드 - 홈페이지주소 : https://www.arduino.cc 접속합니다. Download 를클릭합니다. Windows
BY-FDP-4-70.hwp
 RS-232, RS485 FND Display Module BY-FDP-4-70-XX (Rev 1.0) - 1 - 1. 개요. 본 Display Module은 RS-232, RS-485 겸용입니다. Power : DC24V, DC12V( 주문사양). Max Current : 0.6A 숫자크기 : 58mm(FND Size : 70x47mm 4 개) RS-232,
고급 프로그래밍 설계
 UNIT 13 라즈베리파이블루투스 광운대학교로봇 SW 교육원 최상훈 Bluetooth Module 2 Bluetooth Slave UART Board UART 인터페이스용블루투스모듈 slave/device mode 라즈베리파이 GPIO 3 < 라즈베리파이 B+ 의 P1 헤더핀 GPIO 배치도 > wiringpi 라이브러리 4 라즈베리파이 GPIO 라이브러리
(SW3704) Gingerbread Source Build & Working Guide
 Gingerbread Source Build & Working Guide") (Mango-M32F4) Test Guide http://www.mangoboard.com/ http://cafe.naver.com/embeddedcrazyboys Crazy Embedded Laboratory www.mangoboard.com cafe.naver.com/embeddedcrazyboys CRZ Technology 1 Document History
(Mango-M32F4) Test Guide http://www.mangoboard.com/ http://cafe.naver.com/embeddedcrazyboys Crazy Embedded Laboratory www.mangoboard.com cafe.naver.com/embeddedcrazyboys CRZ Technology 1 Document History
Motor
 Interactive Workshop for Artists & Designers Earl Park Motor Servo Motor Control #include Servo myservo; // create servo object to control a servo int potpin = 0; // analog pin used to connect
온습도 판넬미터(JTH-05) 사양서V1.0
 사양서V1.0") 온습도 조절기 Model:JTH-05 1. 제품 사양. [제품 구분] JTH-05A(입력 전원 AC), JTH-05D(입력 전원 DC) [전원 사양] JTH-05A 입력 전압 출력 전원 소비 전력 JTH-05D AC 90~240V DC 10~36V 12Vdc / Max.170mA Max.2W [본체 사이즈] ~ 온/습도 범위(본체): 사용 [0 ~ 50, 85%RH
온습도 조절기 Model:JTH-05 1. 제품 사양. [제품 구분] JTH-05A(입력 전원 AC), JTH-05D(입력 전원 DC) [전원 사양] JTH-05A 입력 전압 출력 전원 소비 전력 JTH-05D AC 90~240V DC 10~36V 12Vdc / Max.170mA Max.2W [본체 사이즈] ~ 온/습도 범위(본체): 사용 [0 ~ 50, 85%RH
Windows 8에서 BioStar 1 설치하기
 / 콘텐츠 테이블... PC에 BioStar 1 설치 방법... Microsoft SQL Server 2012 Express 설치하기... Running SQL 2012 Express Studio... DBSetup.exe 설정하기... BioStar 서버와 클라이언트 시작하기... 1 1 2 2 6 7 1/11 BioStar 1, Windows 8 BioStar
Microsoft Word - ntasFrameBuilderInstallGuide2.5.doc
 NTAS and FRAME BUILDER Install Guide NTAS and FRAME BUILDER Version 2.5 Copyright 2003 Ari System, Inc. All Rights reserved. NTAS and FRAME BUILDER are trademarks or registered trademarks of Ari System,
<4D F736F F F696E74202D20B8B6C0CCC5A9B7CEC7C1B7CEBCBCBCAD202834C1D6C2F7207E2038C1D6C2F729>
 8주차중간고사 ( 인터럽트및 A/D 변환기문제및풀이 ) Next-Generation Networks Lab. 외부입력인터럽트예제 문제 1 포트 A 의 7-segment 에초시계를구현한다. Tact 스위치 SW3 을 CPU 보드의 PE4 에연결한다. 그리고, SW3 을누르면하강 에지에서초시계가 00 으로초기화된다. 동시에 Tact 스위치 SW4 를 CPU 보드의
1. Windows 설치 (Client 설치 ) 원하는위치에다운받은발송클라이언트압축파일을해제합니다. Step 2. /conf/config.xml 파일수정 conf 폴더에서 config.xml 파일을텍스트에디터를이용하여 Open 합니다. config.xml 파일에서, 아
 원하는위치에다운받은발송클라이언트압축파일을해제합니다. Step 2. /conf/config.xml 파일수정 conf 폴더에서 config.xml 파일을텍스트에디터를이용하여 Open 합니다. config.xml 파일에서, 아") LG U+ SMS/MMS 통합클라이언트 LG U+ SMS/MMS Client Simple Install Manual LG U+ SMS/MMS 통합클라이언트 - 1 - 간단설치매뉴얼 1. Windows 설치 (Client 설치 ) 원하는위치에다운받은발송클라이언트압축파일을해제합니다. Step 2. /conf/config.xml 파일수정 conf 폴더에서 config.xml
LG U+ SMS/MMS 통합클라이언트 LG U+ SMS/MMS Client Simple Install Manual LG U+ SMS/MMS 통합클라이언트 - 1 - 간단설치매뉴얼 1. Windows 설치 (Client 설치 ) 원하는위치에다운받은발송클라이언트압축파일을해제합니다. Step 2. /conf/config.xml 파일수정 conf 폴더에서 config.xml
ISP and CodeVisionAVR C Compiler.hwp
 USBISP V3.0 & P-AVRISP V1.0 with CodeVisionAVR C Compiler http://www.avrmall.com/ November 12, 2007 Copyright (c) 2003-2008 All Rights Reserved. USBISP V3.0 & P-AVRISP V1.0 with CodeVisionAVR C Compiler
Microsoft Word - src.doc
 IPTV 서비스탐색및콘텐츠가이드 RI 시스템운용매뉴얼 목차 1. 서버설정방법... 5 1.1. 서비스탐색서버설정... 5 1.2. 컨텐츠가이드서버설정... 6 2. 서버운용방법... 7 2.1. 서비스탐색서버운용... 7 2.1.1. 서비스가이드서버실행... 7 2.1.2. 서비스가이드정보확인... 8 2.1.3. 서비스가이드정보추가... 9 2.1.4. 서비스가이드정보삭제...
VPN.hwp
 Linksys VPN Router RV042&RV082 VPN Router 용 VPN 터널설정 한국어사용자설명서 V1.0 Table of Content 1 Gateway to Gateway 설정... 1 STEP 1 - Gateway to Gateway 터널생성하기... 1 STEP 2 - 터널정보입력하기... 1 STEP 3 - Gateway to Gateway
hd1300_k_v1r2_Final_.PDF
 Starter's Kit for HelloDevice 1300 Version 11 1 2 1 2 3 31 32 33 34 35 36 4 41 42 43 5 51 52 6 61 62 Appendix A (cross-over) IP 3 Starter's Kit for HelloDevice 1300 1 HelloDevice 1300 Starter's Kit HelloDevice
istay
 ` istay Enhanced the guest experience A Smart Hotel Solution What is istay Guest (Proof of Presence). istay Guest (Proof of Presence). QR.. No App, No Login istay. POP(Proof Of Presence) istay /.. 5% /
다른 JSP 페이지호출 forward() 메서드 - 하나의 JSP 페이지실행이끝나고다른 JSP 페이지를호출할때사용한다. 예 ) <% RequestDispatcher dispatcher = request.getrequestdispatcher(" 실행할페이지.jsp");
 메서드 - 하나의 JSP 페이지실행이끝나고다른 JSP 페이지를호출할때사용한다. 예 ) <% RequestDispatcher dispatcher = request.getrequestdispatcher( 실행할페이지.jsp);") 다른 JSP 페이지호출 forward() 메서드 - 하나의 JSP 페이지실행이끝나고다른 JSP 페이지를호출할때사용한다. 예 ) RequestDispatcher dispatcher = request.getrequestdispatcher(" 실행할페이지.jsp"); dispatcher.forward(request, response); - 위의예에서와같이 RequestDispatcher
다른 JSP 페이지호출 forward() 메서드 - 하나의 JSP 페이지실행이끝나고다른 JSP 페이지를호출할때사용한다. 예 ) RequestDispatcher dispatcher = request.getrequestdispatcher(" 실행할페이지.jsp"); dispatcher.forward(request, response); - 위의예에서와같이 RequestDispatcher

<4D F736F F F696E74202D20BBB7BBB7C7D15F FBEDFB0A3B1B3C0B05FC1A638C0CFC2F72E BC8A3C8AF20B8F0B5E55D>
 뻔뻔한 AVR 프로그래밍 The Last(8 th ) Lecture 유명환 ( yoo@netplug.co.kr) INDEX 1 I 2 C 통신이야기 2 ATmega128 TWI(I 2 C) 구조분석 4 ATmega128 TWI(I 2 C) 실습 : AT24C16 1 I 2 C 통신이야기 I 2 C Inter IC Bus 어떤 IC들간에도공통적으로통할수있는 ex)
(Asynchronous Mode) ( 1, 5~8, 1~2) & (Parity) 1 ; * S erial Port (BIOS INT 14H) - 1 -
 ( 1, 5~8, 1~2) & (Parity) 1 ; * S erial Port (BIOS INT 14H) - 1 -") (Asynchronous Mode) - - - ( 1, 5~8, 1~2) & (Parity) 1 ; * S erial Port (BIOS INT 14H) - 1 - UART (Univ ers al As y nchronous Receiver / T rans mitter) 8250A 8250A { COM1(3F8H). - Line Control Register
(Asynchronous Mode) - - - ( 1, 5~8, 1~2) & (Parity) 1 ; * S erial Port (BIOS INT 14H) - 1 - UART (Univ ers al As y nchronous Receiver / T rans mitter) 8250A 8250A { COM1(3F8H). - Line Control Register
아두이노로만드는인형뽑기장치
 아두이노로만드는인형뽑기장치 목 차 Ⅰ. 아두이노및 C프로그래밍기초 ------------------------------------------------------- 1 1. 아두이노소개 ------------------------------------------------------------------------- 1 2. 아두이노개발환경구축 --------------------------------------------------------------
게시판 스팸 실시간 차단 시스템
 오픈 API 2014. 11-1 - 목 차 1. 스팸지수측정요청프로토콜 3 1.1 스팸지수측정요청프로토콜개요 3 1.2 스팸지수측정요청방법 3 2. 게시판스팸차단도구오픈 API 활용 5 2.1 PHP 5 2.1.1 차단도구오픈 API 적용방법 5 2.1.2 차단도구오픈 API 스팸지수측정요청 5 2.1.3 차단도구오픈 API 스팸지수측정결과값 5 2.2 JSP
H3250_Wi-Fi_E.book
 무선 LAN 기능으로 할 수 있는 것 2 무선 LAN 기능으로 할 수 있는 것 z q l D w 3 Wi-Fi 기능 플로우차트 z q l D 4 Wi-Fi 기능 플로우차트 w 5 본 사용 설명서의 기호 설명 6 각 장별 목차 1 2 3 4 5 6 7 8 9 10 11 12 13 14 7 목차 1 2 3 4 8 목차 5 6 7 8 9 9 목차 10 11 12
 뉴스에서미세먼지주의보가발령이된후학교에서대처가부족한사례 교실에있으면미세먼지를피할수있는지확인필요 실내에서환기여부 마스크착용여부가인체에주는영향확인 필요 관악산에인접한과천중앙고등학의지리적인여건이미세먼지 에영향을주는지확인필요 학교에서미세먼지에대처해서안전하게친구들을보호할수있는예보 시스템개발을위해기후환경 물리 컴퓨터 수학동아리가모임 분야 기후환경 물리 수학 컴퓨터 연구주제의선정과정
Mango-E-Toi Board Developer Manual
 Mango-E-Toi Board Developer Manual http://www.mangoboard.com/ http://cafe.naver.com/embeddedcrazyboys Crazy Embedded Laboratory www.mangoboard.com cafe.naver.com/embeddedcrazyboys CRZ Technology 1 Document
[8051] 강의자료.PDF
![[8051] 강의자료.PDF](/thumbs/60/44663655.jpg "[8051] 강의자료.PDF") CY AC F0 RS1 RS0 OV - P 0xFF 0x80 0x7F 0x30 0x2F 0x20 0x1F 0x18 0x17 0x10 0x0F 0x08 0x07 0x00 0x0000 0x0FFF 0x1000 0xFFFF 0x0000 0xFFFF RAM SFR SMOD - - - GF1 GF0 PD IDL 31 19 18 9 12 13 14 15 1 2 3 4
CY AC F0 RS1 RS0 OV - P 0xFF 0x80 0x7F 0x30 0x2F 0x20 0x1F 0x18 0x17 0x10 0x0F 0x08 0x07 0x00 0x0000 0x0FFF 0x1000 0xFFFF 0x0000 0xFFFF RAM SFR SMOD - - - GF1 GF0 PD IDL 31 19 18 9 12 13 14 15 1 2 3 4
DE1-SoC Board
 실습 1 개발환경 DE1-SoC Board Design Tools - Installation Download & Install Quartus Prime Lite Edition http://www.altera.com/ Quartus Prime (includes Nios II EDS) Nios II Embedded Design Suite (EDS) is automatically
<4D F736F F F696E74202D203131C1D6C2F7202D E6FB8A620C0CCBFEBC7D120C4B3B8AFC5CD204C43442C C1A6BEEEC7CFB1E2205
 강의내용 Ⅰ Arduino 를이용한캐릭터 LCD, VFD 제어하기 1 1. 소개 소개 - CDS 와디지털입출력포트그중에서도 PWM 포트를사용하여 LED 를 통하여아날로그출력을해보려고함. - 이번강좌를통해여러가지센서들을응용함에많은도움이될것임. 2 1. 소개 - 요즘 LCD와관련하여많은제품들이나오고있음. 종류도다양하고크기도다양함. - 이번강의에서는아두이노를이용하여
목차 1 아두이노코딩 1-1 아두이노초보자를위한 아두이노코딩에의한 LED ON OFF 14 Coding_LED_ON_OFF_ 아두이노초보자에게위험스러운 아두이노코딩에의한 LED ON OFF 18 Co
 목차 1 아두이노코딩 1-1 아두이노초보자를위한 아두이노코딩에의한 LED ON OFF 14 Coding_LED_ON_OFF_01 http://blog.daum.net/ejleep1/360 1-2 아두이노초보자에게위험스러운 아두이노코딩에의한 LED ON OFF 18 Coding_Dangerous_LED_ON_OFF_01 http://blog.daum.net/ejleep1/370
Microsoft Word - Armjtag_문서1.doc
 ARM JTAG (wiggler 호환 ) 사용방법 ( IAR EWARM 에서 ARM-JTAG 로 Debugging 하기 ) Test Board : AT91SAM7S256 IAR EWARM : Kickstart for ARM ARM-JTAG : ver 1.0 ( 씨링크테크 ) 1. IAR EWARM (Kickstart for ARM) 설치 2. Macraigor
chapter4
 Basic Netw rk 1. ก ก ก 2. 3. ก ก 4. ก 2 1. 2. 3. 4. ก 5. ก 6. ก ก 7. ก 3 ก ก ก ก (Mainframe) ก ก ก ก (Terminal) ก ก ก ก ก ก ก ก 4 ก (Dumb Terminal) ก ก ก ก Mainframe ก CPU ก ก ก ก 5 ก ก ก ก ก ก ก ก ก ก
졸업작품 2 차보고서 Graduation Project 내자전거를지켜줘! 이름학번연락처이메일 이주희 김민선 지도교수 :
 내자전거를지켜줘! 이름학번연락처이메일 이주희 201011357 010-5043-9053 da2468@naver.com 김민선 201011312 010-9086-9037 mieeu@hanmail.net 지도교수 : 김기천교수님 ( 인 ) Computer Science & Engineering 1/18 1. 프로젝트소개 1.1 배경및목적 1.2 시나리오 1.3
Eclipse 와 Firefox 를이용한 Javascript 개발 발표자 : 문경대 11 년 10 월 26 일수요일
 Eclipse 와 Firefox 를이용한 Javascript 개발 발표자 : 문경대 Introduce Me!!! Job Jeju National University Student Ubuntu Korean Jeju Community Owner E-Mail: ned3y2k@hanmail.net Blog: http://ned3y2k.wo.tc Facebook: http://www.facebook.com/gyeongdae
PowerPoint 프레젠테이션
 유니티와아두이노를활용한 VR 컨트롤러개발 헬로앱스코딩교육 김영준 공학박사, 목원대학교겸임교수前 Microsoft 수석연구원 splduino@gmail.com http://www.helloapps.co.kr 목차 1. 툴설치 2. 아두이노컨트롤러개발실습 3. 유니티기본명령어실습 4. 유니티 VR 콘텐츠개발실습 5. 블루투스를이용한아두이노컨트롤러연동실습 SW 설치
Microsoft PowerPoint - RPino-GOGO_datasheet.pptx
 RPino GOGO 사용자설명서 v1.0 Copyright c NulSom Inc. All Rights Reserved. 제품특징및사양 라즈베리파이 (RaspiberryPi) 에장착하여 PC 없이사용하는확장보드 Atmel사의 ATmega328P / 아두이노 (Arduino) 부트로더내장 라즈베리파이를통한아두이노스케치업로드가능 ( 스케치프로그램사용가능 ) 전용스케치로더
untitled
 Step Motor Device Driver Embedded System Lab. II Step Motor Step Motor Step Motor source Embedded System Lab. II 2 open loop, : : Pulse, 1 Pulse,, -, 1 +5%, step Step Motor (2),, Embedded System Lab. II
RaspberryPi 시리얼통신 1 제 08 강 시리얼통신제어 시리얼통신시리얼모니터링루프백시리얼통신 Win. PC와의시리얼통신가상머신과의시리얼통신아두이노보드와의시리얼통신 KUT51보드와의시리얼통신
 RaspberryPi 시리얼통신 1 제 08 강 시리얼통신제어 시리얼통신시리얼모니터링루프백시리얼통신 Win. PC와의시리얼통신가상머신과의시리얼통신아두이노보드와의시리얼통신 KUT51보드와의시리얼통신 시리얼통신 * Serial 활성화후재부팅 $ sudo raspi-config RaspberryPi 시리얼통신 2 $ sudo reboot : 시리얼통신을위한장치파일
PowerPoint 프레젠테이션
 Network Programming Jo, Heeseung Network 실습 네트워크프로그래밍 멀리떨어져있는호스트들이서로데이터를주고받을수있도록프로그램을구현하는것 파일과는달리데이터를주고받을대상이멀리떨어져있기때문에소프트웨어차원에서호스트들간에연결을해주는장치가필요 이러한기능을해주는장치로소켓이라는인터페이스를많이사용 소켓프로그래밍이란용어와네트워크프로그래밍이랑용어가같은의미로사용
MPLAB C18 C
 MPLAB C18 C MPLAB C18 MPLAB C18 C MPLAB C18 C #define START, c:\mcc18 errorlevel{0 1} char isascii(char ch); list[list_optioin,list_option] OK, Cancel , MPLAB IDE User s Guide MPLAB C18 C
슬라이드 1
 핚국산업기술대학교 제 14 강 GUI (III) 이대현교수 학습안내 학습목표 CEGUI 라이브러리를이용하여, 게임메뉴 UI 를구현해본다. 학습내용 CEGUI 레이아웃의로딩및렌더링. OIS 와 CEGUI 의연결. CEGUI 위젯과이벤트의연동. UI 구현 : 하드코딩방식 C++ 코드를이용하여, 코드내에서직접위젯들을생성및설정 CEGUI::PushButton* resumebutton
Microsoft PowerPoint - polling.pptx
 지현석 (binish@home.cnu.ac.kr) http://binish.or.kr Index 이슈화된키보드해킹 최근키보드해킹이슈의배경지식 Interrupt VS polling What is polling? Polling pseudo code Polling 을이용한키로거분석 방어기법연구 이슈화된키보드해킹 키보드해킹은연일상한가! 주식, 펀드투자의시기?! 최근키보드해킹이슈의배경지식
이도경, 최덕재 Dokyeong Lee, Deokjai Choi 1. 서론
 이도경, 최덕재 Dokyeong Lee, Deokjai Choi 1. 서론 2. 관련연구 2.1 MQTT 프로토콜 Fig. 1. Topic-based Publish/Subscribe Communication Model. Table 1. Delivery and Guarantee by MQTT QoS Level 2.1 MQTT-SN 프로토콜 Fig. 2. MQTT-SN
Web Scraper in 30 Minutes 강철
 Web Scraper in 30 Minutes 강철 발표자 소개 KAIST 전산학과 2015년부터 G사에서 일합니다. 에서 대한민국 정치의 모든 것을 개발하고 있습니다. 목표 웹 스크래퍼를 프레임웍 없이 처음부터 작성해 본다. 목표 웹 스크래퍼를 프레임웍 없이 처음부터 작성해 본다. 스크래퍼/크롤러의 작동 원리를 이해한다. 목표
뉴티씨 (NEWTC) 2. FB-CY4E-DEV (FPGA 개발 키트) 구성도 Port Select SW 7 Segment Text LCD UART RS-232C JTAG PORTA (5V) Active Serial PORTB (5V) OSC. 50MHz Analog
 2. FB-CY4E-DEV (FPGA 개발 키트) 구성도 Port Select SW 7 Segment Text LCD UART RS-232C JTAG PORTA (5V) Active Serial PORTB (5V) OSC. 50MHz Analog") 뉴티씨 (NEWTC) FPGA 개발 키트 (FB-CY4E-DEV) 매뉴얼 (주) 뉴티씨 ( NEWTC ) 1. FB-CY4E-DEV (FPGA 개발 키트) 소개 ALTERA 사의 FPGA(EP4CE6E22C8N)를 이용한 개발보드 입니다. USB 블래스터(FM-USBBLASTER) 를 이용하여 프로그램을 다운로드 가능 LCD, FND(7-Segment), 스위치
뉴티씨 (NEWTC) FPGA 개발 키트 (FB-CY4E-DEV) 매뉴얼 (주) 뉴티씨 ( NEWTC ) 1. FB-CY4E-DEV (FPGA 개발 키트) 소개 ALTERA 사의 FPGA(EP4CE6E22C8N)를 이용한 개발보드 입니다. USB 블래스터(FM-USBBLASTER) 를 이용하여 프로그램을 다운로드 가능 LCD, FND(7-Segment), 스위치
PowerPoint Template
 JavaScript 회원정보 입력양식만들기 HTML & JavaScript Contents 1. Form 객체 2. 일반적인입력양식 3. 선택입력양식 4. 회원정보입력양식만들기 2 Form 객체 Form 객체 입력양식의틀이되는 태그에접근할수있도록지원 Document 객체의하위에위치 속성들은모두 태그의속성들의정보에관련된것
PowerPoint Template
 SOFTWARE ENGINEERING Team Practice #3 (UTP) 201114188 김종연 201114191 정재욱 201114192 정재철 201114195 홍호탁 www.themegallery.com 1 / 19 Contents - Test items - Features to be tested - Features not to be tested
1
 1 2 3 4 5 6 b b t P A S M T U s 7 m P P 8 t P A S M T U s 9 10 11 12 13 14 15 16 17 18 19 20 21 22 23 24 25 26 27 Chapter 1 29 1 2 3 4 18 17 16 15 5 6 7 8 9 14 13 12 11 10 1 2 3 4 5 9 10 11 12 13 14 15
The Pocket Guide to TCP/IP Sockets: C Version
 인터넷프로토콜 5 장 데이터송수신 (3) 1 파일전송메시지구성예제 ( 고정크기메시지 ) 전송방식 : 고정크기 ( 바이너리전송 ) 필요한전송정보 파일이름 ( 최대 255 자 => 255byte 의메모리공간필요 ) 파일크기 (4byte 의경우최대 4GB 크기의파일처리가능 ) 파일내용 ( 가변길이, 0~4GB 크기 ) 메시지구성 FileName (255bytes)
0. 표지에이름과학번을적으시오. (6) 1. 변수 x, y 가 integer type 이라가정하고다음빈칸에 x 와 y 의계산결과값을적으시오. (5) x = (3 + 7) * 6; x = 60 x = (12 + 6) / 2 * 3; x = 27 x = 3 * (8 / 4
 1. 변수 x, y 가 integer type 이라가정하고다음빈칸에 x 와 y 의계산결과값을적으시오. (5) x = (3 + 7) * 6; x = 60 x = (12 + 6) / 2 * 3; x = 27 x = 3 * (8 / 4") Introduction to software design 2012-1 Final 2012.06.13 16:00-18:00 Student ID: Name: - 1 - 0. 표지에이름과학번을적으시오. (6) 1. 변수 x, y 가 integer type 이라가정하고다음빈칸에 x 와 y 의계산결과값을적으시오. (5) x = (3 + 7) * 6; x = 60 x
Introduction to software design 2012-1 Final 2012.06.13 16:00-18:00 Student ID: Name: - 1 - 0. 표지에이름과학번을적으시오. (6) 1. 변수 x, y 가 integer type 이라가정하고다음빈칸에 x 와 y 의계산결과값을적으시오. (5) x = (3 + 7) * 6; x = 60 x
var answer = confirm(" 확인이나취소를누르세요."); // 확인창은사용자의의사를묻는데사용합니다. if(answer == true){ document.write(" 확인을눌렀습니다."); else { document.write(" 취소를눌렀습니다.");
; // 확인창은사용자의의사를묻는데사용합니다. if(answer == true){ document.write( 확인을눌렀습니다.); else { document.write( 취소를눌렀습니다.);") 자바스크립트 (JavaScript) - HTML 은사용자에게인터페이스 (interface) 를제공하는언어 - 자바스크립트는서버로데이터를전송하지않고서할수있는데이터처리를수행한다. - 자바스크립트는 HTML 나 JSP 에서작성할수있고 ( 내부스크립트 ), 별도의파일로도작성이가능하다 ( 외 부스크립트 ). - 내부스크립트 - 외부스크립트
자바스크립트 (JavaScript) - HTML 은사용자에게인터페이스 (interface) 를제공하는언어 - 자바스크립트는서버로데이터를전송하지않고서할수있는데이터처리를수행한다. - 자바스크립트는 HTML 나 JSP 에서작성할수있고 ( 내부스크립트 ), 별도의파일로도작성이가능하다 ( 외 부스크립트 ). - 내부스크립트 - 외부스크립트
중간고사
 중간고사 예제 1 사용자로부터받은두개의숫자 x, y 중에서큰수를찾는알고리즘을의사코드로작성하시오. Step 1: Input x, y Step 2: if (x > y) then MAX
API 매뉴얼
 PCI-DIO12 API Programming (Rev 1.0) Windows, Windows2000, Windows NT and Windows XP are trademarks of Microsoft. We acknowledge that the trademarks or service names of all other organizations mentioned
<4D F736F F F696E74202D20B8B6C0CCC5A9B7CEC7C1B7CEBCBCBCAD202834C1D6C2F7207E2038C1D6C2F729>
 7주차 AVR의 A/D 변환기제어레지스터및관련실습 Next-Generation Networks Lab. 3. 관련레지스터 표 9-4 레지스터 ADMUX ADCSRA ADCH ADCL 설명 ADC Multiplexer Selection Register ADC 의입력채널선택및기준전압선택외 ADC Control and Status Register A ADC 의동작을설정하거나동작상태를표시함
Microsoft Word - Bluetooth User Manual_V1.00_KOR.doc
 Bluetooth User Manual (RIF-BT10) Contents 1. 제품구성 -------------------------------------------------------- 2 2. 제품 Spec -------------------------------------------------------- 3 3. System 구성 ------------------------------------------------------
OM2M 기반의 OHP-M2M 오픈소스설치가이드 2015 년 8 월 경북대학교통신프로토콜연구실 최예찬, 강형우 요약 사물인터넷 (Internet of Things: IoT) 이이슈가되면서다양한사
 이이슈가되면서다양한사") OM2M 기반의 OHP-M2M 오픈소스설치가이드 2015 년 8 월 경북대학교통신프로토콜연구실 최예찬, 강형우 zns038053@gmail.com, hwkang0621@gmail.com 요약 사물인터넷 (Internet of Things: IoT) 이이슈가되면서다양한사물인터넷기반의오픈소스가공개가되고있다. 본문서에서는그중 Eclipse에서공개한 OM2M 플랫폼을기반으로개발된헬스케어플랫폼인
OM2M 기반의 OHP-M2M 오픈소스설치가이드 2015 년 8 월 경북대학교통신프로토콜연구실 최예찬, 강형우 zns038053@gmail.com, hwkang0621@gmail.com 요약 사물인터넷 (Internet of Things: IoT) 이이슈가되면서다양한사물인터넷기반의오픈소스가공개가되고있다. 본문서에서는그중 Eclipse에서공개한 OM2M 플랫폼을기반으로개발된헬스케어플랫폼인
lecture4(6.범용IO).hwp
.hwp") 제 2 부 C-언어를 사용한 마이크로컨트롤러 활용기초 66 C-언어는 수학계산을 위해 개발된 FORTRAN 같은 고급언어들과는 달 리 Unix 운영체제를 개발하면서 같이 개발된 고급언어이다. 운영체제의 특성상 C-언어는 다른 고급언어에 비해 컴퓨터의 하드웨어를 직접 제어할 수 있는 능력이 탁월하여 마이크로프로세서의 프로그램에 있어서 어셈블 리와 더불어 가장
제 2 부 C-언어를 사용한 마이크로컨트롤러 활용기초 66 C-언어는 수학계산을 위해 개발된 FORTRAN 같은 고급언어들과는 달 리 Unix 운영체제를 개발하면서 같이 개발된 고급언어이다. 운영체제의 특성상 C-언어는 다른 고급언어에 비해 컴퓨터의 하드웨어를 직접 제어할 수 있는 능력이 탁월하여 마이크로프로세서의 프로그램에 있어서 어셈블 리와 더불어 가장
JARDUINO-UNO-BT 커넥터 / 스위치기능 종류 USB 커넥터리셋스위치 DC 전원잭업로드선택스위치 ISP 모드선택점퍼블루투스시리얼모듈전원 / 디지털포트 / 아날로그포트커넥터및 ISP 커넥터 기능 +5V 전원공급, 유선업로드기능누른상태에서전원을공급하면부트로더프로그
 JARDUINO-UNO-BT : 유무선아두이노 UNO 호환모듈 이제부터는아두이노도무선으로쓰자!!! 무선업로드기능이내장된아두이노 UNO 호환모듈드디어출시!!! JARDUINO-UNO-BT 소개 JARDUINO-UNO-BT는제이씨넷이출시한아두이노 UNO(Arduino UNO R3) 호환모듈로, 유선업로드는물론블루투스시리얼모듈을포함하고있어무선업로드도가능한아두이노모듈입니다.
Æí¶÷4-¼Ö·ç¼Çc03ÖÁ¾š
 솔루션 2006 454 2006 455 2006 456 2006 457 2006 458 2006 459 2006 460 솔루션 2006 462 2006 463 2006 464 2006 465 2006 466 솔루션 2006 468 2006 469 2006 470 2006 471 2006 472 2006 473 2006 474 2006 475 2006 476
USB USB DV25 DV25 REC SRN-475S REC SRN-475S LAN POWER LAN POWER Quick Network Setup Guide xdsl/cable Modem PC DVR 1~3 1.. DVR DVR IP xdsl Cable xdsl C
 USB USB DV25 DV25 REC SRN-475S REC SRN-475S LAN POWER LAN POWER Quick Network Setup Guide xdsl/cable Modem PC DVR 1~3 1.. DVR DVR IP xdsl Cable xdsl Cable PC PC Step 1~5. Step, PC, DVR Step 1. Cable Step
Microsoft Word - PEB08_USER_GUIDE.doc
 0. PEB08 이란? PEB08(PIC EVALUATION BOARD 8bits) 은 Microchip 8bit Device 개발을쉽고편리하게할수있는보드입니다. 1. 다양한 8bit Device 지원 기존대부분의 8bit 보드의경우일부 Pin-Count만지원을하였지만, PEB08은 PIC10, PIC12, PIC16, PIC18의 DIP Type Package의모든
 사용설명서 NTC-100 사용 전에는 반드시 사용설명서를 꼭 읽어보시기 바랍니다 넷뷰 사용설명서 C O N T E N T S 카메라 설치 및 네트워크 설정 4 1. 넷뷰 카메라 설치 방법 4 1-1 제품구성 4 1-2 설치방법 5 2. 넷뷰 PC 전용 프로그램 설치 7 2-1 소프트웨어 설치 7 2-2 카메라 접속 방법 8 3. IP 네트워크 설정 11 3-1
PowerPoint 프레젠테이션
 Sensor Device Jo, Heeseung Sensor 실습 HBE-SM5-S4210 에는근접 / 가속도 / 컴파스센서가장착 각센서들을사용하기위한디바이스드라이버와어플리케이션을작성 2 근접 (Proximity) 센서 HBE-SM5-S4210 Camera Module 근접센서디바이스 근접센서는사물이다른사물에접촉되기이전에가까이접근하였는지를검출할목적으로사용 일반적으로생활에서자동문이나엘리베이터,
<4D F736F F F696E74202D E6F312D BCB3C4A12C20C4DAB5F920B1E2C3CA2C20BDC3B8AEBEF3C5EBBDC5>
 Arduino 1 ( 소개, IDE 설치, 기초코딩 ) 컴퓨터 2 컴퓨터 컴퓨터 자동적으로계산이나작업을수행하는기계 컴퓨터기능 연산 : 데이터에대한산술연산 ( 덧셈, 뺄셈, 곱셈, 나눗셈 ), 논리연산 (AND, OR 등 ) 등을하는기능. 중앙처리장치 (CPU; central processing unit) 에서수행. 제어 : 명령을순차적으로읽고해석하여처리하는기능으로모든장치의동작을지시하고감독통제하여자동적인처리가가능함.
Analytics > Log & Crash Search > Unity ios SDK [Deprecated] Log & Crash Unity ios SDK. TOAST SDK. Log & Crash Unity SDK Log & Crash Search. Log & Cras
![Analytics > Log & Crash Search > Unity ios SDK [Deprecated] Log & Crash Unity ios SDK. TOAST SDK. Log & Crash Unity SDK Log & Crash Search. Log & Cras](/thumbs/101/151500399.jpg "Analytics > Log & Crash Search > Unity ios SDK [Deprecated] Log & Crash Unity ios SDK. TOAST SDK. Log & Crash Unity SDK Log & Crash Search. Log & Cras") Analytics > Log & Crash Search > Unity ios SDK [Deprecated] Log & Crash Unity ios SDK. TOAST SDK. Log & Crash Unity SDK Log & Crash Search. Log & Crash Unity SDK... Log & Crash Search. - Unity3D v4.0 ios
Analytics > Log & Crash Search > Unity ios SDK [Deprecated] Log & Crash Unity ios SDK. TOAST SDK. Log & Crash Unity SDK Log & Crash Search. Log & Crash Unity SDK... Log & Crash Search. - Unity3D v4.0 ios
Index 1. Intro Install Connect Scratch 1.4 (Offline Editor) Scratch 2.0 (Online Editor) Connect f
 Scratch 2.0 (Online Editor) Connect f") Scratch 호환 센서 보드 SKY SSB 설정 메뉴얼 1st of April 2016 Techdine Index 1. Intro... 03 2. Install... 04 3. Connect... 06 3-1. Scratch 1.4 (Offline Editor)... 06 3-2. Scratch 2.0 (Online Editor)... 09 3-2-1. Connect
Scratch 호환 센서 보드 SKY SSB 설정 메뉴얼 1st of April 2016 Techdine Index 1. Intro... 03 2. Install... 04 3. Connect... 06 3-1. Scratch 1.4 (Offline Editor)... 06 3-2. Scratch 2.0 (Online Editor)... 09 3-2-1. Connect
CAN-fly Quick Manual
 adc-171 Manual Ver.1.0 2011.07.01 www.adc.co.kr 2 contents Contents 1. adc-171(rn-171 Pack) 개요 2. RN-171 Feature 3. adc-171 Connector 4. adc-171 Dimension 5. Schematic 6. Bill Of Materials 7. References
Interstage5 SOAP서비스 설정 가이드
 Interstage 5 Application Server ( Solaris ) SOAP Service Internet Sample Test SOAP Server Application SOAP Client Application CORBA/SOAP Server Gateway CORBA/SOAP Gateway Client INTERSTAGE SOAP Service
untitled
 5V 1 2 - + LM7805 1 3 IN OUT GND POWER SW 1 2 CON 330 2 220uF 0.1 220uF LED 330 330 330 330 330 330 330 330 LED0 LED1 LED2 LED3 LED4 LED5 LED6 LED7 5V 10K 10K 10K 10K 10K 10K 10K 10K SW0 SW1 SW2 SW3 SW4
Microsoft PowerPoint - chap02-C프로그램시작하기.pptx
 #include int main(void) { int num; printf( Please enter an integer "); scanf("%d", &num); if ( num < 0 ) printf("is negative.\n"); printf("num = %d\n", num); return 0; } 1 학습목표 을 작성하면서 C 프로그램의
API STORE 키발급및 API 사용가이드 Document Information 문서명 : API STORE 언어별 Client 사용가이드작성자 : 작성일 : 업무영역 : 버전 : 1 st Draft. 서브시스템 : 문서번호 : 단계 : Docum
 API STORE 키발급및 API 사용가이드 Document Information 문서명 : API STORE 언어별 Client 사용가이드작성자 : 작성일 : 2012.11.23 업무영역 : 버전 : 1 st Draft. 서브시스템 : 문서번호 : 단계 : Document Distribution Copy Number Name(Role, Title) Date
Orcad Capture 9.x
 OrCAD Capture Workbook (Ver 10.xx) 0 Capture 1 2 3 Capture for window 4.opj ( OrCAD Project file) Design file Programe link file..dsn (OrCAD Design file) Design file..olb (OrCAD Library file) file..upd
OSTSen-THL100 사용자설명서 Ver 1.1 Onsystech OSTSen-THL100 Ver1.1 1 of 8 Onsystech
 OSTSen-THL100 사용자설명서 Ver 1.1 Onsystech OSTSen-THL100 Ver1.1 1 of 8 Onsystech 1. 제품소개 1) 제품특징 OSTSen-THL100은 UART 인터페이스를통하여온도, 습도, 조도데이터를제공하는센서모듈입니다. 이센서모듈은사용자가편리하게다양한분야에쉽게적용할수있도록소형으로제작되었습니다. PC에서 OSTSen-THL100의온도,
VZ94-한글매뉴얼
 KOREAN / KOREAN VZ9-4 #1 #2 #3 IR #4 #5 #6 #7 ( ) #8 #9 #10 #11 IR ( ) #12 #13 IR ( ) #14 ( ) #15 #16 #17 (#6) #18 HDMI #19 RGB #20 HDMI-1 #21 HDMI-2 #22 #23 #24 USB (WLAN ) #25 USB ( ) #26 USB ( ) #27
untitled
 1... 2 System... 3... 3.1... 3.2... 3.3... 4... 4.1... 5... 5.1... 5.2... 5.2.1... 5.3... 5.3.1 Modbus-TCP... 5.3.2 Modbus-RTU... 5.3.3 LS485... 5.4... 5.5... 5.5.1... 5.5.2... 5.6... 5.6.1... 5.6.2...
02 C h a p t e r Java
 02 C h a p t e r Java Bioinformatics in J a va,, 2 1,,,, C++, Python, (Java),,, (http://wwwbiojavaorg),, 13, 3D GUI,,, (Java programming language) (Sun Microsystems) 1995 1990 (green project) TV 22 CHAPTER
Raspbian 설치 라즈비안 OS (Raspbian OS) 라즈베리파이 3 Model B USB 마우스 USB 키보드 마이크로 SD 카드 마이크로 SD 카드리더기 HDM I 케이블모니터
 라즈베리파이 3 Model B USB 마우스 USB 키보드 마이크로 SD 카드 마이크로 SD 카드리더기 HDM I 케이블모니터") 운영체제실습 Raspbian 설치 2017. 3 표월성 wspyo74@naver.com cherub.sungkyul.ac.kr 목차 Ⅰ. 설치 1. 라즈비안 (Raspbian 설치 ) 2. 설치후, 설정 설정사항 Raspbian 설치 라즈비안 OS (Raspbian OS) 라즈베리파이 3 Model B USB 마우스 USB 키보드 마이크로 SD 카드 마이크로
운영체제실습 Raspbian 설치 2017. 3 표월성 wspyo74@naver.com cherub.sungkyul.ac.kr 목차 Ⅰ. 설치 1. 라즈비안 (Raspbian 설치 ) 2. 설치후, 설정 설정사항 Raspbian 설치 라즈비안 OS (Raspbian OS) 라즈베리파이 3 Model B USB 마우스 USB 키보드 마이크로 SD 카드 마이크로
13주-14주proc.PDF
 12 : Pro*C/C++ 1 2 Embeded SQL 3 PRO *C 31 C/C++ PRO *C NOT! NOT AND && AND OR OR EQUAL == = SQL,,, Embeded SQL SQL 32 Pro*C C SQL Pro*C C, C Pro*C, C C 321, C char : char[n] : n int, short, long : float
PowerPoint 프레젠테이션
 @ Lesson 3 if, if else, if else if, switch case for, while, do while break, continue : System.in, args, JOptionPane for (,, ) @ vs. logic data method variable Data Data Flow (Type), ( ) @ Member field
Microsoft Word doc
 2. 디바이스드라이버 [ DIO ] 2.1. 개요 타겟보드의데이터버스를이용하여 LED 및스위치동작을제어하는방법을설명하겠다. 2.2. 회로도 2.3. 준비조건 ARM 용크로스컴파일러가설치되어있어야한다. 하드웨어적인점검을하여정상적인동작을한다고가정한다. NFS(Network File System) 를사용할경우에는 NFS가마운트되어있어야한다. 여기서는소스전문을포함하지않았다.
Chapter 4. LISTS
 6. 동치관계 (Equivalence Relations) 동치관계 reflexive, symmetric, transitive 성질을만족 "equal to"(=) 관계는동치관계임. x = x x = y 이면 y = x x = y 이고 y = z 이면 x = z 동치관계를이용하여집합 S 를 동치클래스 로분할 동일한클래스내의원소 x, y 에대해서는 x y 관계성립
ez-shv manual
 ez-shv+ SDI to HDMI Converter with Display and Scaler Operation manual REVISION NUMBER: 1.0.0 DISTRIBUTION DATE: NOVEMBER. 2018 저작권 알림 Copyright 2006~2018 LUMANTEK Co., Ltd. All Rights Reserved 루먼텍 사에서
C프로-3장c03逞풚
 C h a p t e r 03 C++ 3 1 9 4 3 break continue 2 110 if if else if else switch 1 if if if 3 1 1 if 2 2 3 if if 1 2 111 01 #include 02 using namespace std; 03 void main( ) 04 { 05 int x; 06 07
소개 TeraStation 을 구입해 주셔서 감사합니다! 이 사용 설명서는 TeraStation 구성 정보를 제공합니다. 제품은 계속 업데이트되므로, 이 설명서의 이미지 및 텍스트는 사용자가 보유 중인 TeraStation 에 표시 된 이미지 및 텍스트와 약간 다를 수
 사용 설명서 TeraStation Pro II TS-HTGL/R5 패키지 내용물: 본체 (TeraStation) 이더넷 케이블 전원 케이블 TeraNavigator 설치 CD 사용 설명서 (이 설명서) 제품 보증서 www.buffalotech.com 소개 TeraStation 을 구입해 주셔서 감사합니다! 이 사용 설명서는 TeraStation 구성 정보를
PowerPoint 프레젠테이션
 @ Lesson 2... ( ). ( ). @ vs. logic data method variable behavior attribute method field Flow (Type), ( ) member @ () : C program Method A ( ) Method B ( ) Method C () program : Java, C++, C# data @ Program
PowerPoint 프레젠테이션
 KeyPad Device Control - Device driver Jo, Heeseung HBE-SM5-S4210 에는 16 개의 Tack Switch 를사용하여 4 행 4 열의 Keypad 가장착 4x4 Keypad 2 KeyPad 를제어하기위하여 FPGA 내부에 KeyPad controller 가구현 KeyPad controller 16bit 로구성된
Microsoft Word - Automap3
 사 용 설 명 서 본 설명서는 뮤직메트로에서 제공합니다. 순 서 소개 -------------------------------------------------------------------------------------------------------------------------------------------- 3 제품 등록 --------------------------------------------------------------------------------------------------------------------------------------
SQL Developer Connect to TimesTen 유니원아이앤씨 DB 기술지원팀 2010 년 07 월 28 일 문서정보 프로젝트명 SQL Developer Connect to TimesTen 서브시스템명 버전 1.0 문서명 작성일 작성자
 SQL Developer Connect to TimesTen 유니원아이앤씨 DB 팀 2010 년 07 월 28 일 문서정보 프로젝트명 SQL Developer Connect to TimesTen 서브시스템명 버전 1.0 문서명 작성일 2010-07-28 작성자 김학준 최종수정일 2010-07-28 문서번호 20100728_01_khj 재개정이력 일자내용수정인버전
CL5 CL3 CL1 QL5 QL1 V4.5 Supplementary Manual
 CL/QL 시리즈 이보충설명서에서는주로 CL5/CL3/CL1 및 QL5/QL1 펌웨어 V4.5 에서추가또는변경된기능에관해설명합니다. CL5/CL3/CL1 및 QL5/QL1 V4 사용설명서및참조설명서와함께사용하십시오. CL/QL Editor 이보충설명서에서는주로 CL/QL Editor V4.5 에서추가또는변경된기능에관해설명합니다. 참고 이보충설명서에수록된설명은
아두이노로만드는 4 족보행로봇
 아두이노로만드는 4 족보행로봇 목 차 Ⅰ. 아두이노및 C프로그래밍기초 ------------------------------------------------------- 1 1. 아두이노소개 ------------------------------------------------------------------------- 1 2. 아두이노개발환경구축 --------------------------------------------------------------
ez-md+_manual01
 ez-md+ HDMI/SDI Cross Converter with Audio Mux/Demux Operation manual REVISION NUMBER: 1.0.0 DISTRIBUTION DATE: NOVEMBER. 2018 저작권 알림 Copyright 2006~2018 LUMANTEK Co., Ltd. All Rights Reserved 루먼텍 사에서
정보보안 개론과 실습:네트워크
 ` 마이크로프로세서설계및실습 12-13 주차강의자료 학습목표 A/D 변환기의제어방법을이해한다 능숙하게 A/D 변환기를제어할수있도록반복실습한다 2/28 아날로그 - 디지털변환회로 아날로그 - 디지털변환회로 (A/D 변환회로 ) 는, 아날로그전기신호를디지털전기신호로변환하는전자회로이다 A/D 컨버터 (ADC: Analog-to-digital converter) 라고도불린다